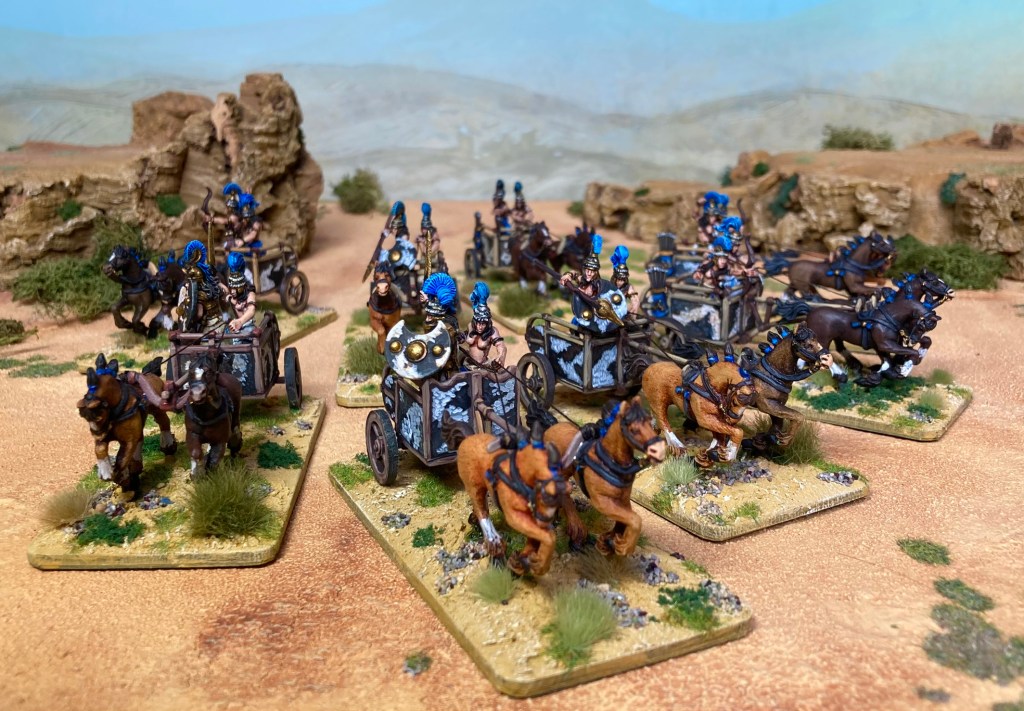
This has been a slow-burning project but a renewed interest in the Trojan War over the last few months has pushed me towards getting these Lucid Eye Amazons on to the table.
To be honest, these don’t really fit Penthesilia and her 12 Amazon bodyguards described by the classical writers, but I love the Mycenean look that the talented Steve Saleh has used in creating these sculpts.
Although I’ve currently still got the bulk of the infantry on the painting table, I thought I’d celebrate the completion of the chariots with a quick photo shoot of the war host so far. These will be heading for use in games of Of Gods And Mortals (OGAM) and my forthcoming Midgard Heroic Battles rules.
The background used here is an enlargement of one created by Jon Hodgson Illustration and used with his permission. As you’ve probably gathered, I’m a huge fan of these miniature backdrops to add a more ‘illustrative’ atmosphere to pics than a photo background.
If you’re interested in Jon’s backdrops, you can buy the A4/A3 downloads on RPG Vault/ Wargames Vault, back his Patreon, or there is a forthcoming A4 spiral-bound book that has been funded by Kickstarter and is available to pre-order.
Next up will be completing the remaining infantry which I hope to crack on with over the next few weeks.
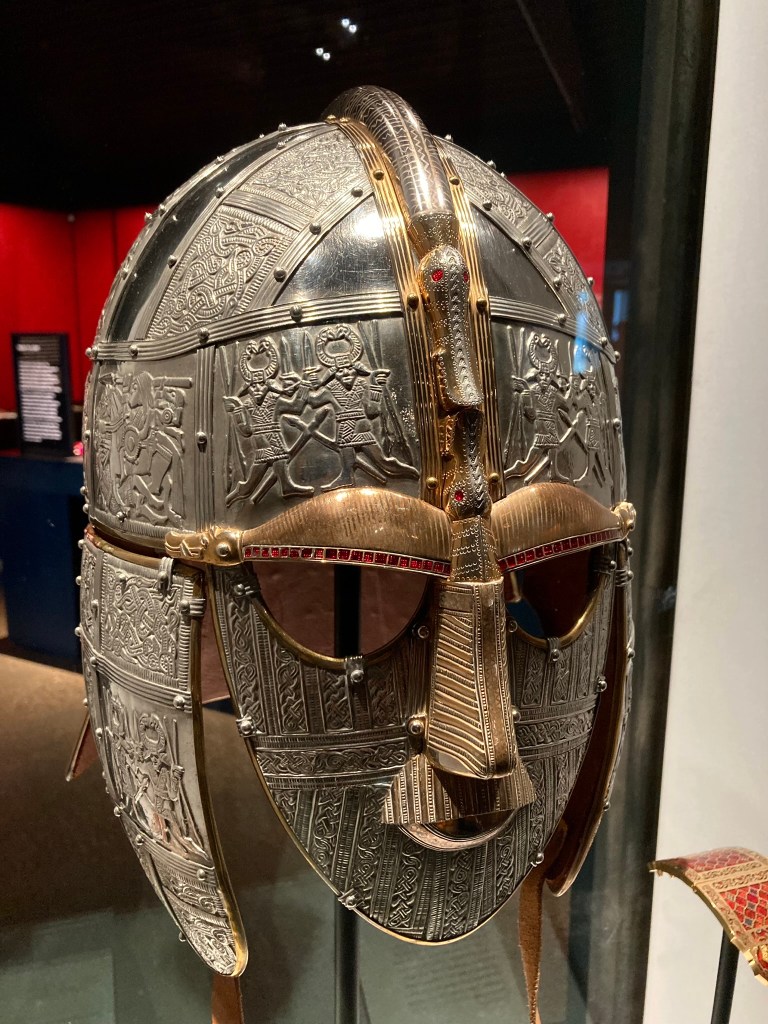
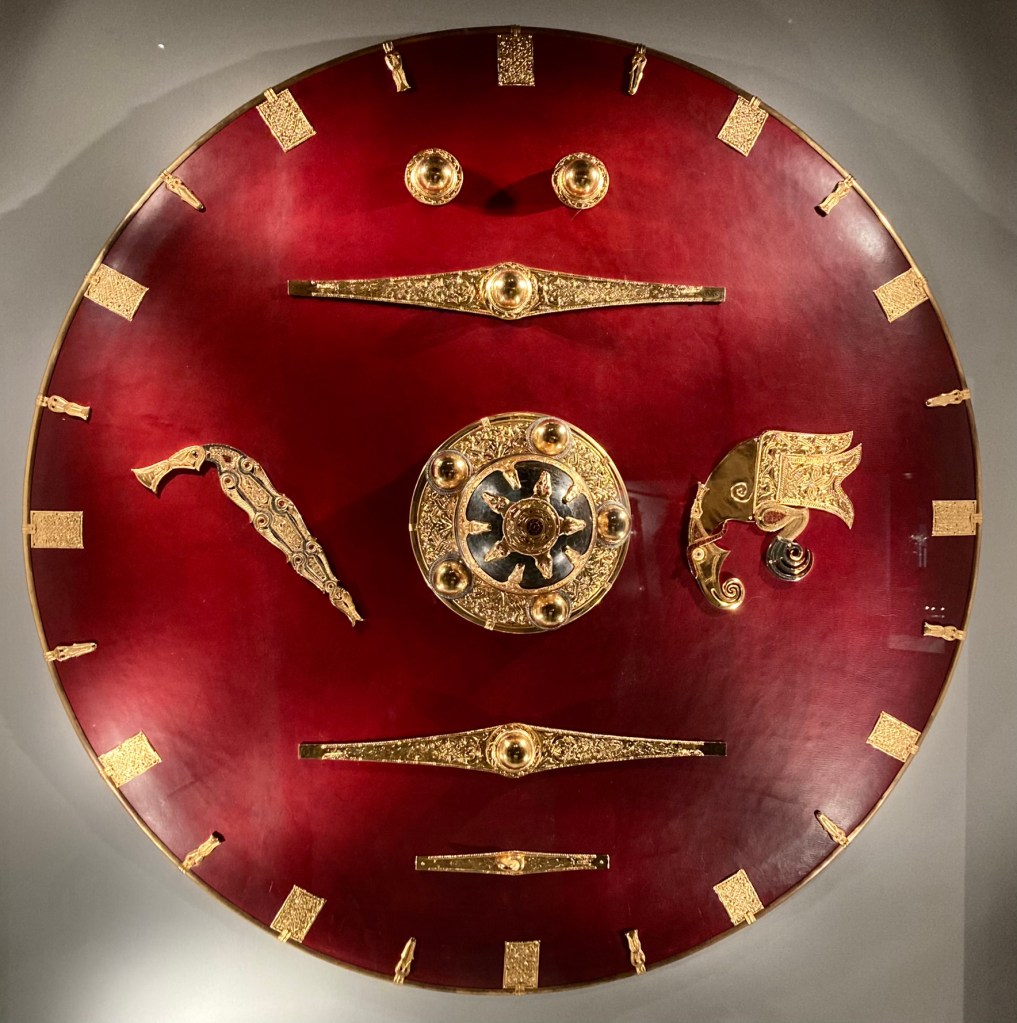
Sutton Hoo has been in my awareness for nearly my entire life; from seeing the iconic helmet and shield at the British Museum as a child, admiring Angus McBride’s illustrations in Osprey books as a teenager and visiting the end of the excavations on site in the early 1990s, I have collected the miniatures and refought the battles. So, it was a great privilege to be asked if I’d help to put on some Anglo-Saxon wargames as part of the National Trust site’s activities in July 2023.
My son was also inspired after watching the Netfix film The Dig and decided to join me, along with chums Pete and Tom. Pete kindly volunteered to drive us all down to Suffolk, and so began the Sutton Hoo wargaming road trip. It didn’t start so well – with Tom unfortunately being laid low with Covid – but the remaining three of us packed up Pete’s car and hit the road on Saturday morning.
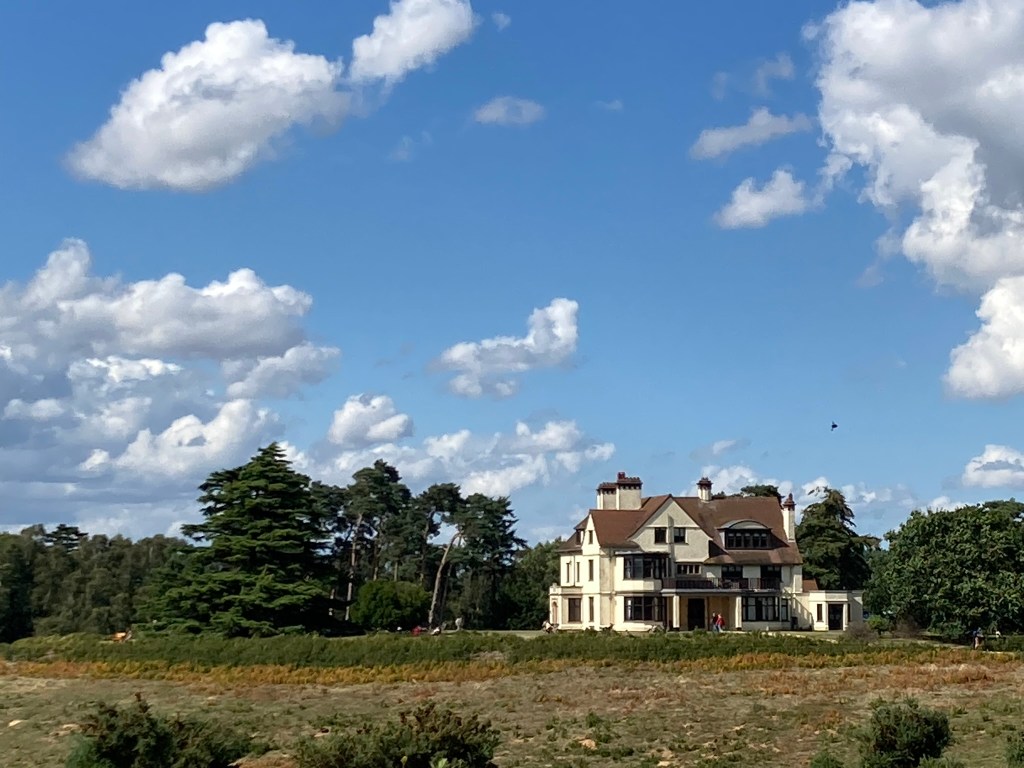
Despite driving through some squally weather, the sun was out by the time we hit the lanes of Suffolk and we were treated to a beautiful late afternoon visit to Sutton Hoo. The National Trust have done a wonderful job with the site – a far cry from the concluding excavations that I remember from my visit thirty-odd years ago.
Tranmer House in the sun
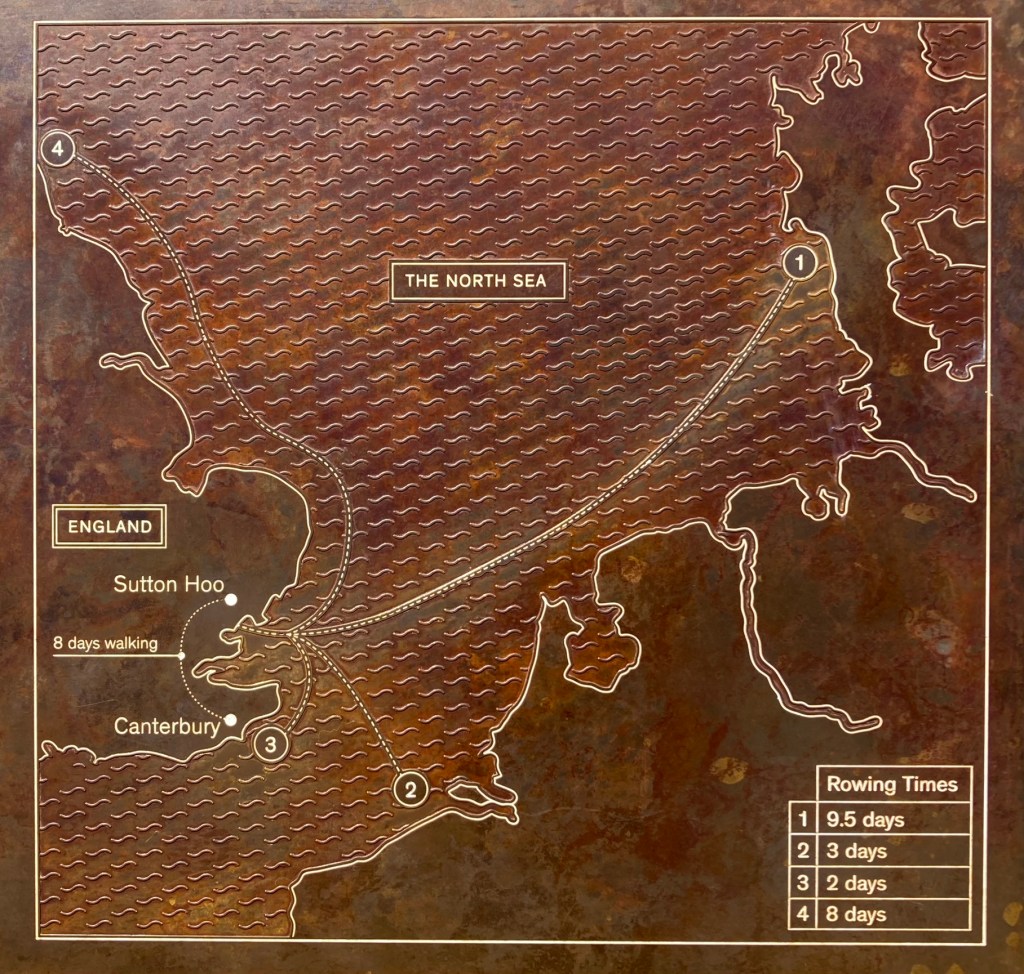
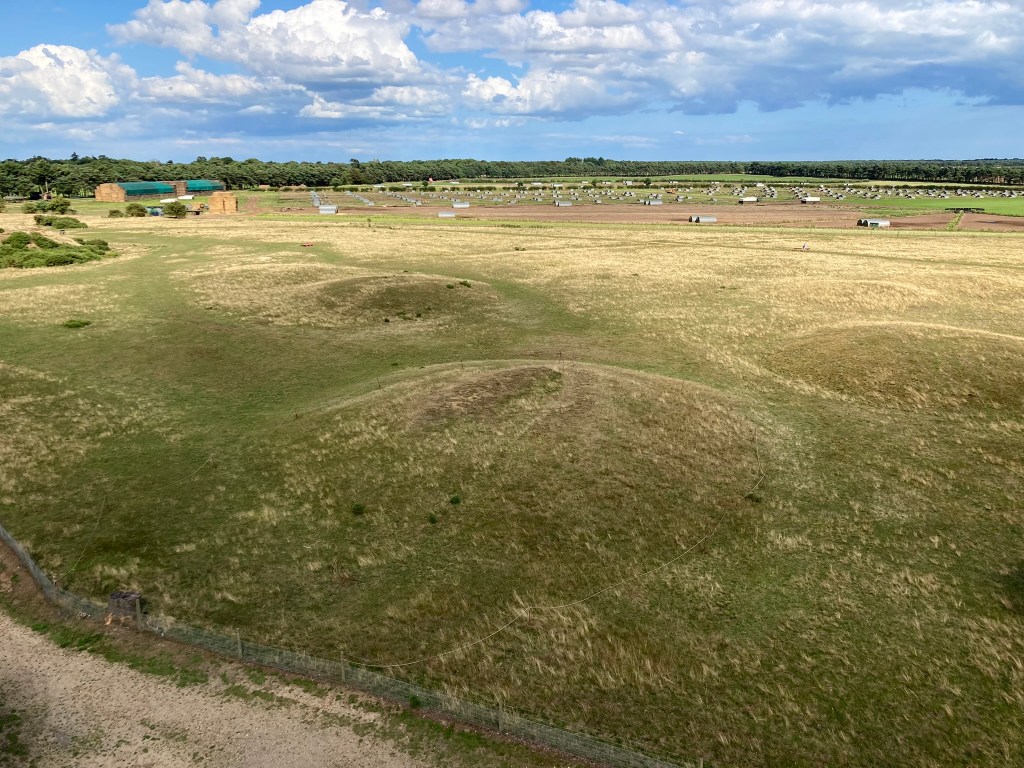
We headed straight out to Tranmer House followed by the obligatory tour of the grave mounds. I was most impressed with the viewing tower with its well-presented information on the geographical links and connections of East Anglia – essential for understanding how a site like this was near the centre of an active and powerful kingdom 1400 years ago.
We also ran into a friendly NT volunteer at the mounds who was able to give us more information about the area and its history, as well as some more background on Edith Pretty and the excavations of 1939.
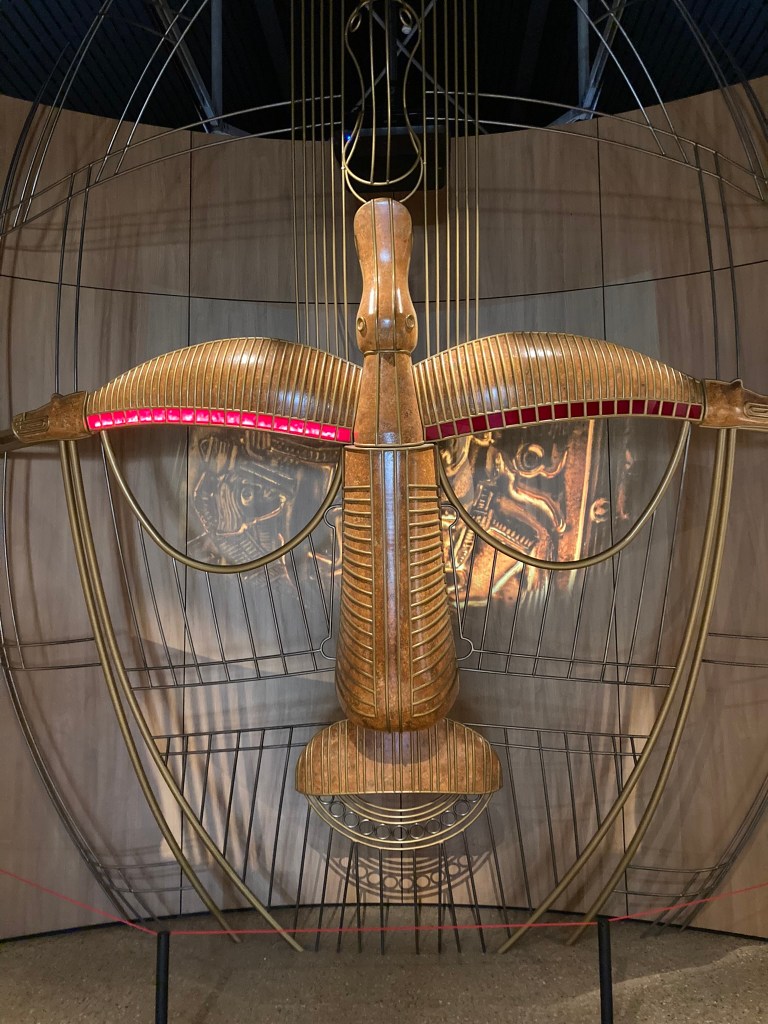
I could happily have sat out by the mounds for several hours, but time was pressing and we needed to get back to the rest of the site. There is a visitor centre next to the shop and café with a state-of-the-art exhibition explaining the history of the site and interpretations of the treasures, alongside outstanding replicas of the helmet, shield, sword and other grave goods.
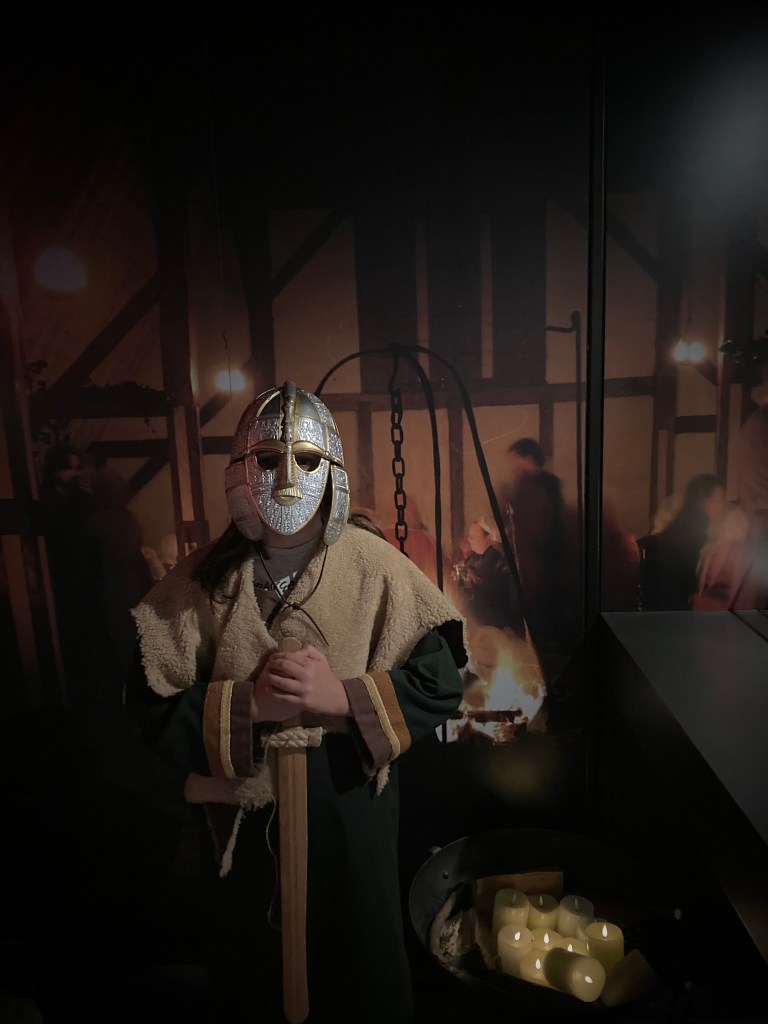
Naturally, my son found the dressing up section and turned in quite a spooky impersonation of Raedwald! We also enjoyed playing some hnefatafl before closing time, at which point we headed off for the less glamorous but perfectly comfortable Premier Inn in Ipswich.
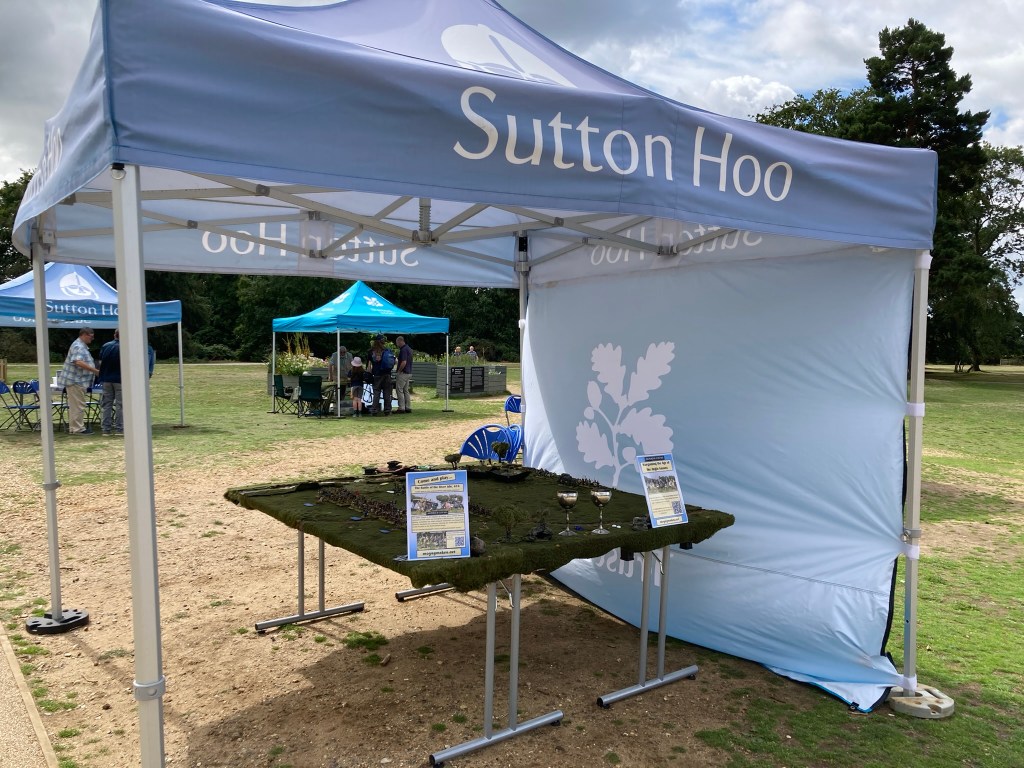
Sunday was the day for the event and we arrived back on site to find Joshua and Andy from the NT putting up gazebos for the gaming activities. Yes, we were gaming outside!
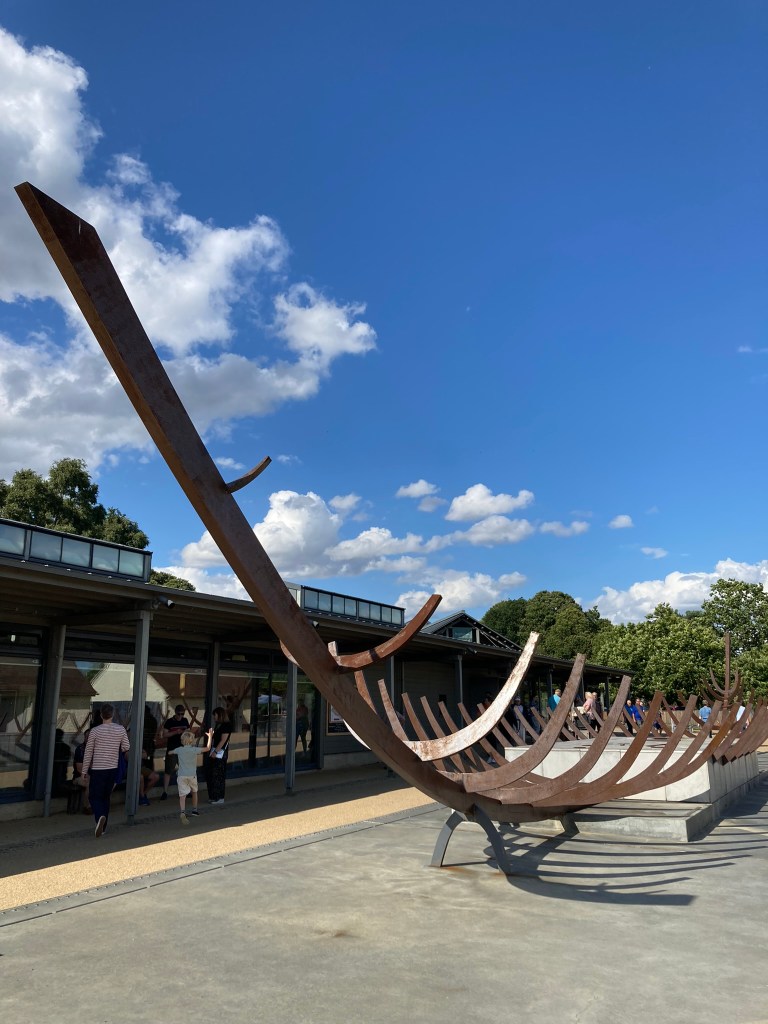
Rain wasn’t forecast until the end of the afternoon, but we knew that wind was going to be the main issue. The Sutton Hoo site is at the top of a ridge above the River Deben (the access point for the boats used in the ship burial in Mounds One and Two) and catches a fair breeze, to say the least. Fortunately, we had come prepared: feeling somewhat like a roadie setting up a gig, I produced two large rolls of gaffer tape (duct tape for our US chums) and we proceeded to stick down nearly every element of the gaming area. In the days when we mainly used big terrain boards, this might have been less of an issue, but with modern terrain cloths we were in danger of taking off!
If it moves, stick it!
It took a while, but eventually everything was secured into position. The biggest issue was the A4 document holders which acted somewhat like a sail – fortunately, several layers of tape combined with East Anglian flint rocks took care of it.
If gaffer tape isn’t enough, flint is the way!
The day passed in a pleasant blur, with visitors crowding the four event tables all day. Local gamers Richard and Ernie (also a NT volunteer) had brought a game of Too Fat Lardies’ Dux Britanniarum.
Dux Brittaniarum action with Richard and Ernie
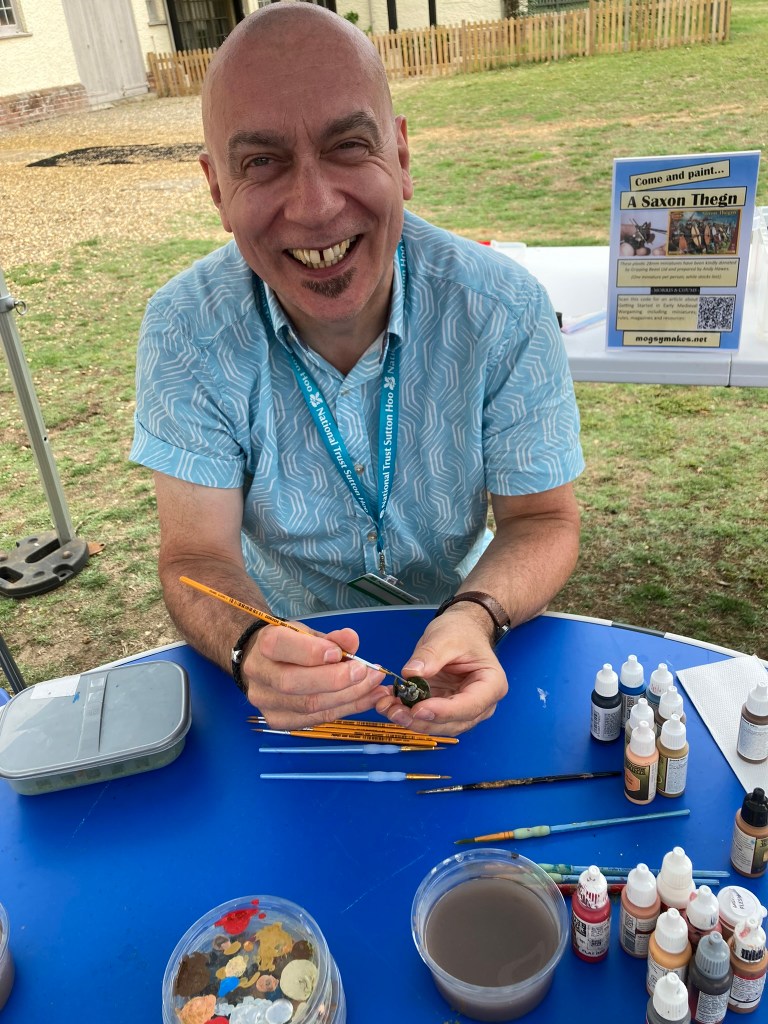
NT staff member Andy hosted a busy ‘paint your own Saxon thegn’ table, kindly sponsored by our the ever-generous Lord Sherwell at Gripping Beast.
Andy H runs the painting table with aplomb
Pete did a sterling job of hosting my 15/18mm Battle of Degsastan game (with no breaks) for a seemingly endless stream of visitors – there were great cheers emanating from his gazebo at regular intervals, so clearly people were enjoying it. Grateful gamers also collected the sample bags of 18mm Saxon miniatures donated by Daniel Mersey of Wiglaf Miniatures.
Pete runs his 467th game of the Battle of Degsastan, 603
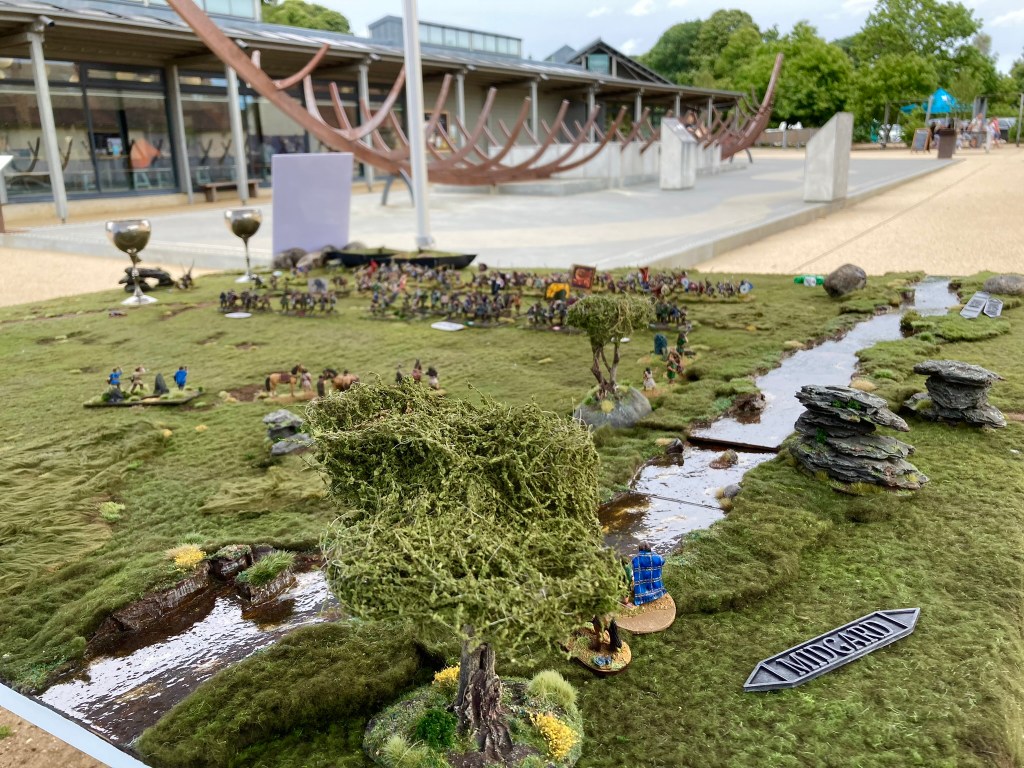
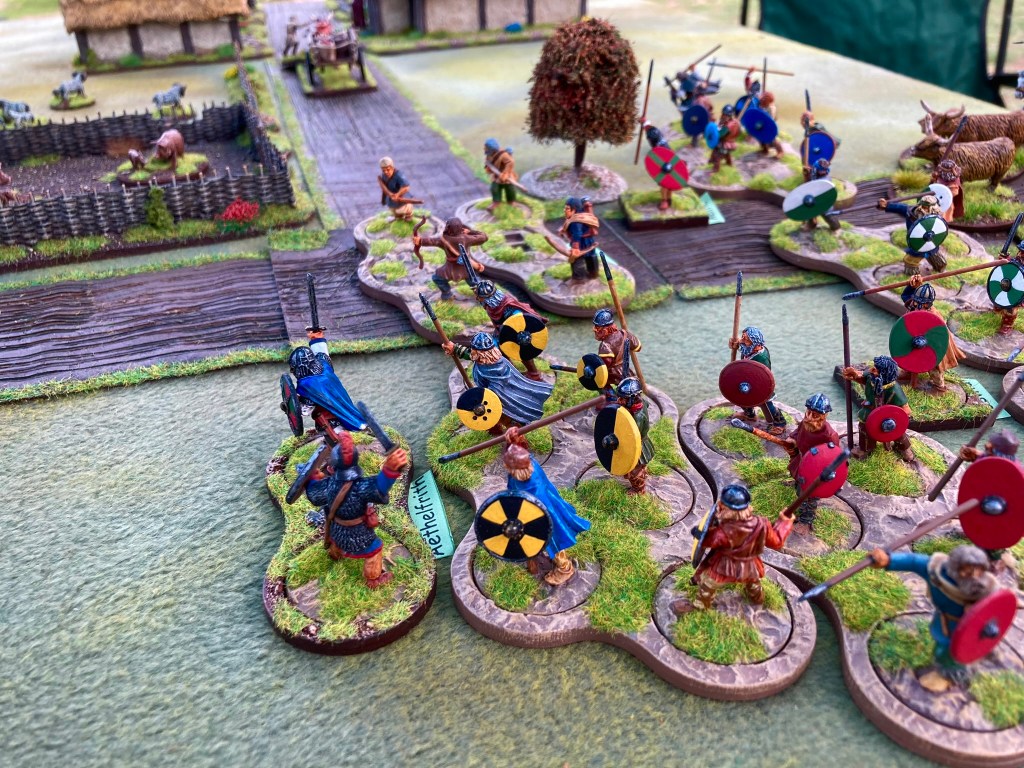
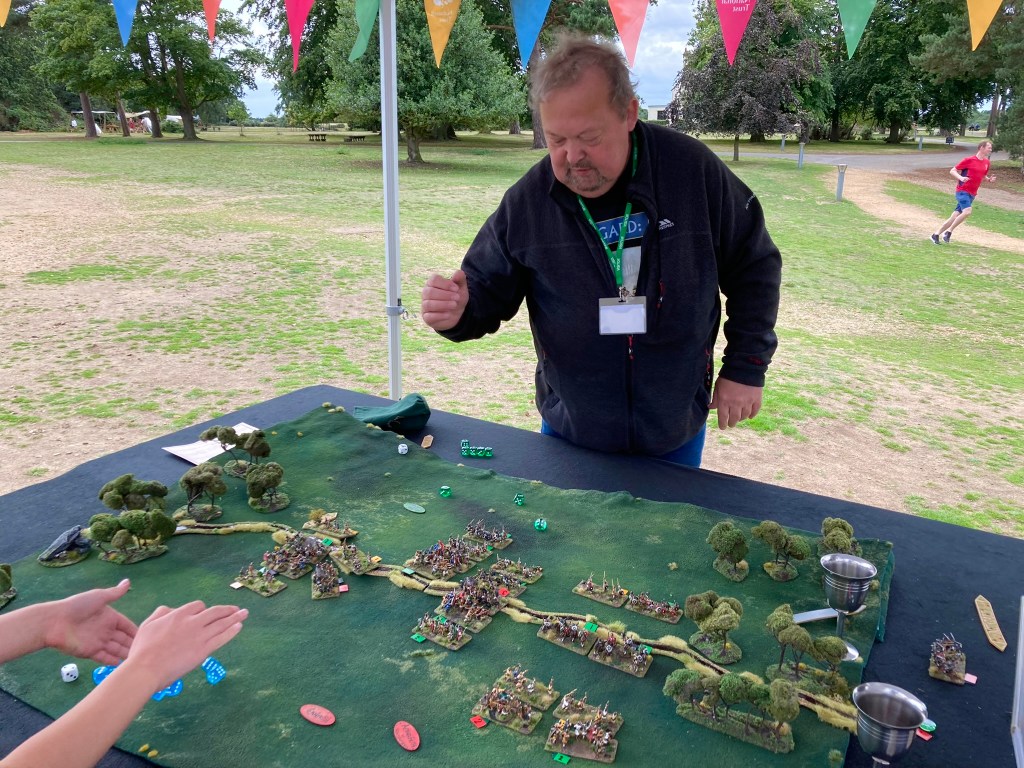
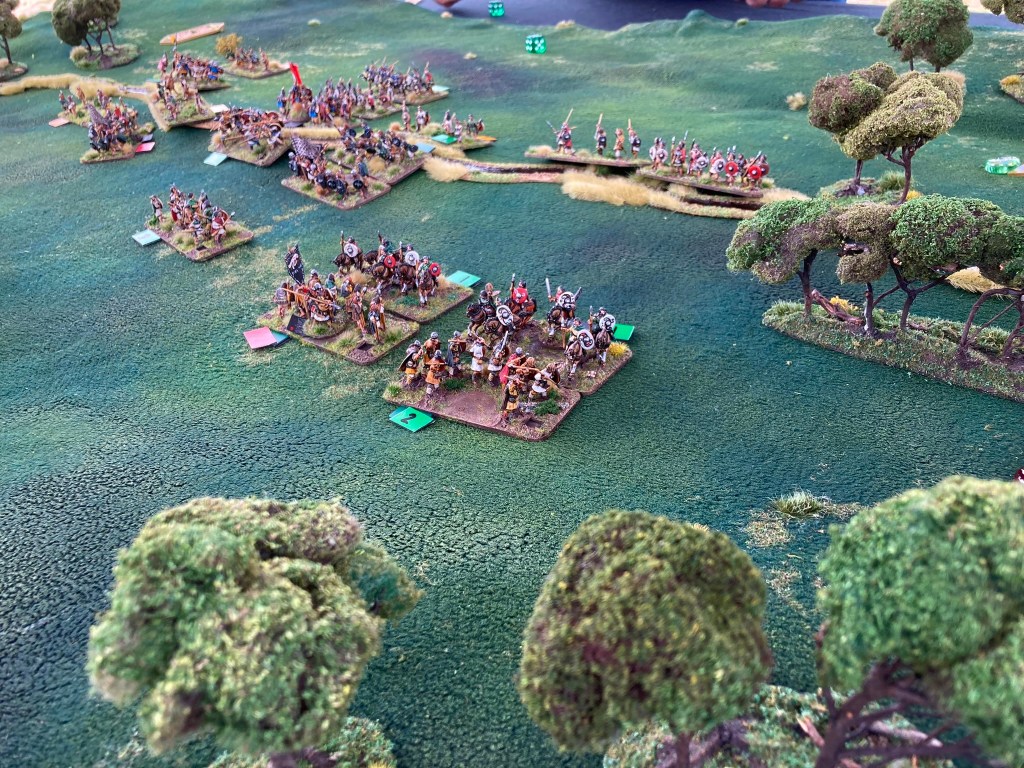
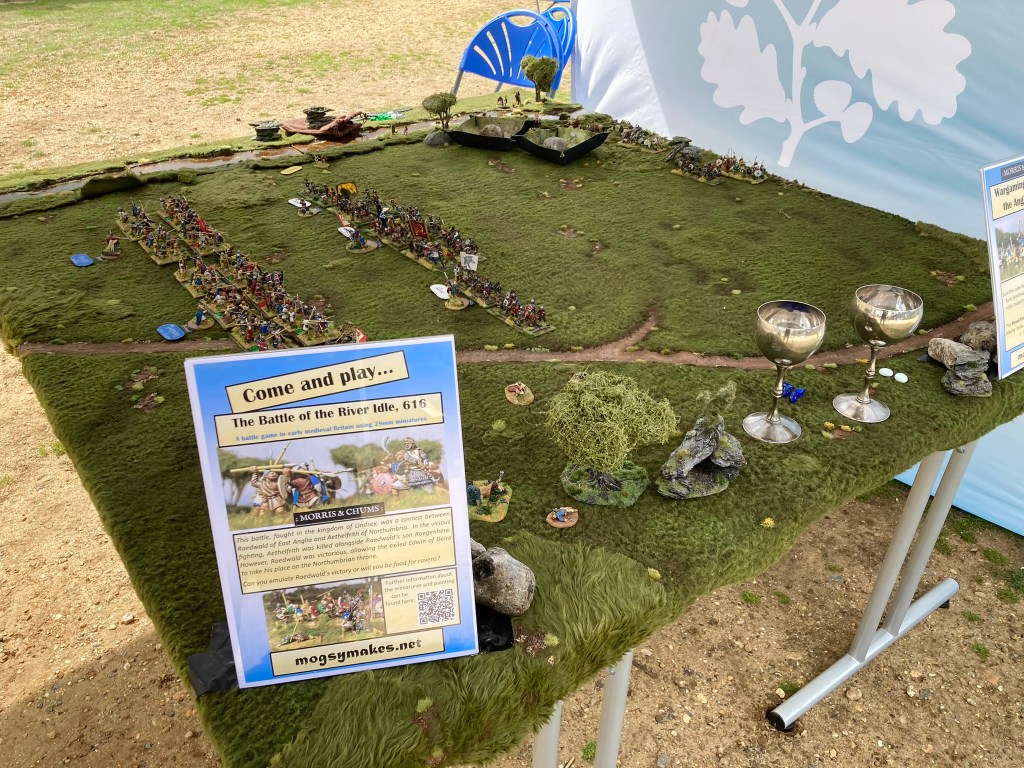
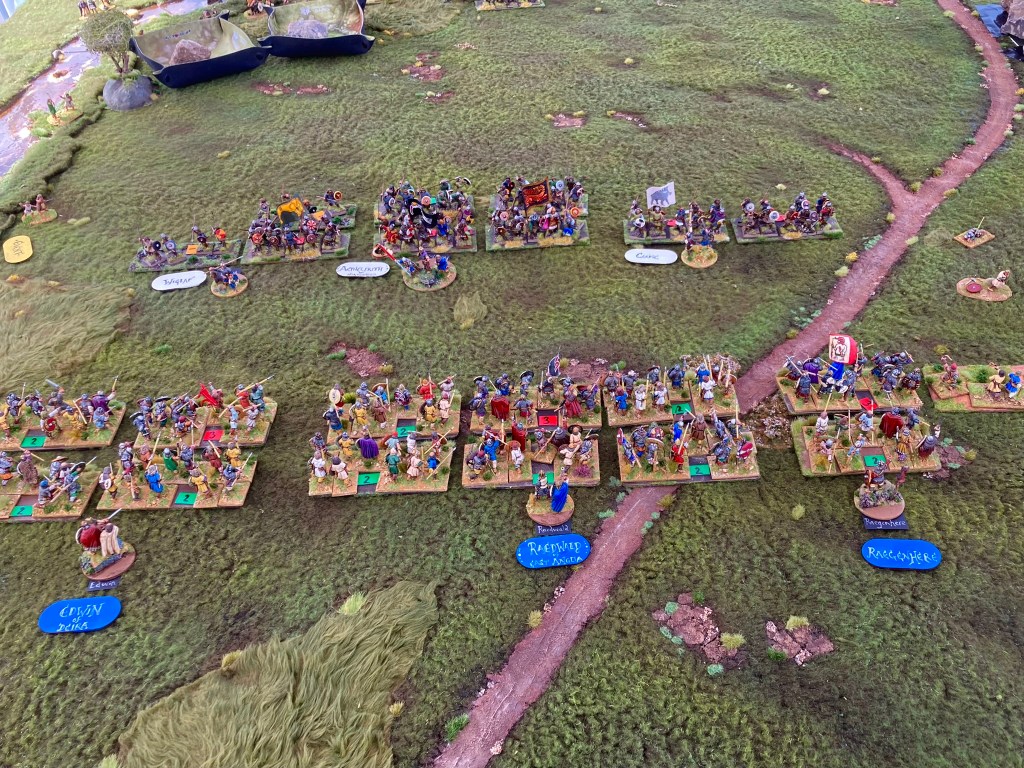
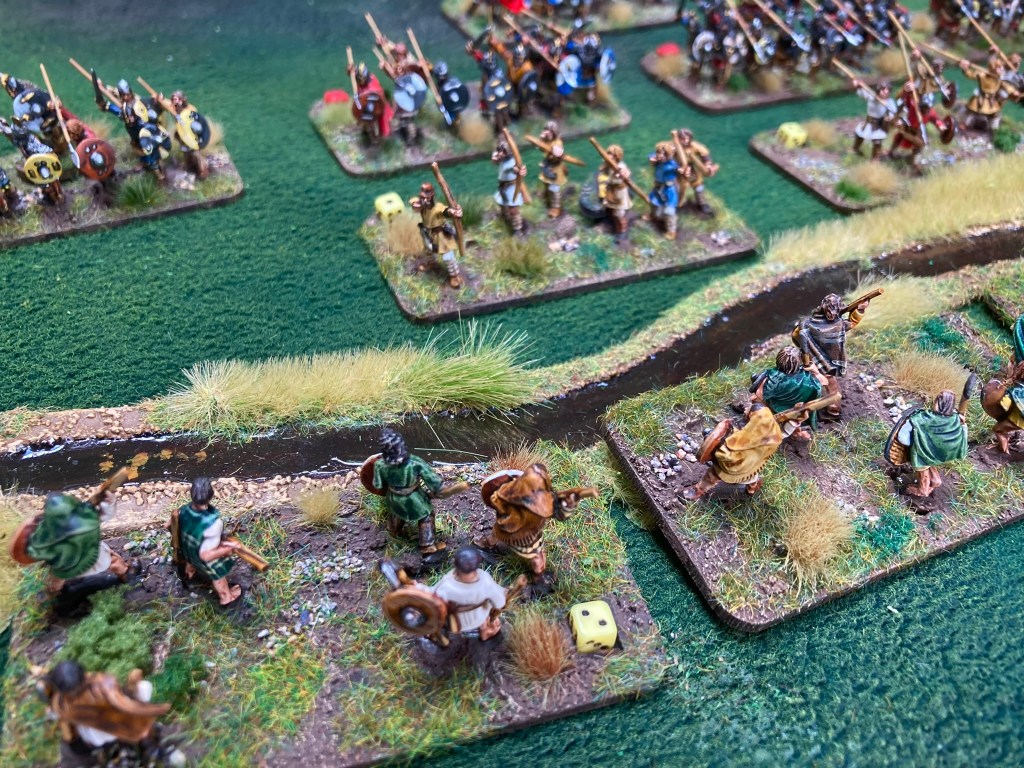
My son and I ran the Battle of the River Idle using 28mm miniatures around ten times in various forms, with victory going to the East Anglians and the Northumbrians in equal measure. Historically, this one was particularly relevant to the site as it’s the battle where King Raedwald of East Anglia (the most likely occupant of the ship burial in Mound One) triumphed over Aethelfrith in 616/617.
The royal family of Northumbria gets usurped by Dave Blue-Boots and his son Bob Blue-Tunic! Some of the minis from the painting table found their way into the front lines…
There was much hilarity as families were pitted against each other and bloodthirsty children charged their miniature heroes into battle. One enthusiastic participant managed to wipe out the entire East Anglian royal family in just ten minutes with a spectacularly unlucky display of dice rolling!
River Idle action as the forces close for battle
Rules used were my own Mead-Price (designed to play a battle in 30 minutes) which are available as a two-page download if you’d like to try them.
Many thanks to Josh, Andy and the Sutton Hoo NT team for making us so welcome, Pete for the heroic driving and game hosting, and Gripping Beast and Wiglaf Miniatures for your generous contributions. It was a great privilege to be involved.
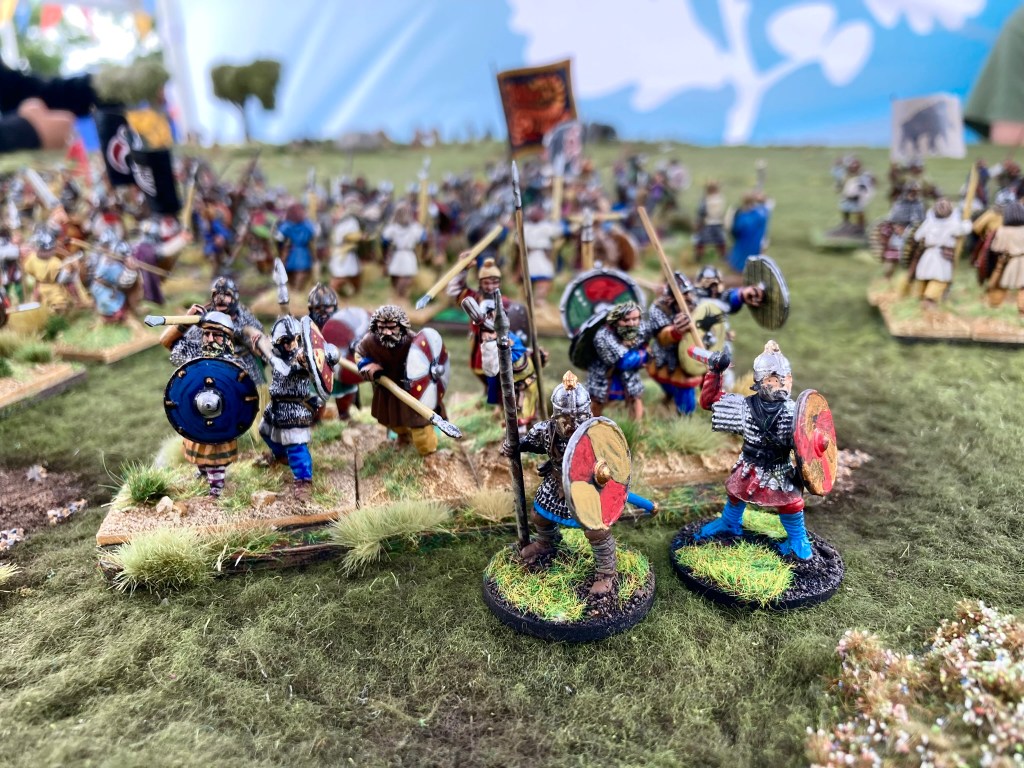
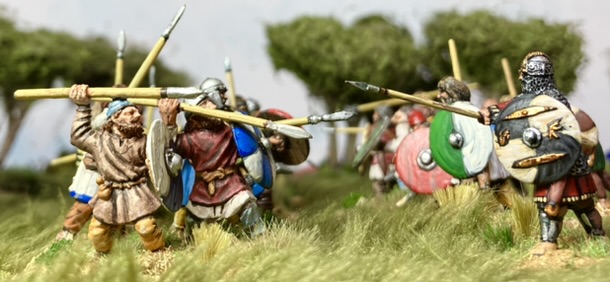
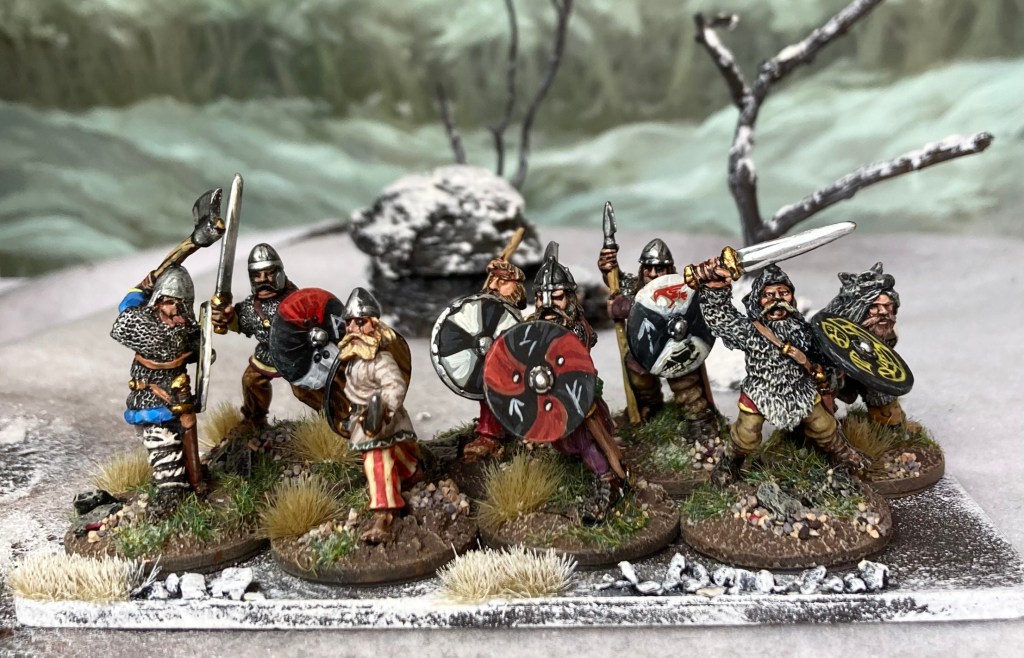
7th Century Saxons by Northstar and Gripping Beast
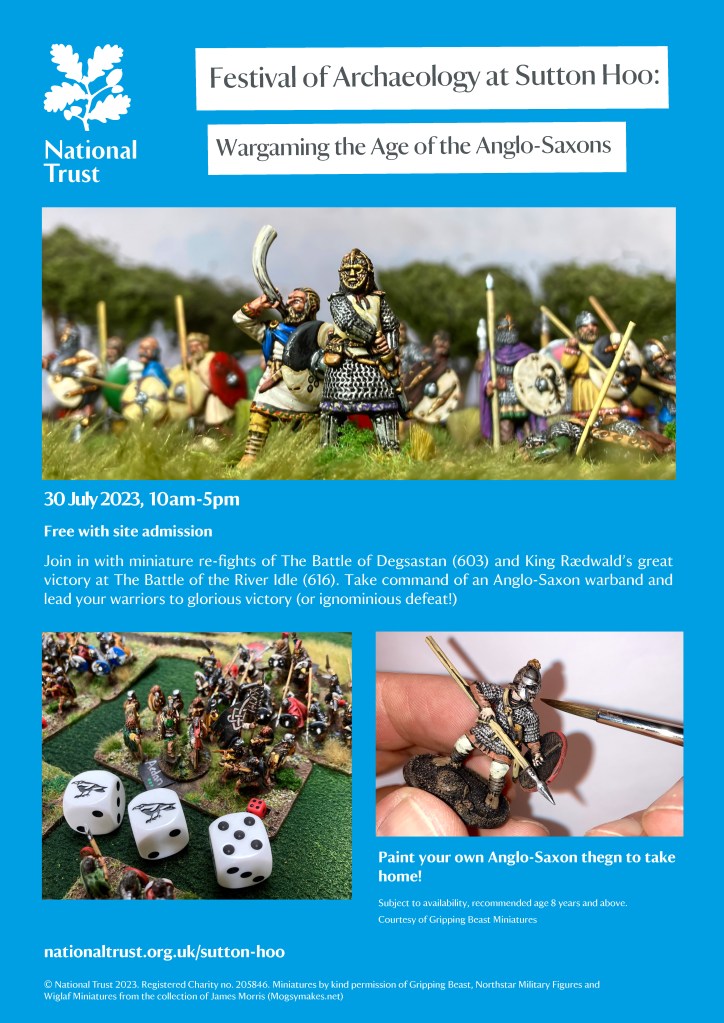
We’re very excited to be heading down to Sutton Hoo at the weekend for the National Trust’s Festival of Archaeology. We’ll be running participation games for two 7th Century battles – Degsastan 603 (using 15mm miniatures) and River Idle 616 (using 28mm miniatures), as well as helping to host a painting table where you can ‘Paint your own Saxon Thegn’ – many thanks to the generous lads at Gripping Beast who have donated all the models for this activity. There will also be a game of Too Fat Lardies’ Dux Britanniarum (hosted by Ernie and Richard) that I’m looking forward to seeing.
Given that we’re running public participation games, I’ve opted to use a 2-page set of my own rules called Mead-Price which play in around 20-30 minutes. They’re really simple but include a couple of concepts from Midgard Heroic Battles (mostly goblets!)
18mm Wiglaf Miniatures who will be appearing in our Battle of Degsastan game. Wiglaf have also kindly donated some give away bags of their minis for the event.
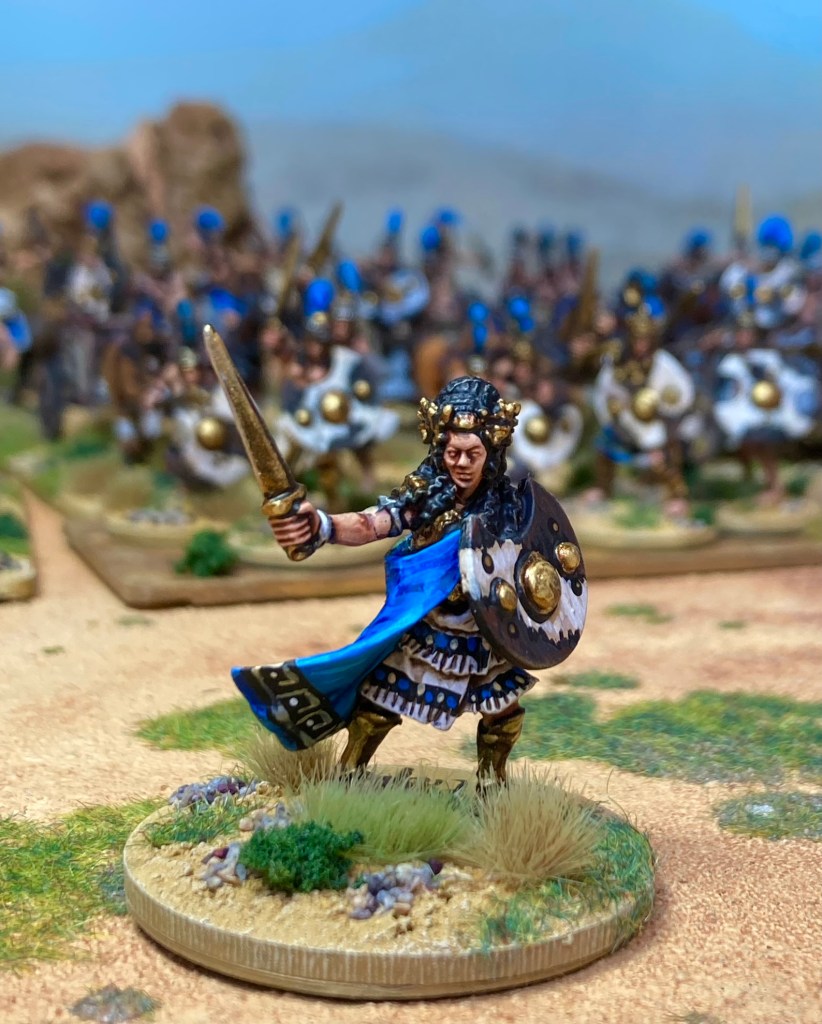
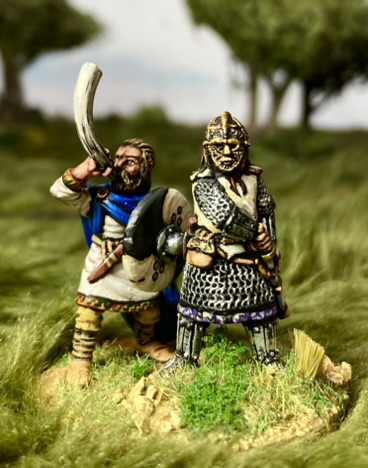
After a renewed interest in the Trojan War recently, I’ve been working away on more 28mm Amazons from Lucid Eye. I have a job lot of these from various sales that I’m determined to get painted up this year! These are beautiful sculpts but there’s quite a lot of flash to clean up, so I tackled that over several evenings and then got on to assembly and painting.
The leader model (left) is a Lucid Eye foot Amazon torso fitted on to a spare GB rider’s legs.
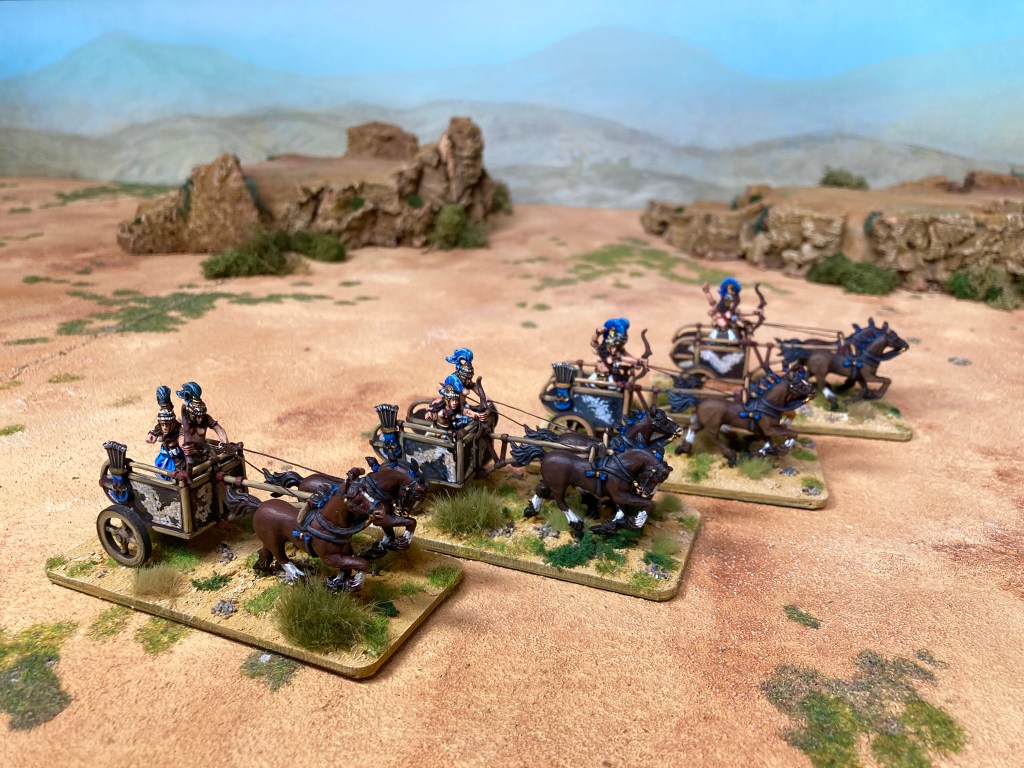
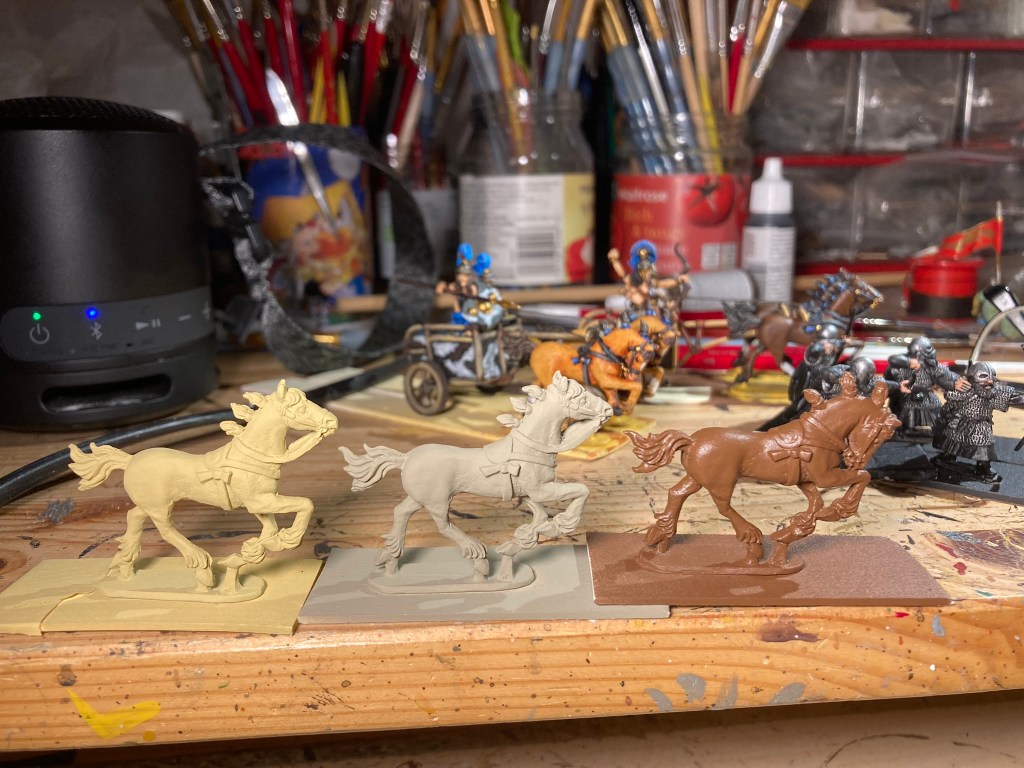
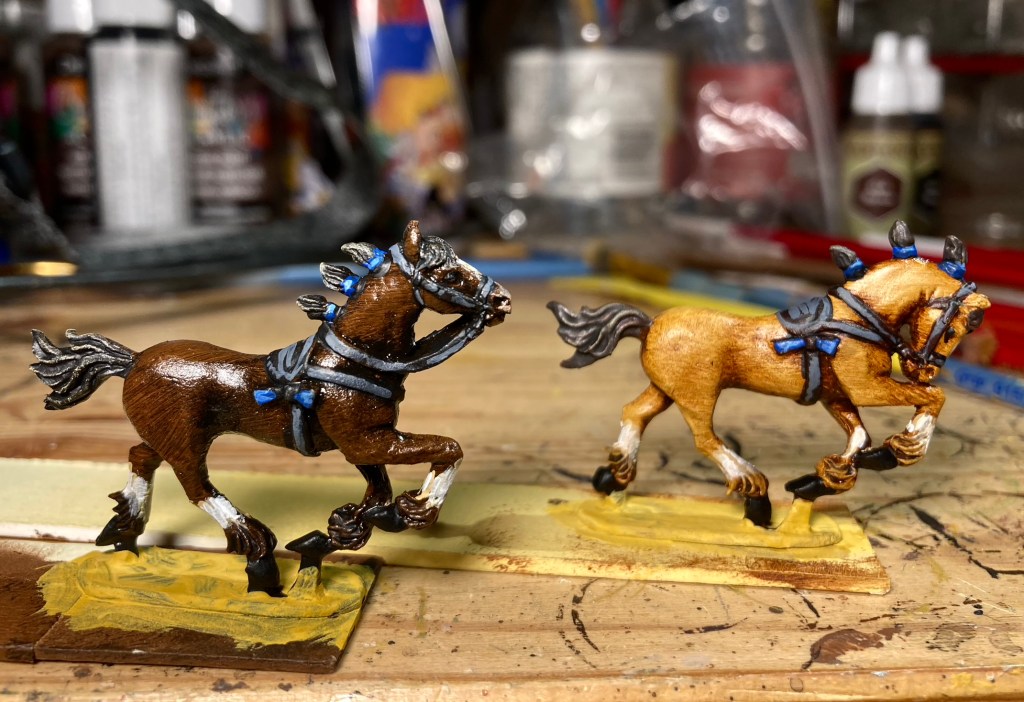
The chariots went together fairly easily (thank Hephaestus for superglue accelerator, though). With a job lot of horses on the go (16 for the chariots and 8 for the horse archers), I decided to go down the oil paint ‘wipe off’ technique.
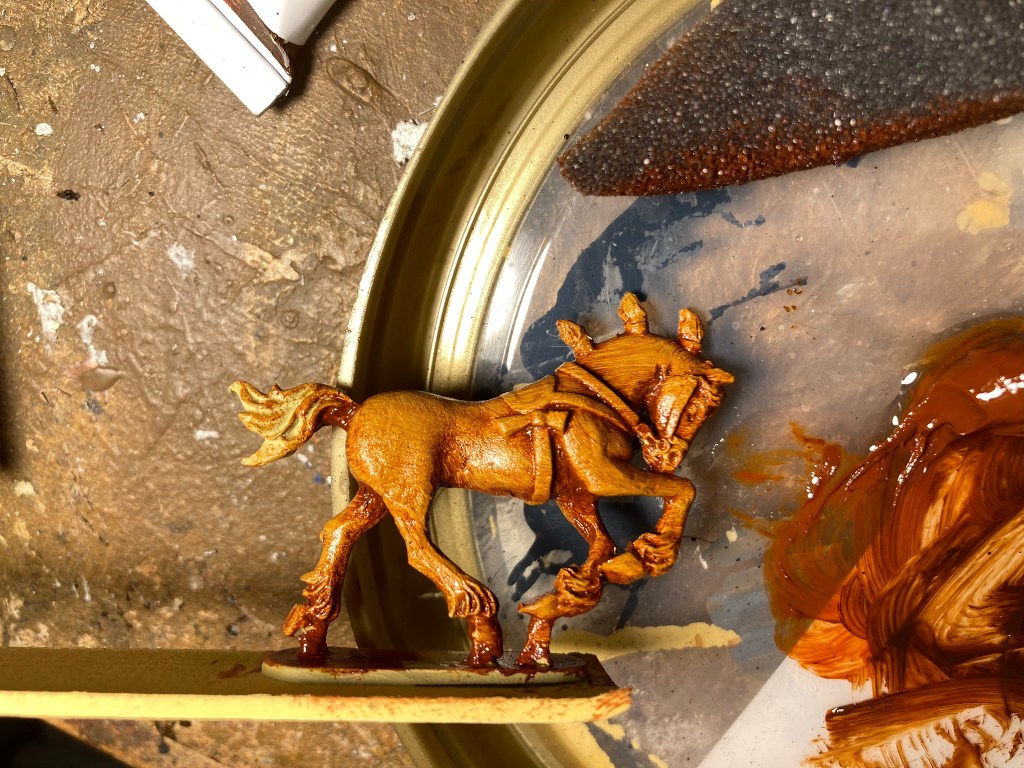
Standard artists’ oil paints used hereHorses sprayed in three different colours: AK Desert Yellow, Halfords Khaki (Light Brown), AK Rust. They need a couple of light coats to get full coverage.Slap on the paint with a thick brush – this is Burnt Sienna on the Desert Yellow undercoatWipe most of the paint off with a piece of sponge rubber. Sometimes you need several passes at this to get it right, but you can see how the oil paint sits in the recesses.Working in a big batch makes everything quicker, and also means that you can play around with different colour mixes. These took about two days to dry though it can be longer.After the oils are dry, paint in the reins, mane, tails etc using traditional acrylics before a coat of matt varnish.
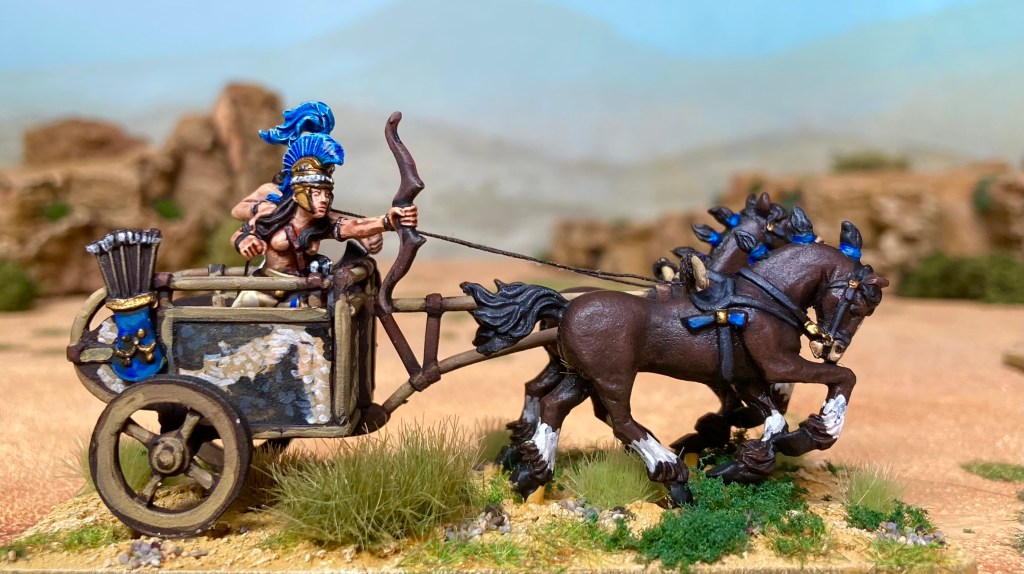
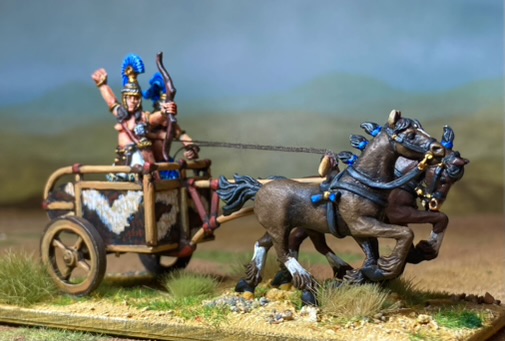
The chariots were sprayed dark brown and then painted with traditional acrylics for the cow hide effect. The crew had a pin inserted into one foot so that they could be painted separately and were then glued into holes I’d drilled in the chariot floor. Slightly fiddly but normal for metal assembly, though it got me thinking how I’d love to see this kind of chariot in plastic – maybe Wargames Atlantic will take the plunge at some point? I see they have just released Trojan warrior STLs for 3D printing…
Crew were undercoated white and painted using GW Contrast paints and traditional acrylics using the same techniques I used on my previous Amazons. The chariot just didn’t look right without reins, so against my better judgement, I drilled out the charioteer’s hands and used cotton during final assembly. It looks good though!
The horse archers were a less straight forward proposition. Although the Aenead hints at the majority of the Amazons being mounted, Lucid Eye have only one pack of horse archers (Steve Saleh explained this to me a while back as he considers the Amazon elite to be in the chariots, of which there are three variants available, with the horse archers supporting them. This fits with the Minoan Greek influence on the design, whereas many Amazon depictions follow a more Scythian look).
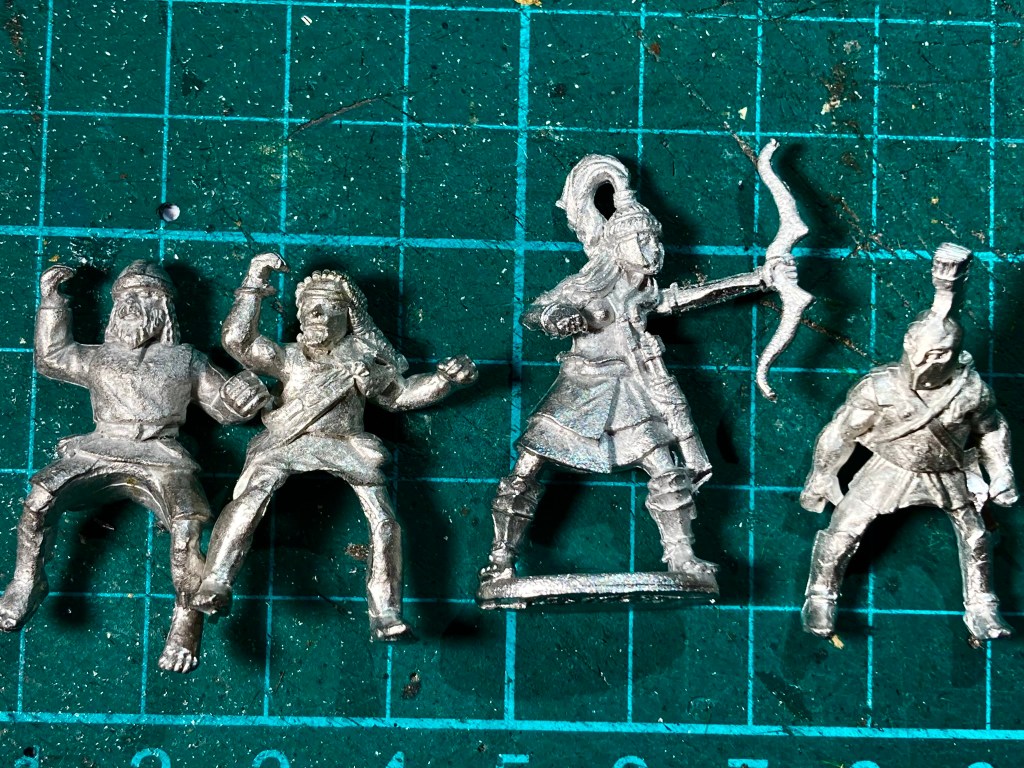
These are the only options in the Lucid Eye horse archer pack, so I converted for more variety.
I decided that I wanted a little more variety and started digging through the bits box, where I found several Gripping Beast bare-legged riders that looked like they’d fit with the Saleh sculpts. Cue a bit of late-night metal conversion pinning bodies and legs together! It’d have been easier with plastics but I enjoyed using up some old models and creating something unique.
Bits box spare minis get hacked up to make the horse archers – GB Pict, Numidian, LE Amazon, GB Greek
A few spare Foundry horses were then added to the mix and I used green stuff (somewhat roughly) to cover up the worst of the damage – they won’t be winning any modelling prizes, but fine on the wargames table.
Family shot – I’m pleased that I managed to get this much variety out of what I had available.
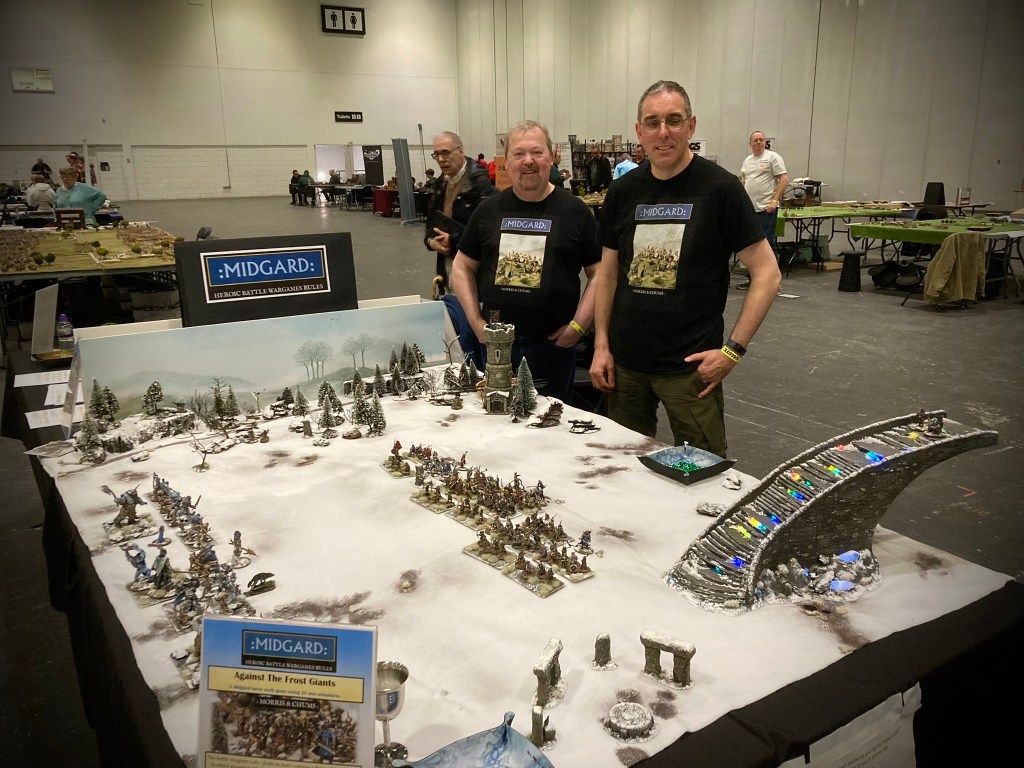
With Salute 50 out of the way and Partizan coming up, I added a few extra pieces to the ‘Against the Frost Giants’ scenario that we’ll be playing in Newark on May 21st 2023. There will, in fact, be two games on show – the 28mm Against the Frost Giants game (with a Norse myth setting) and the 15mm Battle of Degsastan 603 game (set in the early medieval period).
Battle of Degsastan 603 using 15/ 18mm miniatures by Forged in Battle and Wiglaf Miniatures. Background image used by permission of Jon Hodgson Illustration.
We’re looking forward to demoing Midgard Heroic Battles again with both games, hopefully showing the versatility of the rule set and running through some examples of play. We have a bigger team than we did at Salute, cheaper (free) parking and better lighting, so we look forward to seeing you there if you can make it!
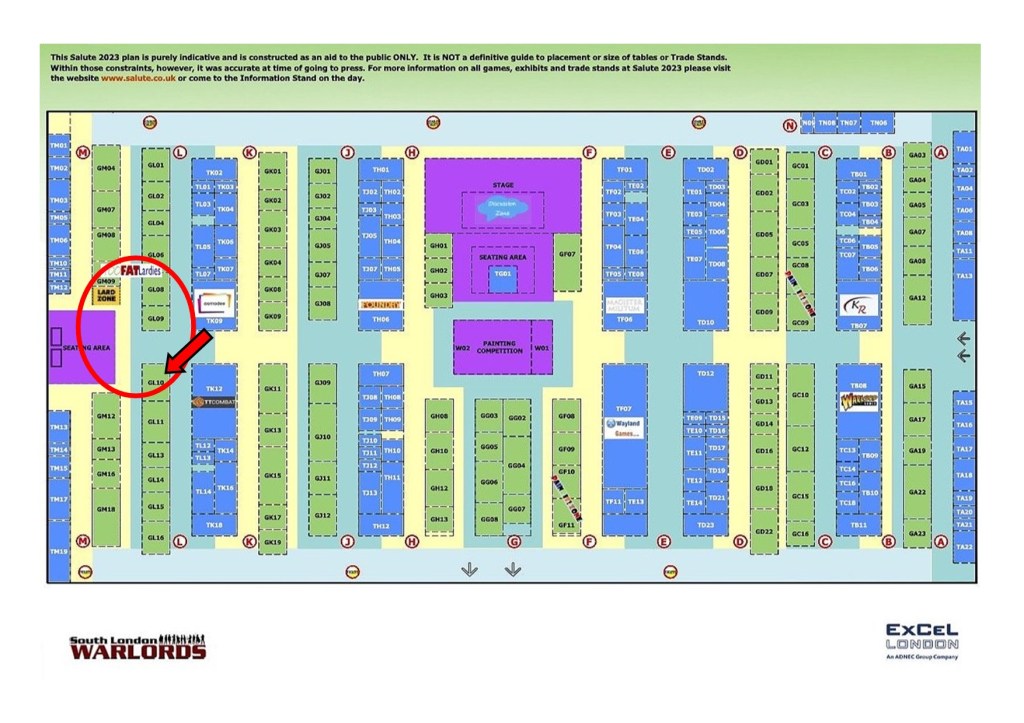
Note that we (Morris and Chums) have moved from our usual spot in the Demo Zone: as the rules are due to be published by Reisswitz Press (Two Fat Lardies), it only seemed right to move into the welcoming arms of the Lard Zone – see the new map above!
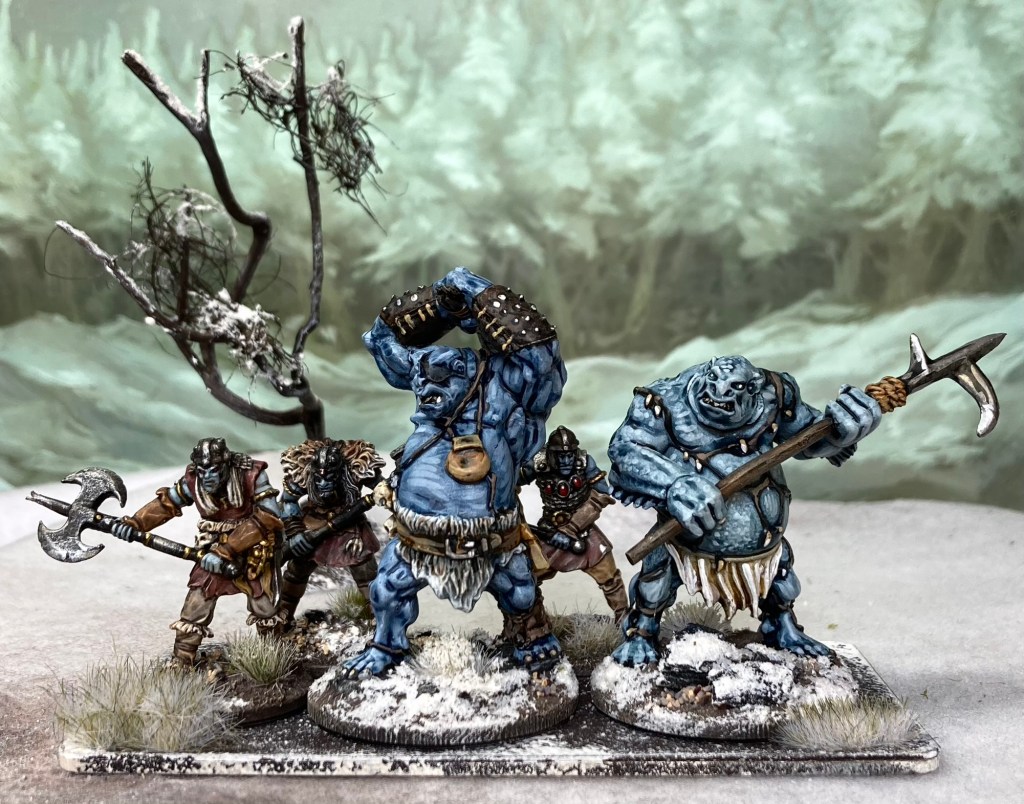
Lucid Eye Trolls alongside an Ogre and Merrow by Reaper Bones.
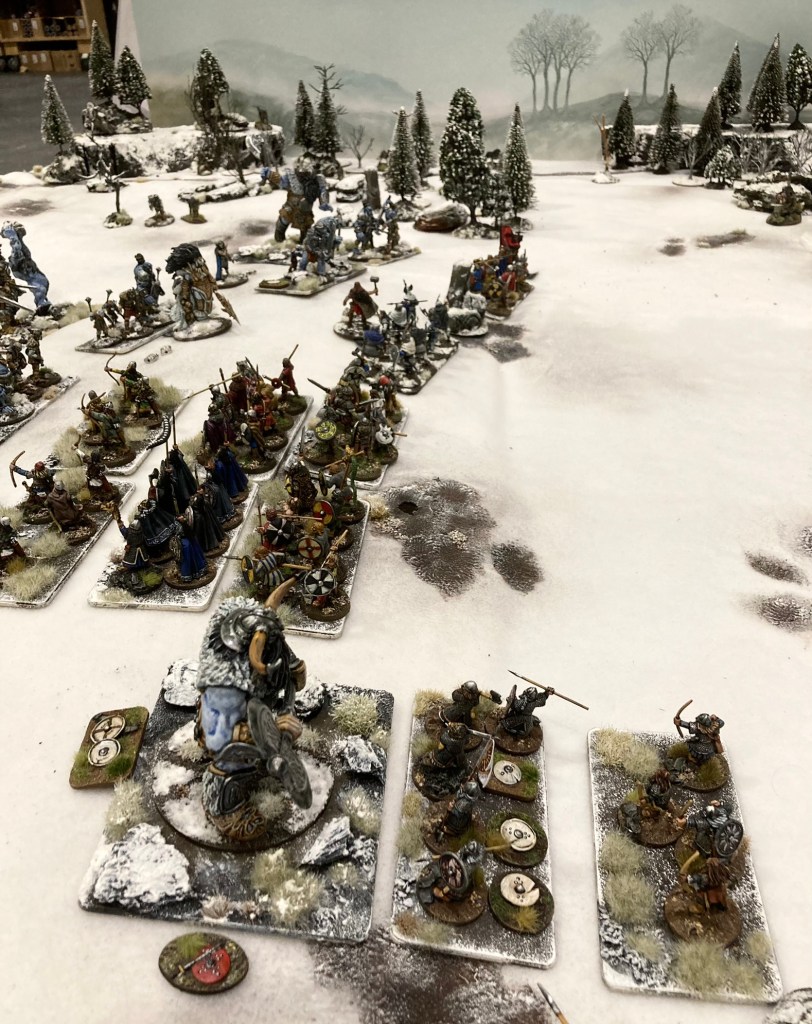
First up is a quick look at the smaller end of the Frost Giant army. I have added a number of new units in the last month, combining a variety of different-sized models. I dipped into the excellent Reaper Bones range of trolls and the like; these were supplemented by Lucid Eye Trolls from the Red Book of the Elf King range (pricy but lovely models) and some plastic Oathmark Goblins given a frosty paint job. The 1/72 soft plastic Trolls from Dark Alliance – incredibly good value at around £8 for a box of 8 – were also pressed into service.
Another Reaper Bones Ogre with his minions (Oathmark Goblins)
All of the units are based on magnetic discs, which are then attached to an MDF unit base with a top layer of steel paper. As with all Midgard units, the exact number of miniatures on the base is unimportant as long as frontages are consistent (these are on the standard base width of 12 cm). In Midgard terms, these are treated as Warriors with the Big and Impetuous traits.
Some extra terrain pieces have also been added. My only miniatures purchase at Salute was this pair of rune stones from Fenris Games which painted up an absolute treat. This is my first Fenris purchase and certainly won’t be my last!
Top notch Viking rune stones by Fenris Games with a Lucid Eye Troll
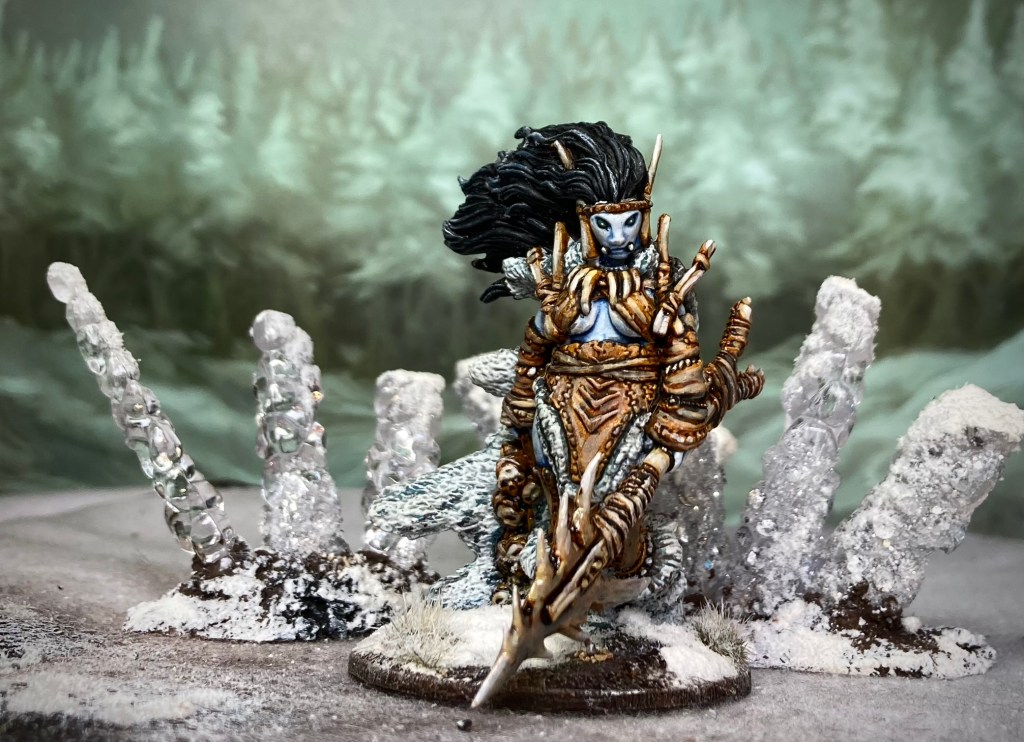
As a tidy-up after finishing the rainbow bridge centre piece, I created some fantastical ice crystal terrain pieces with leftover items from the Bifrost build. These included some pieces of quartz and also crystals made from cheap plastic Christmas decorations.
Chunks of quartz repurposed into drop on terrain alongside a Lucid Eye Elf
Loki (a Lucid Eye Elf) hangs out in the crystals
Frosty crystals – cheap plastic Christmas decorations with some modificationsAngrboda, Loki’s giant wife (Reaper Bones)
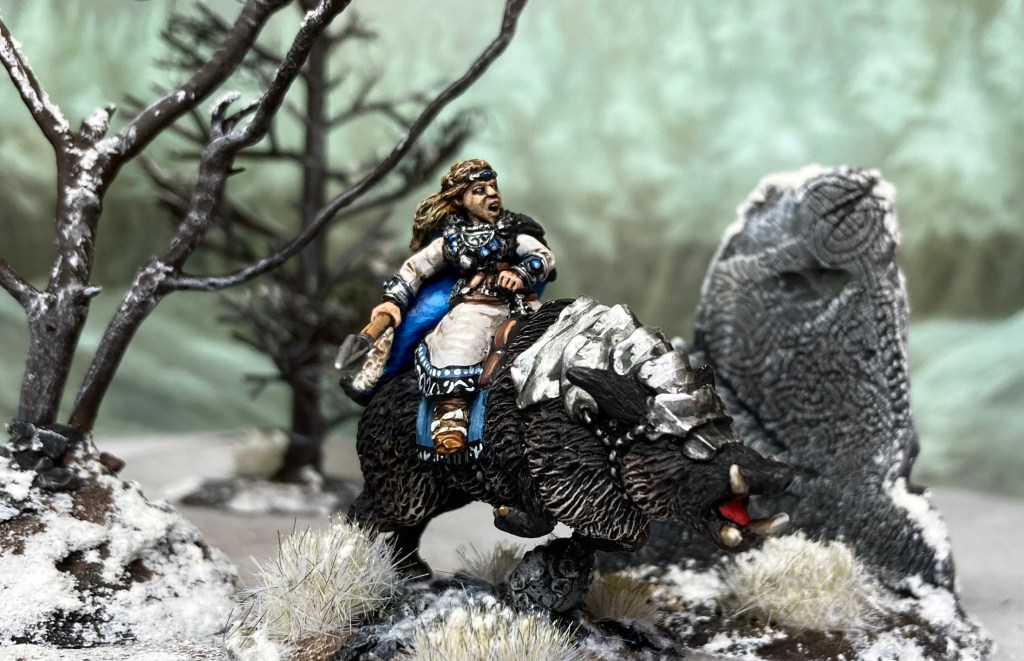
There’s not much new for the Aesir but I thought it’d be nice to grab a few shots of some of the protagonists. Here’s Freya by Bad Squiddo Games – she is serving as the Army Commander for the Aesir force, being the goddess of war and somewhat more strategic than good ol’ Thor.
Other Gods featured in the game are Heimdall and Thor, a couple of awesome sculpts from the miniatures for the Blood Rage boardgame.
I’ve provided the Aesir forces with a number of archer units which did great service in our last game. Here’s some Conqueror Models’ Dwarves sculpted by dwarfmeister Colin Patten.
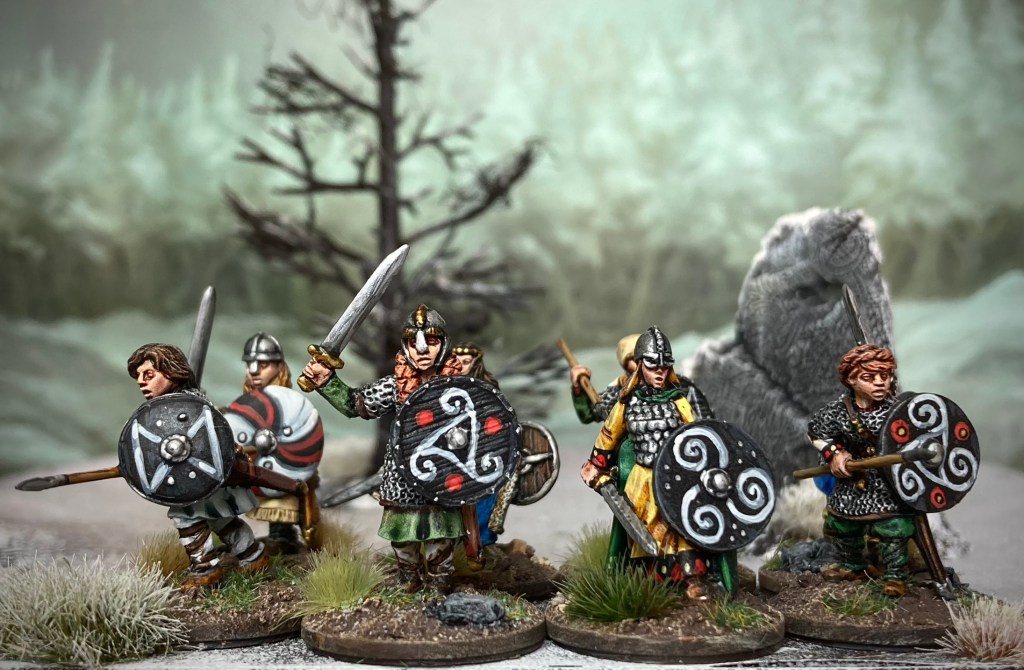
More Bad Squiddo Games minis here in the form of a unit of shield maidens.
And finally some very old but much-loved Foundry Vikings (with a Gripping Beast berserker lurking at back right). Some of these fellas first saw action in the 1990s but have had a recent refurb for the game.
The 90 x 120 cm battlefied set for action in my kitchen as Martin takes the role of Aethelfrith of Northumbria. Background art used by kind permission of Jon Hodgson Illustration.
Following the game’s first appearance at Salute 50 in London, Martin popped over for a much quieter gaming experience – a kitchen table rematch of Northumbria vs Dal Riada at the Battle of Degsastan in 603 CE.
I’ve played this game many times since reading Guy Halsall’s article in Miniature Wargames magazine in the 1980s, and was delighted to hear that he’s just written an updated version due to appear soon in Wargames Soldiers & Strategy magazine! Definitely one to look out for,
Goblets are used to record the Reputation of both forces during the game
Although Martin’s being playing my Midgard Heroic Battles rules since their very first play test some years ago, quite a bit has changed over the last year so a quiet game was a good opportunity to bring him up to date. I still don’t have a release date for the rules but keep an eye on social media and my blog – as soon as there’s an official announcement from Reisswitz Press, it’ll be on here.
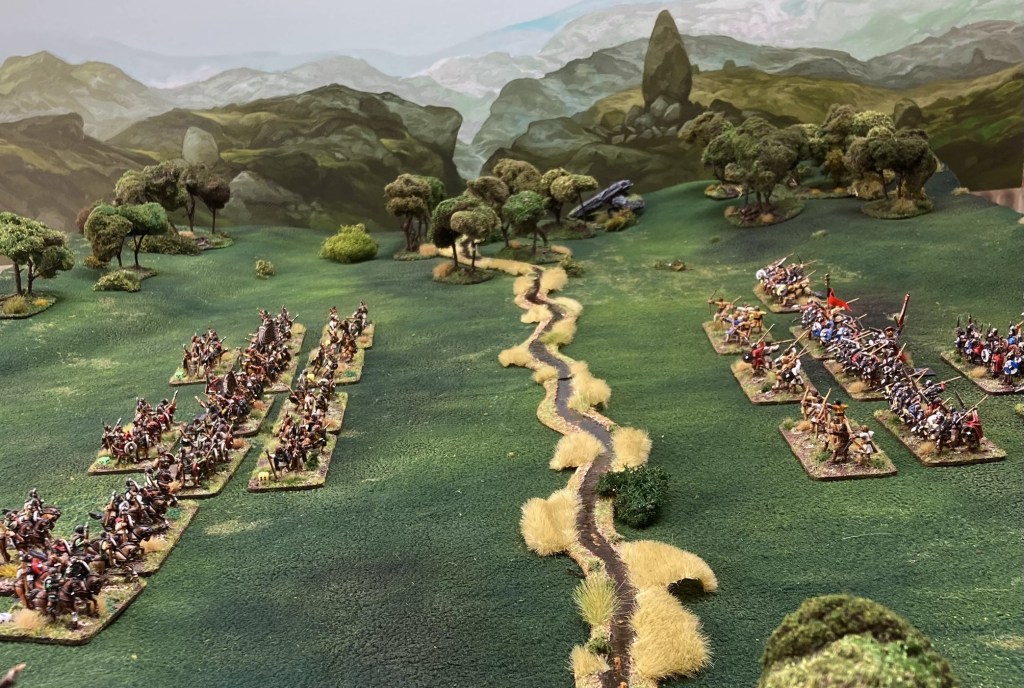
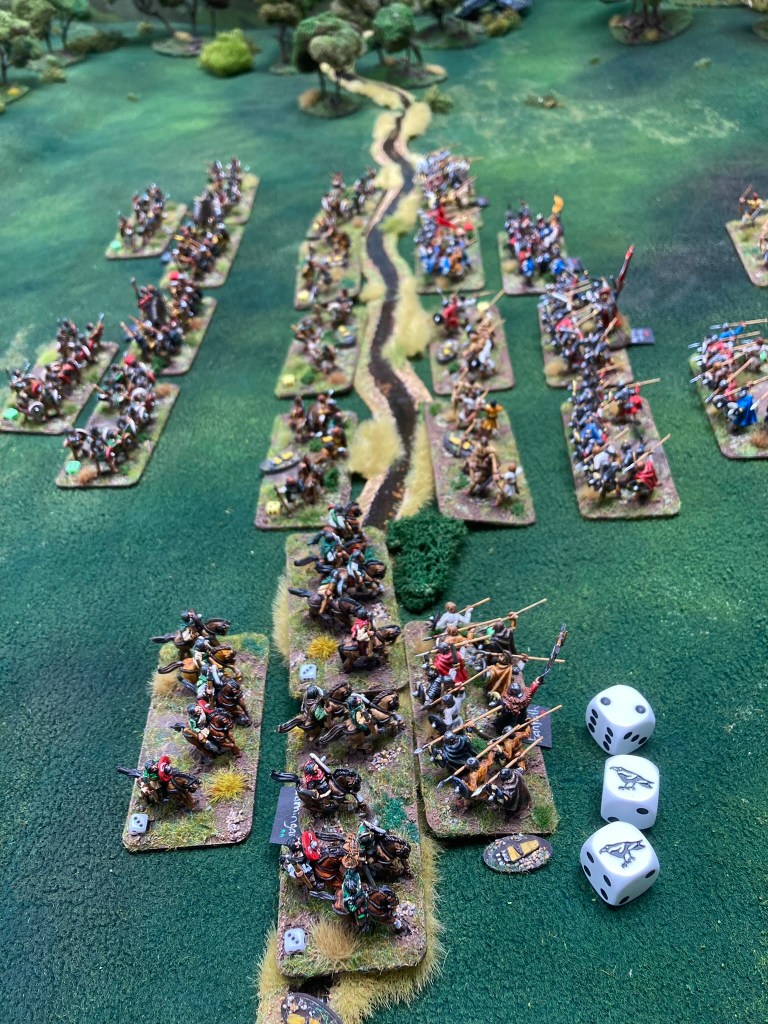
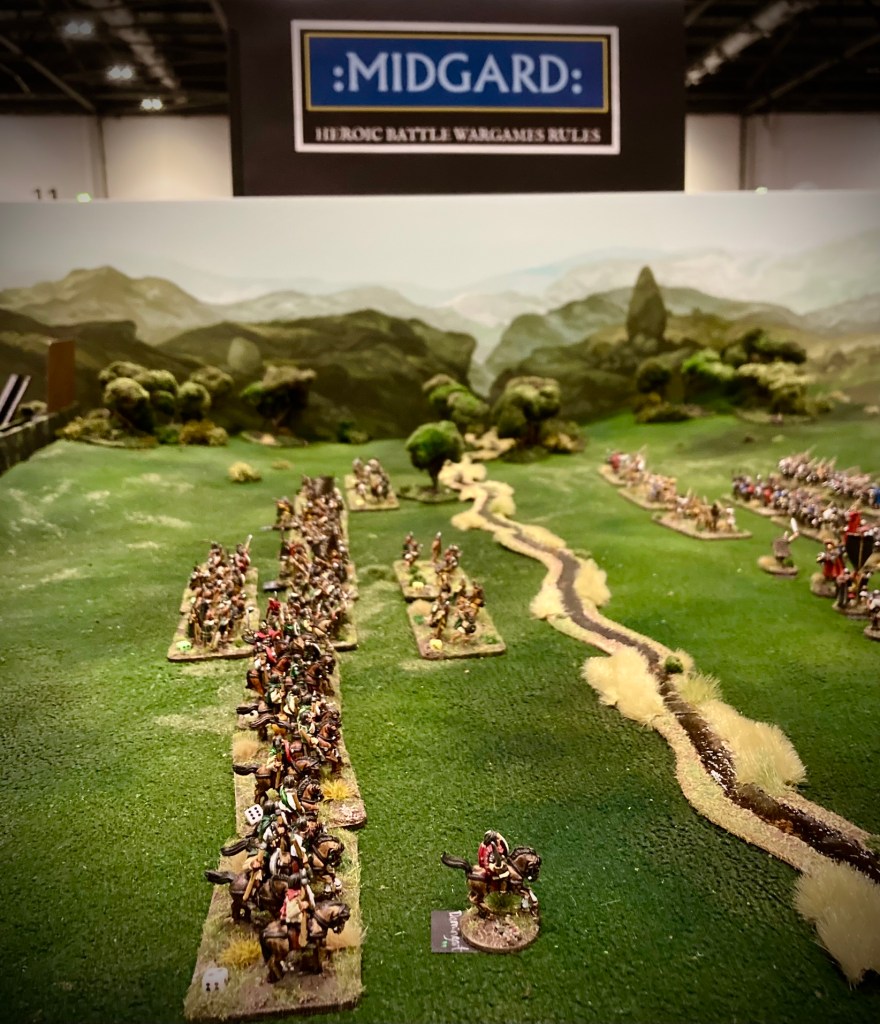
The two forces arrayed for battle: Dal Riada on the left (all 15mm figures from Forged in Battle; Northumbrians on the right (18mm fgures by Wiglaf Miniatures). Background art used by kind permission of Jon Hodgson Illustration.
This 15mm battle is an ideal introduction to Midgard: the forces are around 300 points each (perfect for an evening’s play) and there’s nothing more fantastical in the game than a pattern-welded blade and the Fated trait hanging over Saxon noble Theobald. (As Theobald died in the historical battle, I gave him a trait which means that he can’t reroll his Risk to Heroes tests – meaning that he’s more likely to be wounded or killed. As fortune would have it, he survived our game to inherit his brother’s kingdom!)
Divine help is appealed for by the Dal Riadans
The forces were as follows:
DAL RIADA & ALLIES
Aedan Mac Gabhrain (Army Commander, Level 3 Mighty Hero)
Mael Uma (Irish Warlord, Level 2 Minor Hero)
Domingart (Aedan’s son, Level 2 Minor Hero)
2 Dal Riada/ Irish Hearthguard units (bodyguards for Aedan and Mael Uma)
4 Dal Riada/ Irish Warrior units
3 Dal Riadan units of Mounted Warriors (Noble Light Riders in Midgard terms)
4 Dal Riada/ Irish Skirmisher units
Dal Riadans – 11 units, 3 Heroes (300 Midgard points)
NORTHUMBRIANS
The Northumbrian force was smaller but better-equipped:
Aethelfrith (Army Commander and Level 3 Mighty Hero)
Theobald (Brother of Aethelfrith, Level 2 Minor Hero)
Cerdic (Champion, Level 1 Hero)
Eanfrith (Brother of Aethelfrith, Level 2 Minor Hero)
3 Saxon Hearthguard Warrior units
4 Saxon Warrior units
3 Saxon Skirmisher units
And the Northumbrians – 10 units, 4 Heroes (300 Midgard points)Skirmishers swap darts and arrows
True to form, both sides advanced to the stream and exchanged missiles across it.
The micro-dice at the back of each base is used to keep track of Stamina (damage) – all skirmisher units have just two points each, so are unlikely to hang around when combat starts
Playing Domingart leading the Celtic mounted warriors, I chose to throw in the first charge of the game to gain the maximum Reputation! This was possibly a little optimistic but at that point, there was only a single Saxon unit commanded by Eanfrith holding the Northumbrian left flank. An unfortunate Risk to Heroes roll – made in Midgard whenever a Hero’s unit suffers damage – saw Eanfrith roll the dreaded double one! Fortunately, he was able to expend a Mighty Deed and a Reputation Token from his goblet to survive this, but it was an early boost for the Dal Riadans.
Eanfrith (bottom right) flunks that Risk to Heroes roll!
Seeing the danger, wily old Aethelfrith sent some of the Saxon warriors down the line in case Eanfrith should break.
More Saxons (right) arrive to reinforce the beleaguered Eanfrith
Sporadic javelin fire was beginning to cause problems for the Saxons in the centre and right, so Northumbrian champion Cerdic bravely charged over the stream and into the main Dal Riadan force. Very quickly, the Northumbrians found themselves taking casualties with their friends too far behind to support (the stream provided a movement penalty, making it hard to advance over in good order). Once again, Aethelfrith proved himself an inspiring leader by using his Hold Fast! trait to rally Cerdic’s men and keep them in the fight.
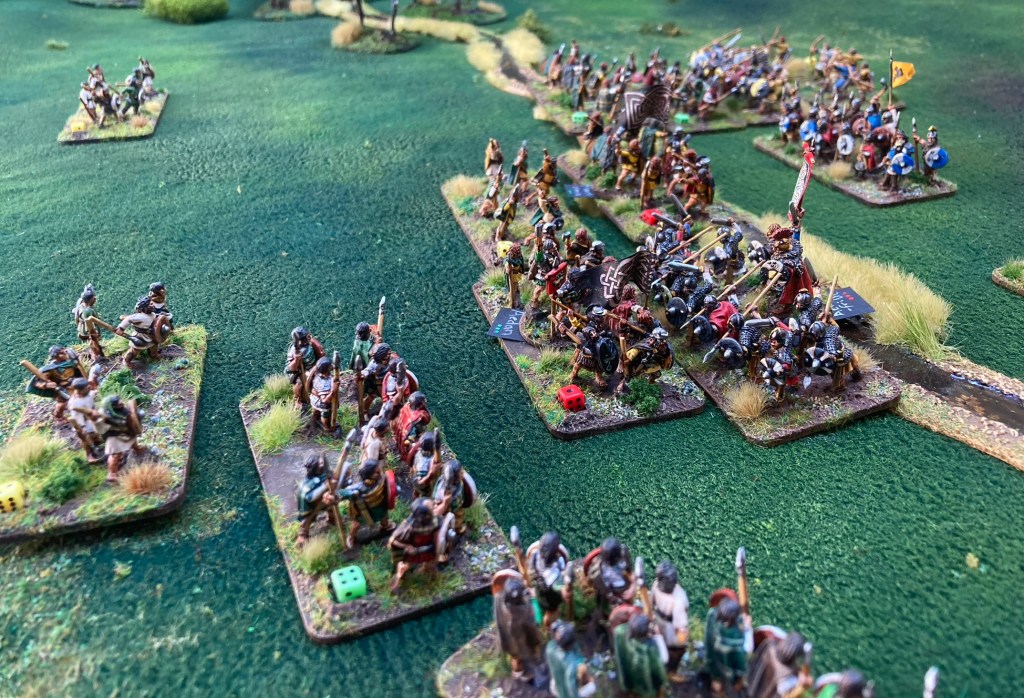
Another Saxon unit followed Cerdic and found itself fighting both Mael Uma and Aedan’s hearthguard units – a most perilous situation.
This is when Aethelfrith stepped up to the mark and crossed the stream, gaining great reputation as his men charged Aedan Mac Gabhrain’s personal guard (Reputation Tokens can be gained for leading units into combat, with bonuses if the Army Commander is involved).
Aethelfrith steps up to the stream
Not only were the Saxons better-armoured, but they had the luck, and Aedan rolled double one for his Risk to Heroes test! He recovered to suffer just a single wound, but his reputation had taken a battering.
Hearthguard on hearthguard actionDouble one (ravens) for Aedan! I found the raven dice at a games shop in Copenhagen – with the custom icon on the 1 (rather than the 6) they are ideal for Risk to Heroes tests in Midgard.The Saxons have secured their left flank (bottom) and are holding firm in the centre having crossed the stream
With Aedan wounded and his hearth guard taking a battering (reduced to one Stamina point), I desperately needed to get some reinforcements into action. Two Dal Riadan warrior units were rushing to the rescue, but failed their Command Test for charge home. With Aedan having burned all his Mighty Deeds for this turn in the preceding combat, there was nothing I could do!
The fresh Dal Riadan unit (right) has just failed its Command Test and cannot charge in to reinforce Aedan’s struggling hearthguard!
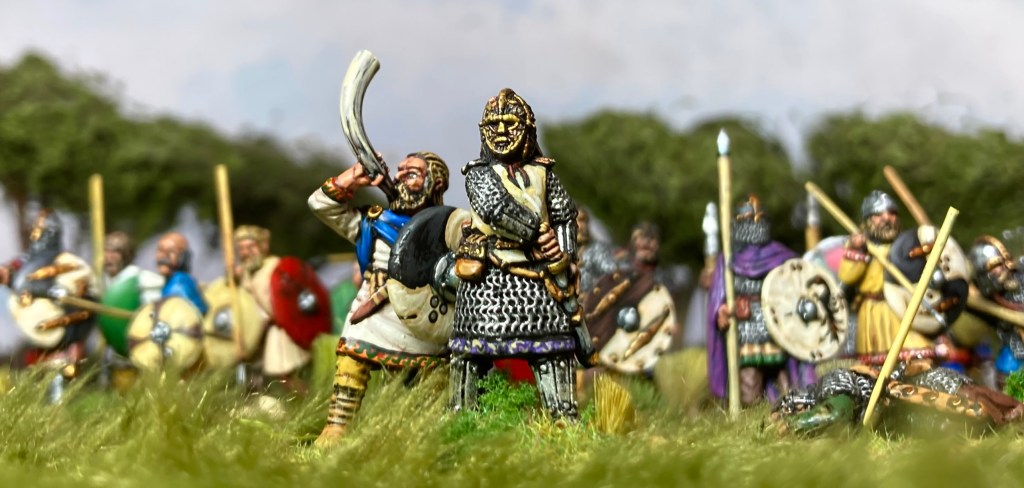
Reduced to desperate measures and feeling heroic, Aedan challenged Aethelfrith to single combat in the midst of battle. The Northumbrian leader accepted but quickly regretted it as Aedan struck him a wounding blow in the second round – now both leaders were on the ropes.
Single combat!
A draw in the third round of single combat in Midgard inflicts a wound on both challengers…and guess what? Aedan struck Aethelfrith down, but was himself mortally wounded in the act. Both leaders fell dying as the battle raged on around them. This meant a major loss of Reputation Tokens for both sides – the next units to break would decide the game.
The Dal Riadans (green) are running out of Reputation! Dice tray by Handiwork Games.
Despite the loss of their leader, the Saxons had done exceptionally well to hang onto their troops, although several warrior units were close to breaking. However, Domingart’s impetuous charge on the Dal Riadan right had cost them dear. After Saxon reinforcements had arrived, all three Dal Riadan mounted warrior units had broken in short succession – Domingart was still fighting, but was now wounded and losing Reputation hand over fist. Having lost all his men in the melee, he fought on but was last seen falling under a hedge of Saxon spears. Victory to the Northumbrians!
Domingart goes down fighting
And so, history was repeated with another Saxon victory. Although I had given him the Fated trait to encourage a heroic end, Theobald survived with a single wound and took over the kingship from his fallen brother Aethelfrith.
We’ll be running this game again at Partizan in Newark on Trent on May 21st 2023 – do come and say hi. You’ll find us in the Lard Zone this time around.
With the rainbow bridge terrain piece complete, on April 22 it was time for the big one: Salute 50! The UK’s biggest miniature wargames show takes place every year at ExCel in Docklands, London; I hadn’t been since 2015 so was very excited about a return to the fiftieth edition of Salute.
We come from the land of ice and snow! The background is by Jon Hodgson Illustration and used with kind permission.
Salute is absolutely huge and it’s easy to be overwhelmed by the space, though this year we had tagged along with the Two Fat Lardies on the edge of the Lard Zone – a collection of TFL/ Reisswitz Press participation games.
Frost Giants march into battle – the big chap on the left is by Reaper Bones.
That said, due to the size of the venue they were still a full spear throw from our table, but we were graced with visits from many of the Lardistas, including Sidney Roundwood himself! (All joking aside, Sid is a terrific chap who influenced me in my Verdun project several years ago and has always been supportive and creative in equal measure).
I was accompanied by two stalwart souls – Pete J and Andy Mac – long term gaming companions who have been separately involved in the Midgard Heroic Battles play testing process. This was fortunate, as I’d had the bright idea of running not just one but two games of Midgard at the show!
Pete, myself and Andy looking bright and breezy before the hordes descend! Photo by Pete Jenkins Photography.
Midgard is a highly versatile game, switching easily between figure sizes and different settings. To showcase this, we were running a 28mm Norse myth battle next to a 15mm Dark Ages one.
28mm Norse myth Midgard on one side of the table……15mm Dark Ages on the other, with another stunning backdrop from Jon Hodgson Illustration and used with kind permission.
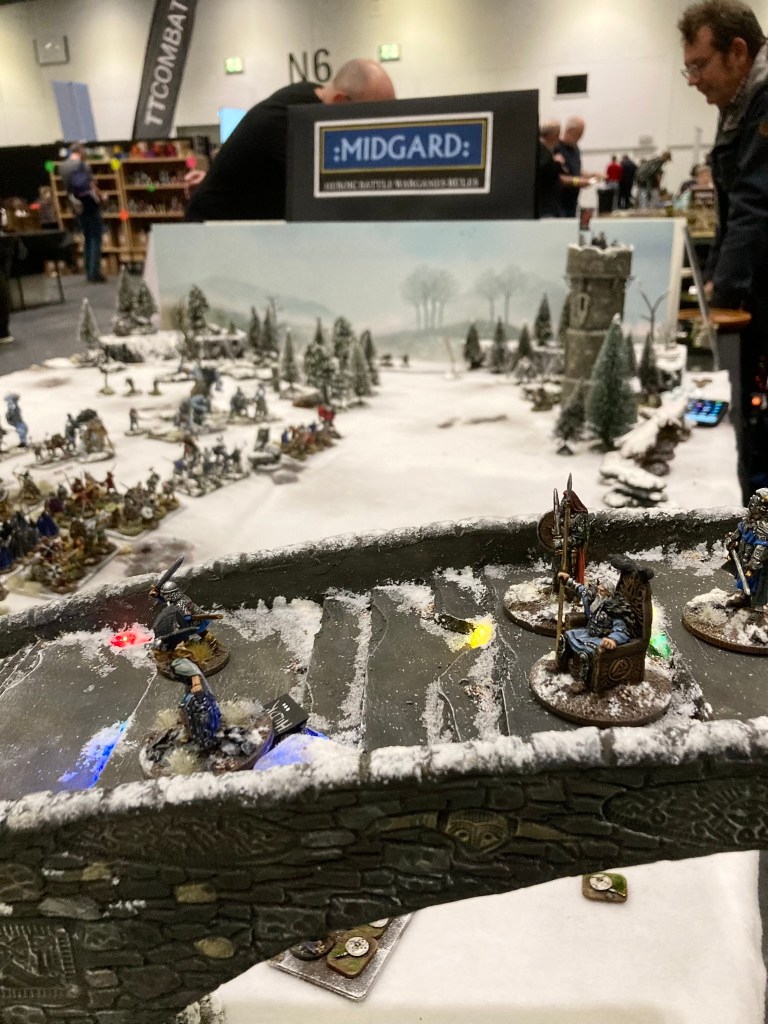
The 28mm game was the chance for the rainbow bridge to get into action: equipped with lights, snow and a Led Zep soundtrack. this scenario saw Loki leading an army of frost giants in an attack on Bifrost, the rainbow bridge of Norse mythology (and Marvel) fame.
Opposing him were, of course, Heimdall, Freya and Thor with a diverse bunch of Asgardian defenders, including Norsemen, shield maidens, dwarfs and alfar. If you’re interested in the figures and terrain, there is a full blog article here with details of what’s what.
I was blown away by the popularity of the games – we spent a very fulfilling day chatting and fielding enquiries about the rules virtually non-stop. Gaming-wise, we settled for running sections of the Norse myth game for passing players to introduce the basic mechanics of the rules.
Heimdall fought a gripping single combat against Bergelmir the Frost Giant, with both wounding each other but surviving; unfortunately for Heimdall, he had used up all his Mighty Deeds and lost his final Stamina point after being crushed as his Dwarf unit was pushed back by the trolls. Ouch!
The Frost Giants crushed all before them and, despite Freya taking down Bergelmir, she found herself on the losing end of a melee before being sent packing to Valhalla.
The 15mm Battle of Degsastan game proved unexpectedly popular with both Pete and Andy doing sterling work running games for interested players during the day. We were graced with a visit from Dan Mersey who was pleased to see his 18mm Wiglaf Miniatures in action and to hear Immigrant Song blasting from the rainbow bridge!
15/18mm Battle of Degsastan – Dal Riadans on the left (Forged in Battle minis), Northumbrians on the right (Wiglaf minis)Mersey and Morris! Thanks for dropping by.
Overall, a fulfilling if exhausting day out, and such a pleasure to meet so many folk excited for the release of the rules. Editing, artwork, photography and ruler/ token design are all underway, but there is no release date yet. Keep following us on social media and we’ll let you know as soon as there is news!
Massive thanks to Pete J and Andy Mac for their companionship and assistance.
This year’s game for Salute 50 at Excel in London (22.4.23) is going to be a double-header to promote my forthcoming Midgard Heroic Battles rules, currently in editing and pre-production with Reisswitz Press. As Midgard can be played in multiple settings with any scale miniatures, we’re going to have an 15mm Dark Ages (early medieval) historical game next to a 28mm Norse myth one.
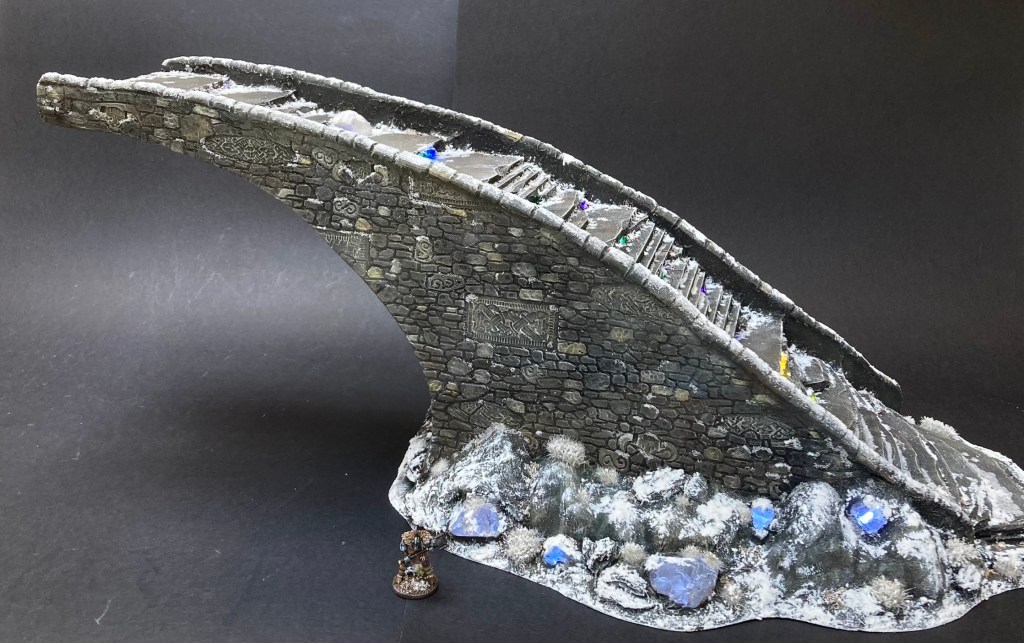
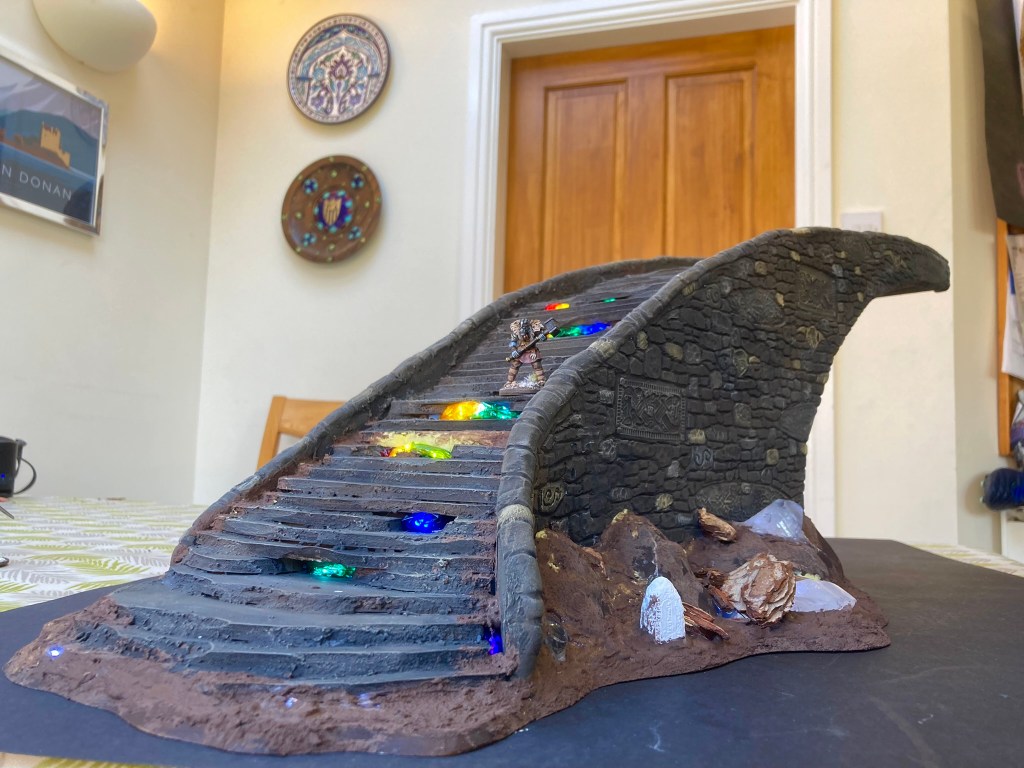
The Norse myth game is entitled ‘Against the Frost Giants’ and depicts an attempt by Loki and his minions to storm Bifrost, the rainbow bridge of Norse mythology that connects Midgard to Asgard.
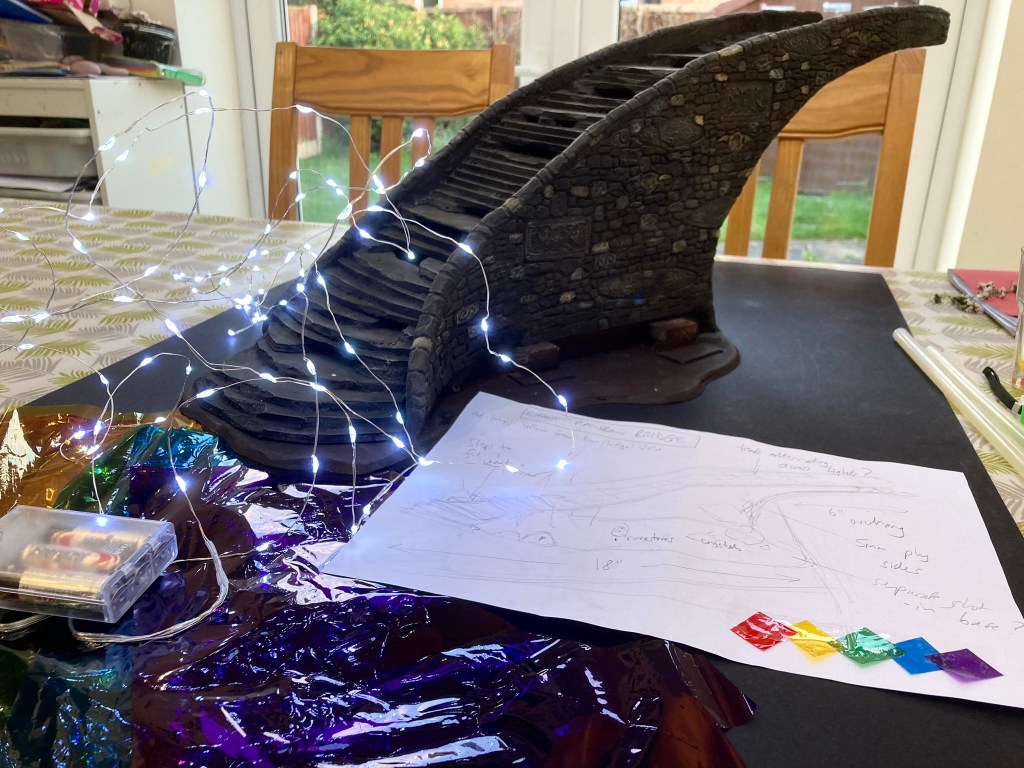
Obviously, pretty much everyone’s seen the Marvel films, in which the rainbow bridge looks something like multiple strands of optic fibre. I decided that I wanted something a little more down to earth, but with some added lighting to suggest its magical qualities.
Frost Giant by Reaper Bones, Troll by Lucid Eye Publications from the Red Book of the Elf King range
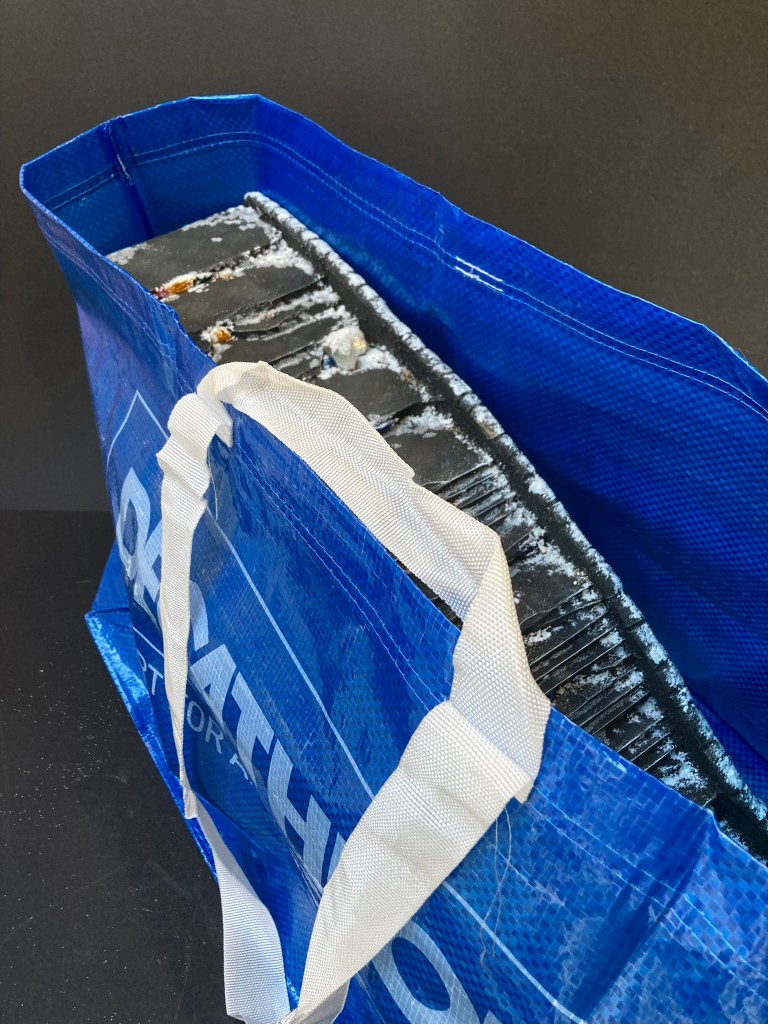
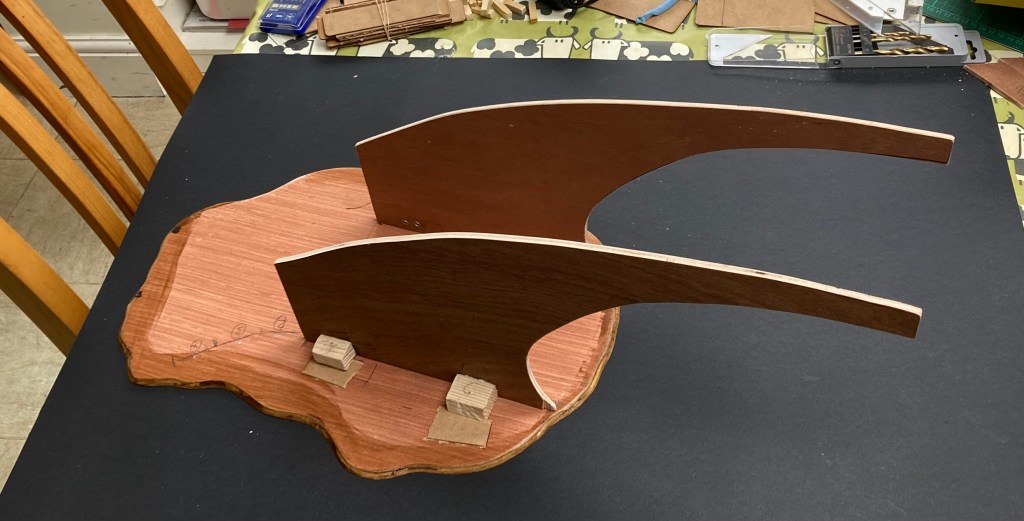
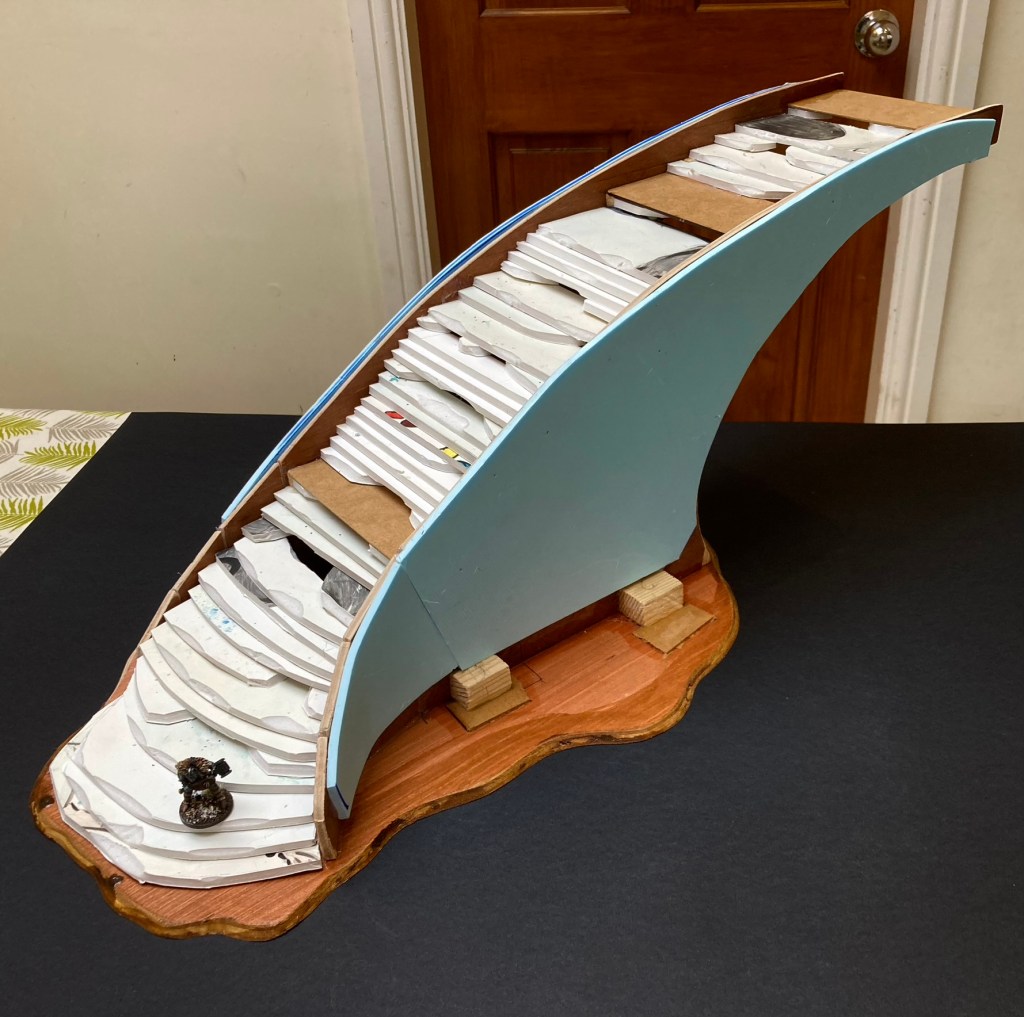
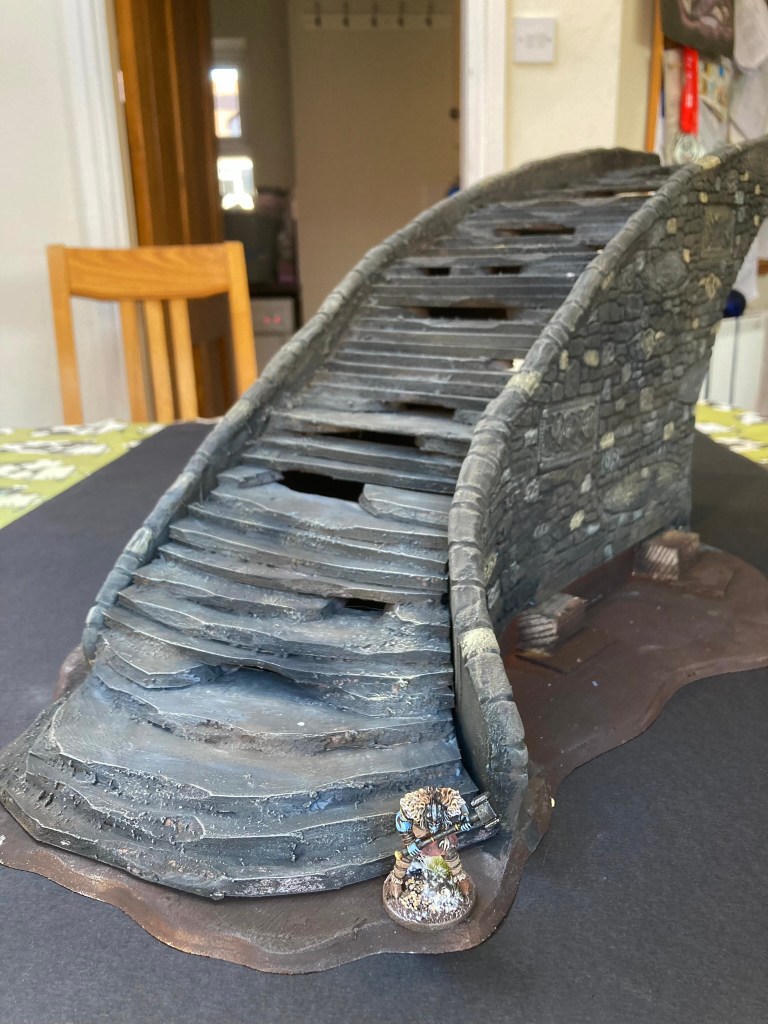
Practicality was also a consideration (what! I hear you cry) – as the battle was going to be fought around the foot of the bridge – rather than across it – so it would need to be easily transportable. This led me to sketch up a design with a definite arch but not one that would extend 4 feet into the air, fun as that might have been! The final design was sized to be carried in a large shopping bag.
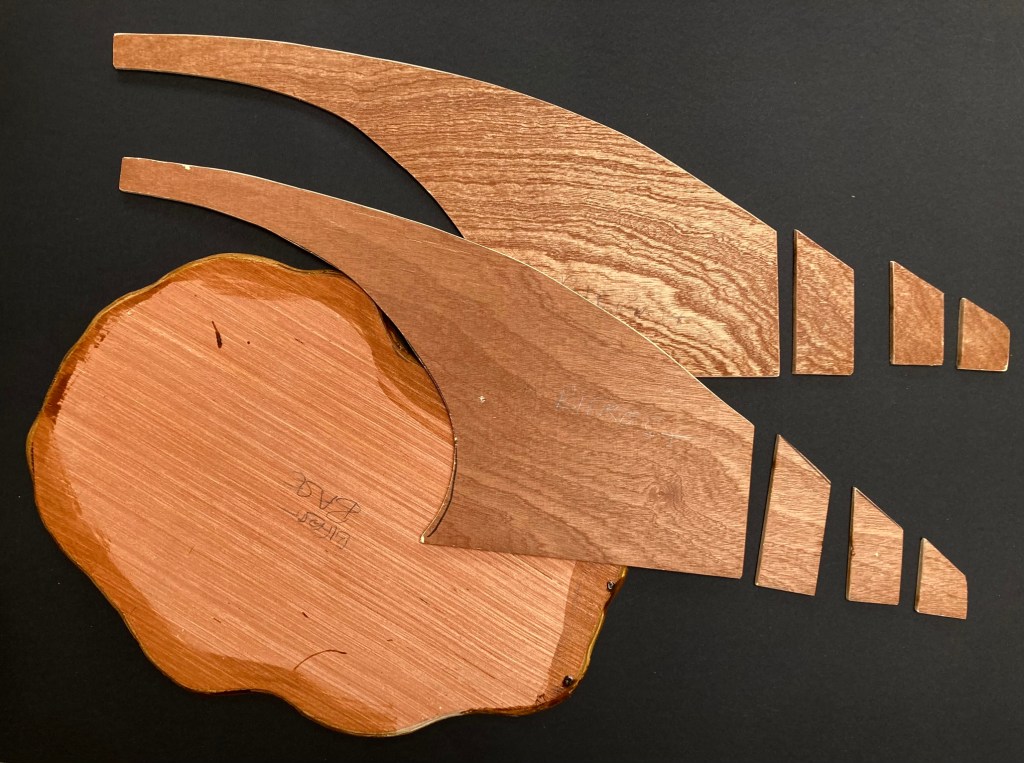
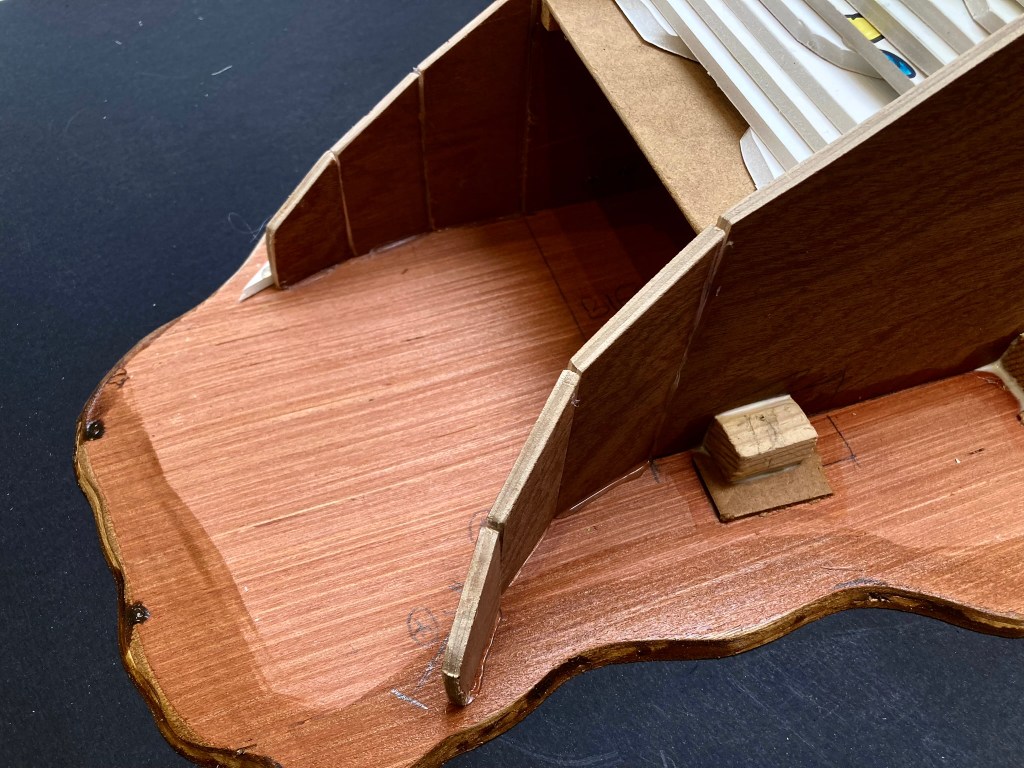
Once I was happy with the shape of the piece, I put together cardboard templates and then cut the three main pieces out of 5mm plywood using an electric jigsaw. The two bridge sides were then split vertically where they join the board in order to be able to create a curved base.
In progress…5mm plywood cut to shape
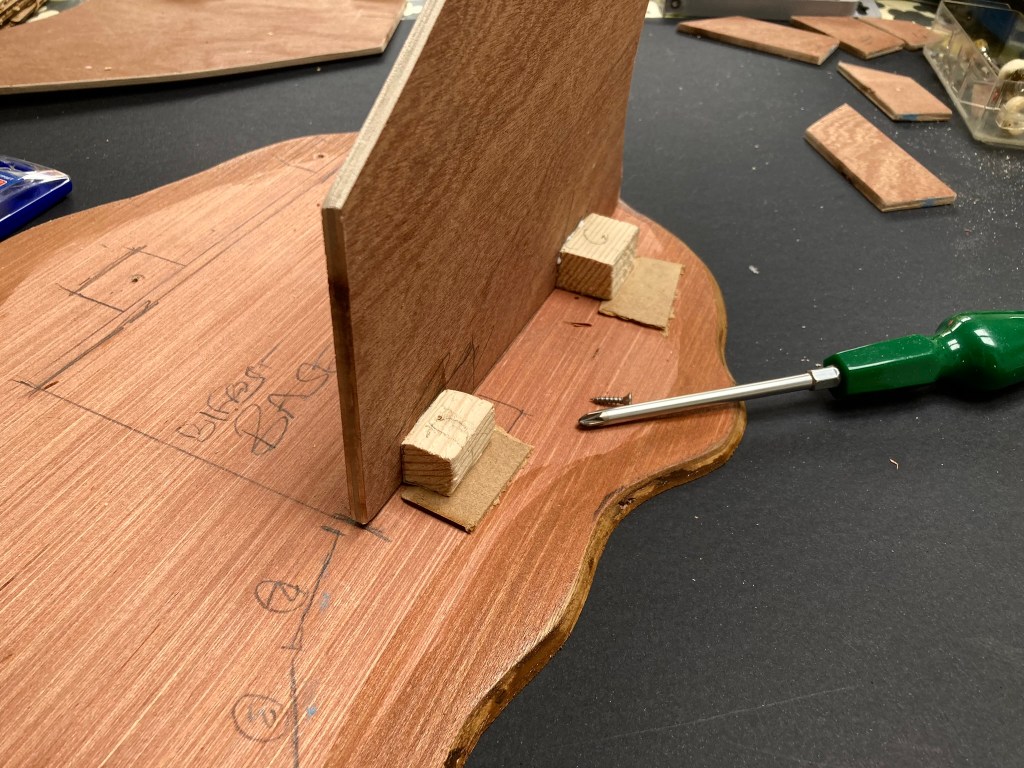
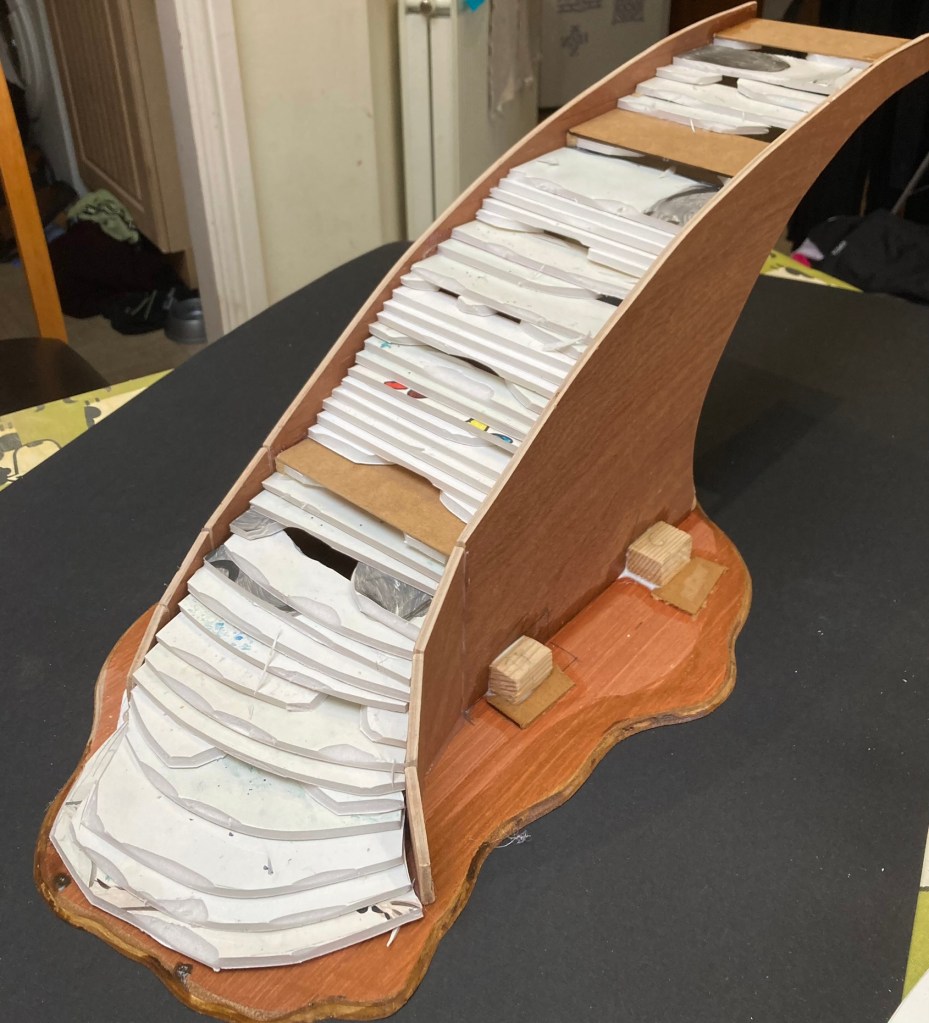
The base was painted with varnish to discourage warping, then I used my rudimentary carpentry skills to assemble the bridge uprights with screws and wood glue. While I could just have glued the whole thing together, I would hate for it to fall apart in transit at some point this year!
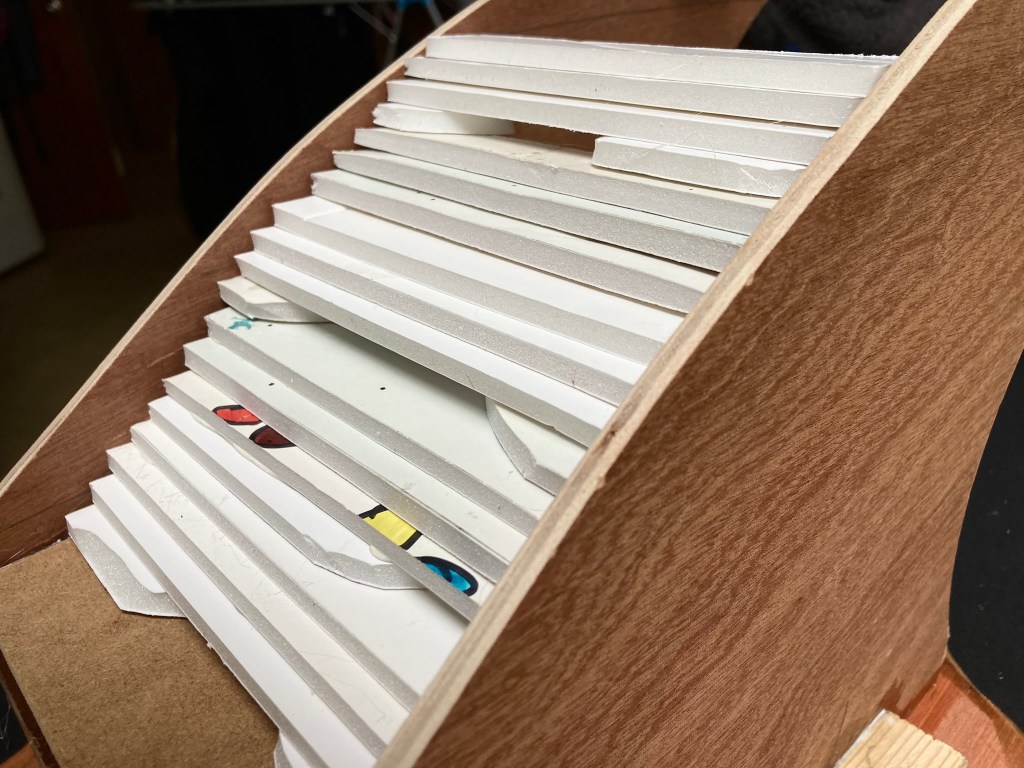
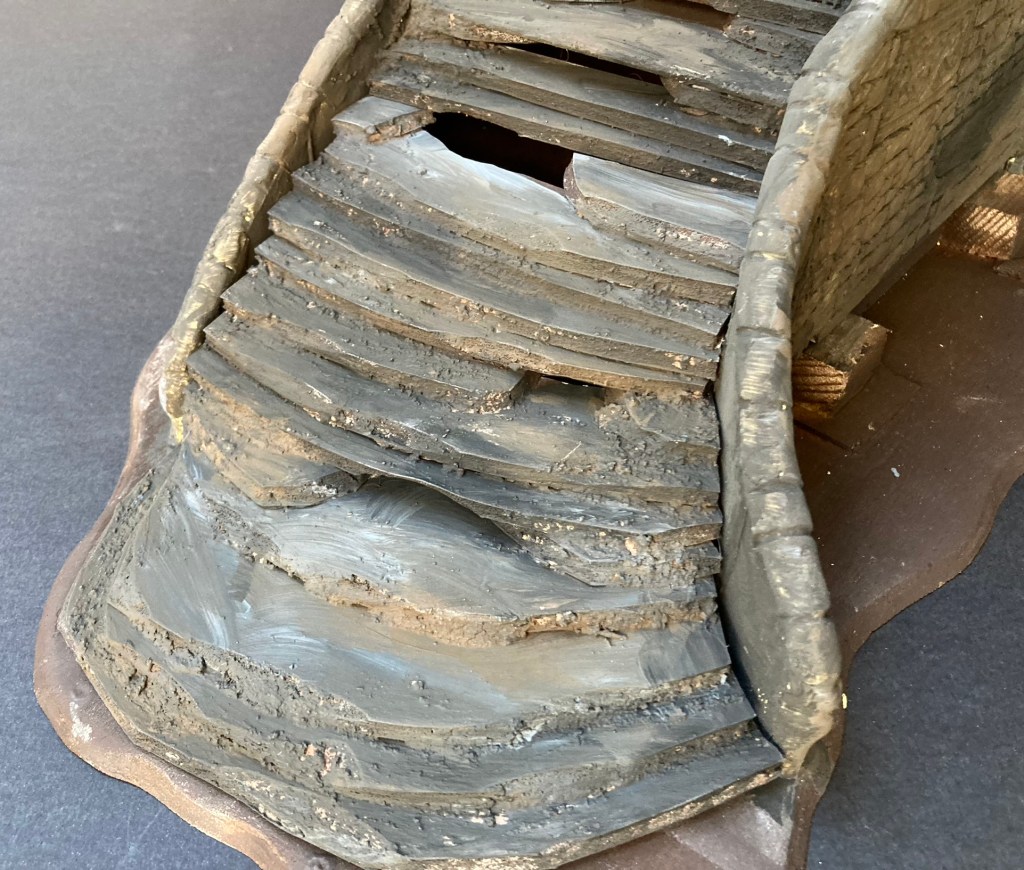
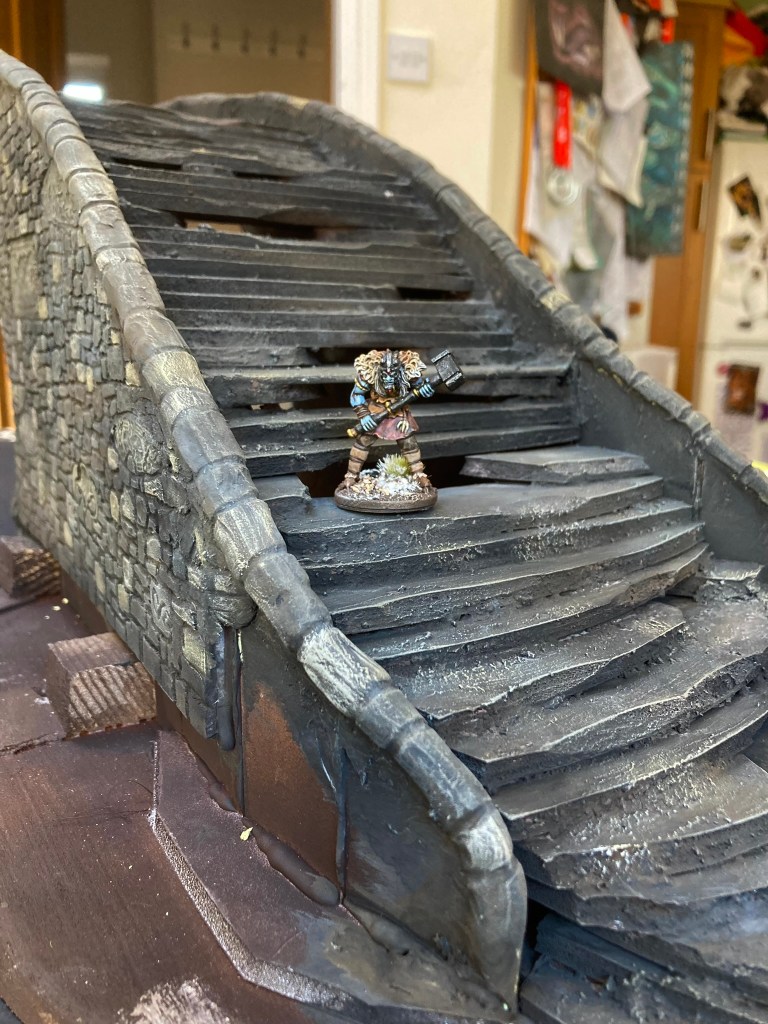
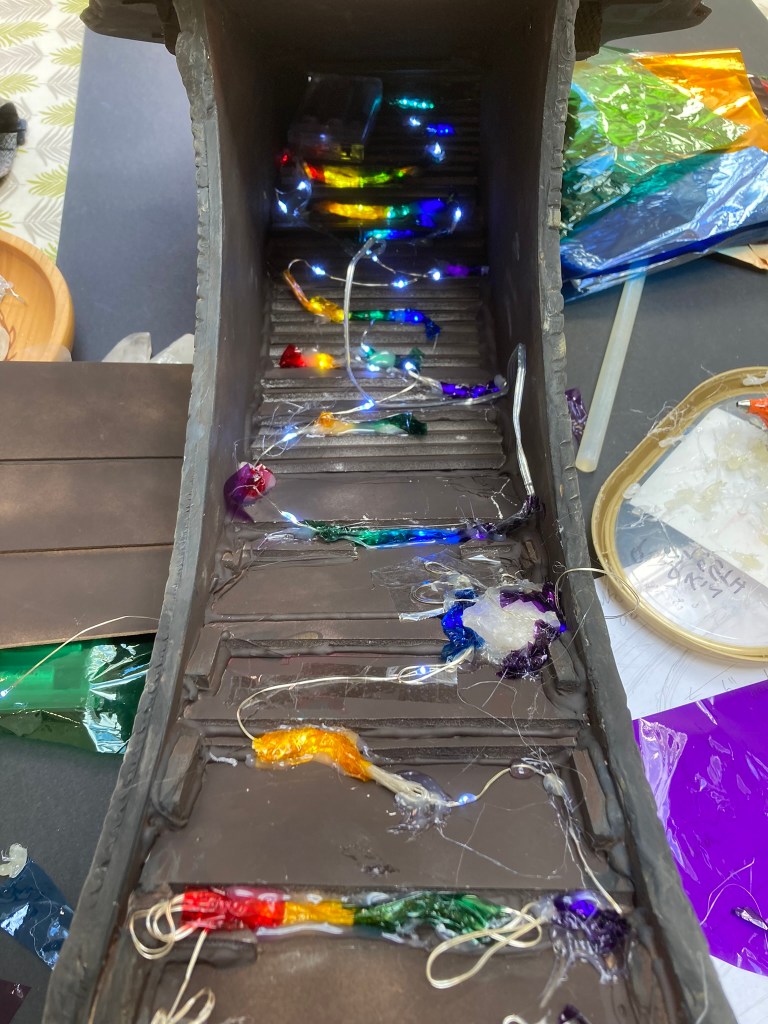
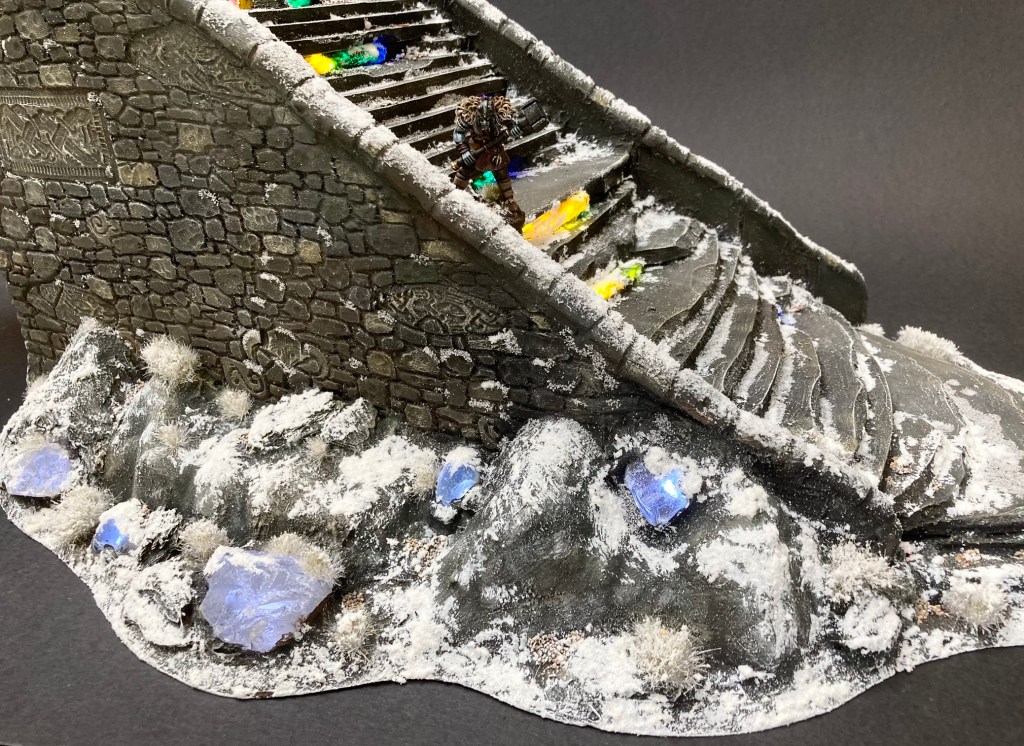
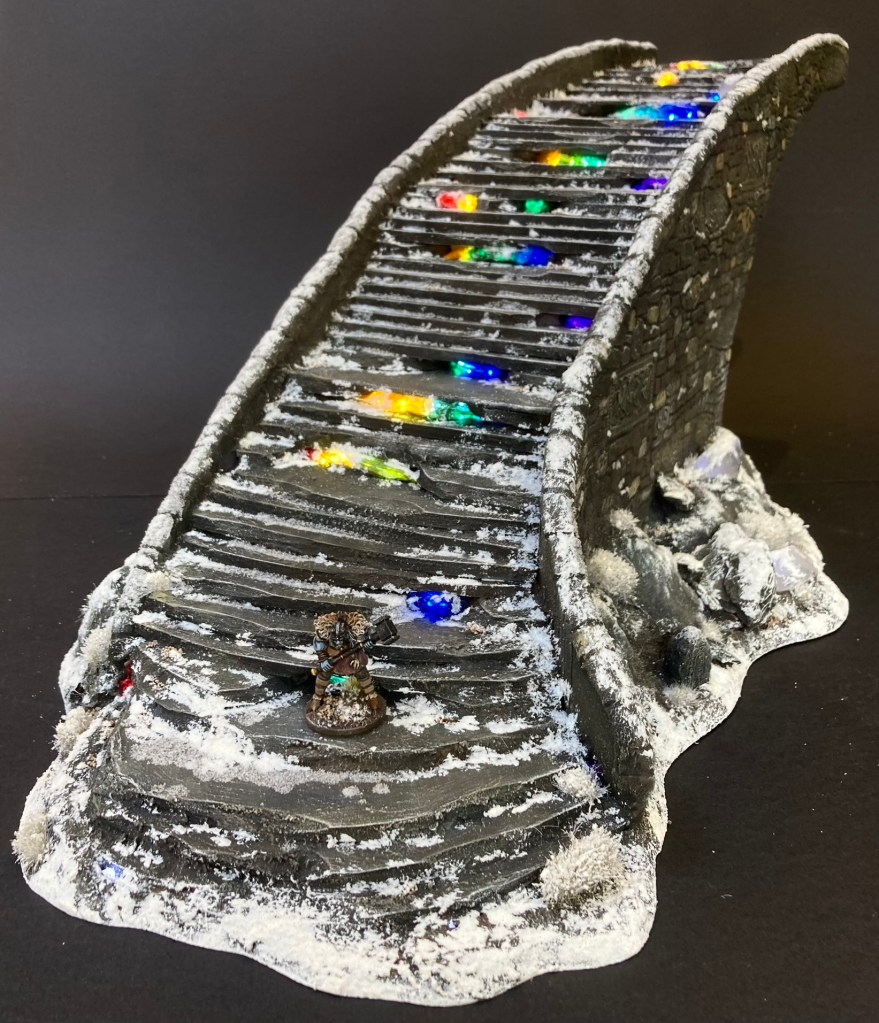
The uprights were deliberately positioned 13cm apart – this meant that, on some sections, I could place a wide step that would fit a 12cm wide Midgard unit base or a Hero model. The bulk of the steps were filled in with scraps of 5mm foam board to create an irregular staircase with some gaps in between to accommodate the lights.
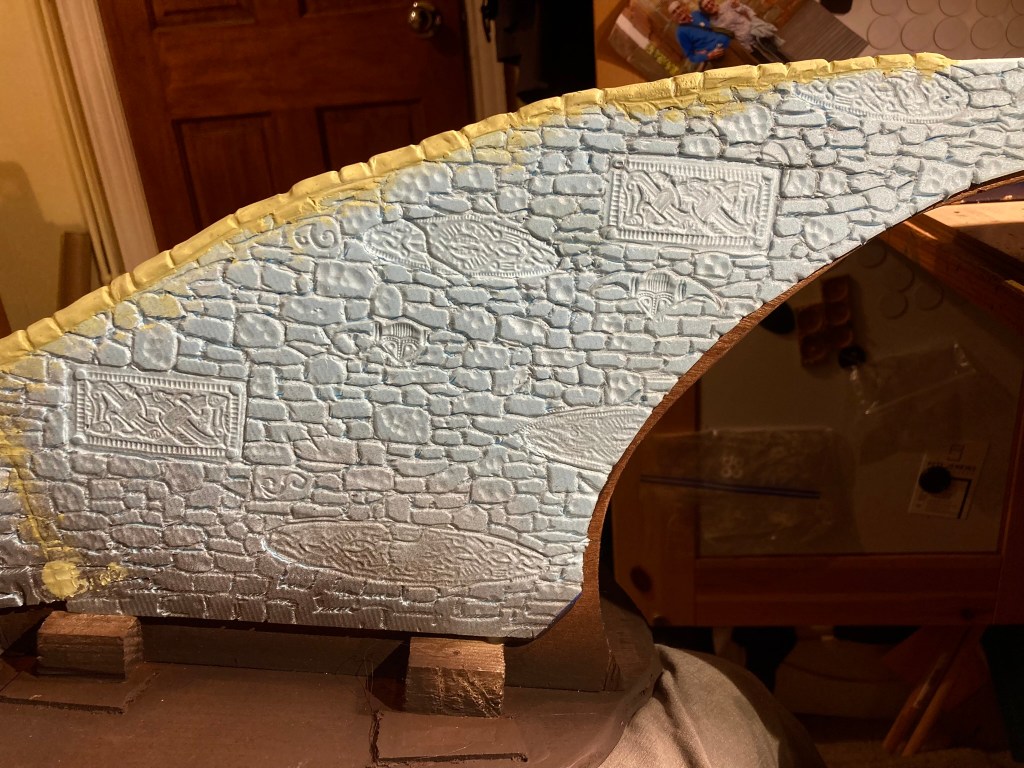
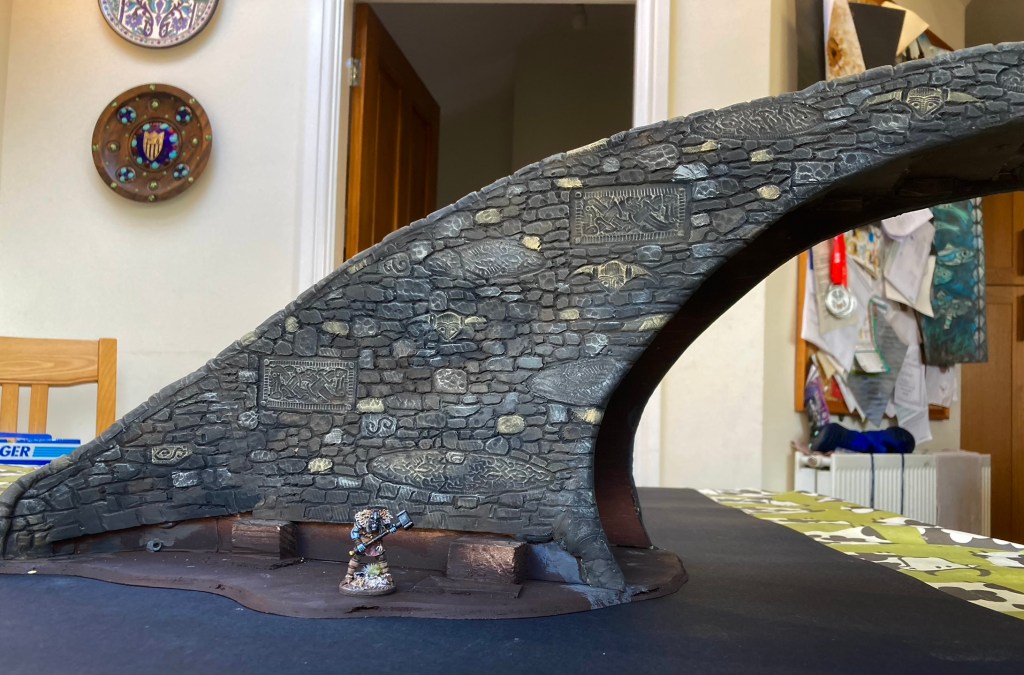
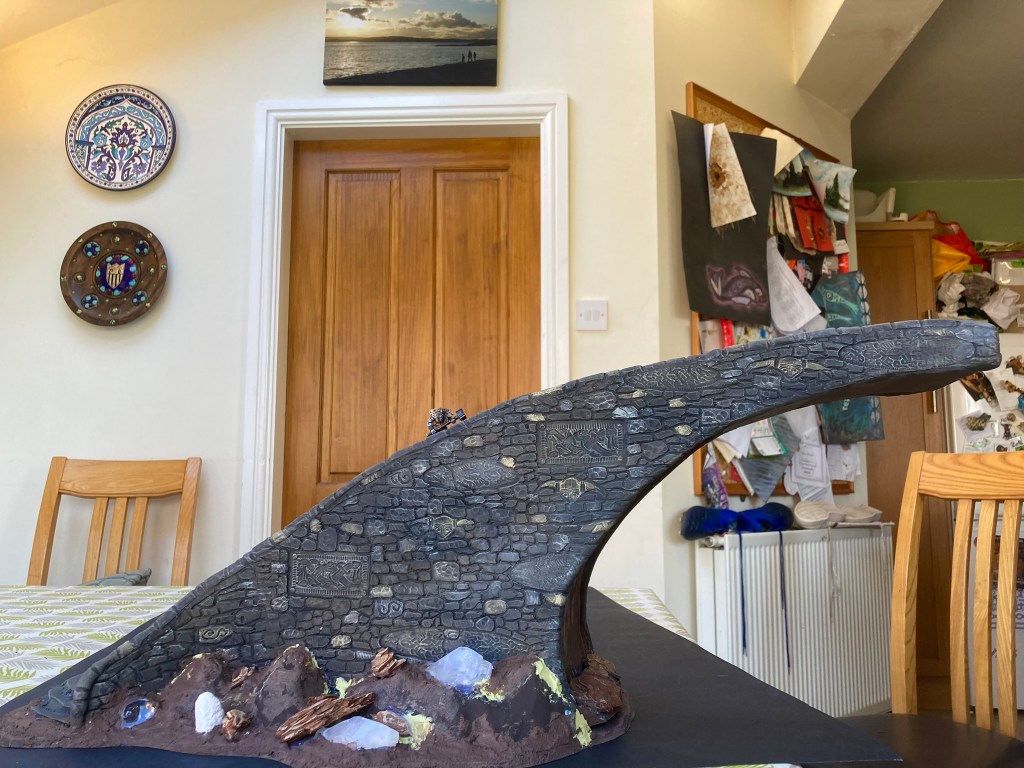
I planned to texture the bridge sides using the same techniques from my Elf Tower build, so glued a couple of sheets of 5mm styrofoam to the wooden sides. This stuff is expensive but well worth it for the effect I was after.
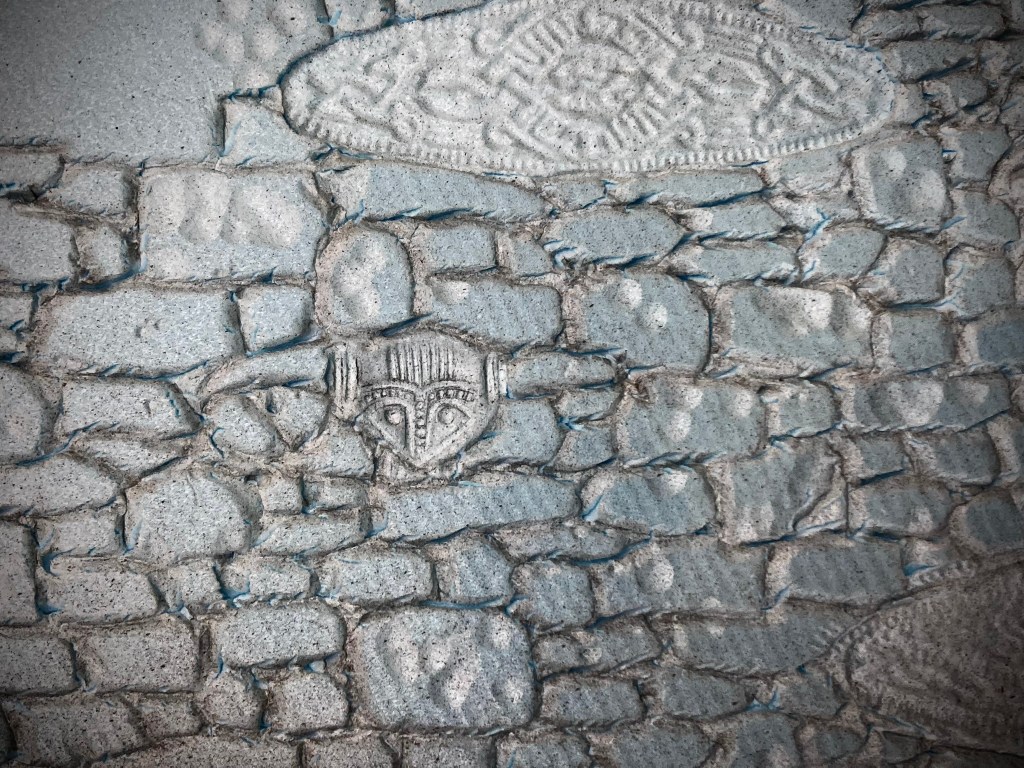
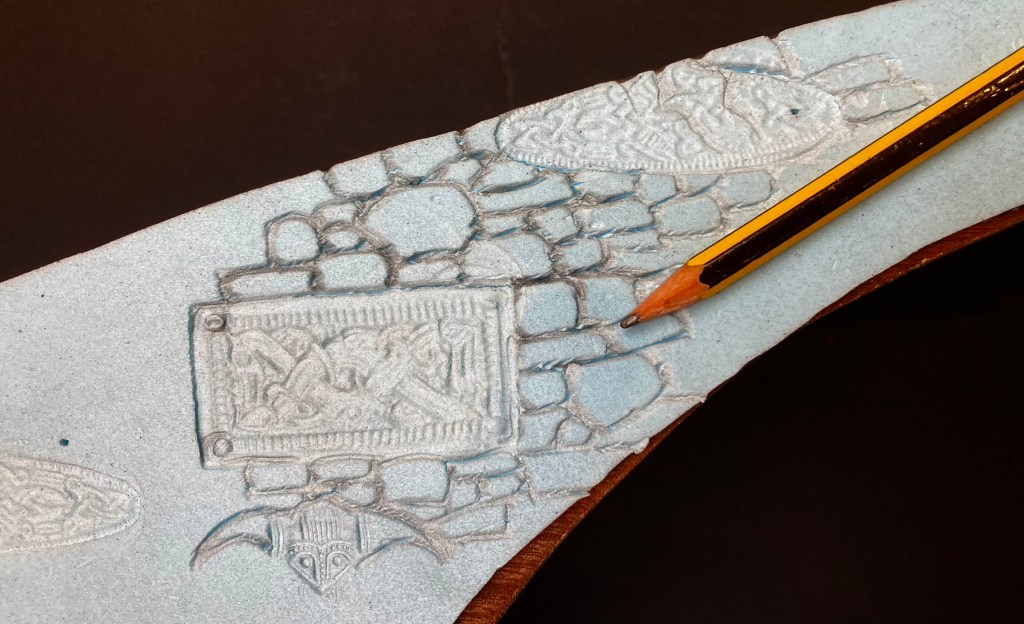
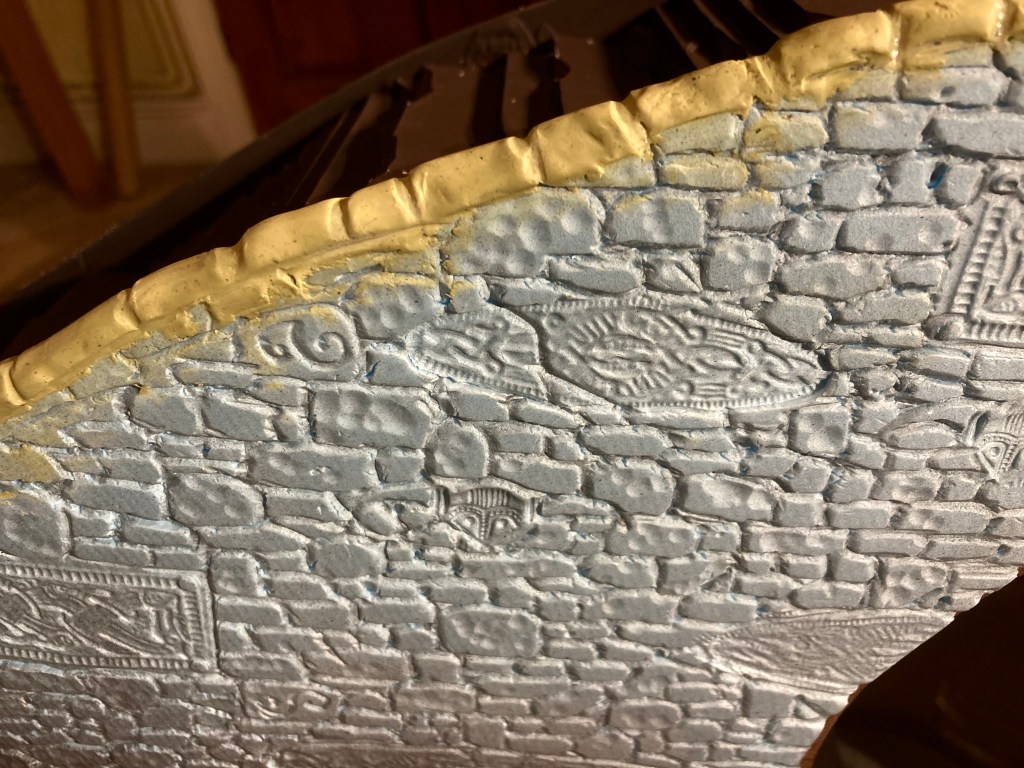
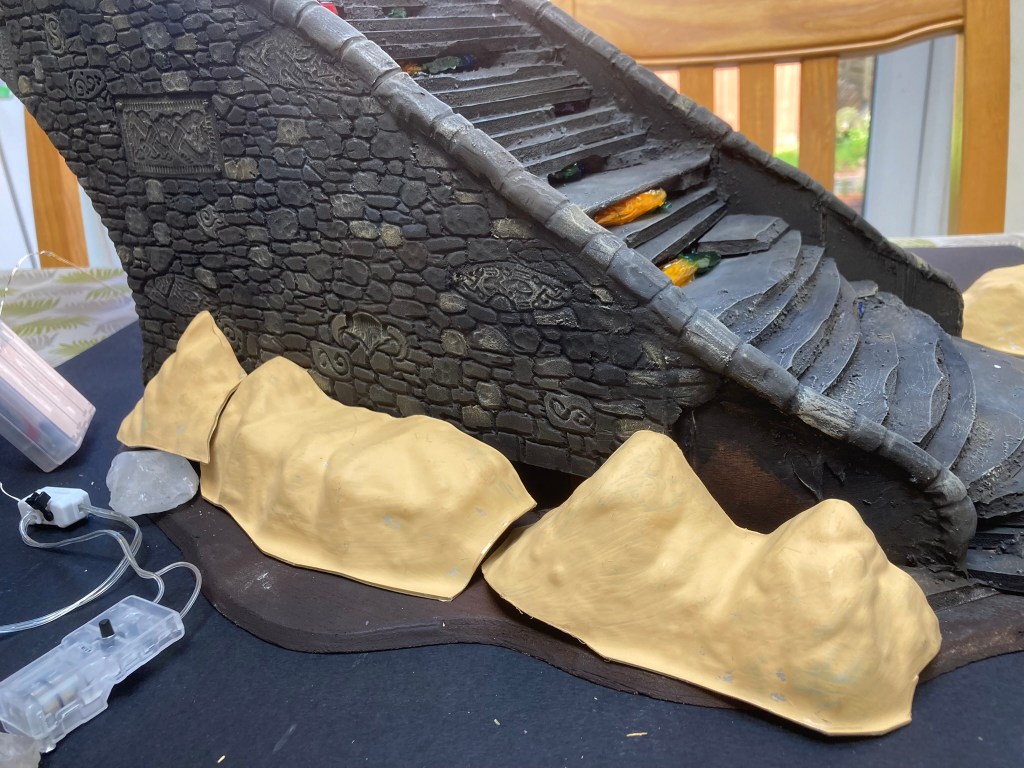
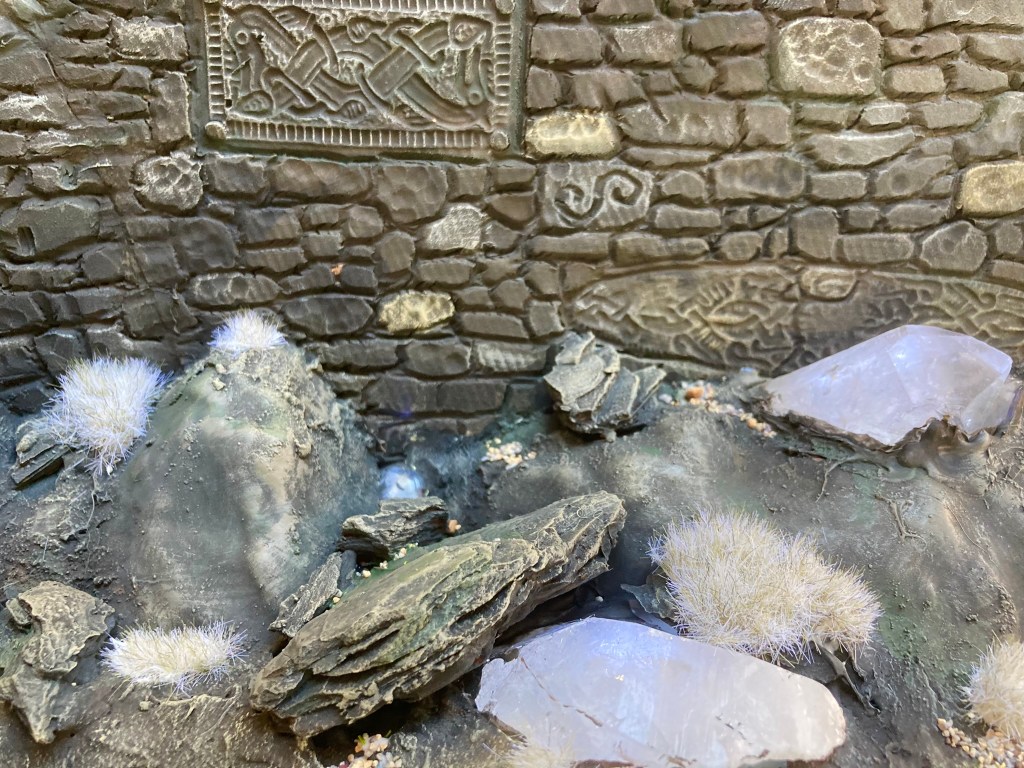
With the glue dry, it was time to create the stonework design. Using some Viking/ Saxon metalwork from the loft, I pressed these into the foam to suggest large blocks that had been placed by gods with the areas around filled in with smaller stones. Additional texture was added with a pencil. Once completed, I modelled the edges of the stonework using standard yellow/green Milliput epoxy putty. I could have used more foam, but wanted the edges to be able to resist knocks in transit, so Milliput was the correct tool for the job.
With the bridge walls complete, it was time for an initial coat of paint. A mix of sand, filler and PVA glue helped to blend the steps together, which was followed up by a coat of craft acrylic applied in patches (Deco Art Acrylics, using a blend of Raw Umber, Slate Grey and Black).
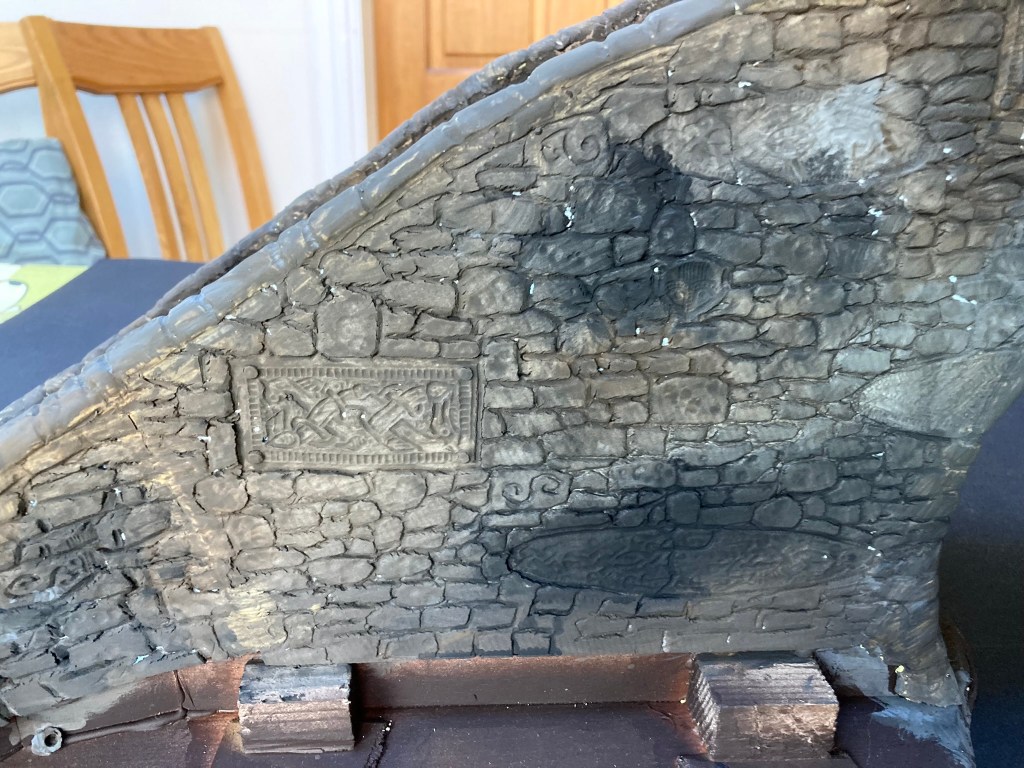
Once dry, the whole thing was given a black wash and then lightly dry brushed with lighter versions the original acrylics. Individual stones were picked out in different shades of brown, grey and khaki.
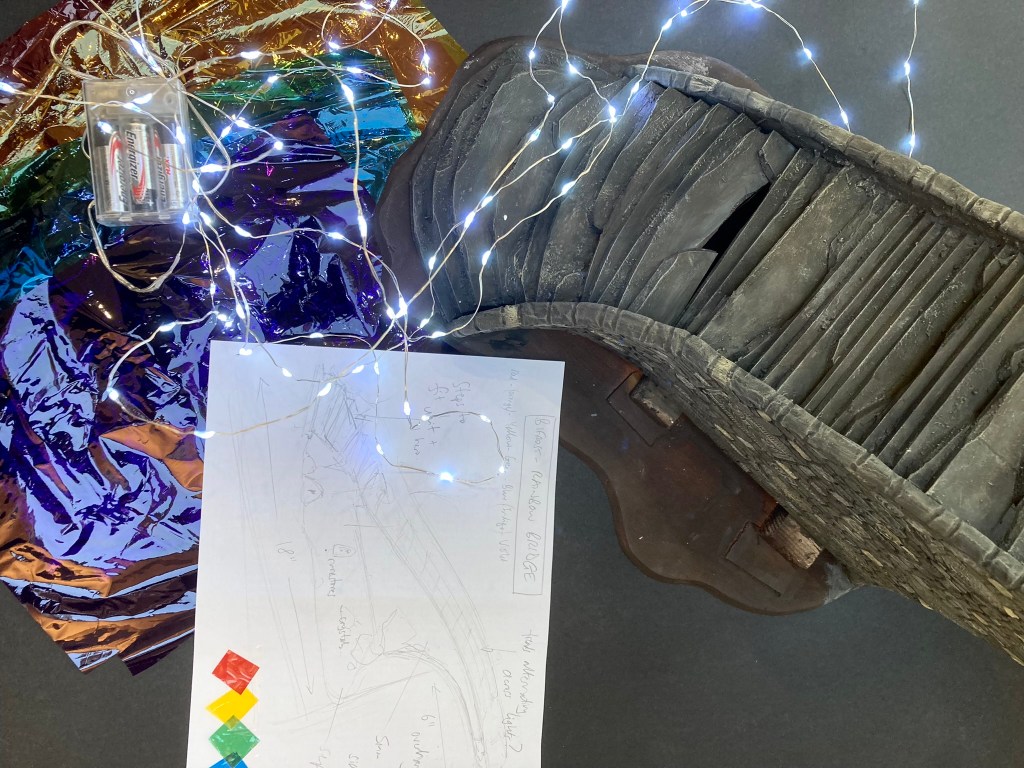
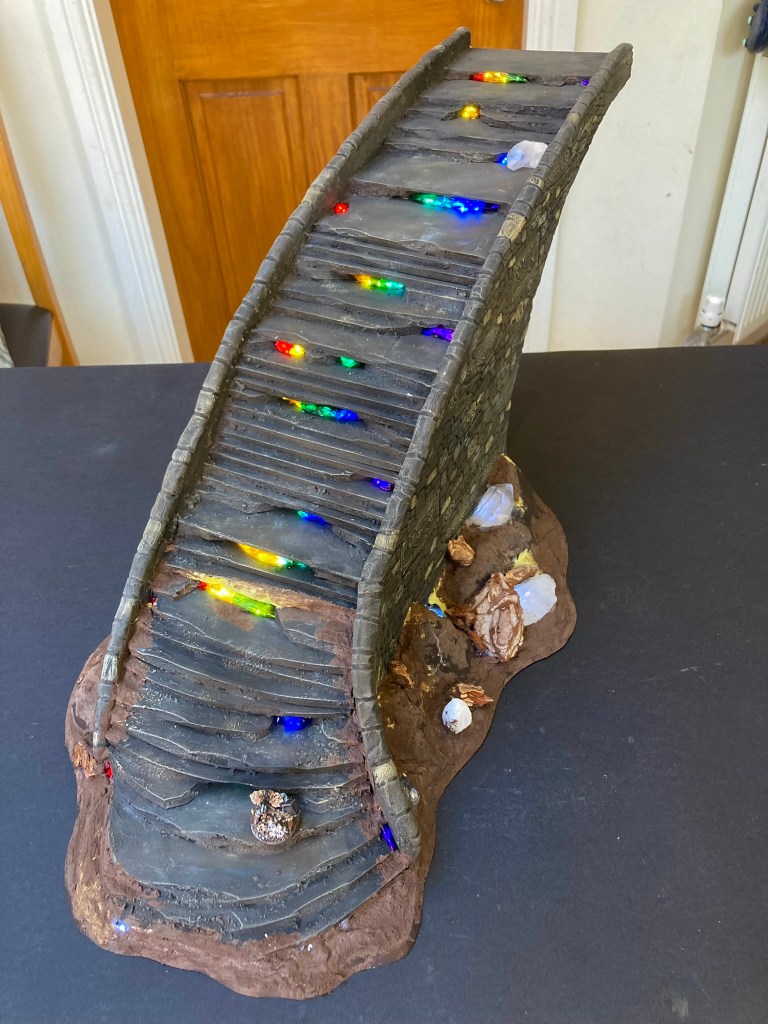
Now the fun really started – time for the lights! I had initially ordered some programmable LEDs from eBay, but these turned out to be incredibly bright and a bit too disco for what I was after. Instead I bought a couple of sets of simple white LEDs and found some coloured cellophane in the bits draw – these would form the basis of my rainbow scheme.
Today on Blue Peter, you will need a set of LED Christmas lights and some coloured plastic…
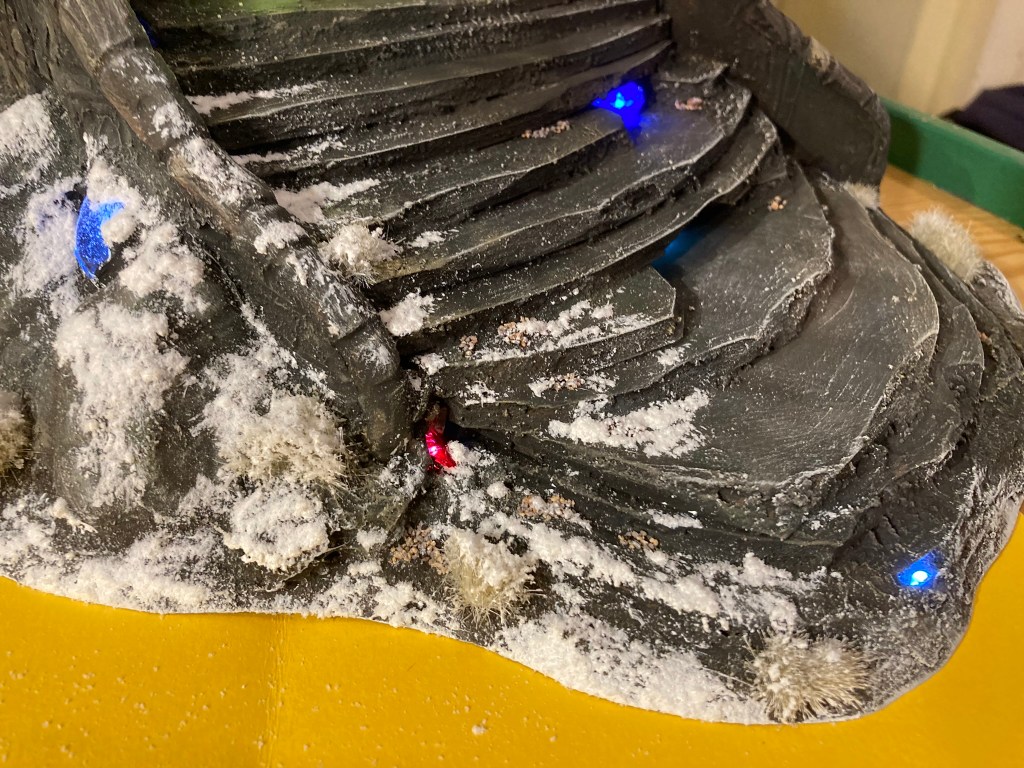
I’d left the inside of the bridge hollow with a pull-out section to allow me to hide the lighting circuit – bundles of LEDs were wrapped up together in sections of cellophane and then pushed into the gaps between the steps. Once I was happy with the lights, I then glued, taped and pinned everything into position.
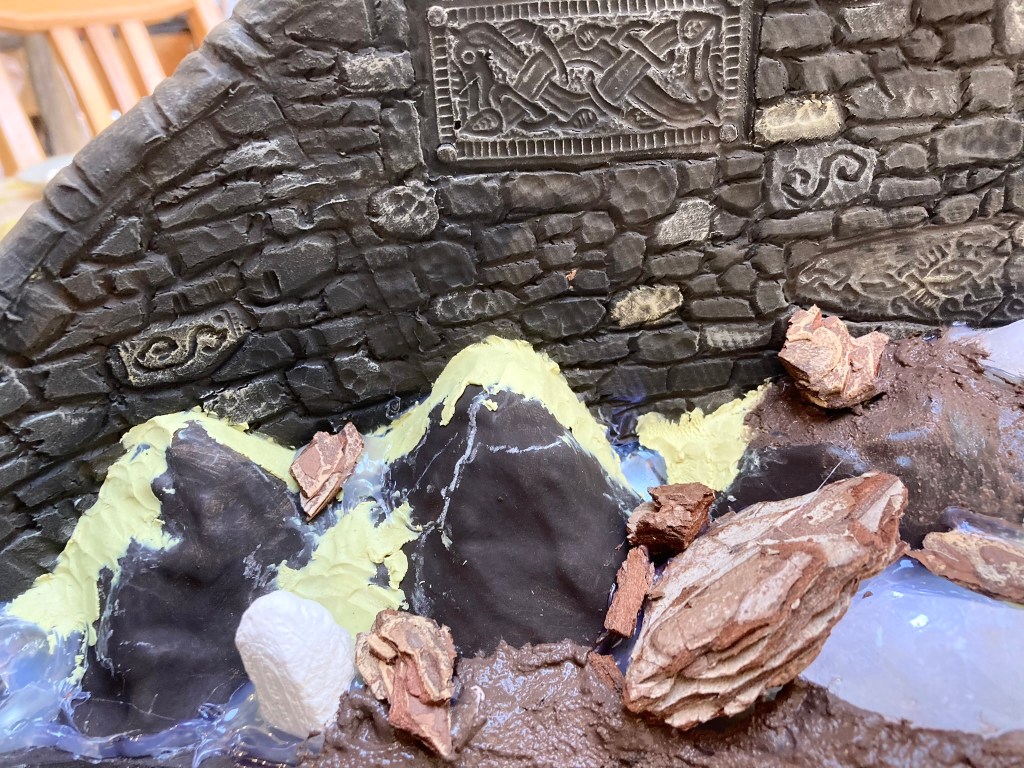
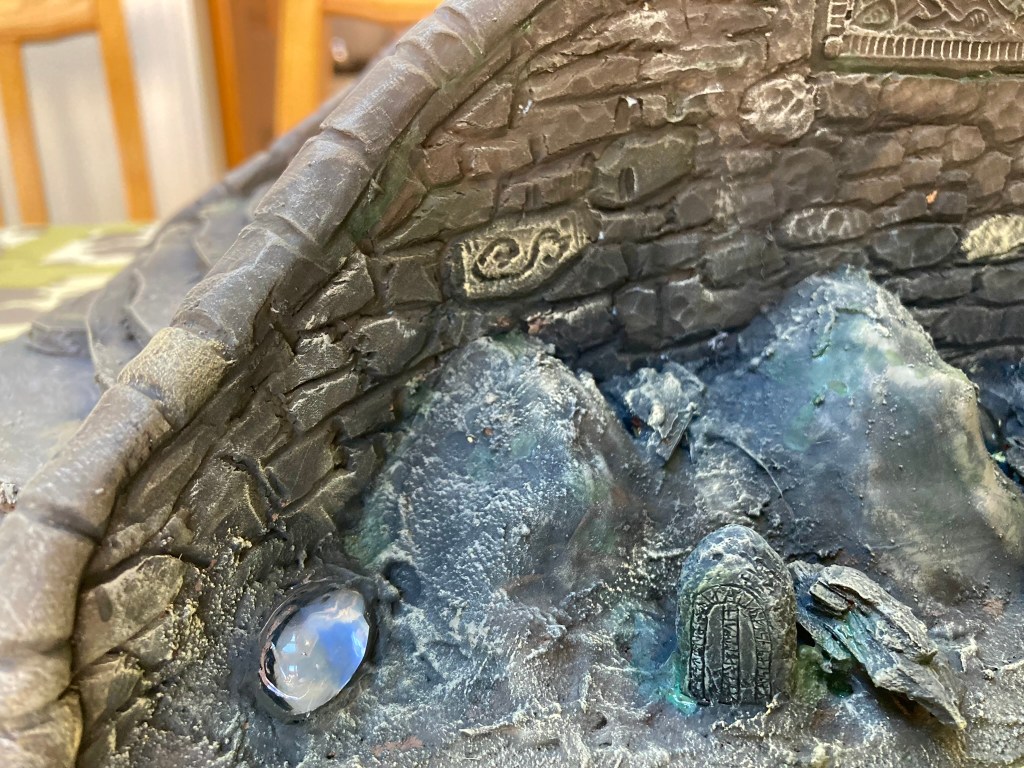
An entire set of 100 LEDs was used to light the staircase, with another set round the outside of the bridge. I built up a set of rocks using various vac-formed left overs from a previous project, then modelled in glass pebbles and pieces of quartz crystal to give the impression of the area being generally enchanted. Hot glue and Milliput were again used to hold everything together and hide the cracks!
Vac-formed rocks are cut to shape to create a rocky baseRock texture going into position with a resin rune stone (left), pine bark chippings as rocks and a lit-up quartz crystal (right). Everything is blended in with a mix of brown paint, filler and sand.
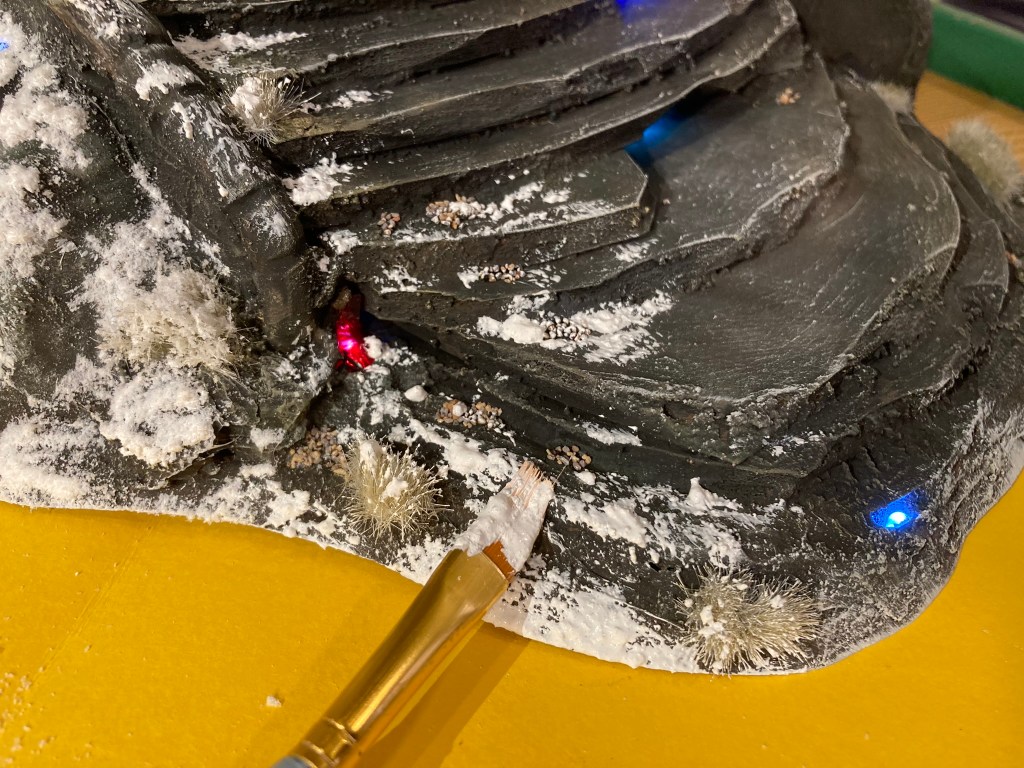
The final steps involved tidying up the groundwork and adding some grass tufts – I used the Gamers Grass winter ones.
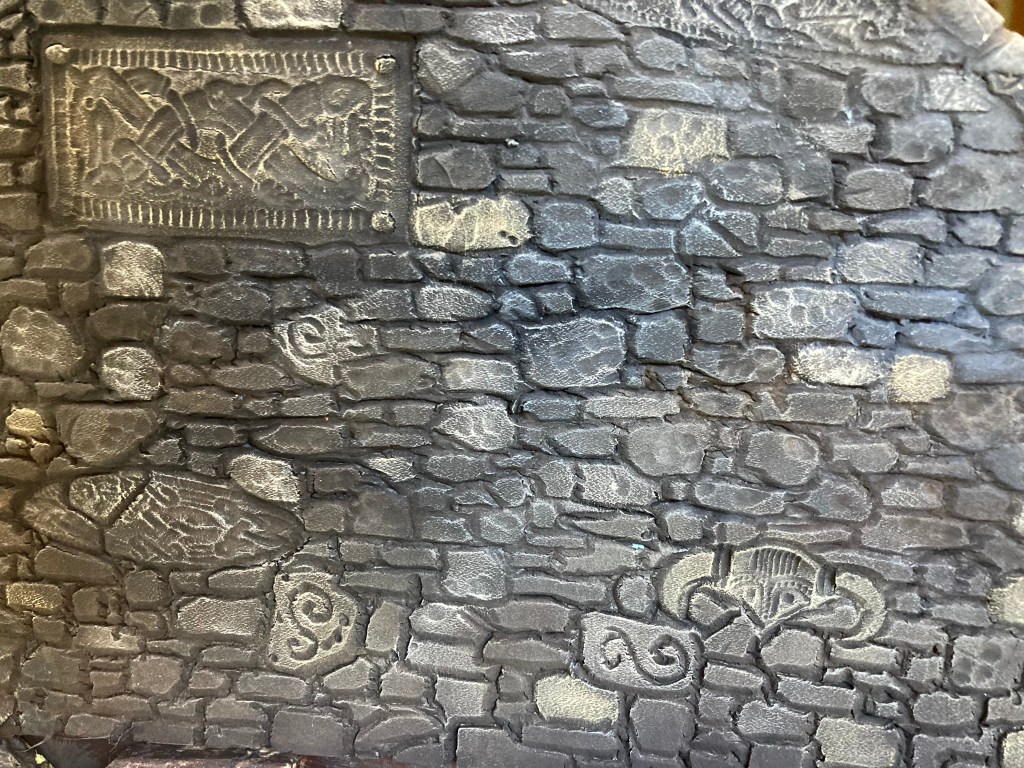
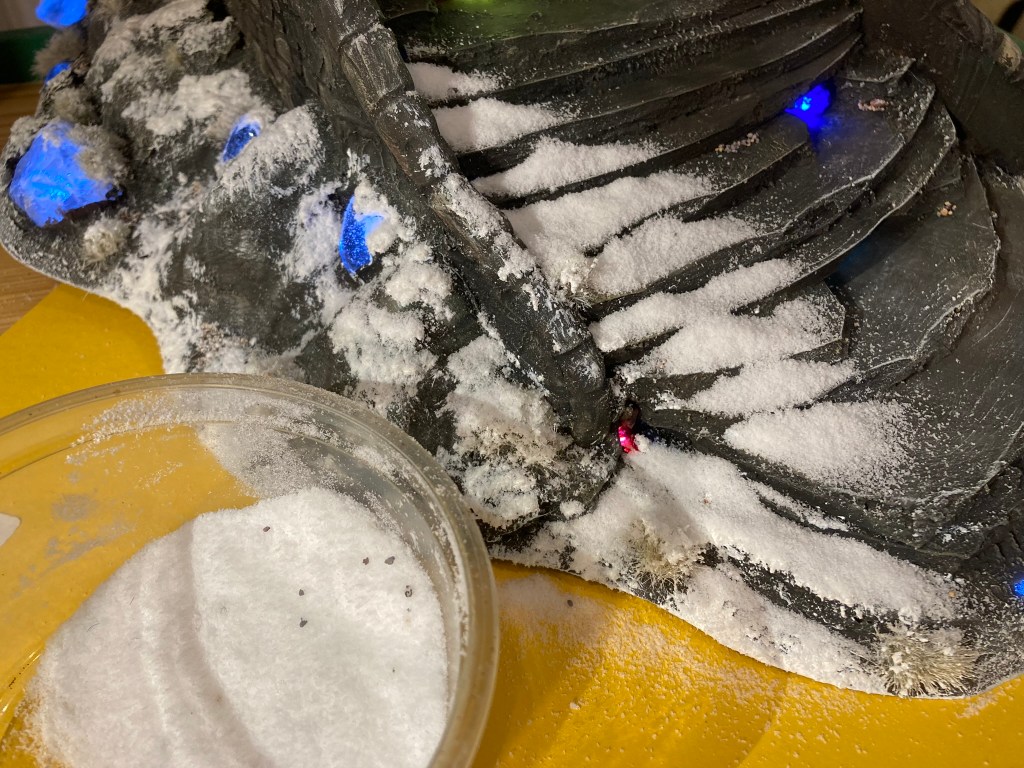
It all looked pretty good at this point, but now it was time to add the snow (the bridge is going to be used on a snowy table so I needed it to blend in). This was my usual mix of white acrylic paint, PVA glue and Woodland Scenics snow flock – I added extra paint as the flock comes out translucent if you apply it with just glue. The pictures show the three stages – apply snow mix with a brush, scatter extra snow flock on top, then shake off.
An additional frosty effect was added to areas of the stonework using a tiny amount of PVA and some snow flock.
The Lucid Eye troll poses on the bridge -Heimdall is clearly off duty!
Stairway to Heaven!
And finally, it was all done! I can’t wait to see what it looks like on the gaming table at Salute 50. If you’re at the show, you can find us in the Lard Zone at the far end of the hall (marked in red on this floor plan).
Having played a couple of games with other people’s figures, it was time to get my Xenos Rampant space poilus into their first scrap. We’ve started a campaign at the club fighting over the planet Len-Ton and its multitudinous moons.
The first mission for my Vingtième République would be a race against Je-Rem-Ee’s Orks to capture the governor of Central Len-Ton . Fortunately for both sides, the governor had become stranded in the jungle without his bodyguards.
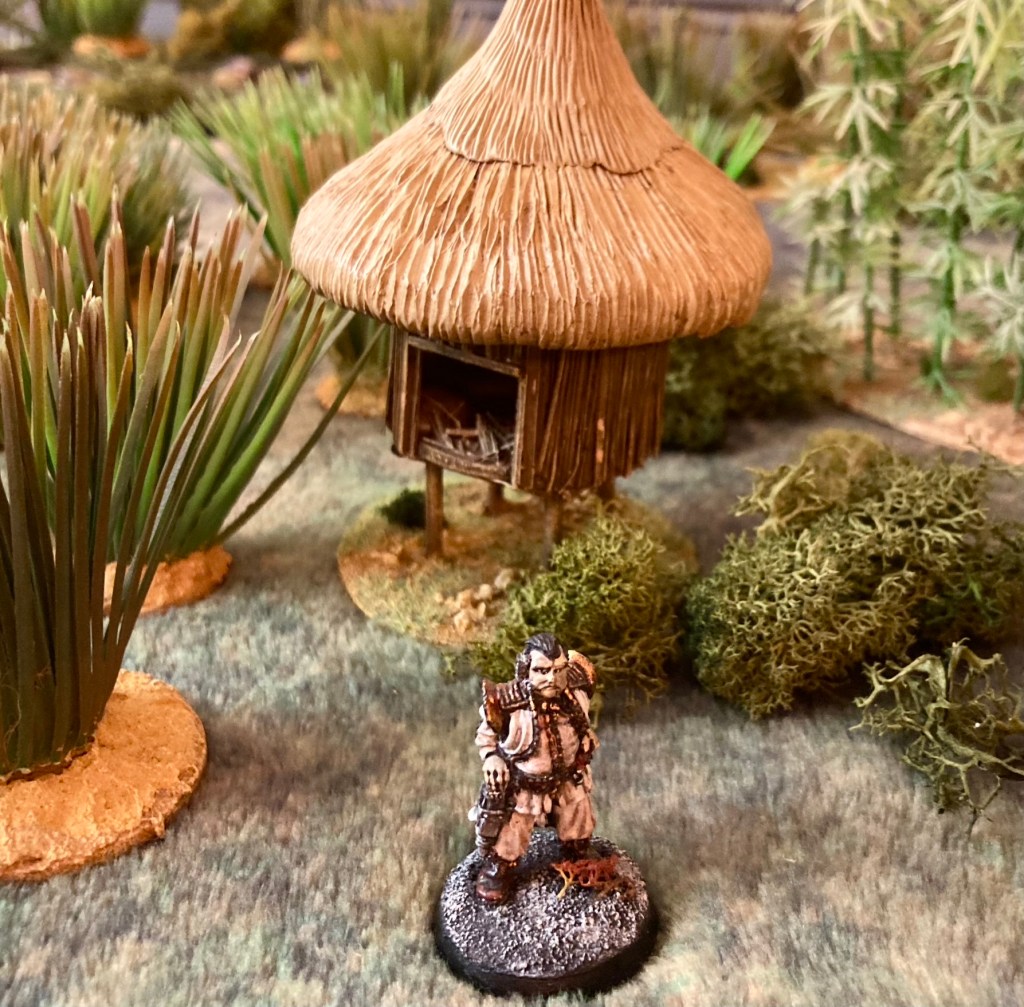
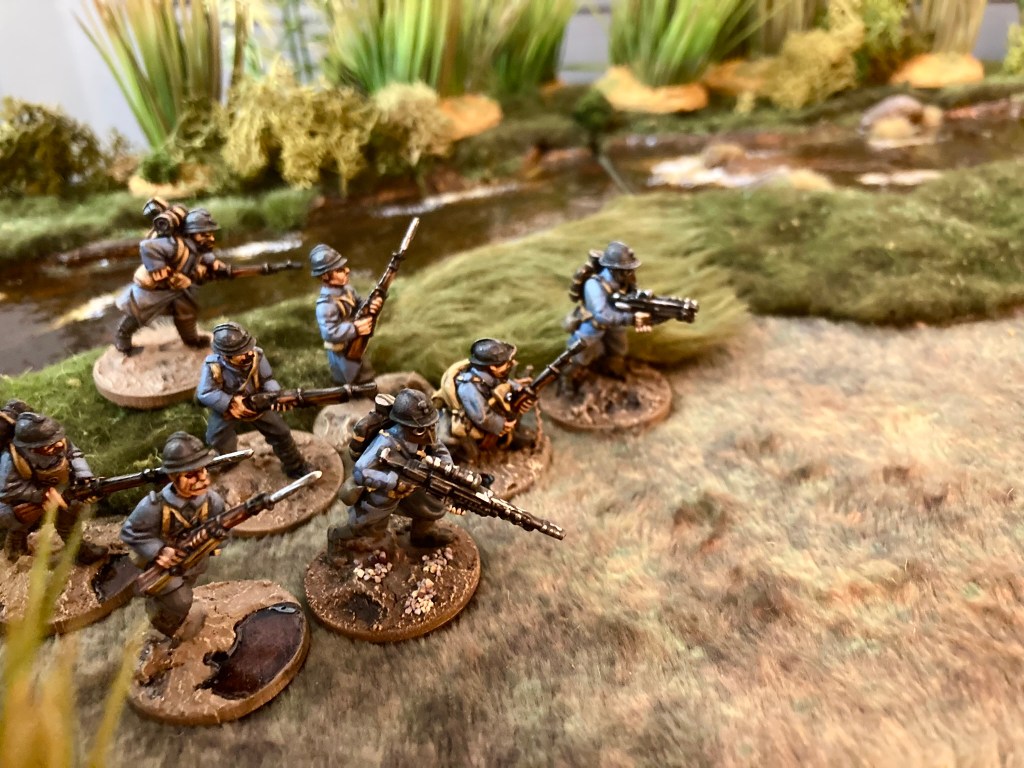
Capitaine Renaud Duscard and his Poilus (Light Infantry with Heavy Weapons) prepare to head into the jungles of Central Len-Ton. You can see more about this force and the minis used in my previous blog post hereThe governor of Leo-Ton Central waiting for a ride. I think this is a very old Metal Magic casting.
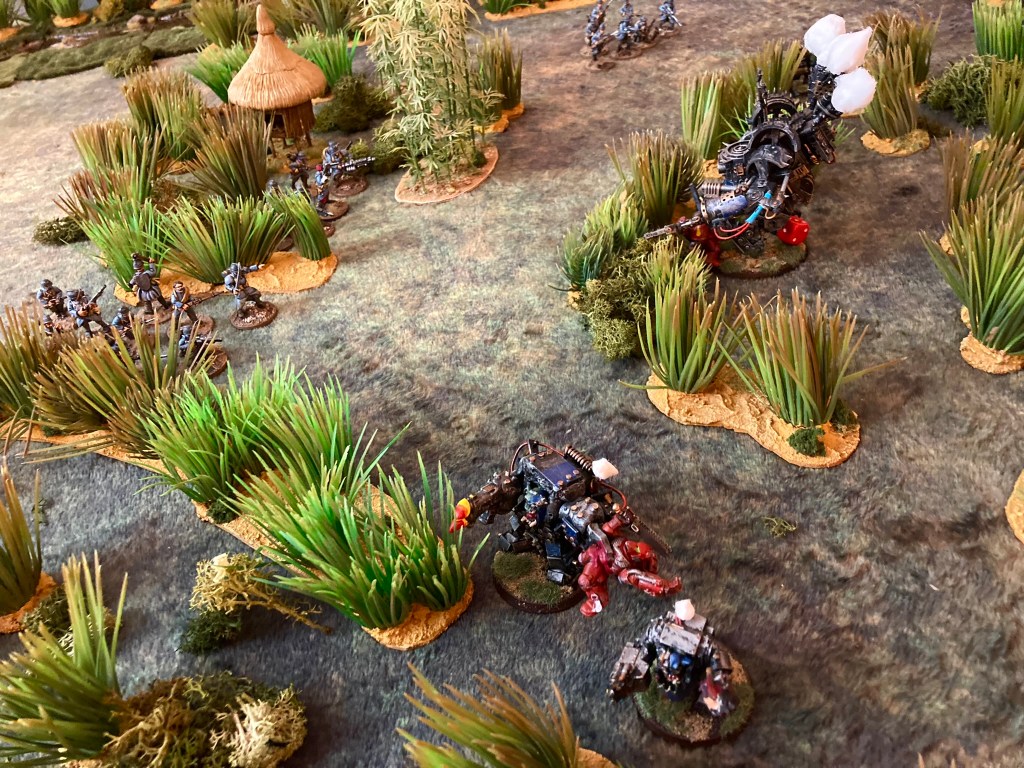
Using Scenario Juliet: VIP Extraction from the XR rules, we set up a 4 x 4’ table using some jungle terrain (plastic aquarium plants with a respray – elephant grass from my Death in the Dark Continent games and bamboo from the WW2 Crete project of 2018). Following the advice of other XR players, we used a lot of terrain to block line of sight, counting it as soft cover and blocking sight 6” in.
Mon Dieu! Too much elephant grass
The Orks won the initiative roll and got moving. I have to say that I very much prefer the XR activation system to previous variants; The Men Who Would Be Kings introduced the free activation mechanic, and this is taken further in XR with all troop types having a free activation (i.e. not having to pass an activation test to perform some actions). While the friction of the original Lion/ Dragon Rampant can be entertaining (dicing for every single activation), it can also be very frustrating when you fail a string of activations with poor dice rolls. The TMWWBK/ XR model means that you can prioritise more effectively and get some units activating w before you get onto the more risky activations that might not come off. It’s also a better model for scaling up to a bigger battle as you’ll be able to control a few more units without the game grinding to a halt.
Turn 1: the French advance from the left – the Orks (out of shot) are waiting to pounce.
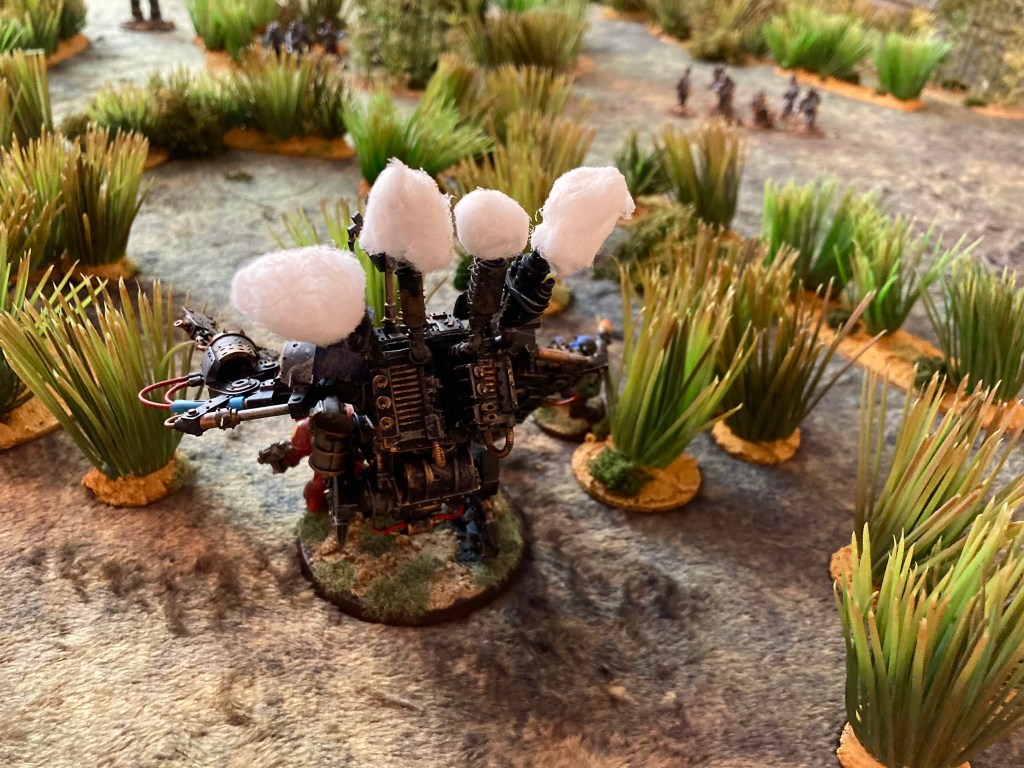
Anyway, Pete’s Orks sprung into action, most notably the Gretchin. These little chaps had received a movement upgrade which meant that they could move 12” and be unaffected by rough terrain. With the bulk of the table covered by elephant grass, this unassuming unit turned out to be a game winner.
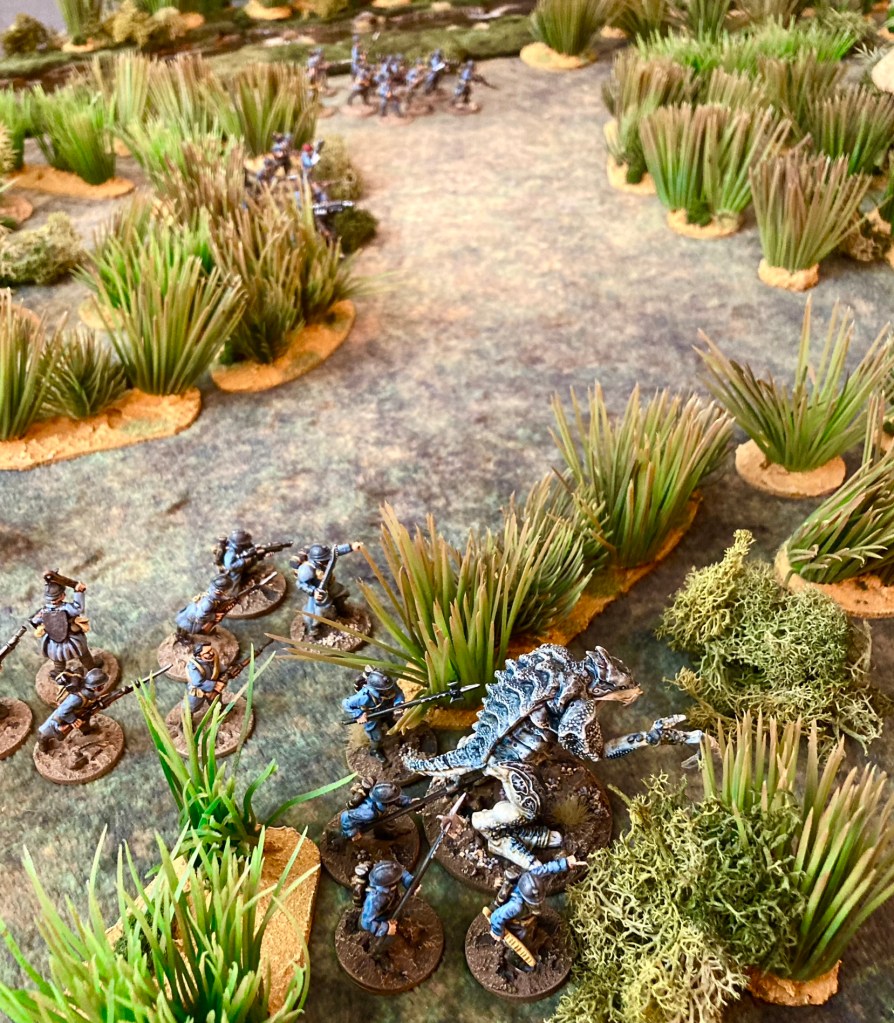
Not the escort he was hoping for! Pete’s gretchin (GW minis)The baguette handler encourages his charge into action. This was the best unit I had for the scenario (Greater Xenomorph with Open Order rule – 10″ move and no penalty in rough terrain)
The French tried to respond, putting units forward as fast as they could go. The Greater Xenomorph and his baguette handler were the designated rough terrain troops (10” move with no penalties), but naturally they got distracted with the Wild Charge rule and ended up in a bloody close combat with Je-Rem-Ee’s personal guard.
Smash n’ grab: gretchin sweep up the governor, with Shoota Boyz in support
The Gretchin zipped through the undergrowth all the way to the governor, scooped him up and scarpered. Faced with this, there wasn’t a lot we Frenchies could do apart from advance and open fire, although actually this started to make an impression on the Orks who had pushed forward towards the river.
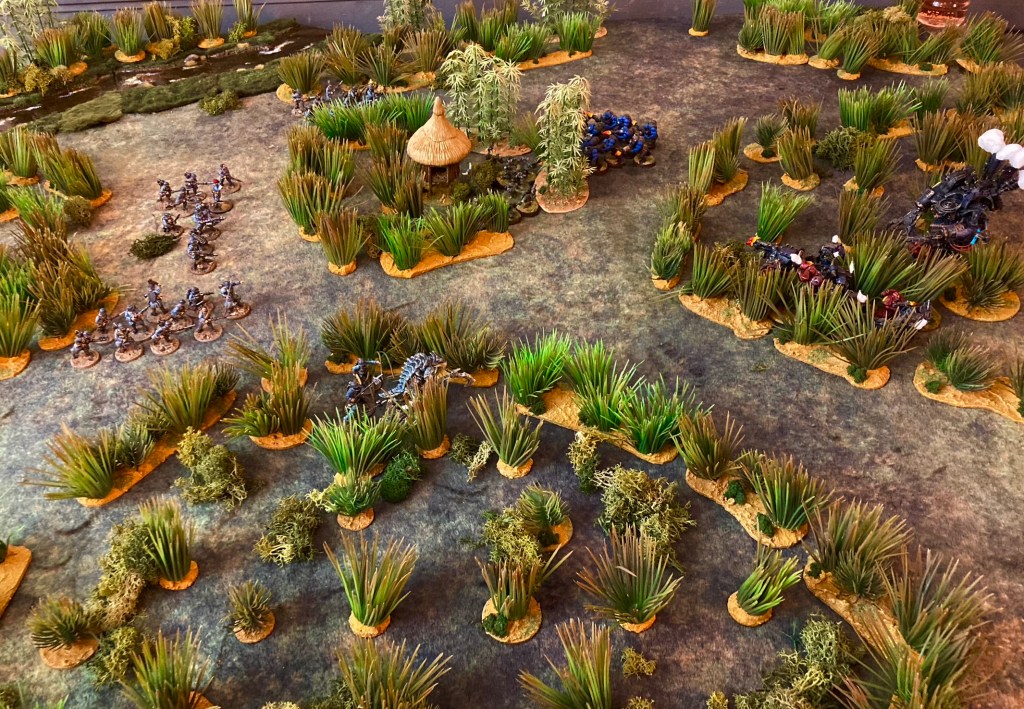
The gretchin have ‘rescued’ the lucky governor (centre, next to hut) and proceed to make their escape. Je-Rem-Ee’s Orks march up in support from the right.Aerial view: the French Light Infantry at the top are trying to cut off the gretchin, but will get into a firefight with the blue Shoota Boyz
The shooting mechanisms for Xenos Rampant will be very familiar to anyone who’s played the other Rampant variants, though in this case, it’s rolling ten dice at full strength and five at half or below. Cover increases Armour value, as does shooting beyond effective range. The latter is a major change to the Rampant canon but works well, though it does mean that blocking terrain around the centre of a battlefield becomes a necessity to avoid a shoot out with little movement.
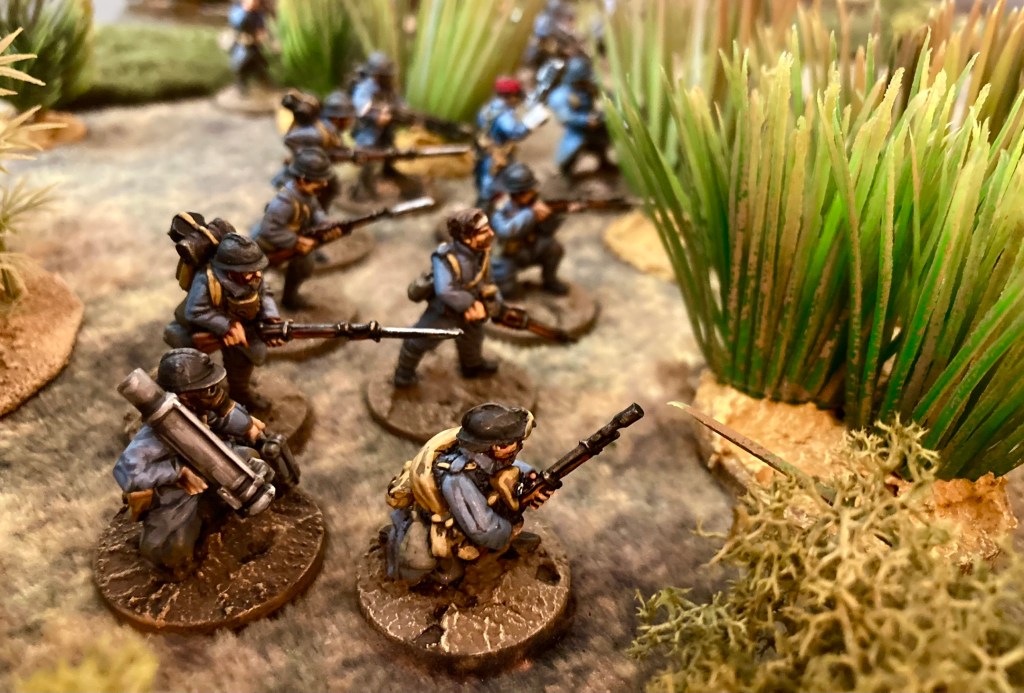
The French Light Infantry with Heavy Weapons seek their targets
I was impressed by the thought that has gone into the latest incarnation of the Courage test: you need to take one whenever you are hit by shooting (even if no damage is done) but the modifier is only the number of strength points damage taken, rather than counting back unit loss from the whole game, as it is in Lion/ Dragon Rampant. This felt much more appropriate for a shooting game and was also quicker to play.
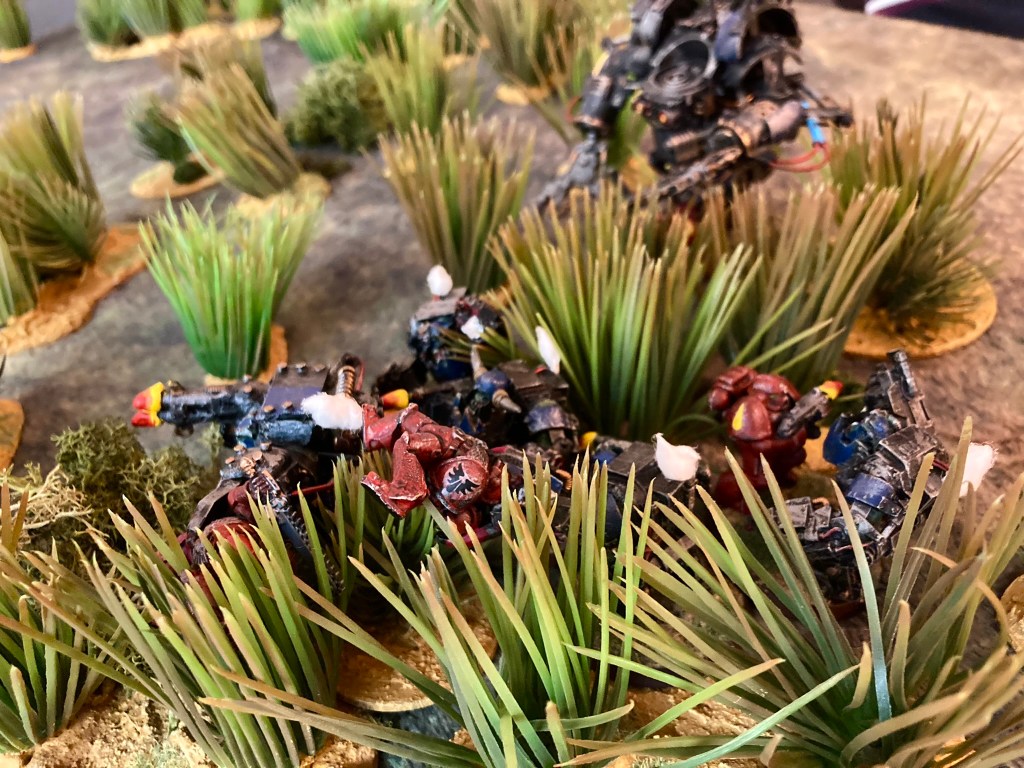
Ork Shoota Boyz (Light Infantry with increased squad size) suffer as they get caught in the open by French fire
Sticking with Courage tests, units in cover get a +1 bonus, and, if failed, will retreat into cover if possible. Both nice touches for a set of rules based around ranged weaponry.
The Orks on the right stay in cover and gain a nice Armour bonus against shooting
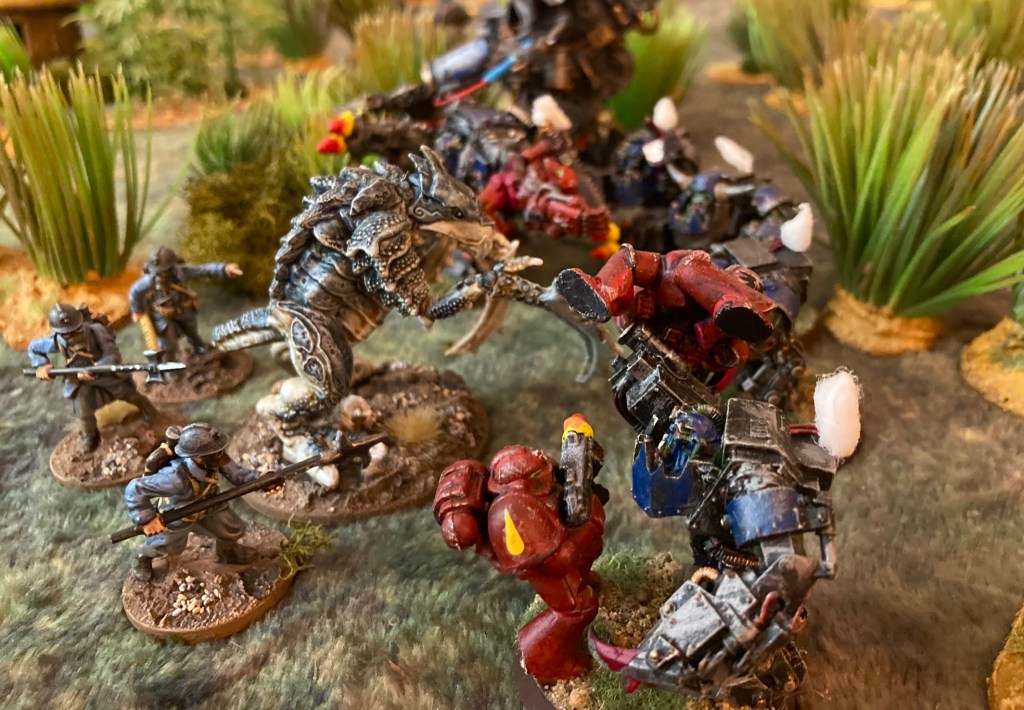
My Greater Xenomorph was well-suited to the terrain and was able to push forwards on my right flank, although he lost a couple of Strength Points (halberdiers, in this case) to fire from Je-Rem-Ee’s unit (Elite Infantry) and the Ork Dreadnought (Fighting Vehicle, Walker). Eventually, though, he was able to Wild Charge the Ork commander. A ding-dong scrap ensued over the next couple of turns, which eventually left the Xenomorph destroyed and the Ork Commander’s unit badly mauled.
If there’s a bustle in your hedgerow, it’s probably a bunch of Orks attempting to sneak upJe-Rem-Ee’s personal guard get involved in a losing battle with the French Xenomorph. Confusingly, Pete’s Orks are modelled fighting Space Marines, hence the appearance of a three-way battle! (All Orks by GW)
This allowed me to target Je-Rem-Ee with the advancing French Commander’s unit (Light Infantry with Heavy Weapons), which stuck enough hits on Je-Rem-Ee to render him inoperable. A neat touch in the campaign rules is a simple table to roll on for commanders being taken out – Je-Rem-Ee rolled a 2 – severely wounded and had to miss the next game.
This late surge for the French continued as my Light Infantry on the left flank engaged the Shoota Boyz who had pushed up to protect the retreating gretchin. Although both units were evenly matched, the French got the better of the dice rolling and forced the Orks to fail a Courage test, thereby suppressing the unit. A bayonet charge followed and the Orks were defeated!
French Light Infantry take out the suppressed Shoota Boyz with a bayonet charge
At this point, Pete’s gretchin and the governor left the table, thereby claiming the win. It was something of a pyrrhic victory, but Pete had actually sportingly kept the VIP on for longer than needed to prolong the game. If we play the scenario again, we might modify it so that the VIP slows down the escort as they leave the table (maybe reducing move to 6″ or introducing a random element to make the move more unpredictable, e.g. an ordered activation).
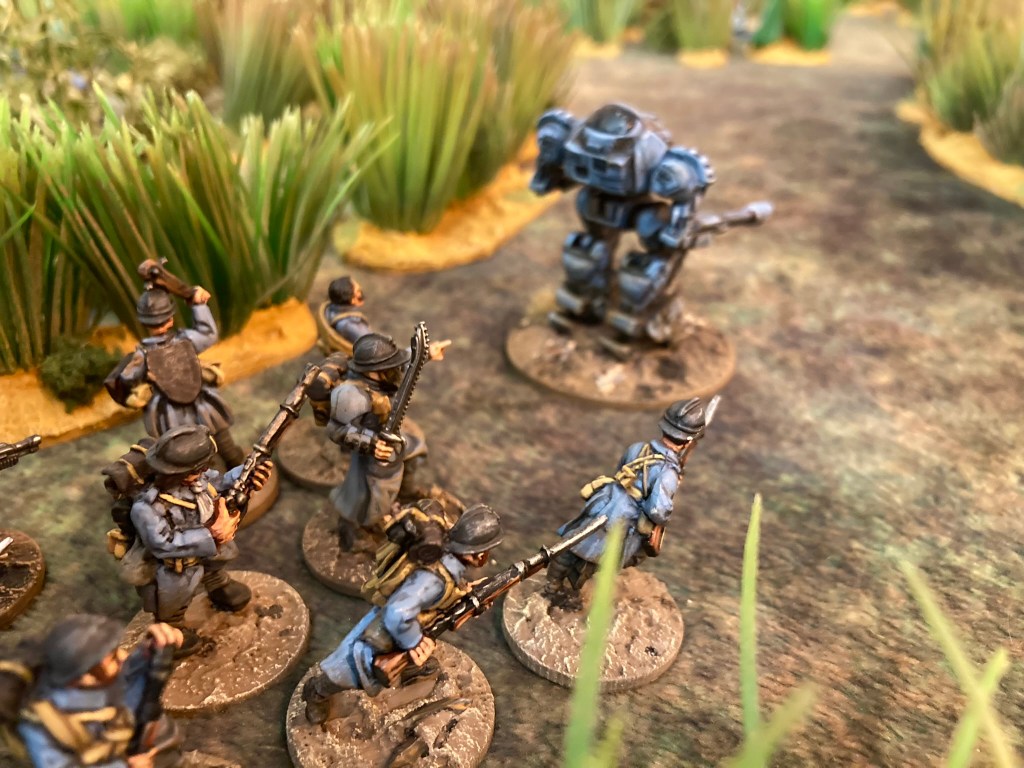
Game over, man: the Orks beat a winning retreatThe French walker (Fighting Vehicle, Walker, Mechanoid) is sadly not fast enough to get forwards and join the fight
Anyway, XR has had a resounding thumbs up from our group. I’m impressed with the developments in the Rampant mechanisms, and it is unquestionably versatile. It plays quickly and doesn’t get bogged down in layers upon layers of internal detail – although having the specific special rules for your force written on your force roster is pretty much essential for speedy play. Looking forward to the next campaign game!
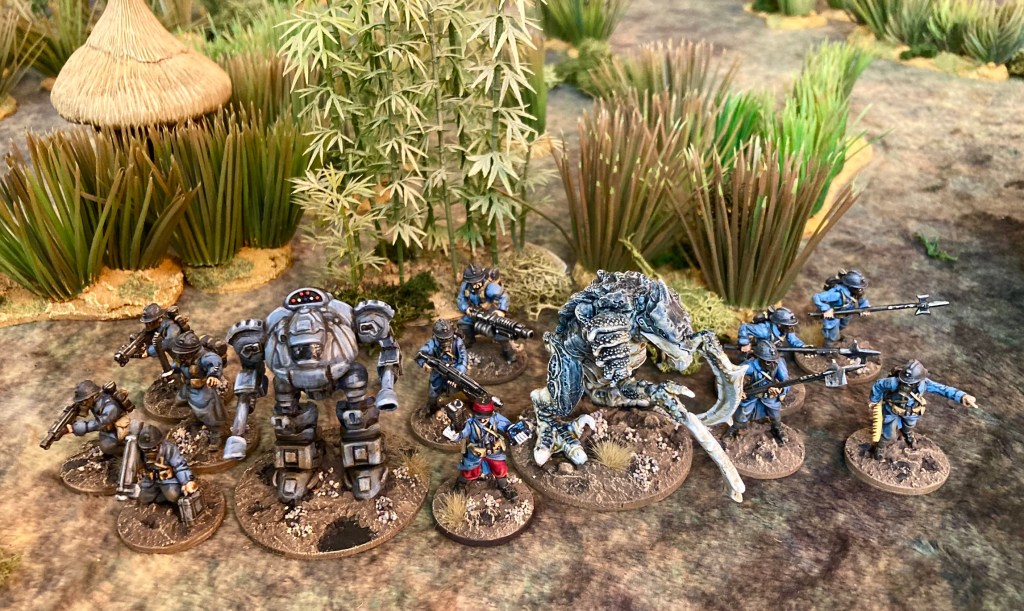
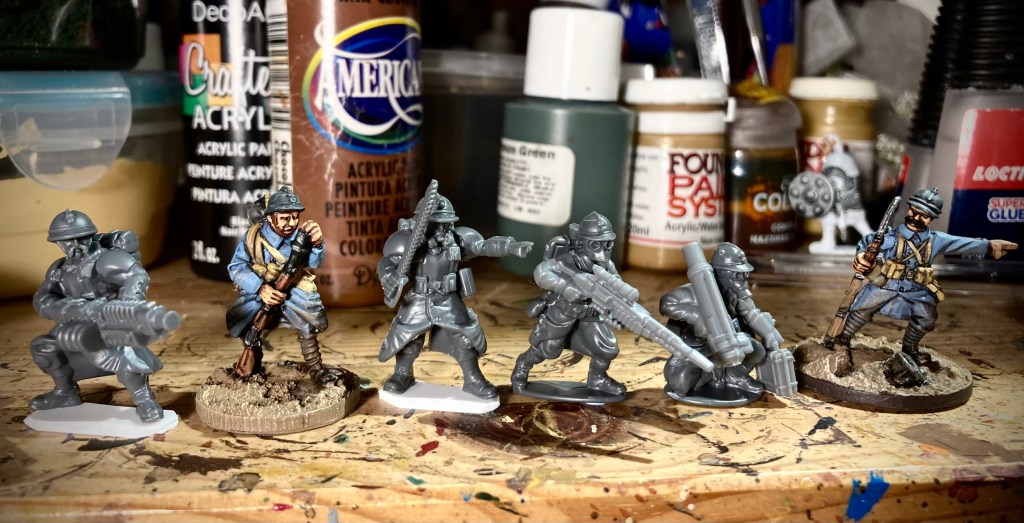
Roll call! The new Weird War additions to my WW1 French.
Having caved in and decided to give Xenos Rampant a go, I initially toyed with the idea of reconstructing my Eldar force from way back when. However, discovering that I only had six figures remaining (having sold the others several house moves ago), I realised that a Weird WW1 force might be easier to put together. Paul W at my club organised a trial game involving his rather nice WWW1 Germans and Brits, so I went home to look at my options.
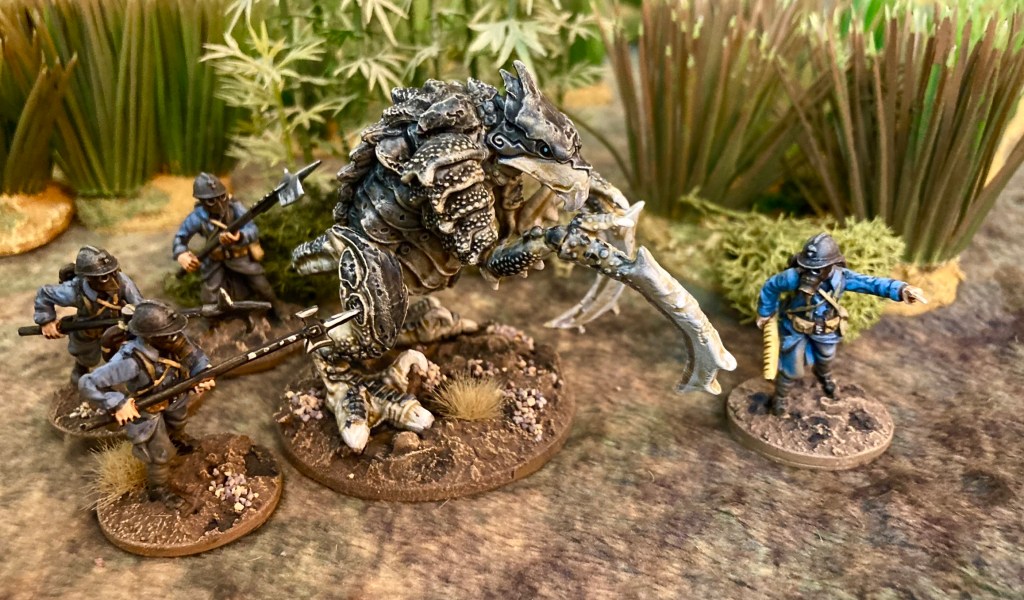
In the grim darkness of the far future, there is only a Gloomstalker being prodded into battle by men with halberds and a baguette. The background is from Jon Hodgson’s set on Wargames Vault
I felt that some kind of robot/ walker and possibly an alien beast would be fun – Reaper Bones was my first port of call. Although I live remarkably close to the Reaper UK warehouse, it was actually quicker to order from Mighty Lancer Games and get them delivered straight to my door. Ordered Monday morning and delivered Wednesday – these guys are good!
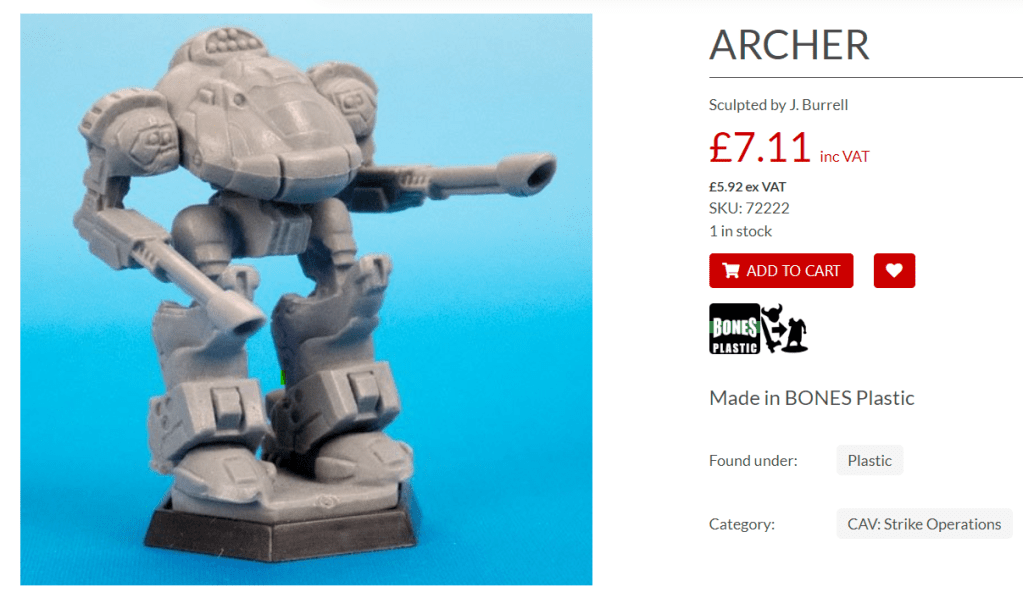
Archer (off the Reaper website).
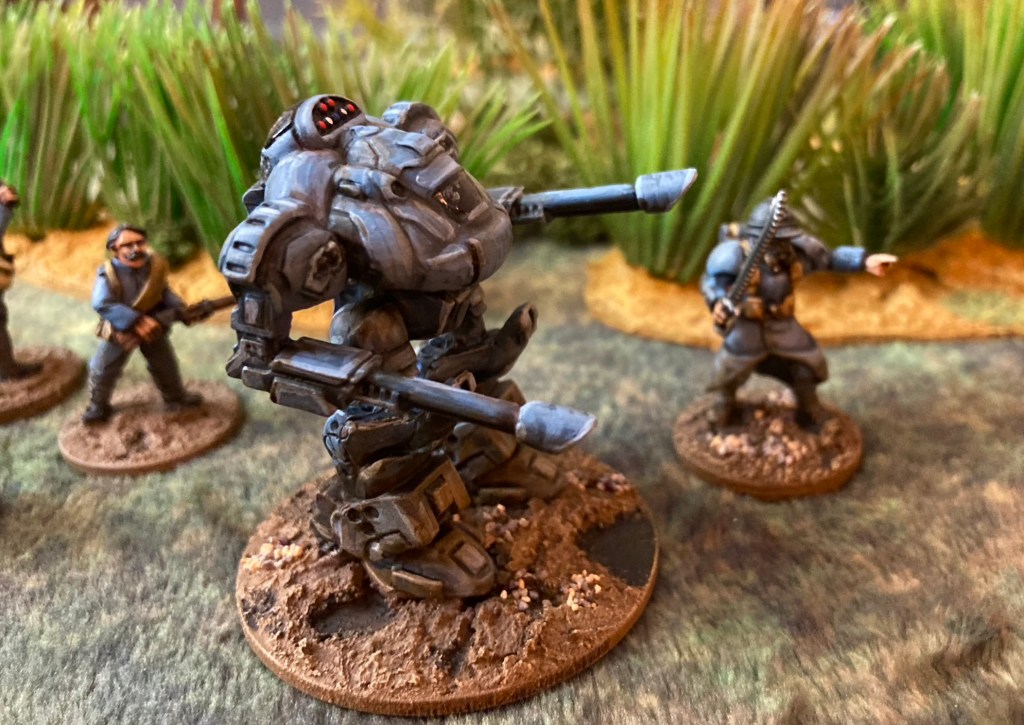
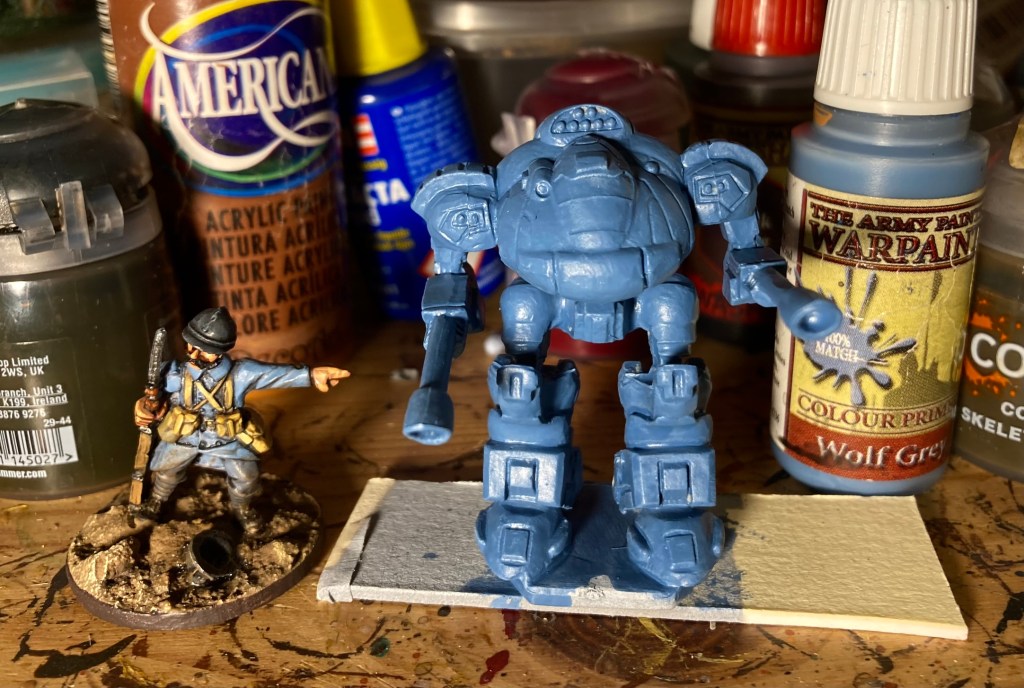
The robot/ walker is an ‘Archer’, a Battletech-style mech that costs only a few pounds but provides an easy Fighting Vehicle with ‘Walker’ and ‘Mechanoid’ traits for XR. While I initially had ideas to convert it, I decided to simply paint it up with a base coat of Army Painter Wolf Grey to match the rest of my French. After multiple washes and plentiful grime added around the legs, it was ready for action.
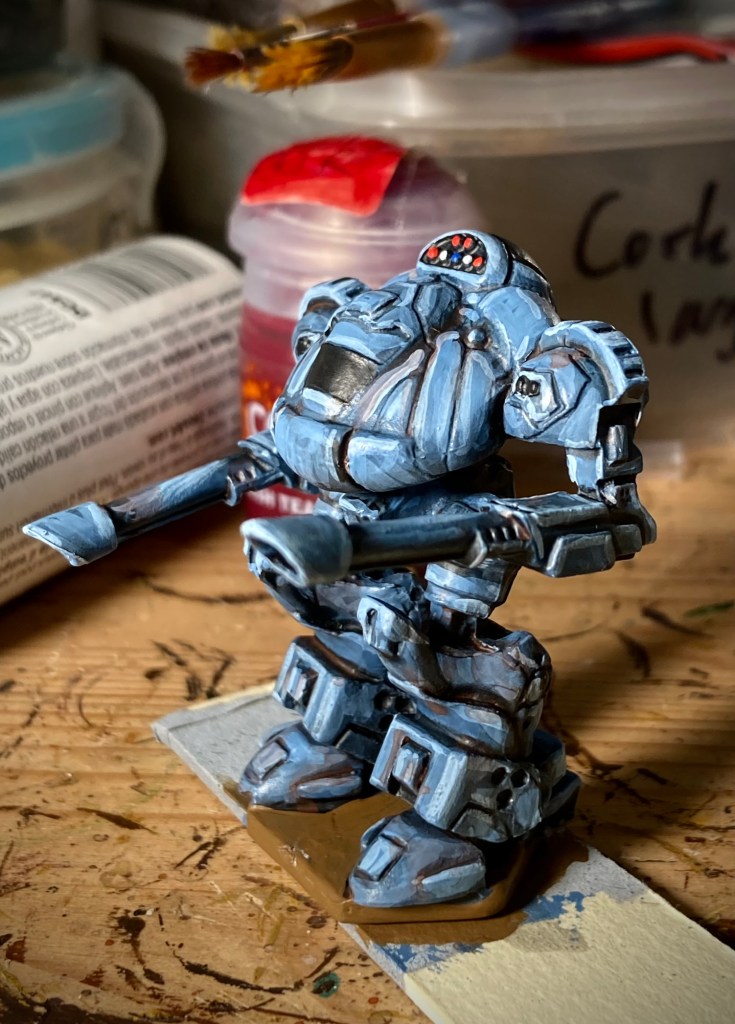
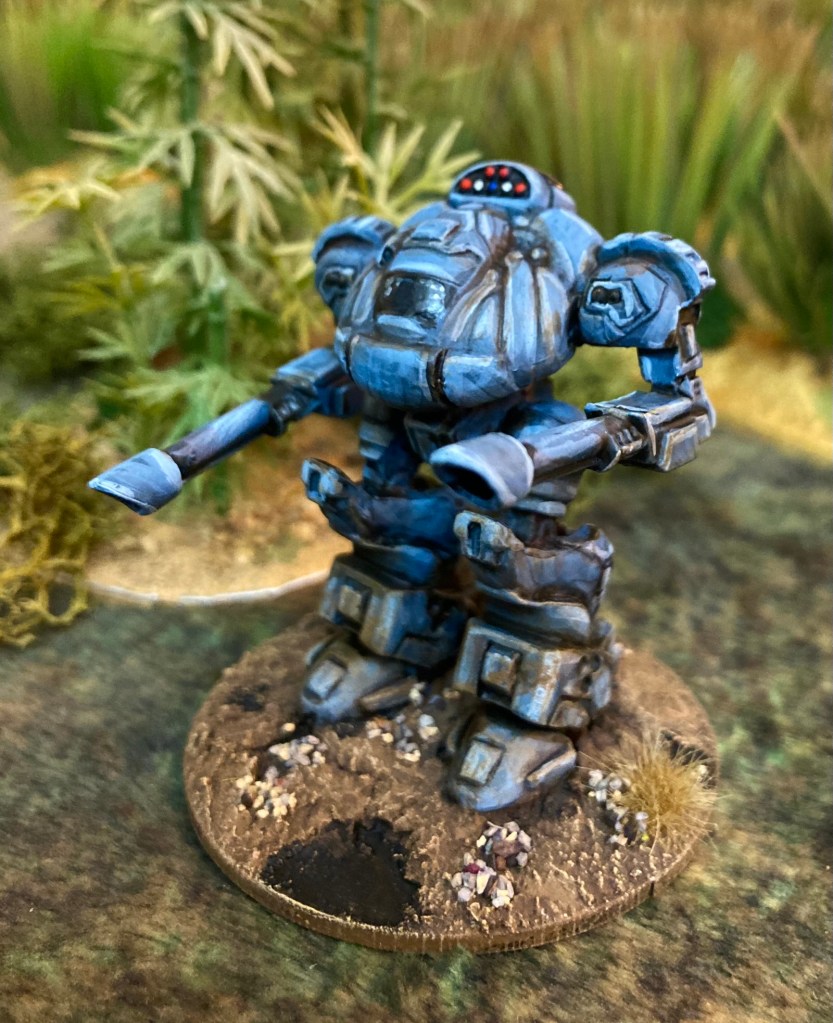
Robot/ walker with a base coat of Army Painter Wolf Grey, the same stuff I use for my French greatcoats.Robot/ walker with some washes; I’ve had a go at some (crude) edge highlighting here before adding lots of grime to the legs.The finished robot/ walker – he’s had a coat of matt varnish, but gloss on the canopy.
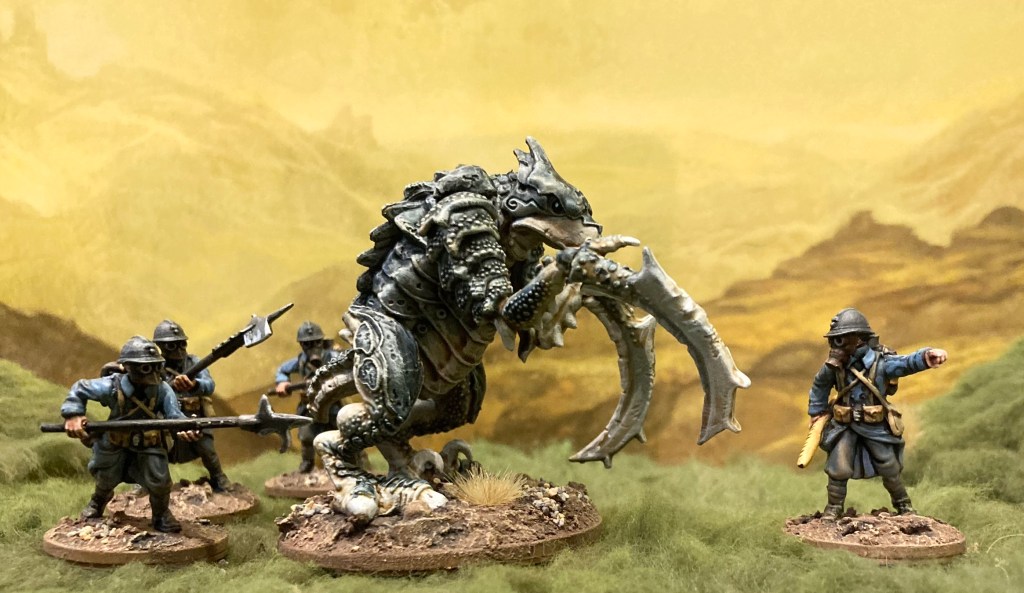
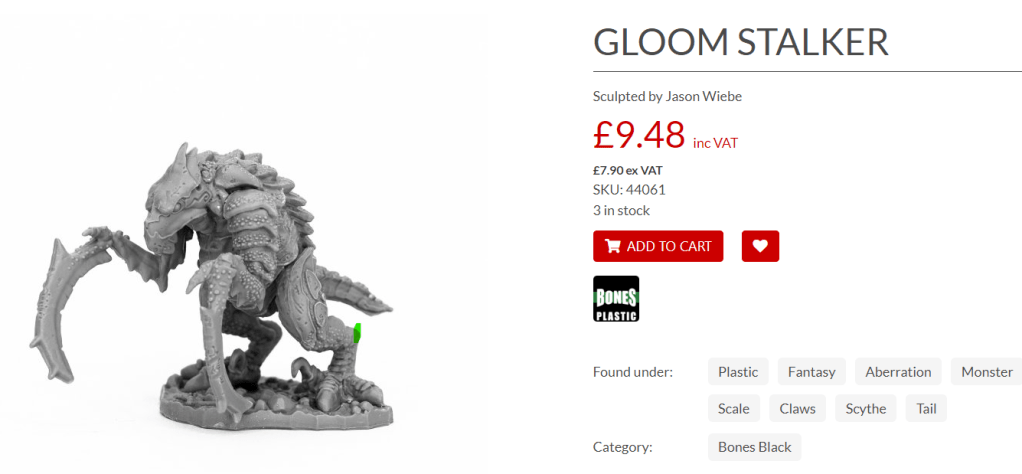
Reaper Bones is also a fantastic source of giant, well-priced beastie miniatures, and I had great fun hunting down a Greater Xenomorph for the force. Rejecting the giant frogs, man-eating slugs and other more obvious items, I plumped for a ‘Gloom Stalker’. This chap bears more than a passing resemblance to a D&D Hook Horror, but for my purposes, he was going to be a misunderstood but highly dangerous creature that had been captured by the poilus and forced into battle.
Gloom Stalker from the Reaper website3d jigsaw puzzle – Gloom Stalker and Archer parts after arrival and cleaning. These guys are actually incredibly easy to put together, aided by the very secure joining pegs.
Both the robot and the Gloom Stalker came as multi part kits in Reaper Bones’ slightly flexible plastic material. These needed a good wash before assembly using superglue, then I gave them my usual undercoat of Halfords Grey Plastic Primer before a quick spray of Halfords White Primer.
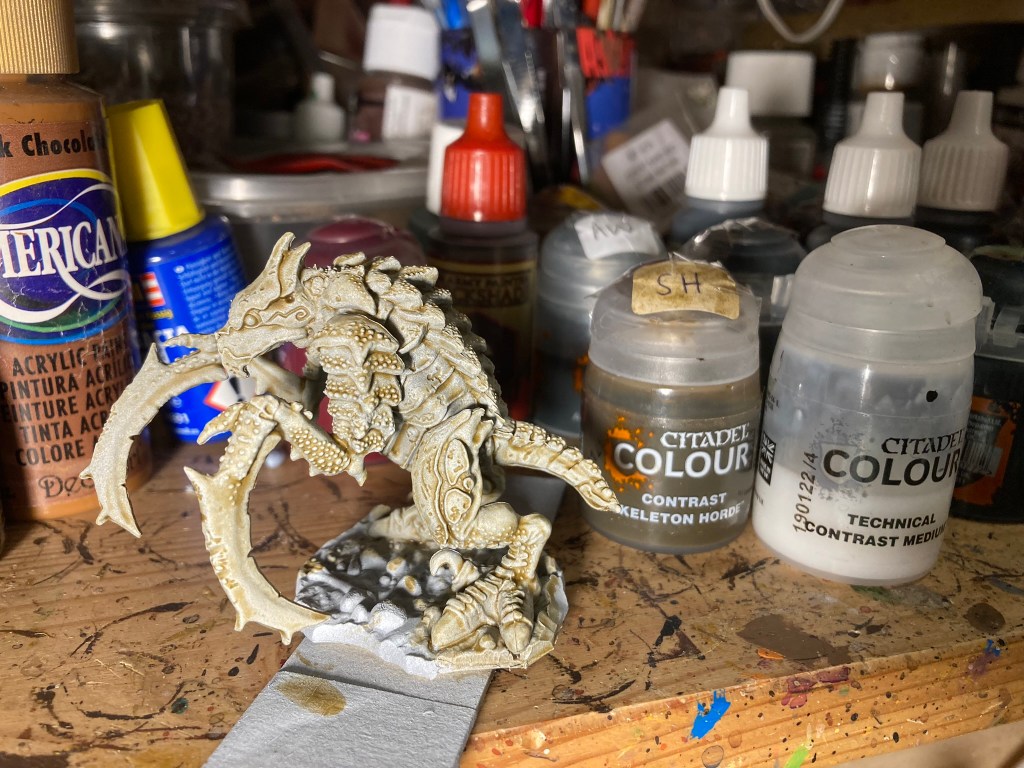
The Gloom Stalker was a very simple paint job; first he had a layer of thinned GW Contrast Skeleton Horde all over. When dry, I blended in more thinned Contrasts (Ultramarine Blue and Black Templar), getting lighter towards the belly and darker towards the back. (Sorry I failed to get photos of the latter stages…this was a busy week).
Gloom Stalker after undercoating.Gloom Stalker gets his basecoat – thinned Skeleton Horde. I forgot to get a photo of the next few stages, sorry.
While single-model units in XR are fine, I wanted a group of handlers to tie the creature to my force and provide an easy way of tracking hits – Greater Xenomorphs have 5 Strength Points, so I needed to add four humans to the unit.
Adding metal Front Rank halberds from the bits box by drilling out the rifle hands.
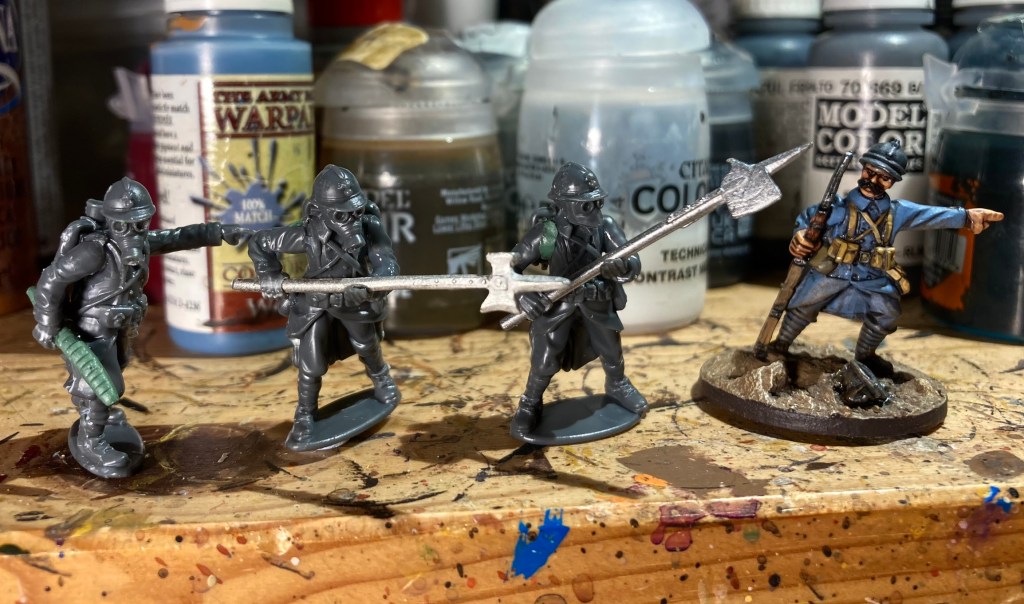
These came in the form of some sprues of Wargames Atlantic WW1/WW2 French (thanks Guy and Wayne for generously providing me with these). I quickly kit bashed three halberdiers and a baguette handler, all with gas masks for that Weird WW1 look.
Ready for action! The baguette handler (left) has a bread product carefully crafted from green stuff! The finished Gloom Stalker and his handlers going out into their first game of XR. (Spoiler: they didn’t make it.)
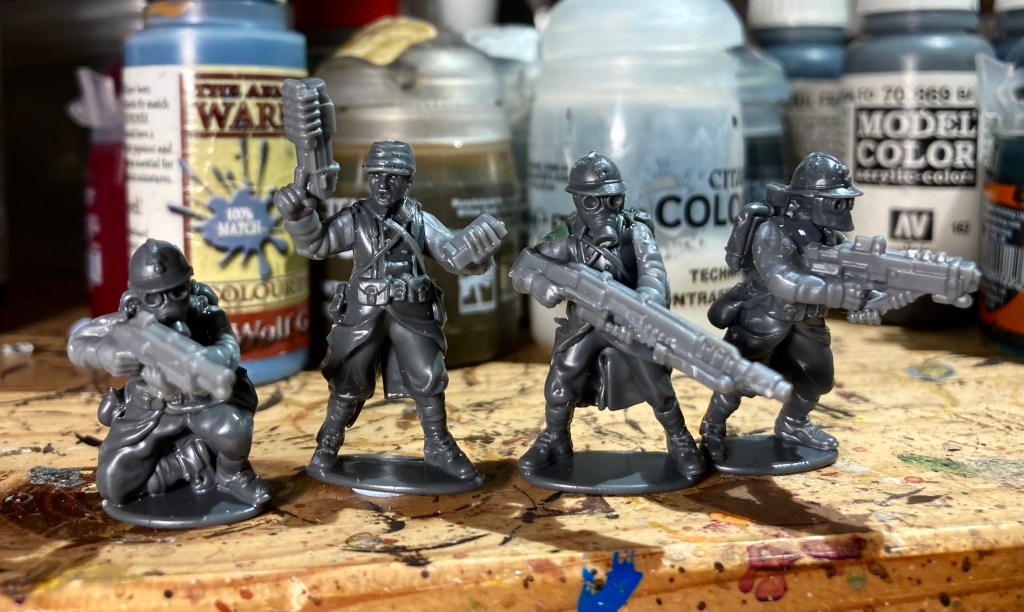
As well as the handlers, I also added a scattering of sci-fi poilus to bulk out my historical models.
L-R: Wargames Atlantic Grognard, Brigade Games metal, another Grognard, then two WA French plastics with Stargrave arms and weapons – these needed a little lrimming down but ended up matching the greatcoat torsos just fine. Last in the line is a Gripping Beast (Woodbine Designs) Frenchman.
Most were made using the WA French sprue with futuristic weapon arms from the Stargrave Mercenaries kit by Northstar/ Osprey, although I also experimented with a couple of figures from the WA Grognards box. The latter were slightly on the heroic side to match with my previous French but I think they mix in well enough after painting.
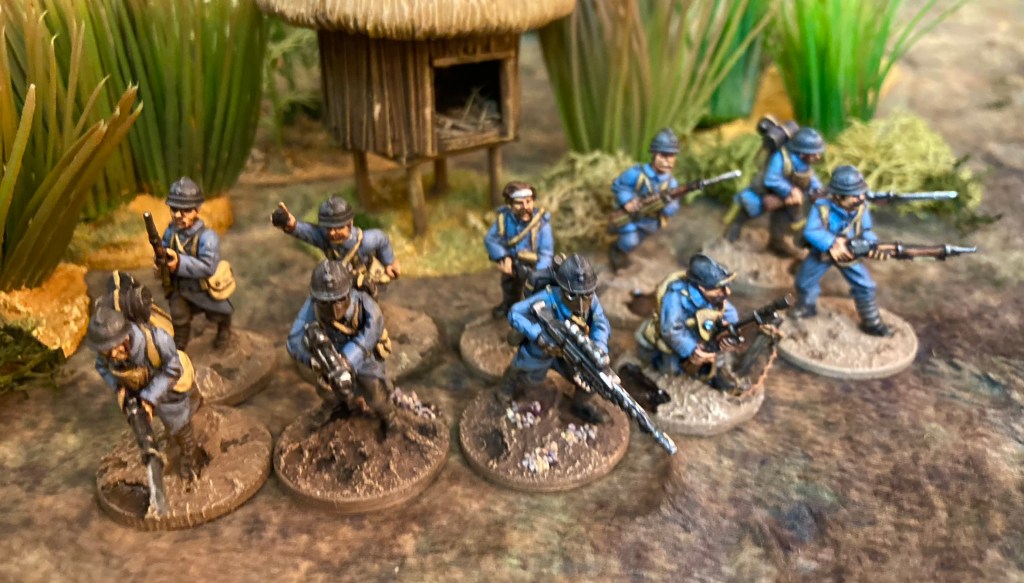
The Capitaine and his boys: all WA French with Stargrave Mercenaries arms and weapons.A finished squad of Light Infantry for XR: new plastic models front centre (WA Grognard) and right (WA French with Stargrave arms/ weapon), backed up by an assortment of historical WW1 French (Brigade Games, Renegade, Gripping Beast/ Woodbine, Scarab and an Old Glory trench raider far left with club)
The boys in horizon blue got their first XR outing last week, more on which in a future blog post!
Slightly fuzzy shot taken down the club of another unit of Light Infantry with a few extras – manufacturers as above.