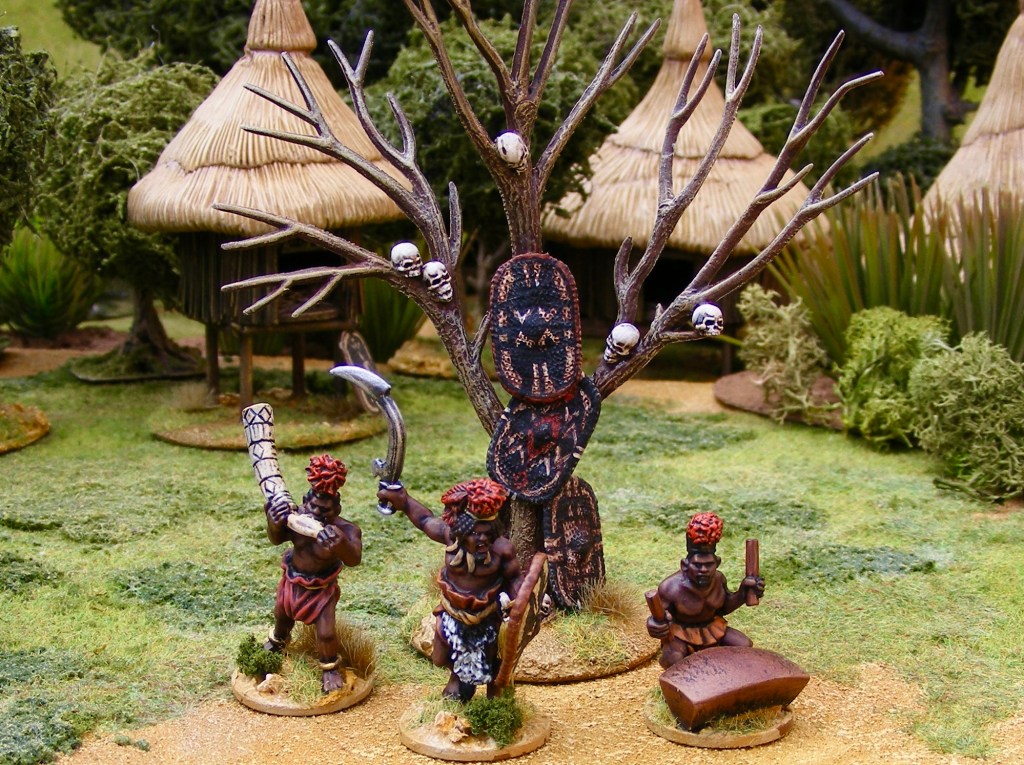
Inspired by the writings of Chris Peers and his rather wonderful Death in the Dark Continent rules, I spent some months back in 2013 putting together an Azande force. These lovely 28mm models are all by Mark Copplestone, sculpted between his time at Foundry and Copplestone Miniatures.
These fierce warriors won several battles against the reviled Belgian Force Publique in the 1800s and adopted firearms alongside their traditional throwing spears and fearsome throwing knives. If you want to know more of the background, I can highly recommend that you get hold of a copy of Chris Peers’ The African Wars. Foundry’s Azande page also has a potted history and painting guide.
I wanted to create more than just an army to get the flavour of the Azande; fortunately, the tribe was well-recorded in photographs and drawings in the late 1800s, including this fascinating image of an Azande village. This was my jumping-off point for creating some scenic pieces to fill out my own gaming set up.
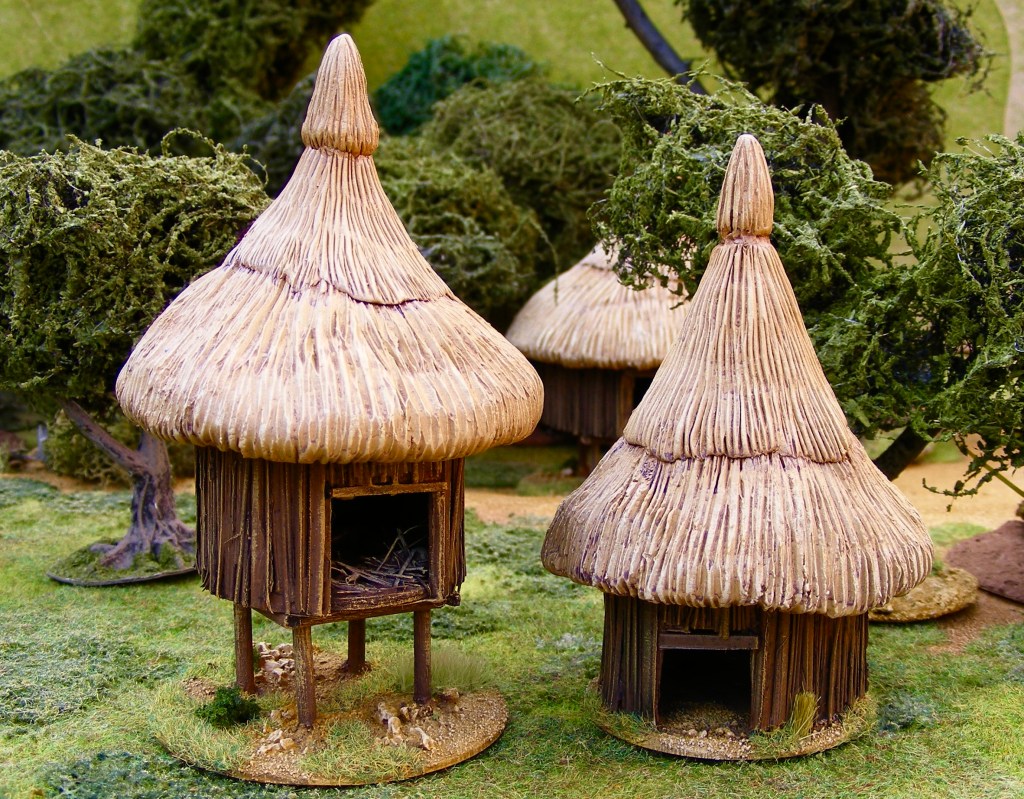
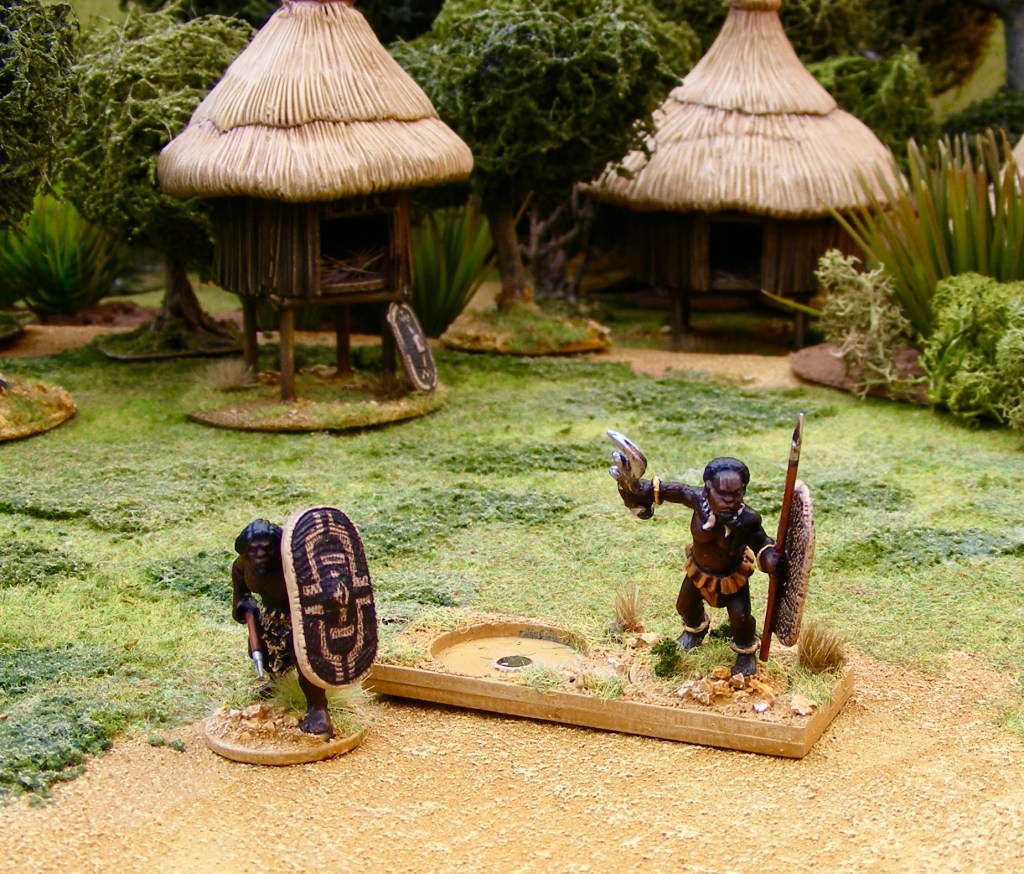
The huts were so unique that I decided to scratch build my own. They started life as small cardboard tubes with broom bristles glued around the outside for texture. Some were on stilts, which I achieved by cutting up wooden skewers and drilling them through the hut and into the base.
The main part of each hut was the roof, for which I roughly carved a piece of blue foam. The thatch was then added in layers of Milliput, into which I pressed a rough pattern. The insane pointy tops were made from yet more Milliput formed over a cocktail stick pressed into the top of the roof.
VLUU L200 / Samsung L200
Unfortunately these are the only WIP photos that I took at the time, but hopefully you get the idea!
VLUU L200 / Samsung L200
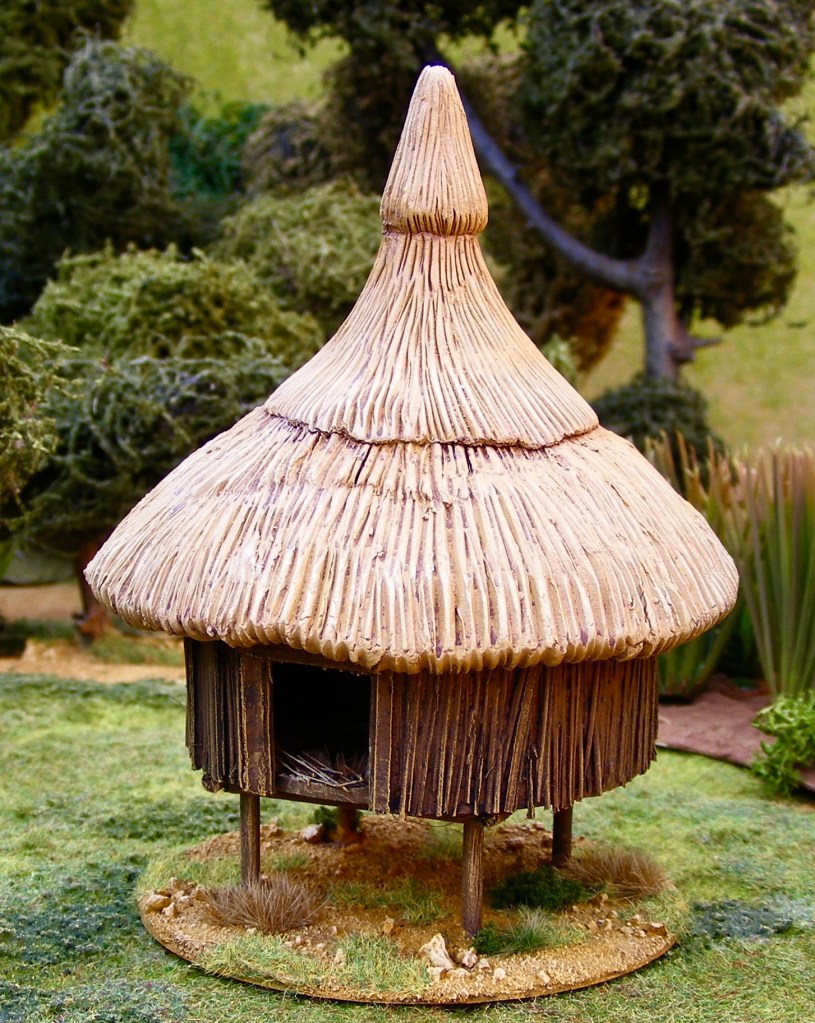
Spray painting was the fastest way to finish these. I gave all the models an overall coat of brown (Army Painter Leather Brown) followed by masking up the hut walls and spraying the roofs with a yellow-brown (Army Painter Desert Yellow).
VLUU L200 / Samsung L200VLUU L200 / Samsung L200
When all this was dry and the fumes had cleared, I painted the huts with various black/brown washes and dry-brushed highlights.
This hut got some painted decoration around the door as well.Hut with shield!
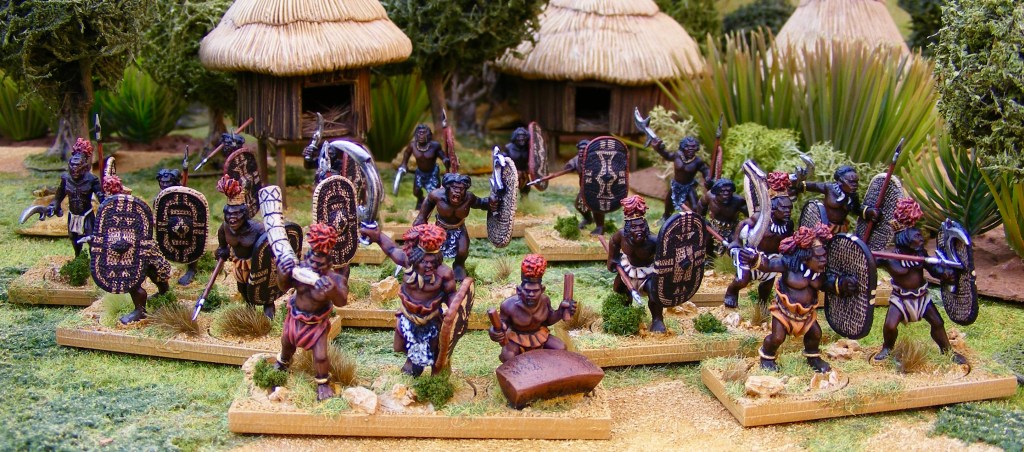
I painted around 80 figures for the army, so I experimented with time-saving techniques. The bulk of the warriors were sprayed with Army Painter Leather Brown and then subjected to a coat of black/brown oil paint which was wiped off to leave the basic skin colour. This was really effective (even if it took five days to dry!) A few of the personality figures were instead black-undercoated and the painted traditionally using the Foundry Dusky Flesh triad.
Musketmen with skin tones using an oil paint wipe-off technique
Clothing and detail was then picked out in acrylic paints, before I got over-involved in painting the shields, at which point I was glad I’d saved all that time with the oil paints! I’ve always loved painting shields and had a brilliant time picking out the patterns on these based on various surviving examples I’d seen in books and museums.
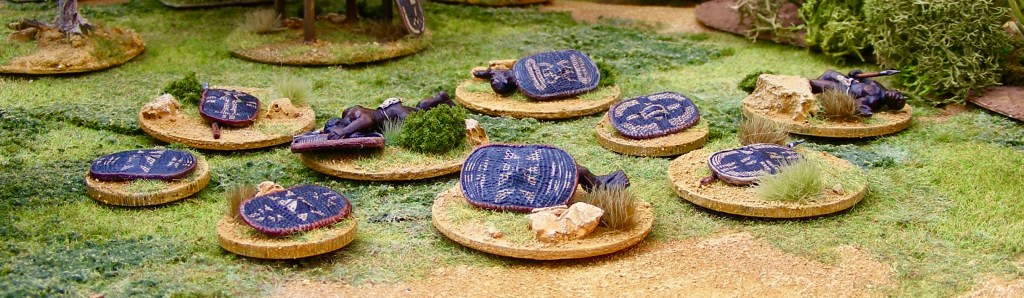
Shields, I love ’emMusket-armed king and bodyguards (the skin on these is Foundry Dusky Flesh triad)Grim but necessary – Disorder markers for playing DITDC. There’s no specific Azande casualties in the Foundry range so I just added Azande shields.
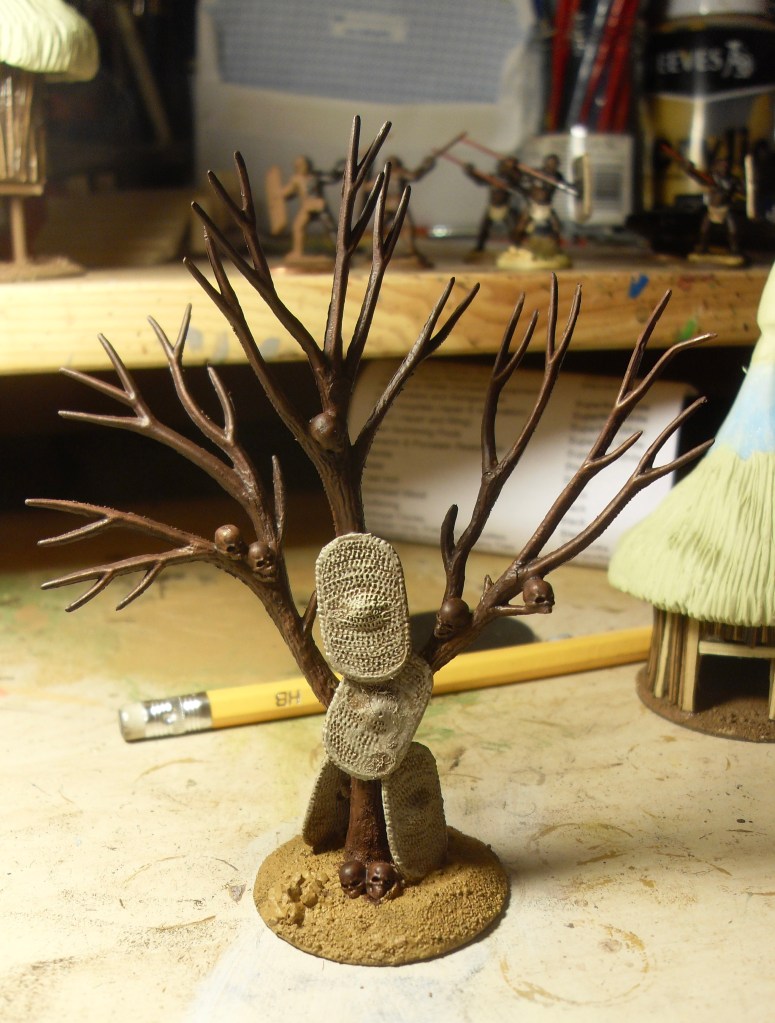
The centrepiece of the village is the ‘tree of skulls’, adorned with shields and grisly battle trophies. This was created from a single Woodland Scenics tree armature with skulls from the old Wargames Factory (now Warlord Games) plastic skeletons and some spare Foundry Azande shields.
VLUU L200 / Samsung L200
Although DITDC uses 60mm ‘elements’, I wanted to be able to split up the figures for skirmish gaming as well, so I bought a load of 60mm movement trays from the ever-wonderful Warbases and added 5mm neodynium magnets. The figures were all based on UK 1p pieces – the most recent kind are magnetic and therefore perfect for this kind of thing.
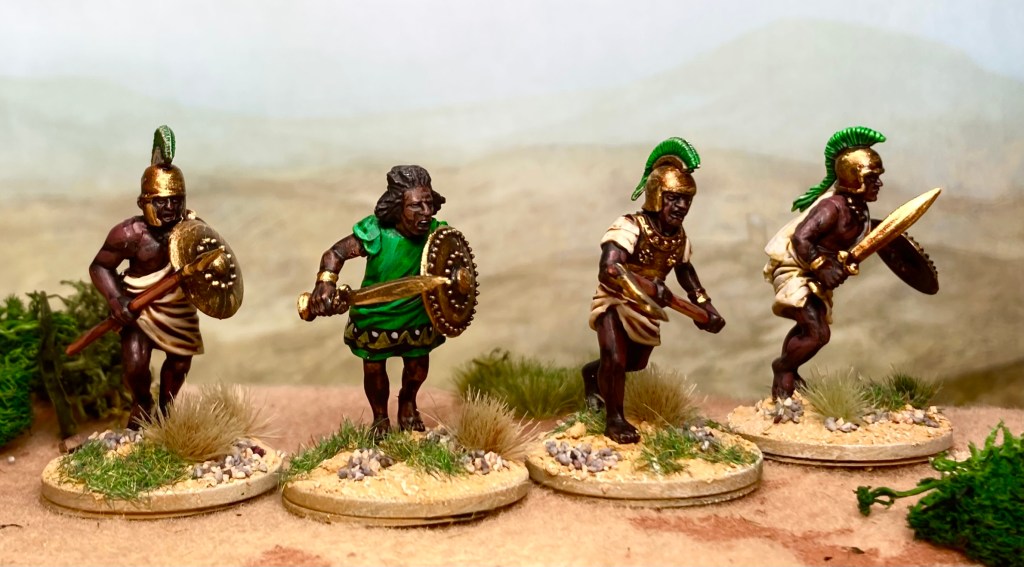
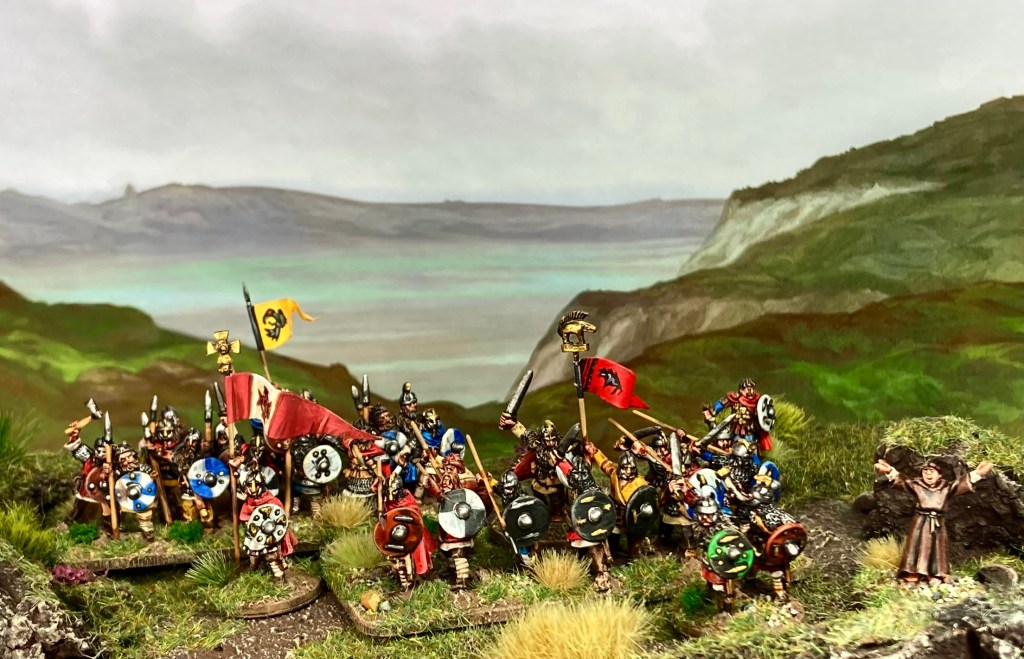
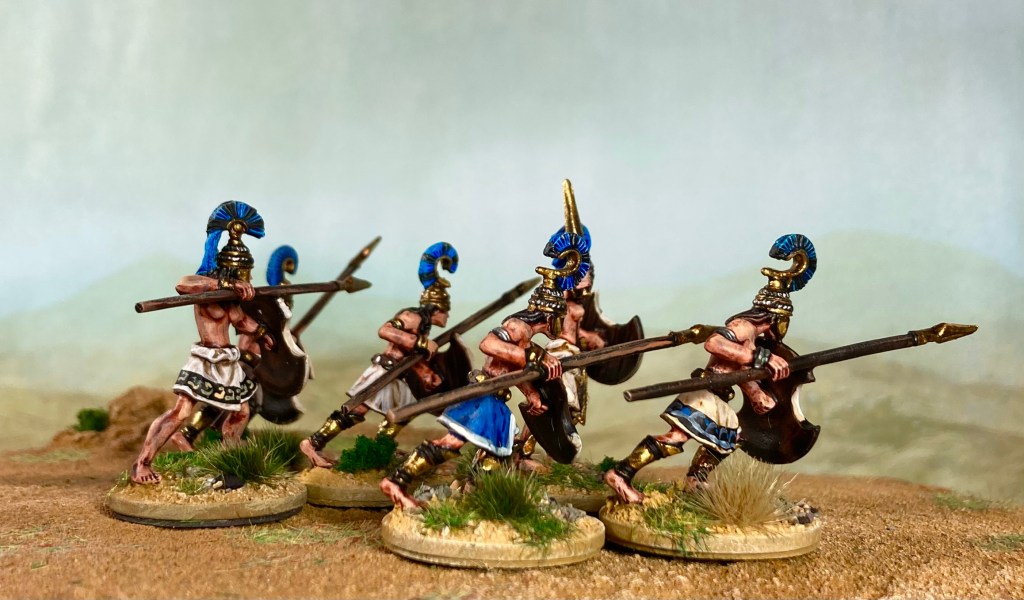
Following on from my post about doing some Amazons and Ethiopians for the Trojan War a few weeks back, I was inspired to get a mini for King Memnon of Ethiopia, who features in the later sections of the Iliad.
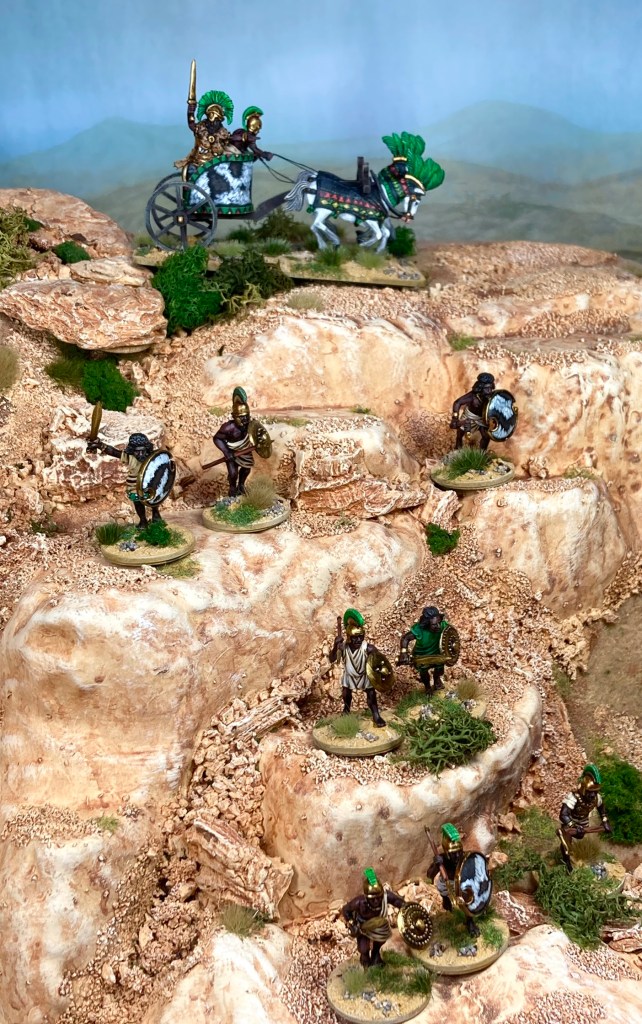
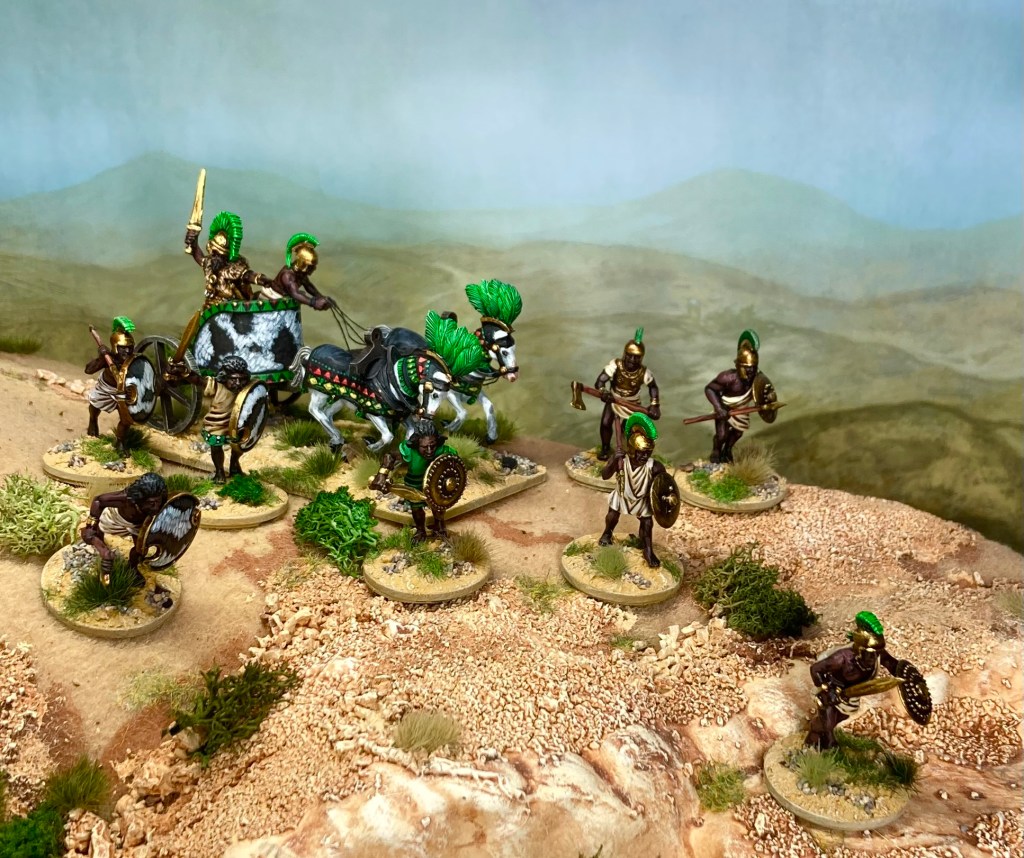
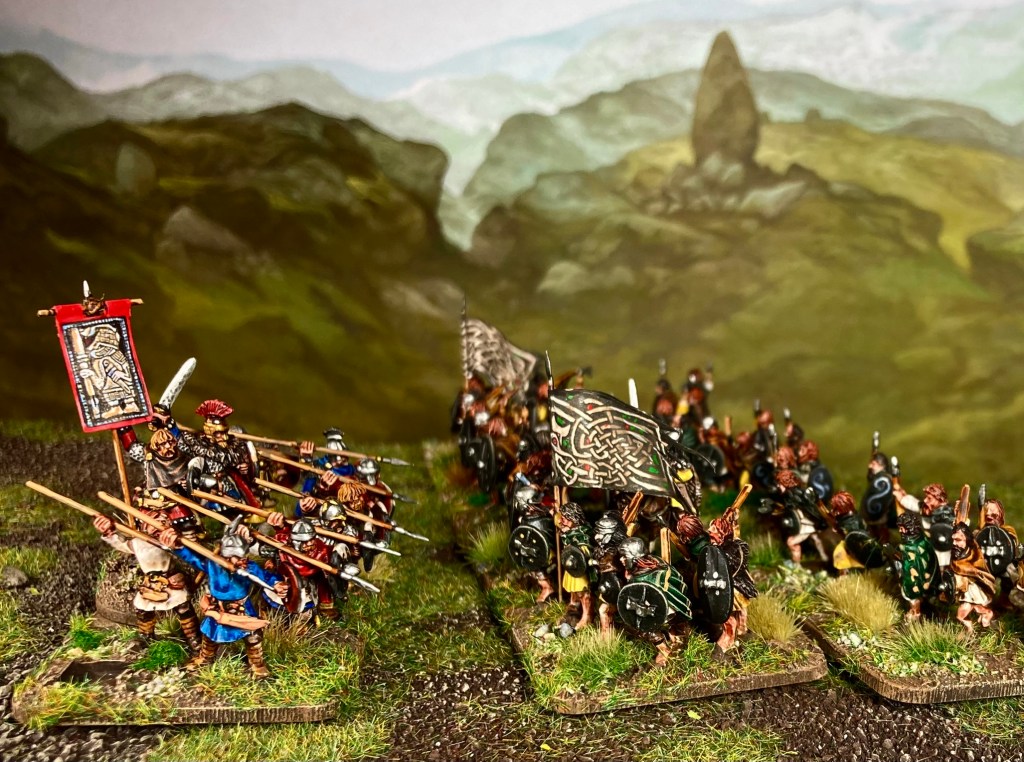
Memnon and his warriors, photographed on a rocky hillside that I built a few years back. Background by Jon Hodgson Maps
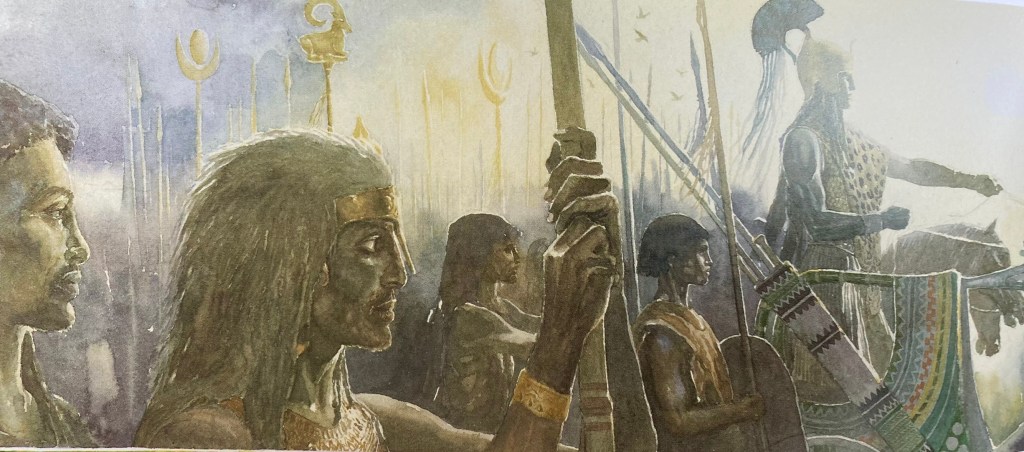
In Rosemary Sutcliff’s Black Ships Before Troy, one of John Howe’s watercolours has a go at recreating Memnon and his troops. I say ‘recreating’ but ‘imagining’ is probably a better term for this kind of mythological illustration. Anyway, I thought I’d attempt something similar in 28mm.
Illustration by John Howe from Black Ships Before Troy
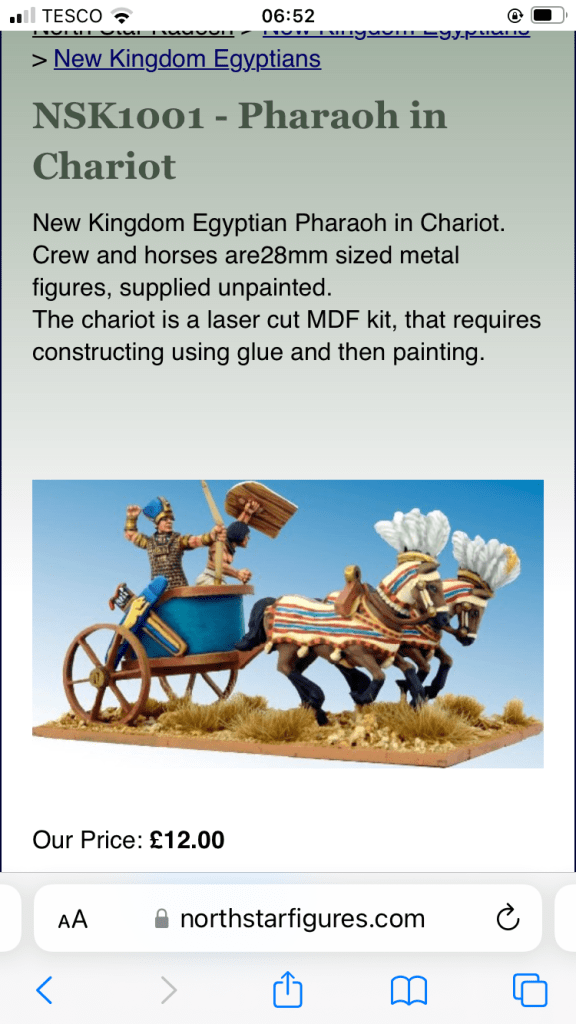
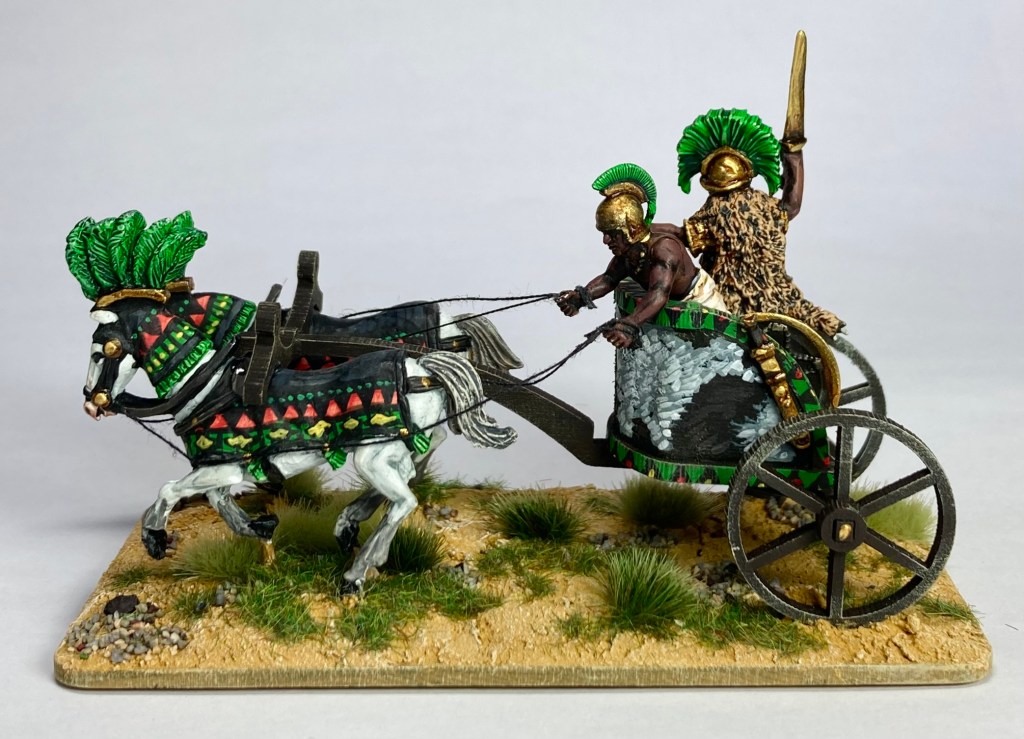
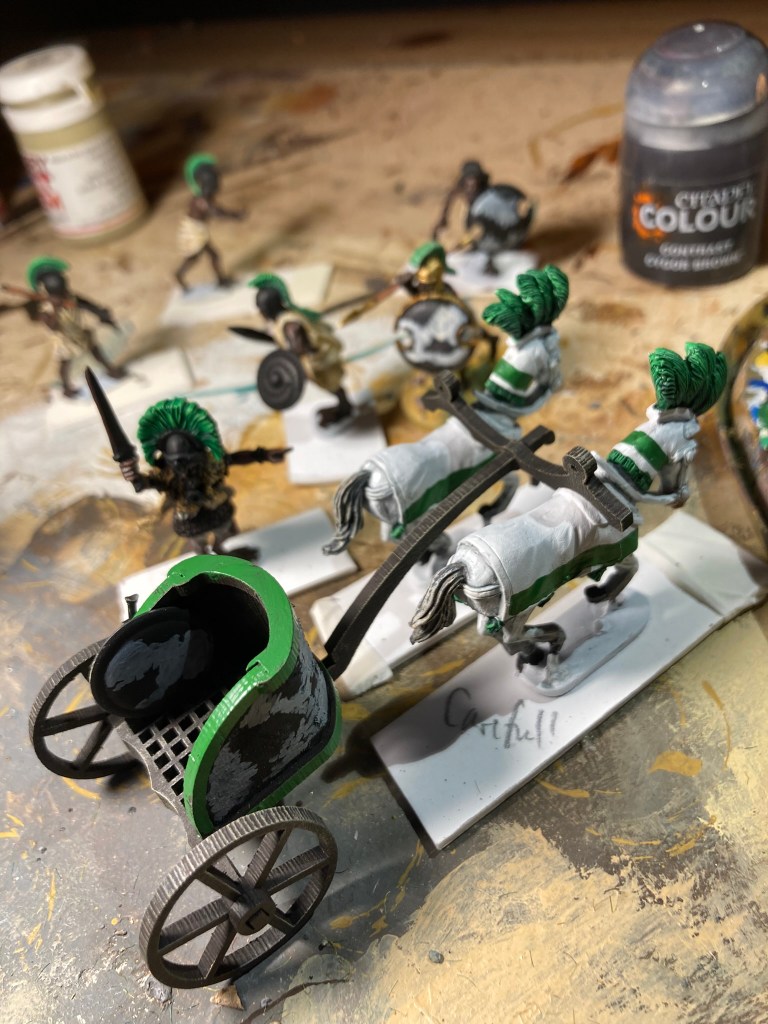
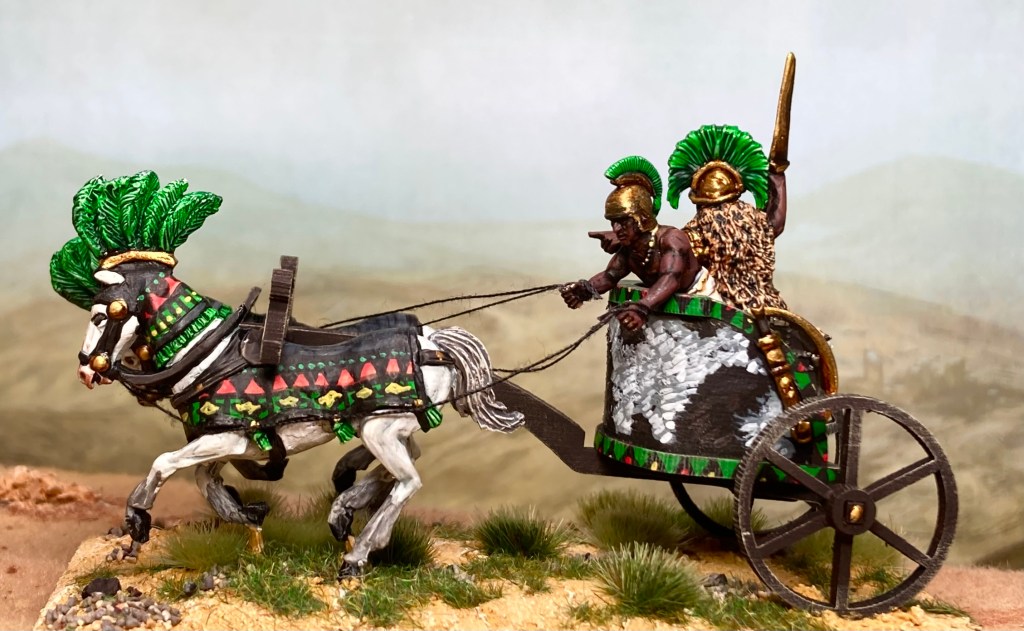
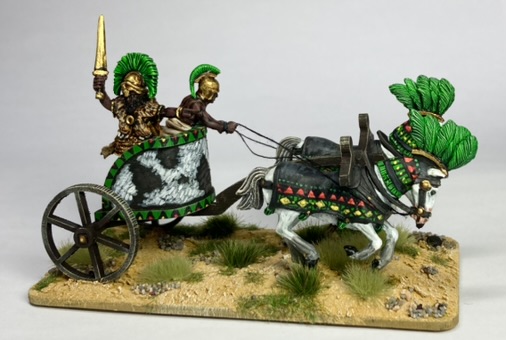
After some hunting around through the usual suspects online (Foundry, Eureka, Redoubt, Lucid Eye) I settled on using a Northstar Kadesh chariot with a converted Sea Peoples leader as Memnon. The colour scheme was to reflect the green and gold that I’d used to tie Memnon’s followers together last time out, expanded with a little red and black. Howes’s illustration draws upon the modern Ethiopian flag colours for inspiration, which although obviously anachronistic, has a clear African vibe to it. One reason I picked the Northstar chariot was that the horses had elaborate plumes and caparisons which would allow for some bright colours and patterns!
Northstar chariot original (pic from Northstar website)
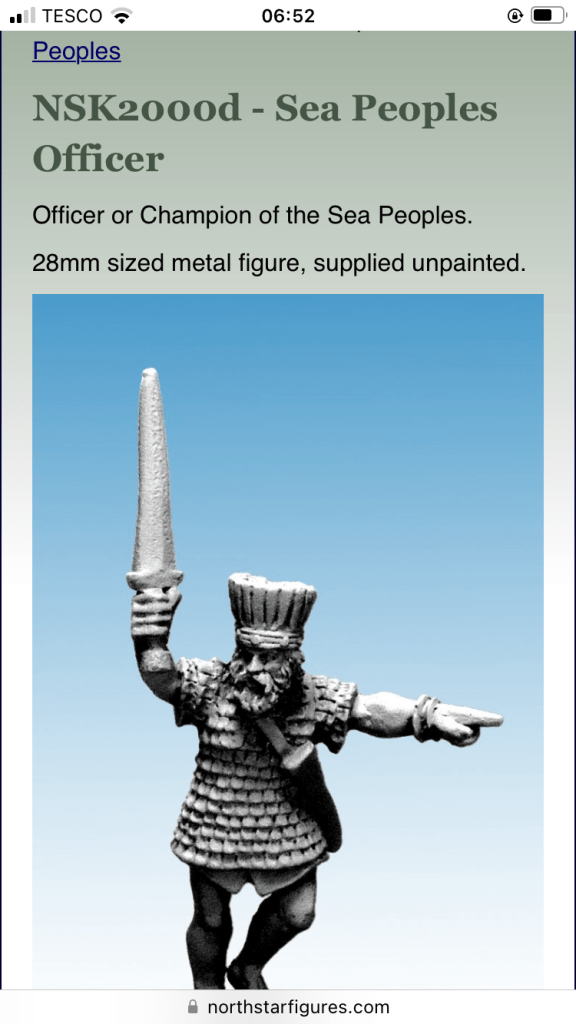
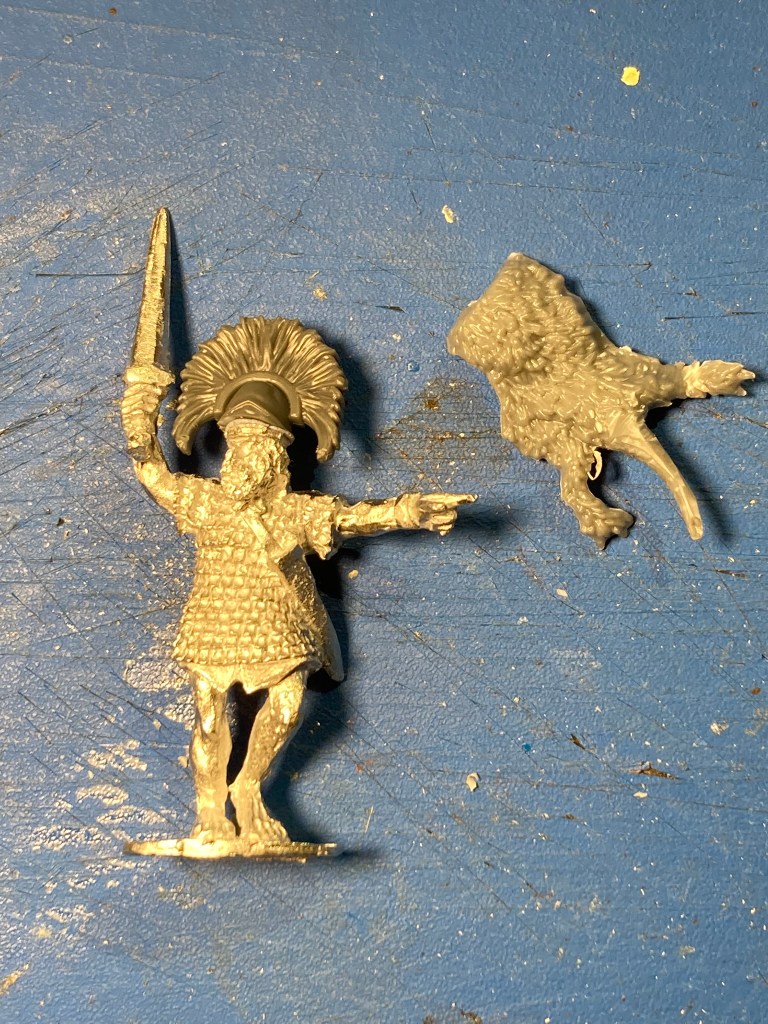
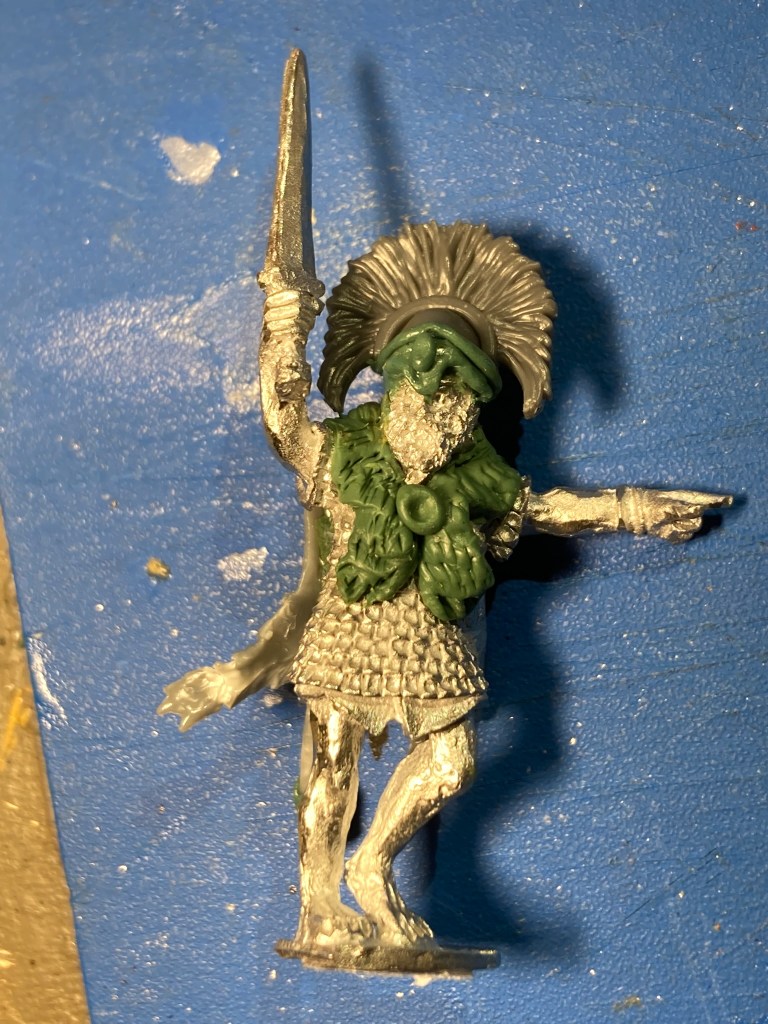
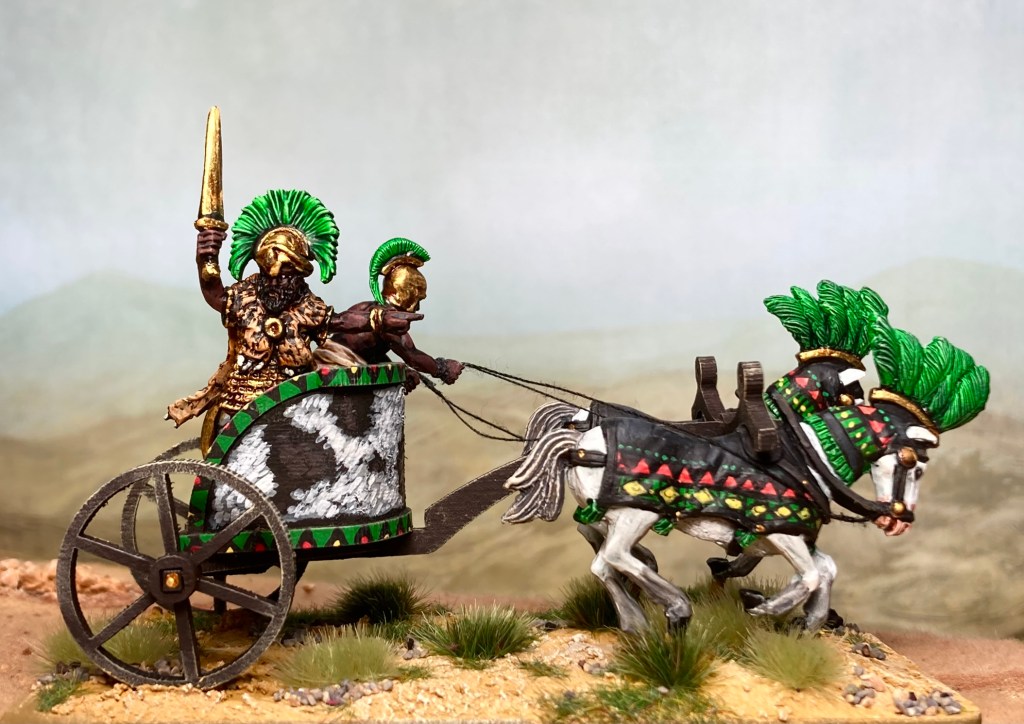
Memnon himself started life as a Sea Peoples officer; the figure was suitably heroic (pointing and waving a sword, wearing scale armour) but I wanted to swap his headgear for something more esoteric. His Ethiopian warriors are conversions of Perry Beja models with some Greek-style crested helmets so I wanted something similar but suitably ostentatious for the big boss.
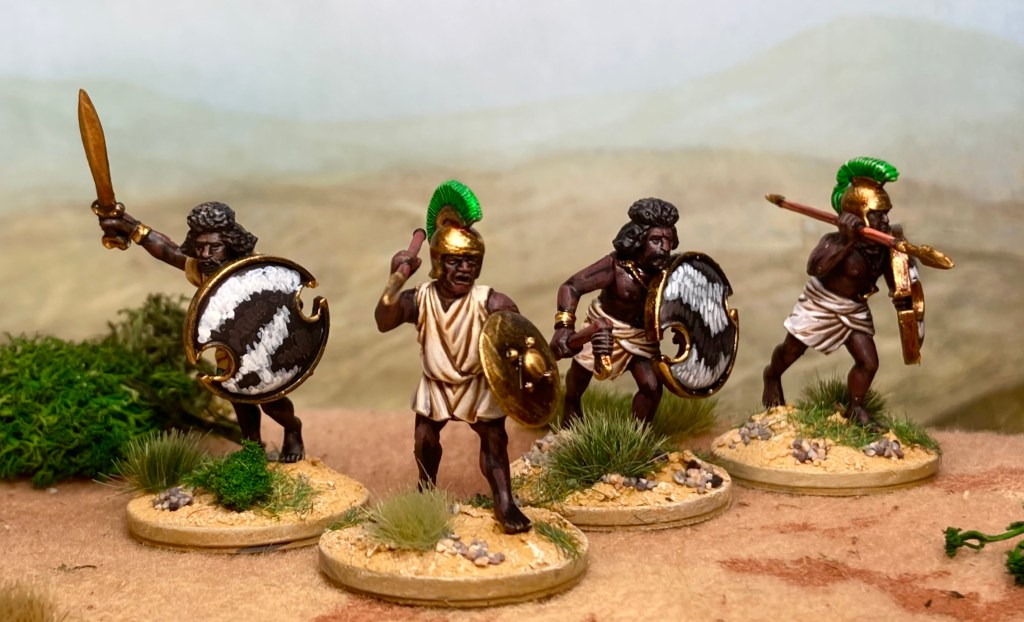
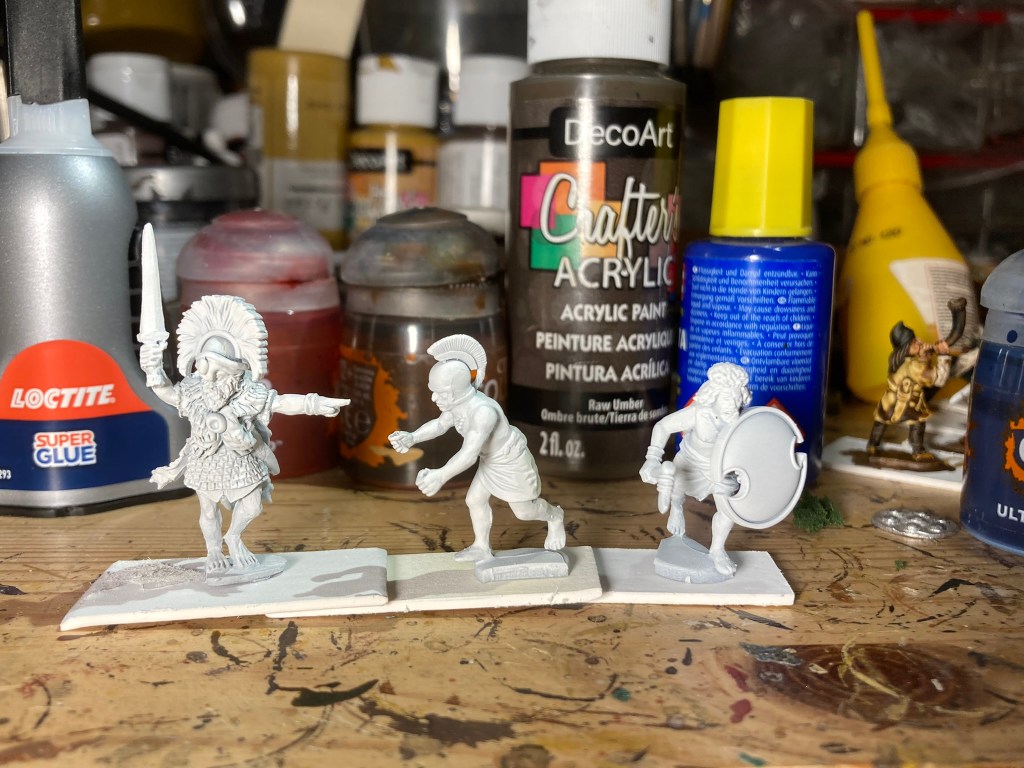
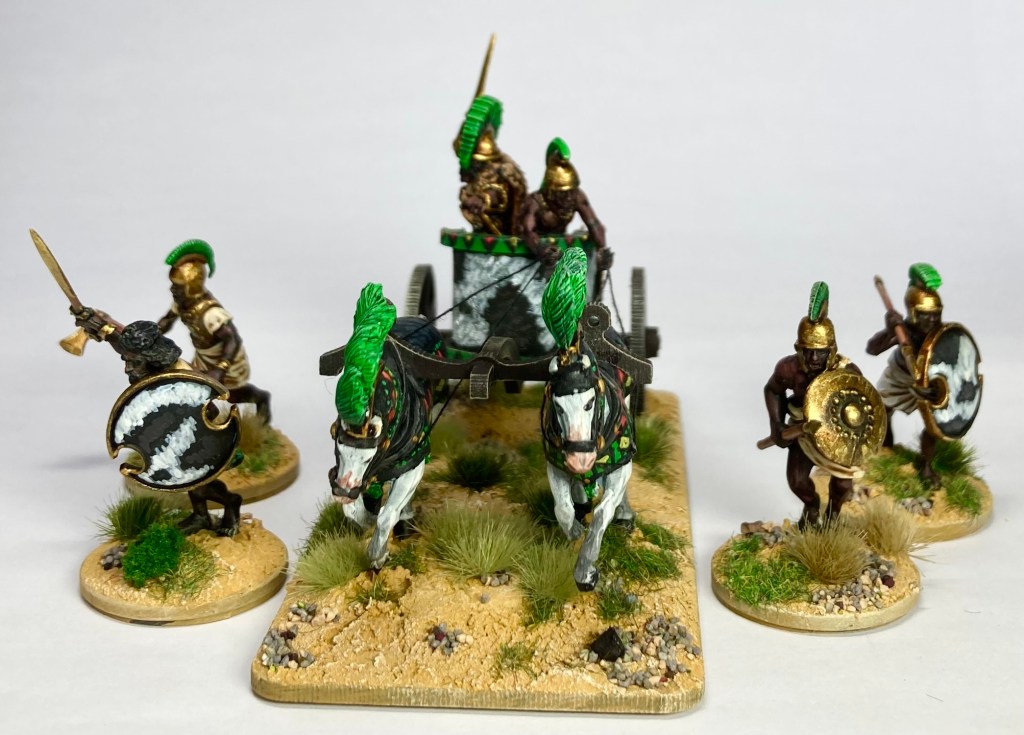
Memnon’s warriors – all converted plastics. Bodies and bare heads are from Perry Miniatures’ Beja, apart from second left who has a Warlord Games Greek Hoplite body. Helmeted heads are Victrix Iberians with crests added. Shields are from Oathmark Skeletons and Wargames Atlantic Skeletons.More of the same – these guys have weapons and shields taken from Oathmark skeletons and revenants.
Cue hunting through all my bits boxes! Victrix had some nice crests but these were beaten into second place by Wargames Atlantic skeletons, which feature a single transverse crest of heroic dimensions.
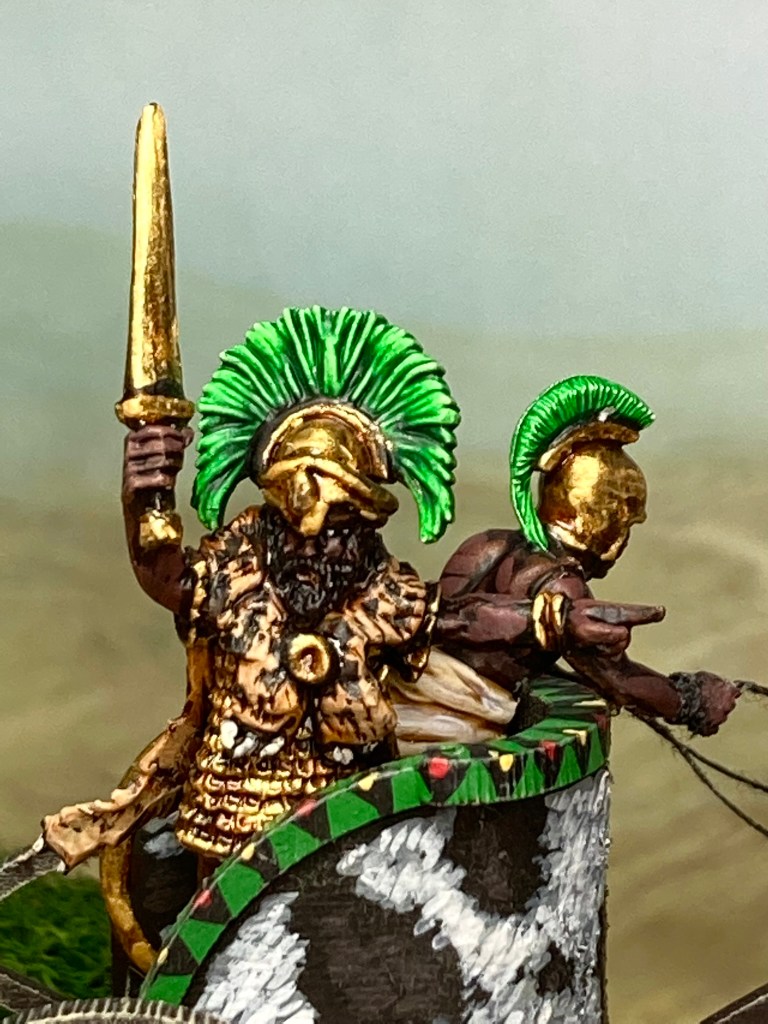
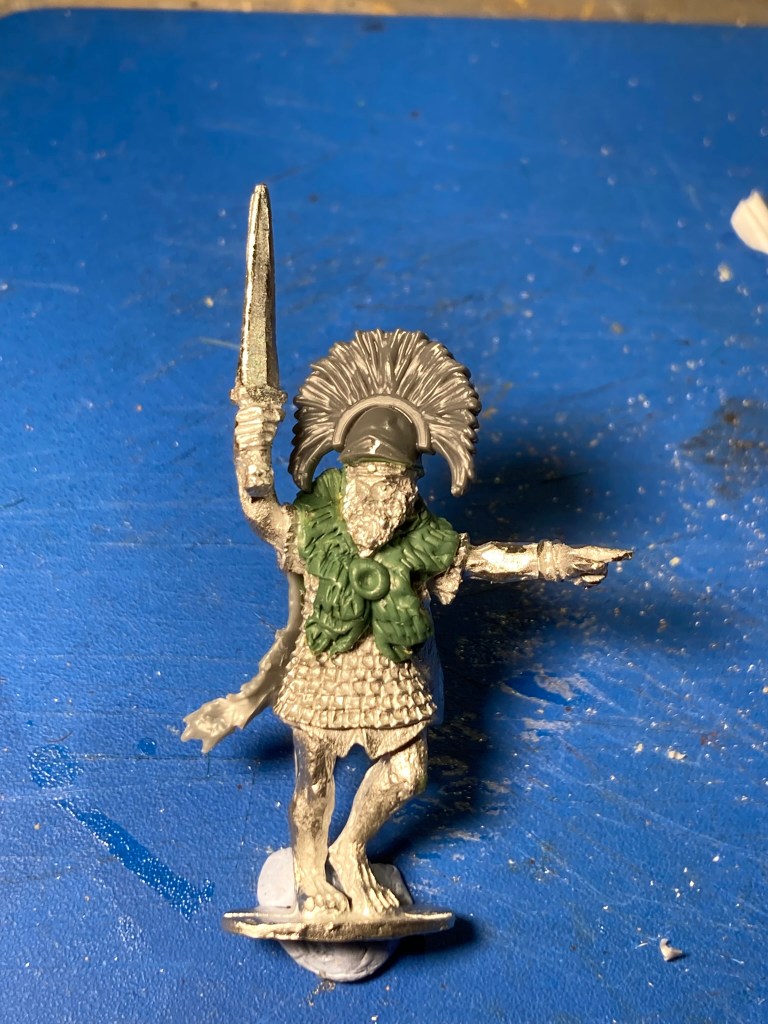
After some chopping and gluing, I managed to transpose the rather OTT crest onto Memnon’s royal head and blended it in with some inexpert green stuffing. A fur cape was added from a Victrix Roman and I now had the hero I was after.
A bit rough and ready, but King Memnon takes shape!
The charioteer was a simpler affair, being no more than a Perry Beja body and arms with a Victrix Iberian head and crest. The hands had the weapons cut off and were then drilled out to accept reins that I would add after painting.
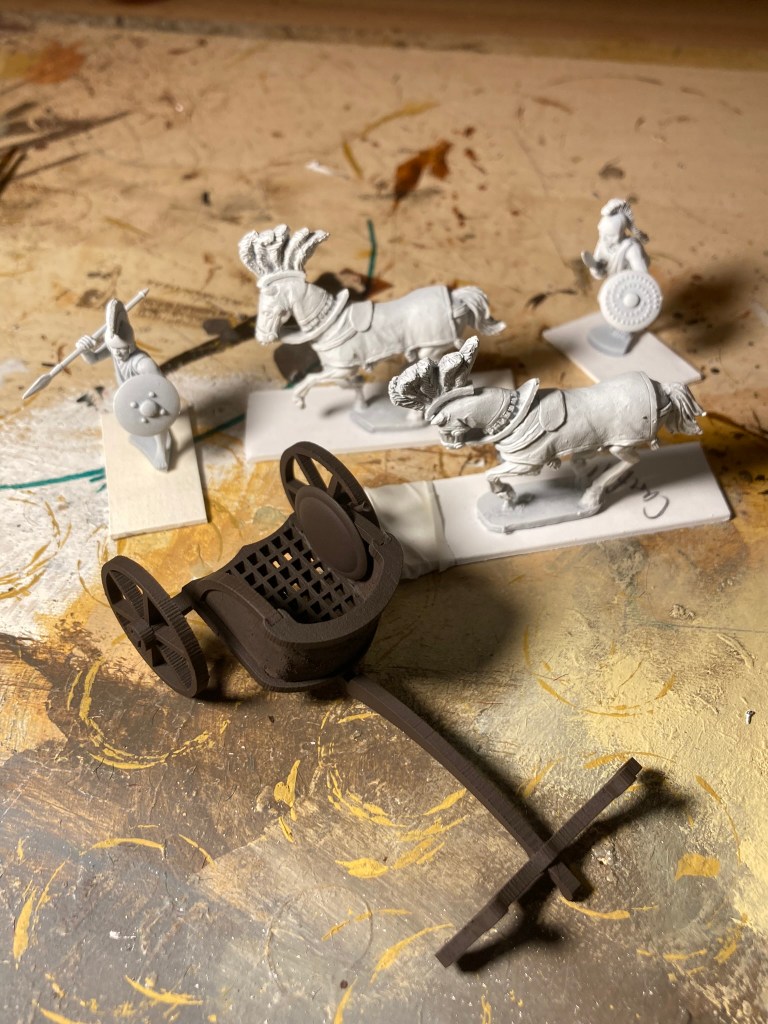
The Northstar chariot is made from MDF and grey board (originally produced for them by 4Ground and now by Sarissa) and it’s a clever little piece of work that wasn’t too hard to fit Memnon and his charioteer into.
Component parts from Northstar – you can see the level of detail on the MDF chariot.
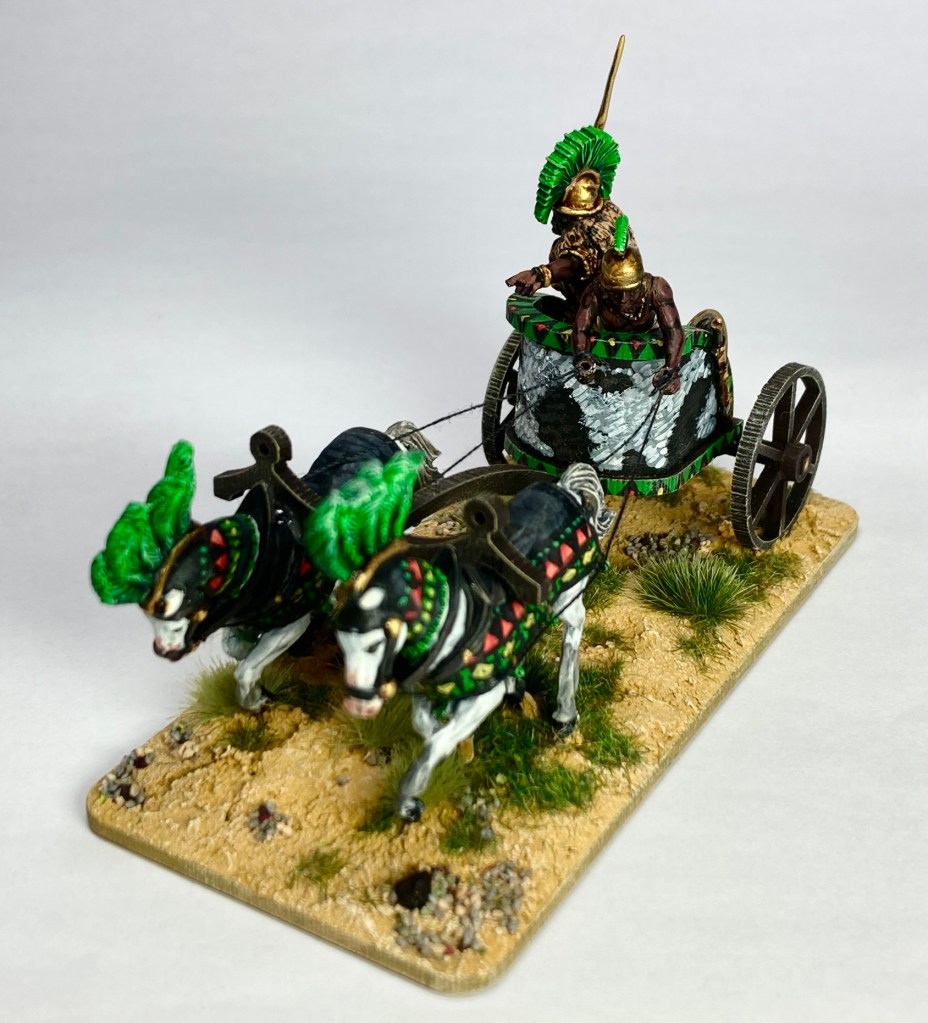
I primed it separately from the other models with a coat of Halfords camouflage dark brown spray. This didn’t take long to dry brush up with various shades of brown before painting the housing to match the cowhide shields of the Ethiopians. Ok, then I got slightly carried away and decided to add a pattern, but hey, it looks the part.
Memnon and his charioteer both had a white undercoat before being painted using the same colours as my previous Ethiopians. His fur cloak had a few spots added to suggest a leopard or similarly ferocious big cat.
The horses – also primed white- received a base coat of GW Contrast Apothecary White with various patches of grey and pink added for variety. Patterns were picked out in acrylics using a number 1 brush before blocking in the areas around them in black. Tassels and plumes were treated the same as the Ethiopian helmet plumes – GW Contrast Warp Lightning and Dark Angels Green in various mixes.
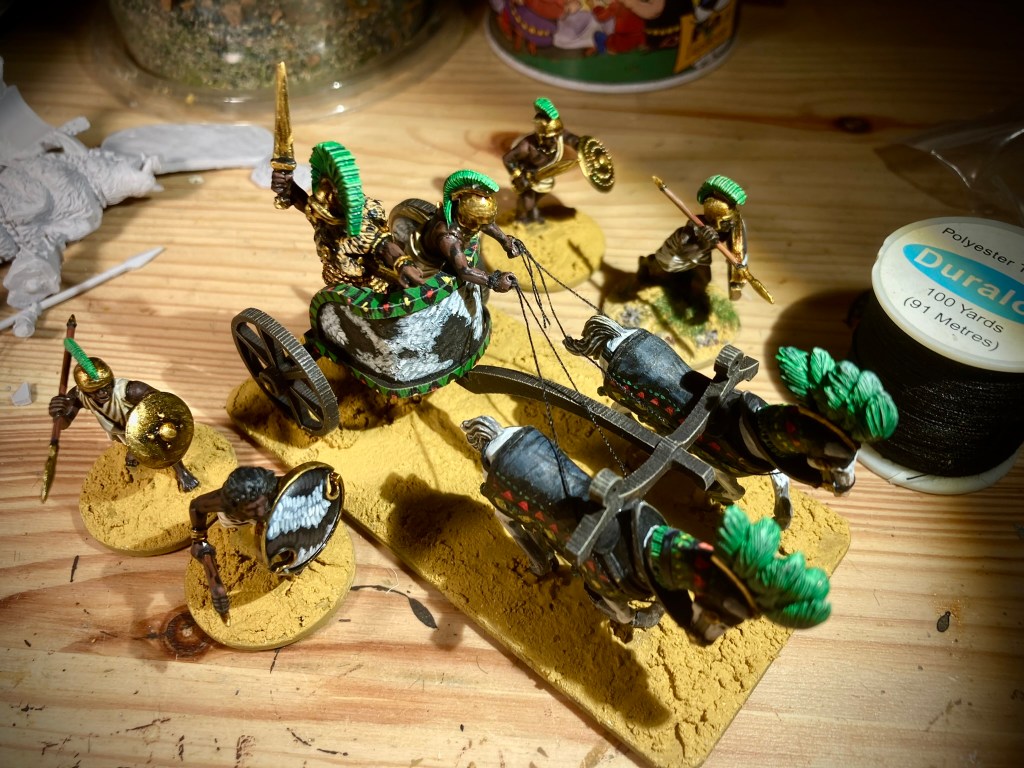
With all the base layers finished, I gave the minis two coats of matt varnish and then did the bronze. After that, it was time to assemble the pieces.
In a scene reminiscent of Ben Hur, our heroic charioteer struggles to get it together with the reins and chariot…Success! Just the last bits of basing to go..
After some suitably sandy basing and a few grass tufts and rocks, Memnon and his warriors were ready to go.
I really enjoyed doing these minis and will be using them in my Greek myth games very soon – either in Midgard or, quite possibly, as a good basis for a warband in Of Gods And Mortals (OGAM).
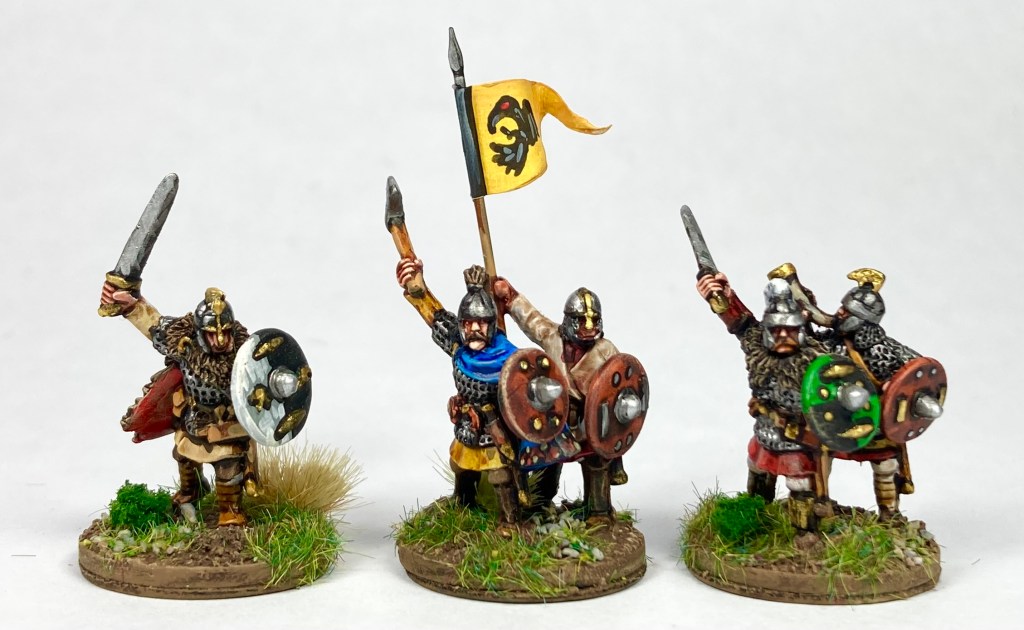
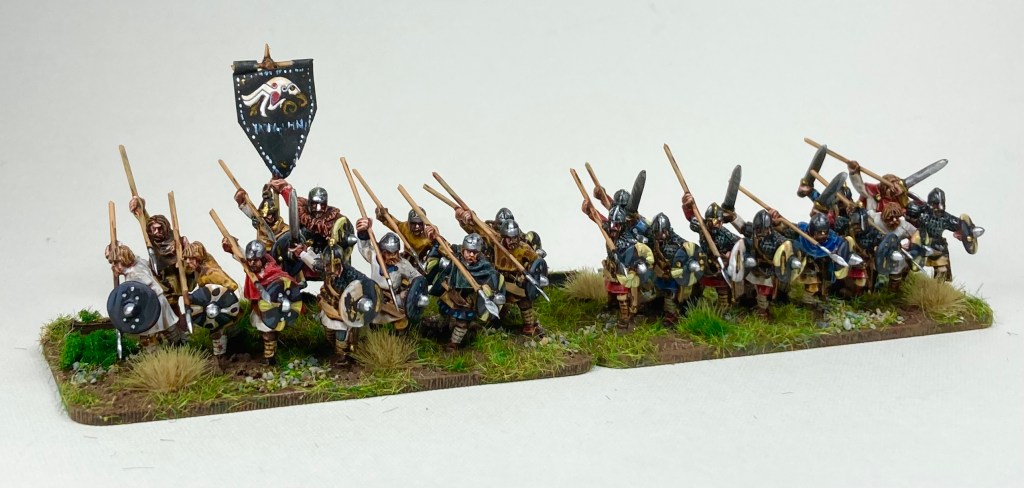
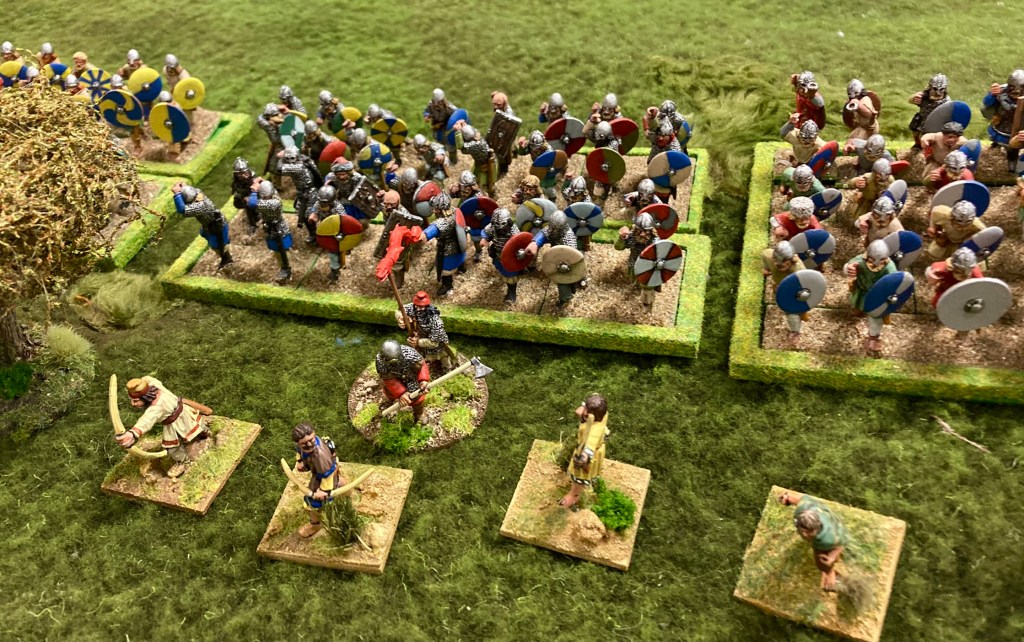
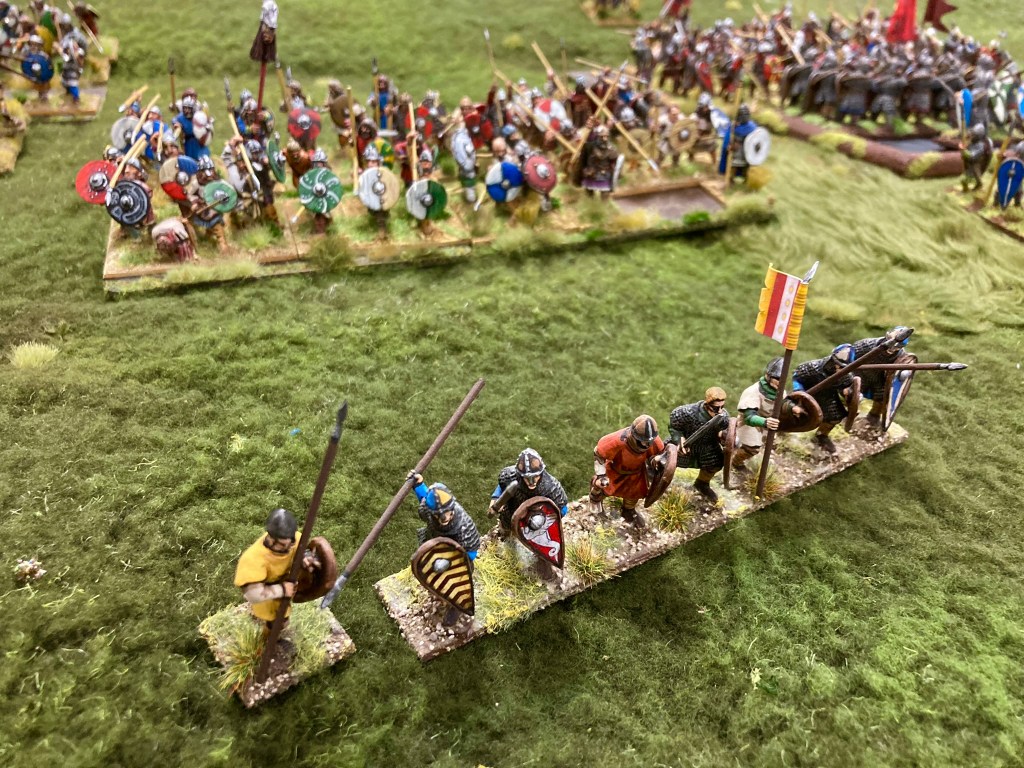
Dan Mersey of Wiglaf Miniatures kindly sent me a pre-release sample of the latest 18mm Wiglaf Miniatures Saxons a month ago, which I promptly cleaned up, undercoated, base coated…and then abandoned for several weeks as I got distracted by work and other things. Fortunately, I found some focus this week and got them finished off and based up.
This chap (front right) is my favourite of this release – a wonderfully animated little warrior with a superb Vendel helm.
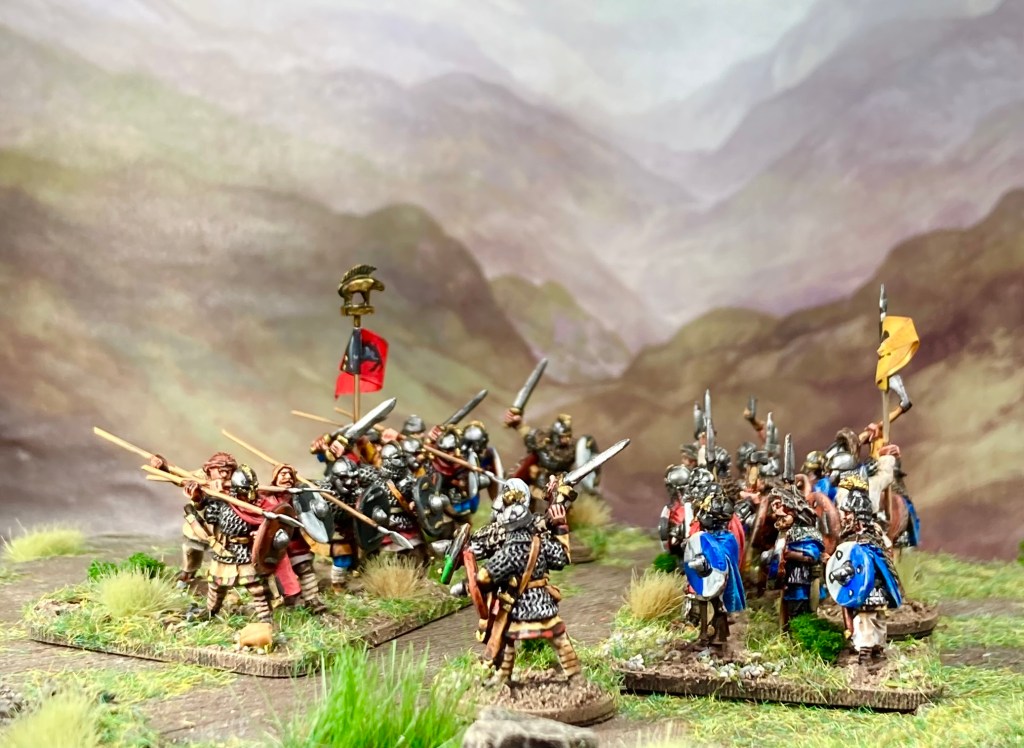
As you probably already know, the second Wiglaf release is another pack of character models and a couple of packs of Vendel-style Saxons showing the Swedish influence that may have been present in the East Saxon kingdoms of the 7th and 8th centuries. These have some subtle differences to the original release: slightly larger shields ornamented with metal strips and plaques – similar to the Sutton Hoo shield ; tunics with a distinctive ‘crossover’ neck; and helmets based on the various Vendel-period designs with mail ventails and large cheek plates.
I thought it’d be fun to paint the Wiglaf Minis side-by-side with some Forged in Battle 15mm of a very similar style. While not described as ‘Vendel’, the FiB pack of ‘Saxon Raiders’ contains a number of 7th-8th century armoured Saxon warriors, including a version of the Sutton Hoo king, some Vendel helms and (fun but not quite sure of the provenance of this) a couple of guys wearing a wolf skin head dress.
Forged in Battle (left), Wiglaf (right)
Despite Wiglaf being described as 18mm and the Forged in Battle as 15mm, both are very compatible, with the Wiglafs being marginally broader and more animated.
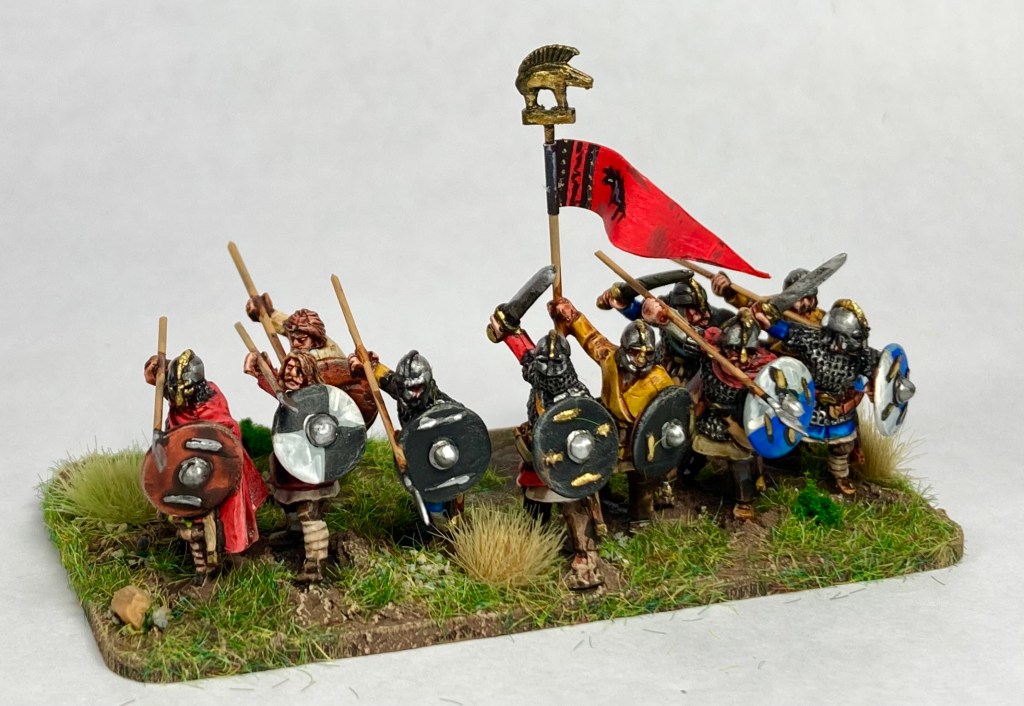
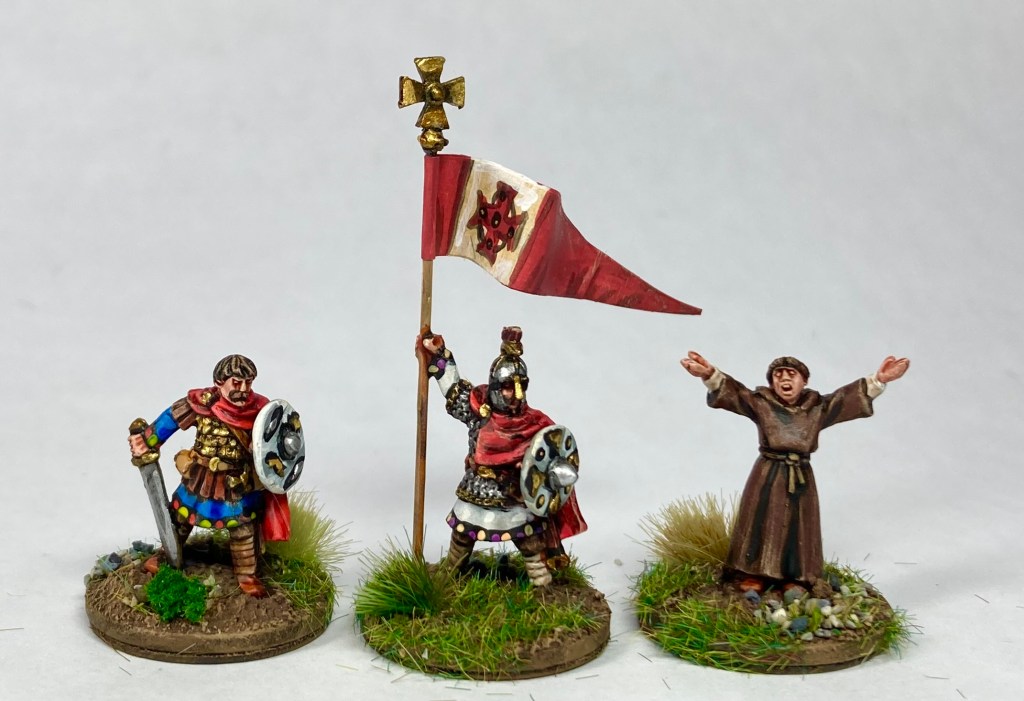
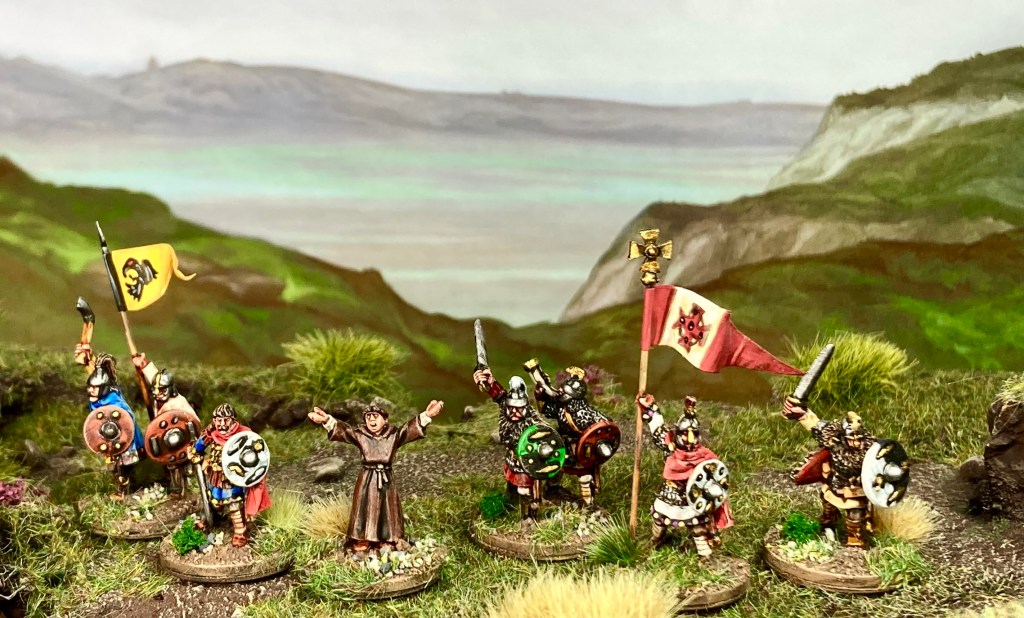
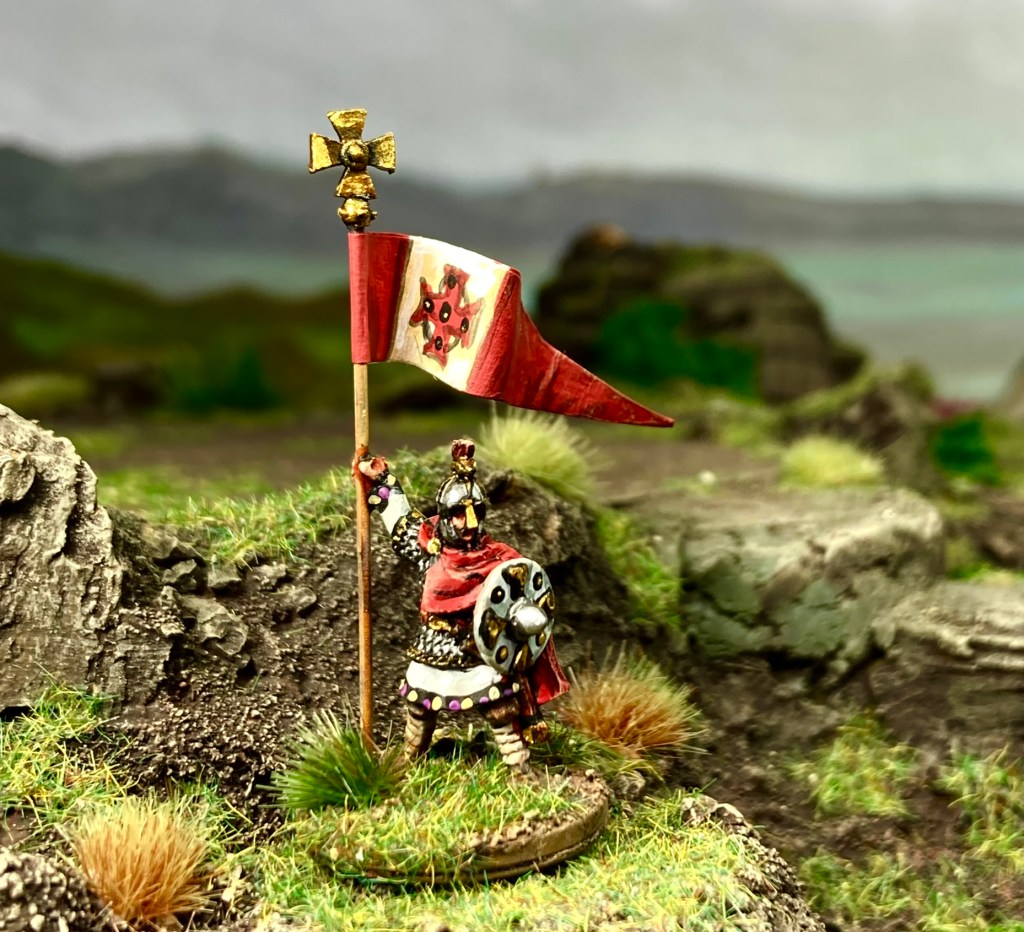
Characters in the latest Wiglaf release include Edwin and Oswald of Northumbria, plus a praying monk, a banner bearer and horn blower and a number of leaders aimed at the South-East: Æthelbert of Kent, Sexred of Essex and Caedwalla of Wessex. These are all lovely sculpts that I’ve struggled to do justice to, especially after seeing Steve Dean’s work, but they’ve all painted up nicely. As usual with Mark Copplestone’s 15/18mm work, they are all good enough to be 28mms!
Wiglaf character miniatures
An interesting feature of the new leader pack is that it also contains some ‘banner pole toppers’ to add a bit of fun to the standard bearers (a cross, boar and deer – the latter not pictured). While quite fiddly to drill out, they absolutely look the part once finished.
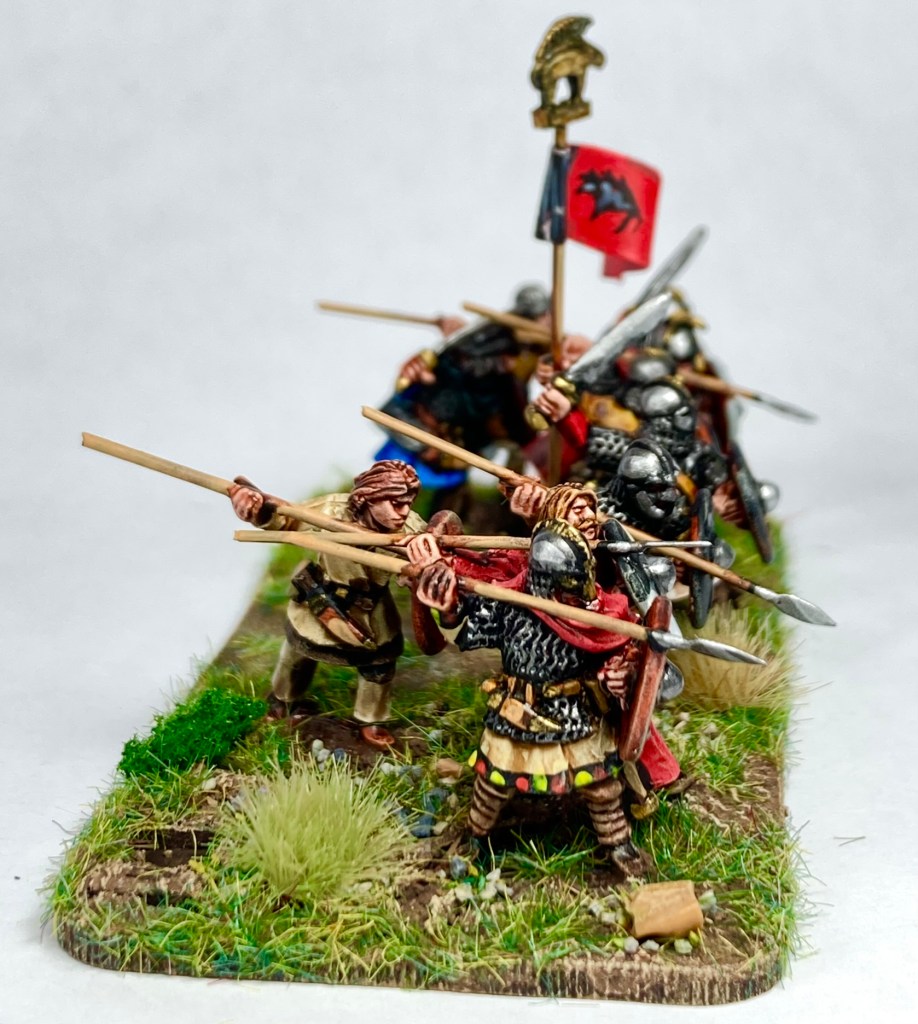
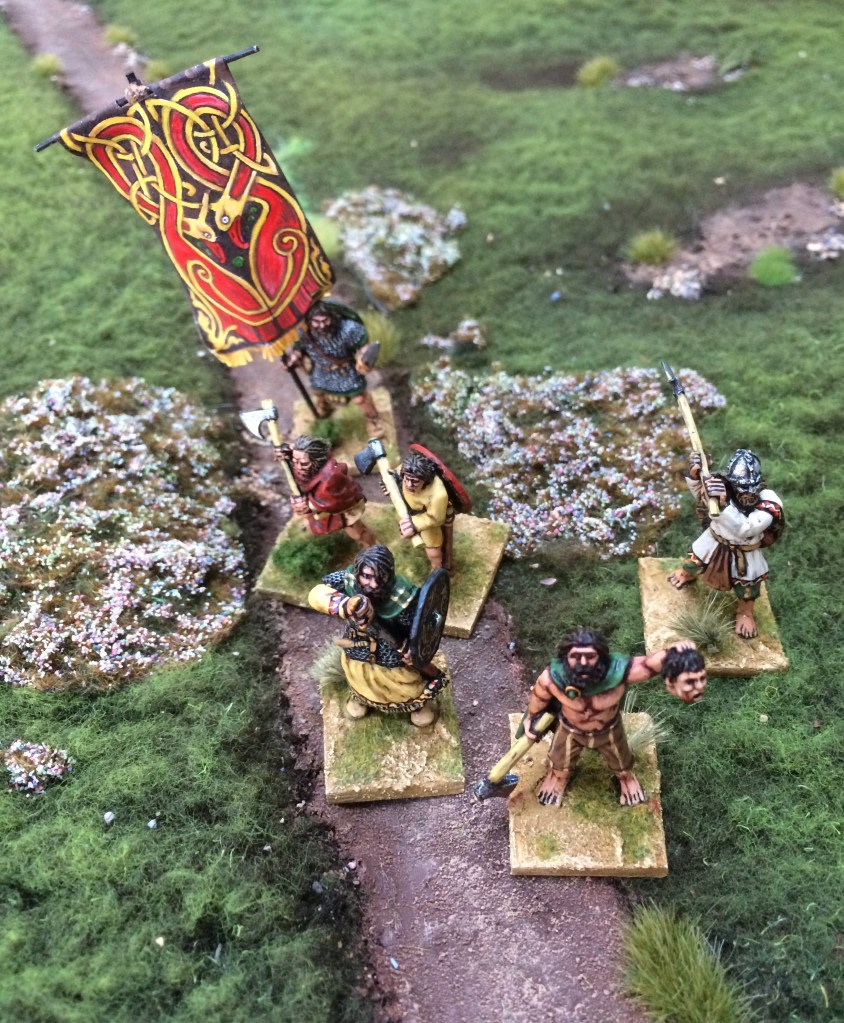
Oswald of Northumbria showing off his Christian credentials. The banner is hand painted, based on one that I saw a few weeks back at a re-enactment event.
The paint job was, once again, a white undercoat with GW Contrast colours followed by some selected highlights. I cut a few more corners this time, but spent longer on the metallics to make sure I had the shine on the armour and weapons that I like. If you want to see the painting method in more detail, have a look at my previous post here.
Forged in Battle 15mm Saxons
Unit bases were 40 x 80mm to play Age of Penda, with a micro dice holder at the back right to record damage. The heroes were based on 20mm rounds in order to fit into the gaps I left in the unit bases.
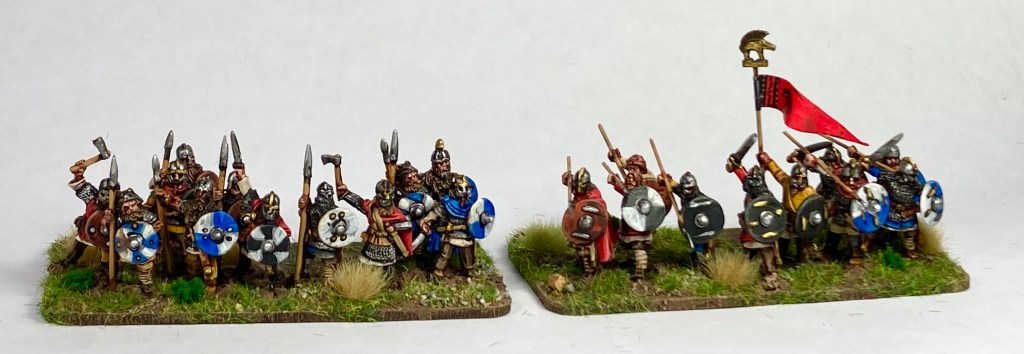
Forged in Battle Saxon unit with a couple of Wiglaf command models (centre back)
I’ll doubtless be doing some more of these in the near future, but right now my eyes need a break so it’s time for some 28mms!
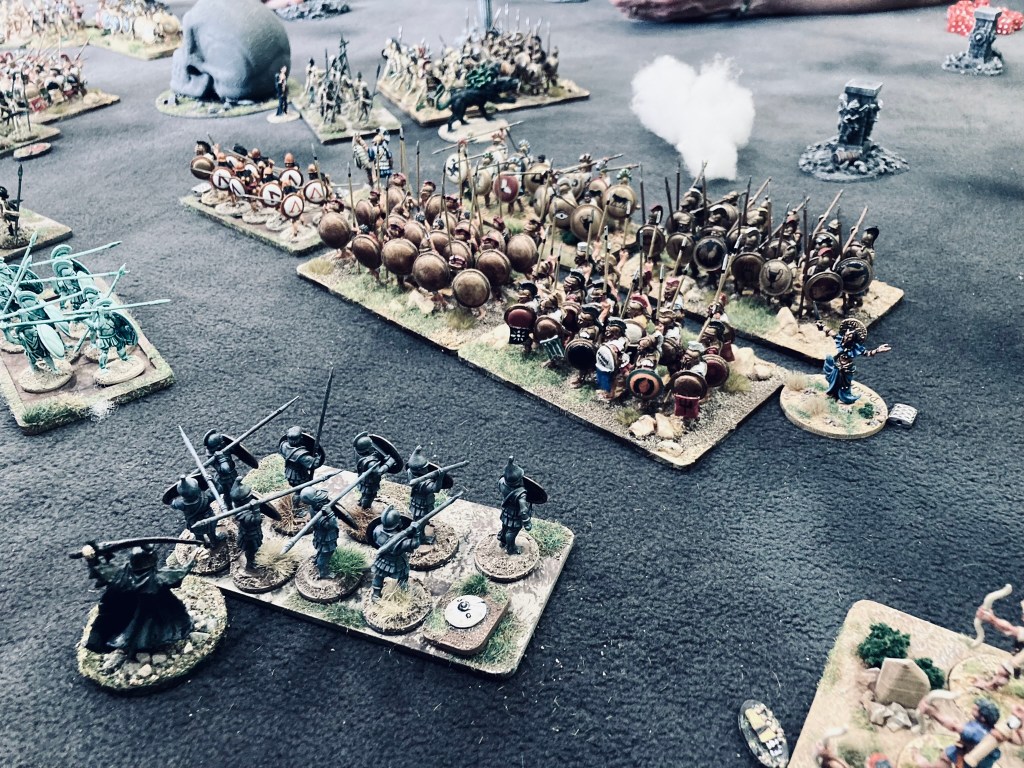
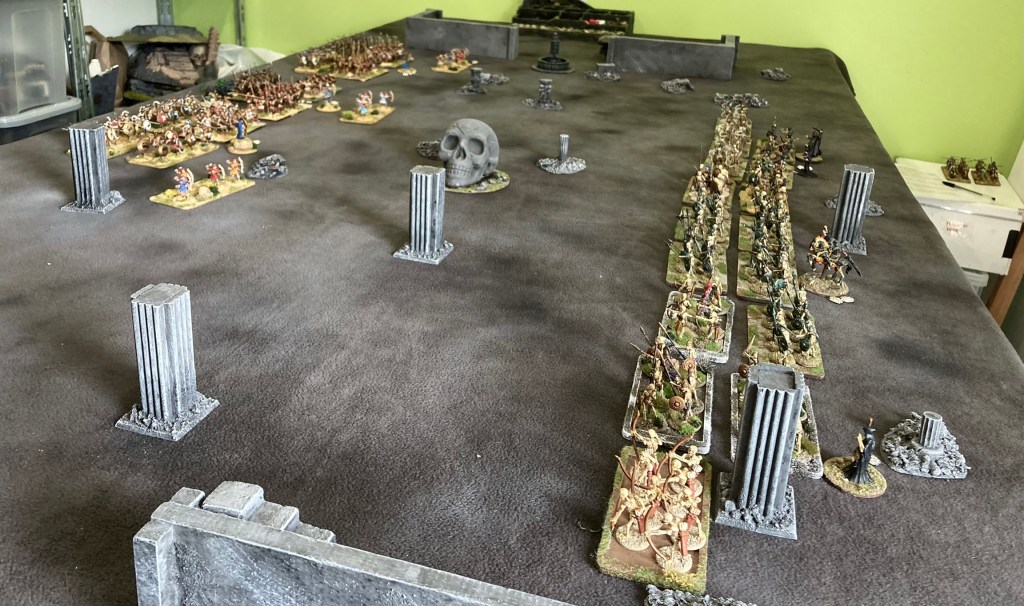
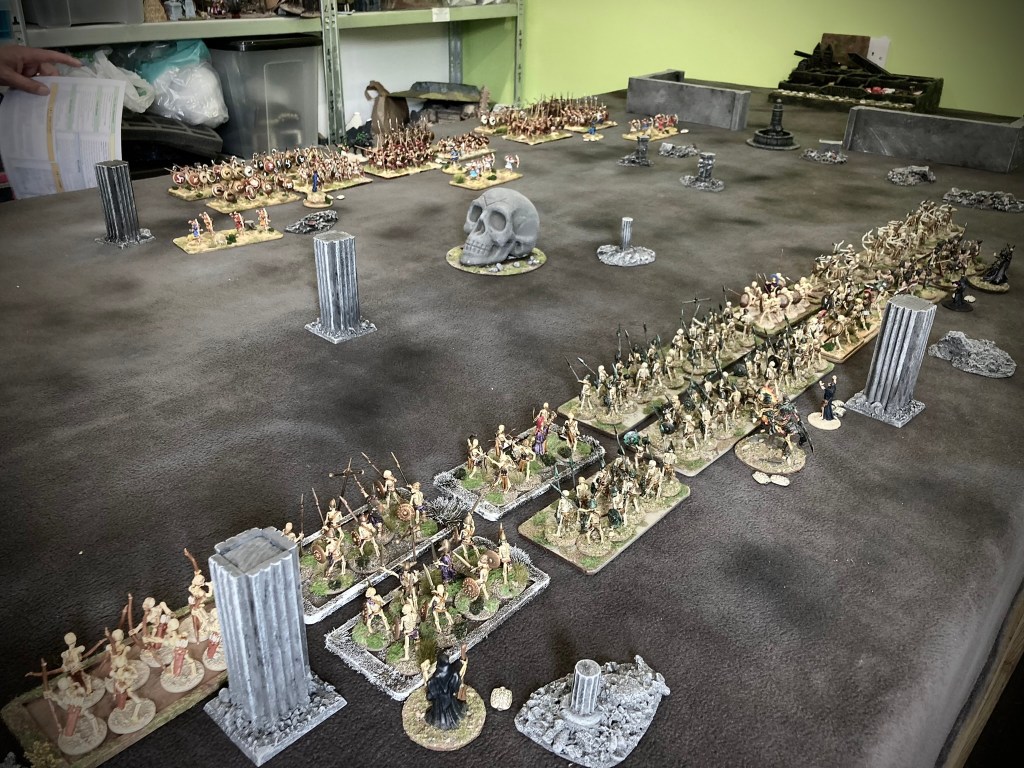
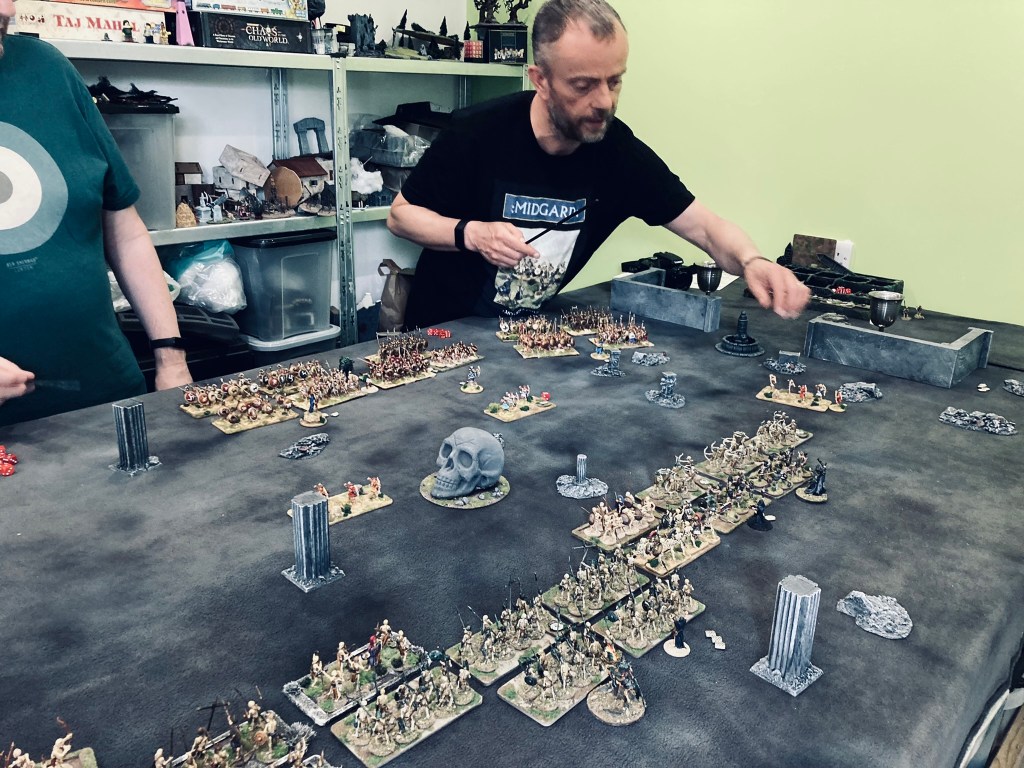
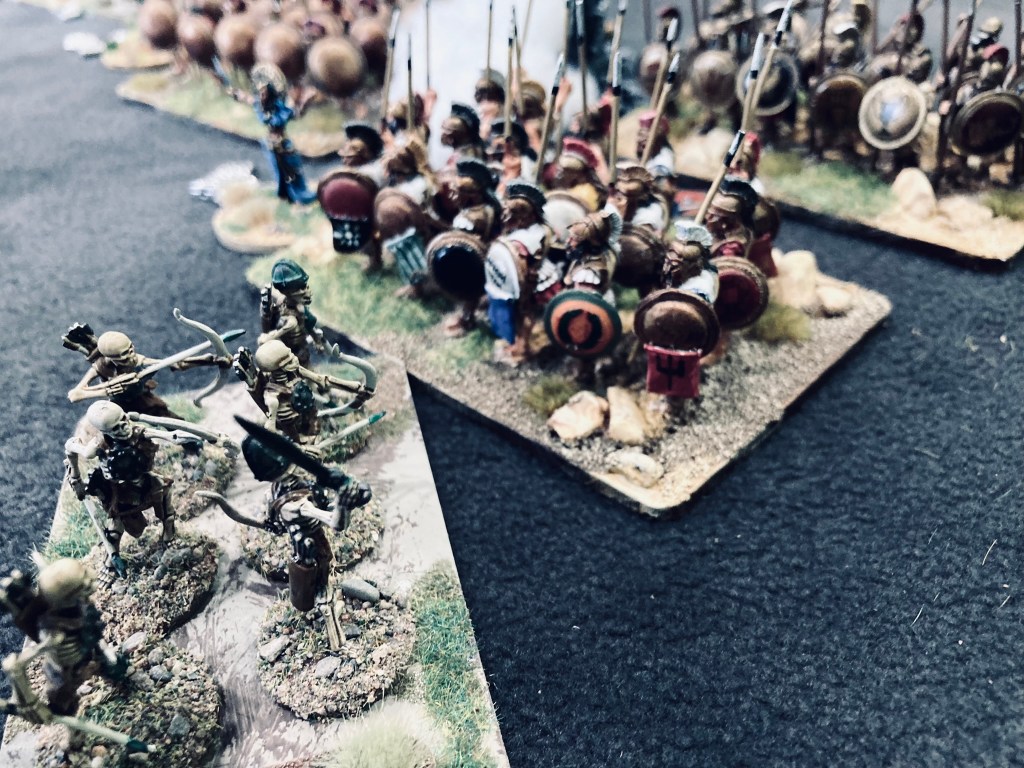
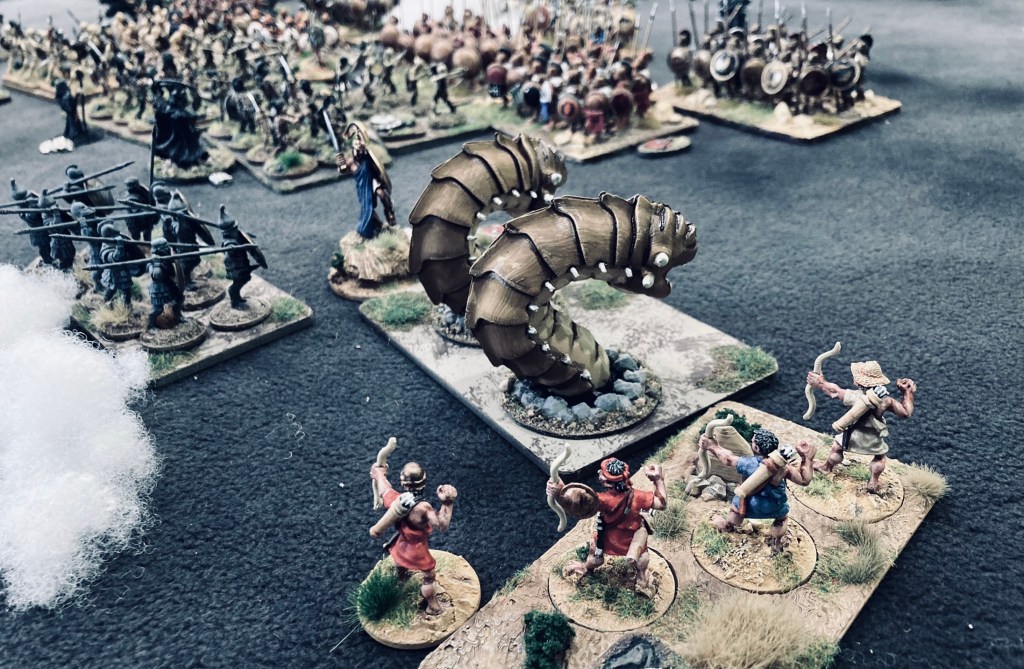
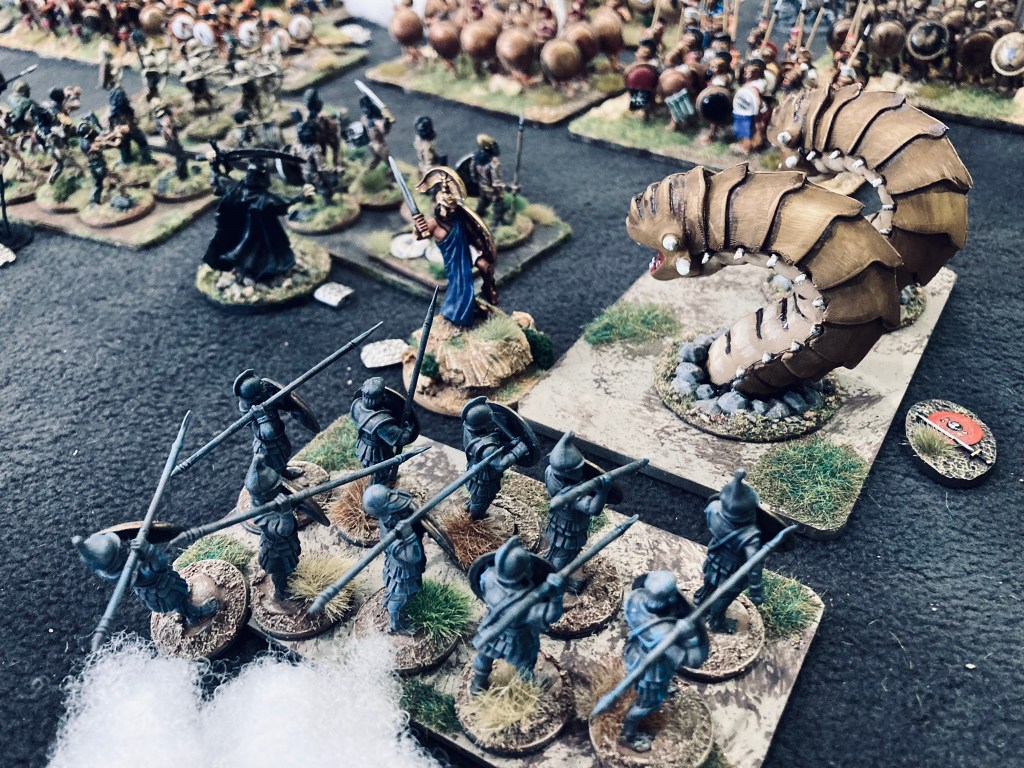
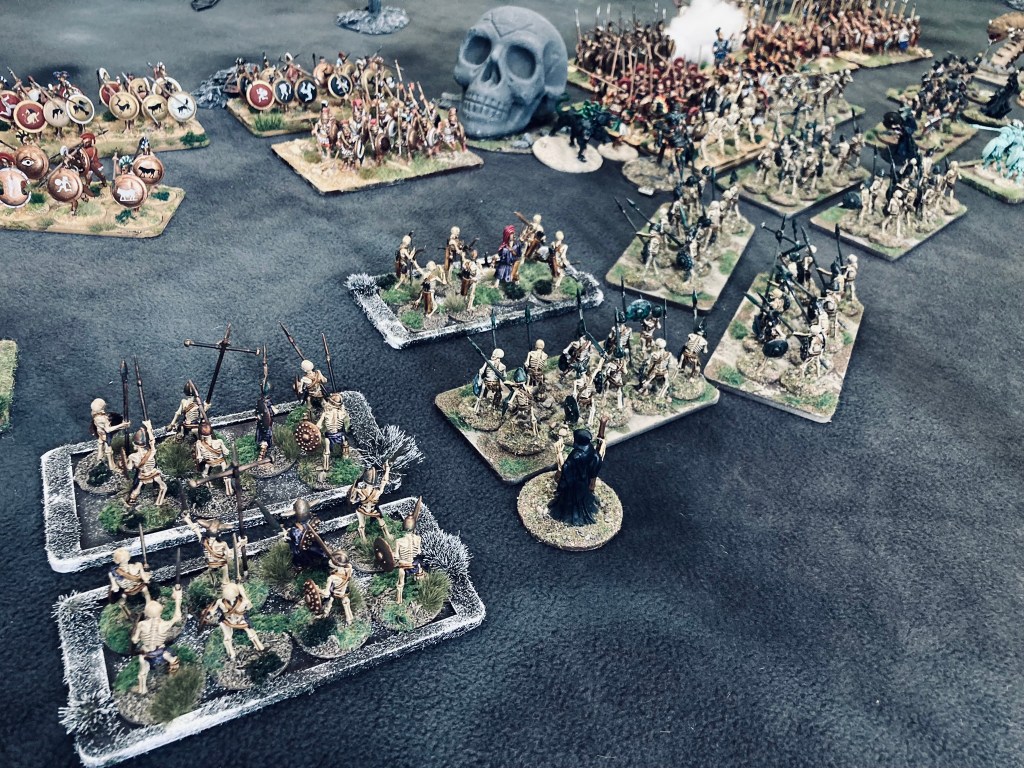
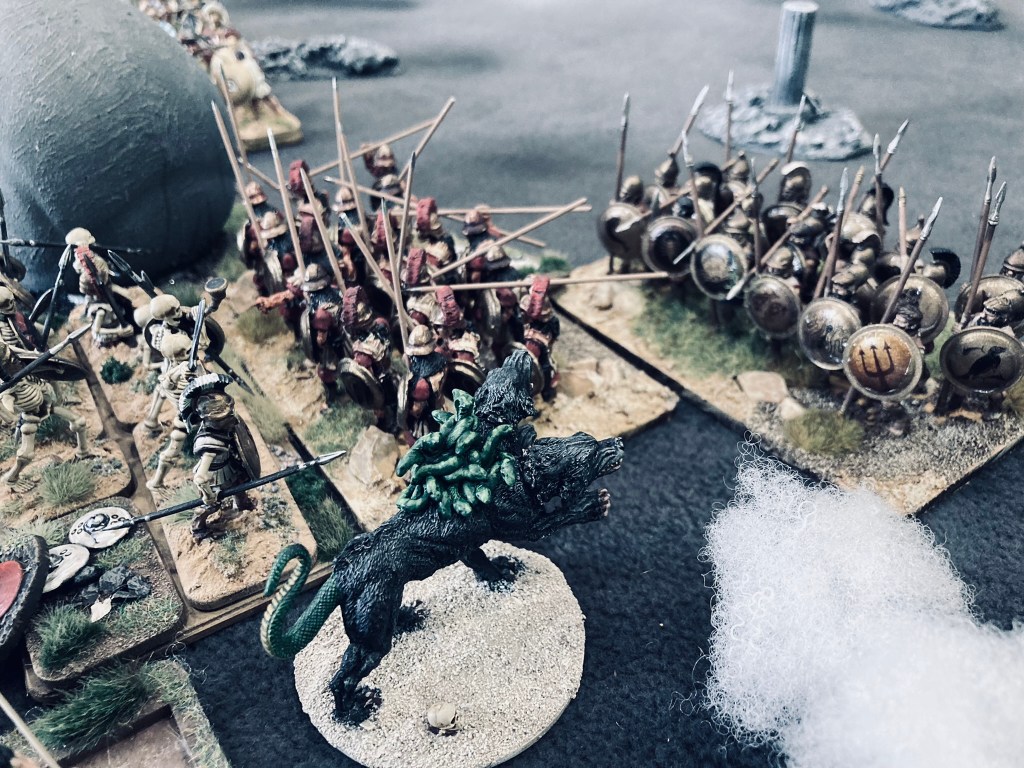
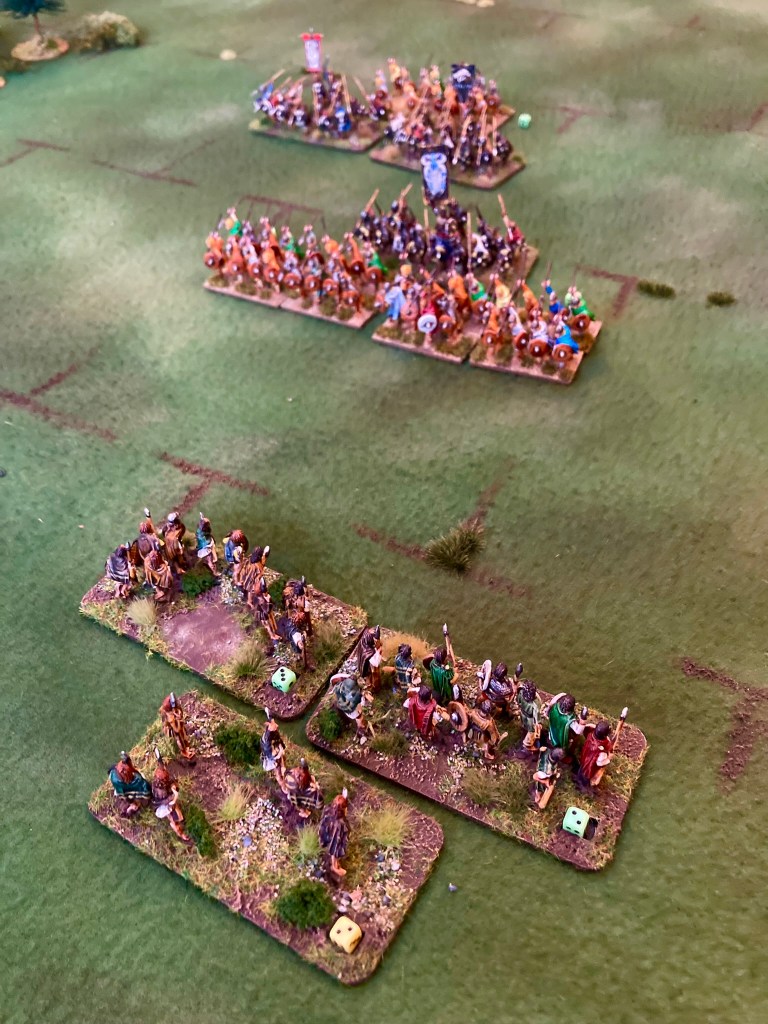
Basiileus’ hoplites face off against the shades of Hades
In testing my Midgard rules, we’ve been slowly playing our way through a Greek myth mini-campaign based on the adventures of Greek prince Basileus and his hardened crew of hoplites – you can read more here in previous instalment Basil and the Horn of the Minotaur. The whole thing is loosely based on Jason and the Argonauts with more than a dose of Harryhausen and nothing too serious involved.
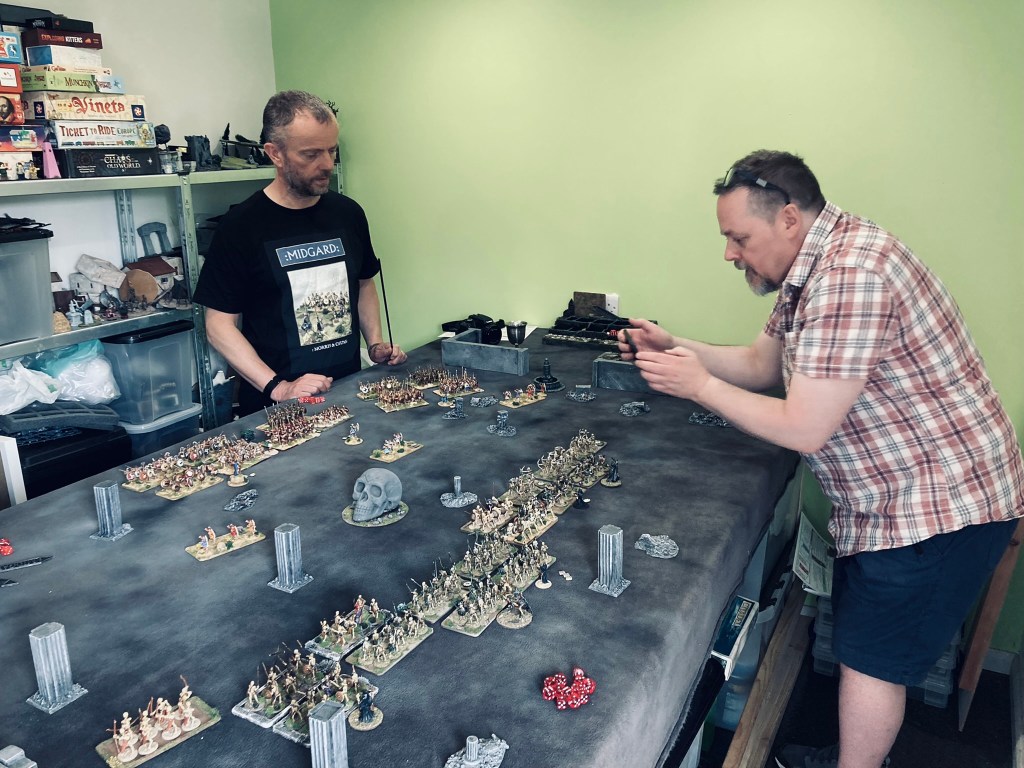
This weekend’s game was prompted by the outpouring of excellent and well-priced 28mm plastic undead mini kits over the last couple of years. Tom, Martin and myself have all succumbed to a greater or lesser extent, thus we had enough skeletons and shades to put together an army of Hades. Tom had recently added Hades, Cerebus and Orpheus to his collection as well, and thus a simple scenario was born…
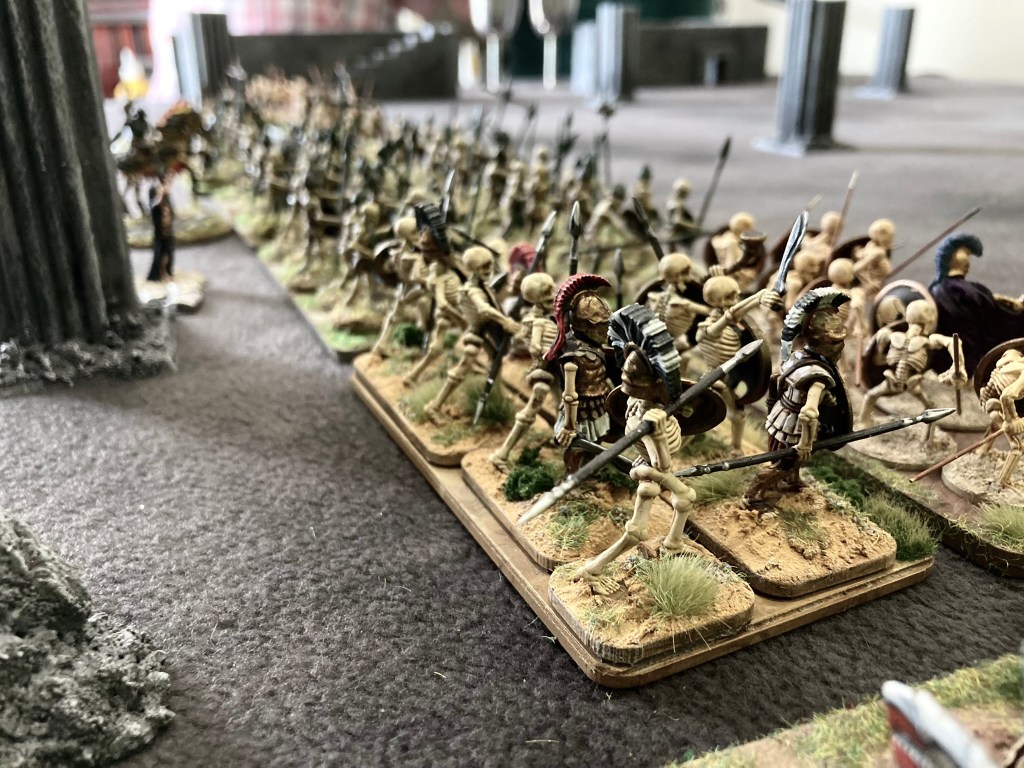
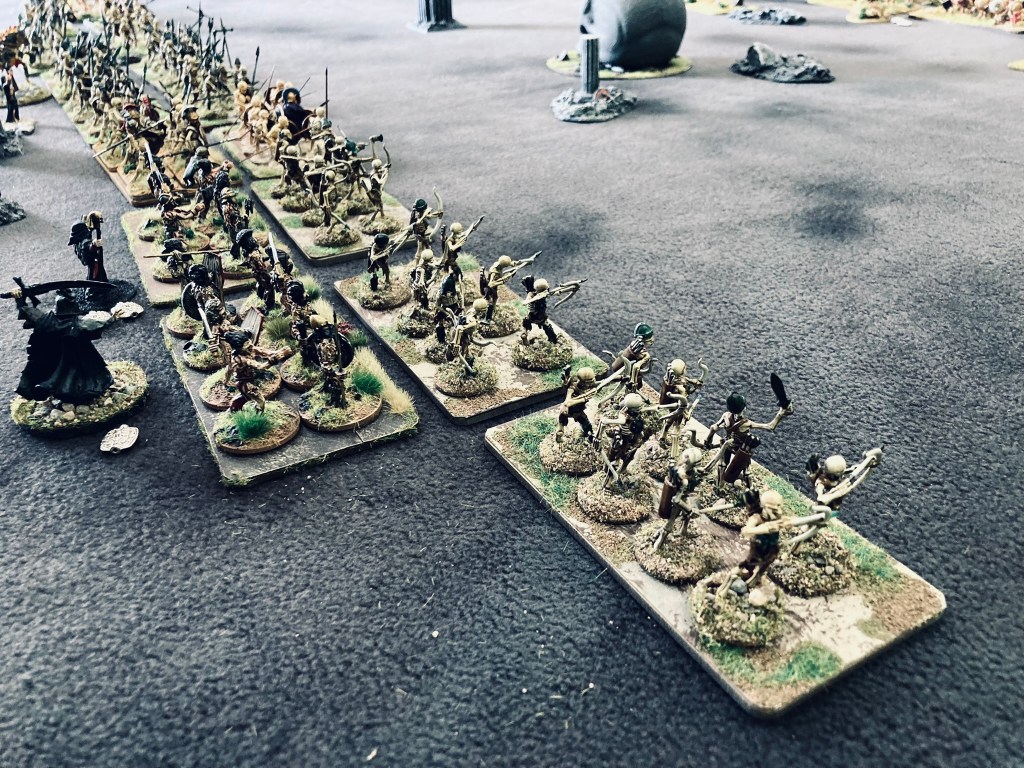
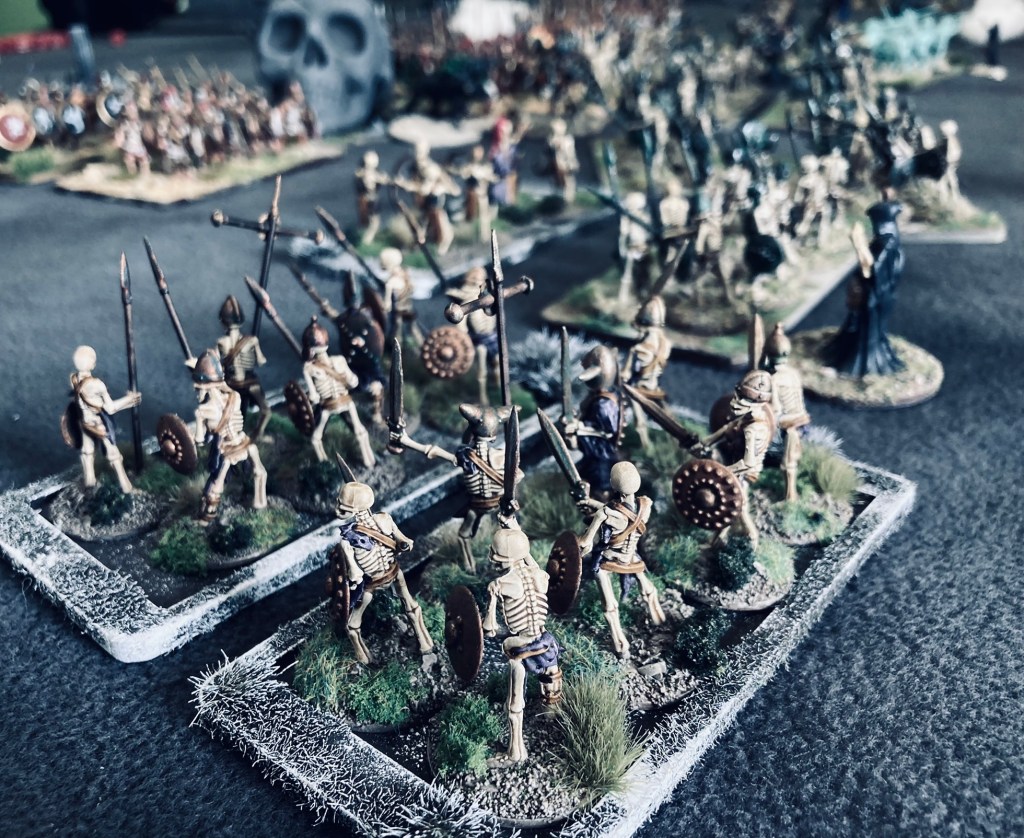
Legions of the Dead – nearest unit is Wargames Atlantic skeletons with some Victrix Greek parts
‘Greek hero Basileus has been set three highly dangerous (and probably fatal) tasks by the King of Athens in return for the hand of his daughter. Fortunately, Basileus can call on a large band of followers – the Argianauts. Having successfully escaped from Crete with the Minotaur’s horn during his first task last year, Basil has also recently liberated Apollo’s chalice from the Isle of Delos.
‘Now Basil tackles his most dangerous task – emulating Heracles in bringing Cerberus out of the Underworld. Fortunately, he has acquired the services of the famed Orpheus to charm the three-headed hound, but Hades is on the warpath to stop him. Who will prevail?‘
The scenario would be fought as a straight battle but with Orpheus in control of the enchanted Cerberus – the mission for the denizens of Hades was to get him back at all costs! Which was pretty much what happened.
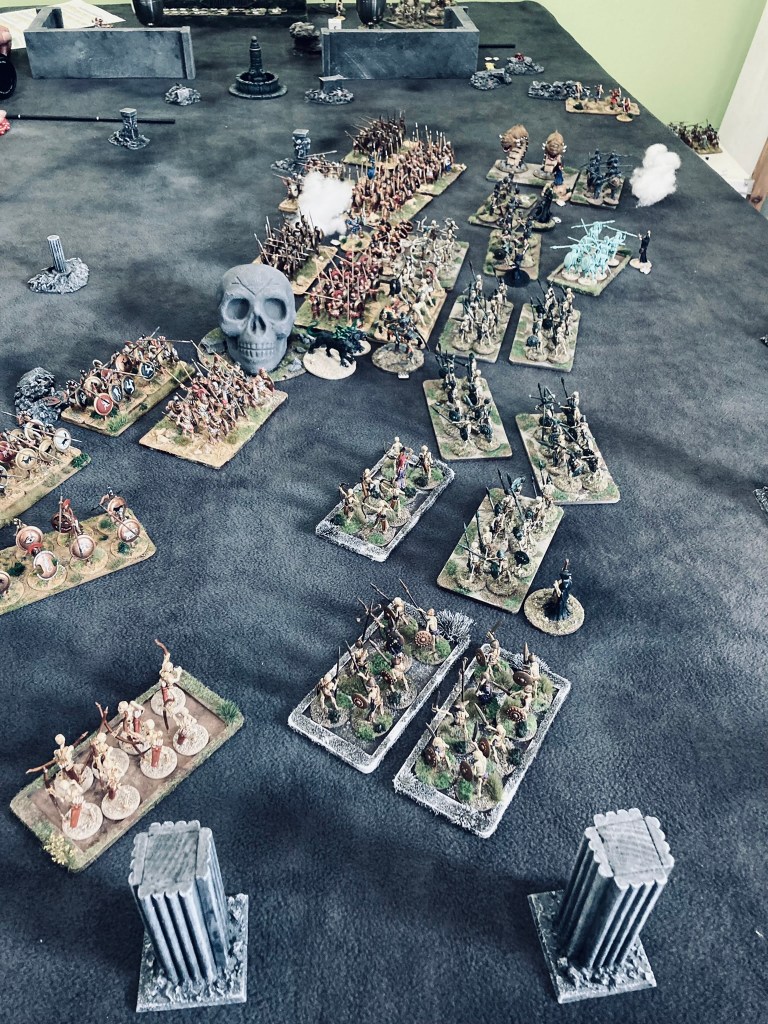
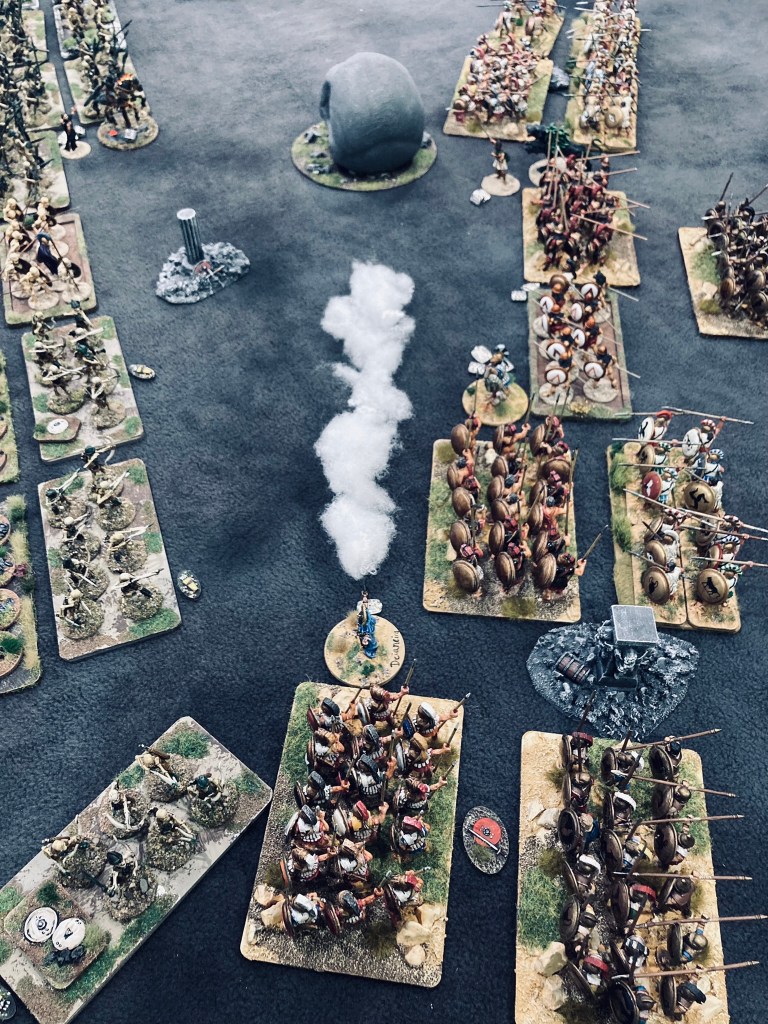
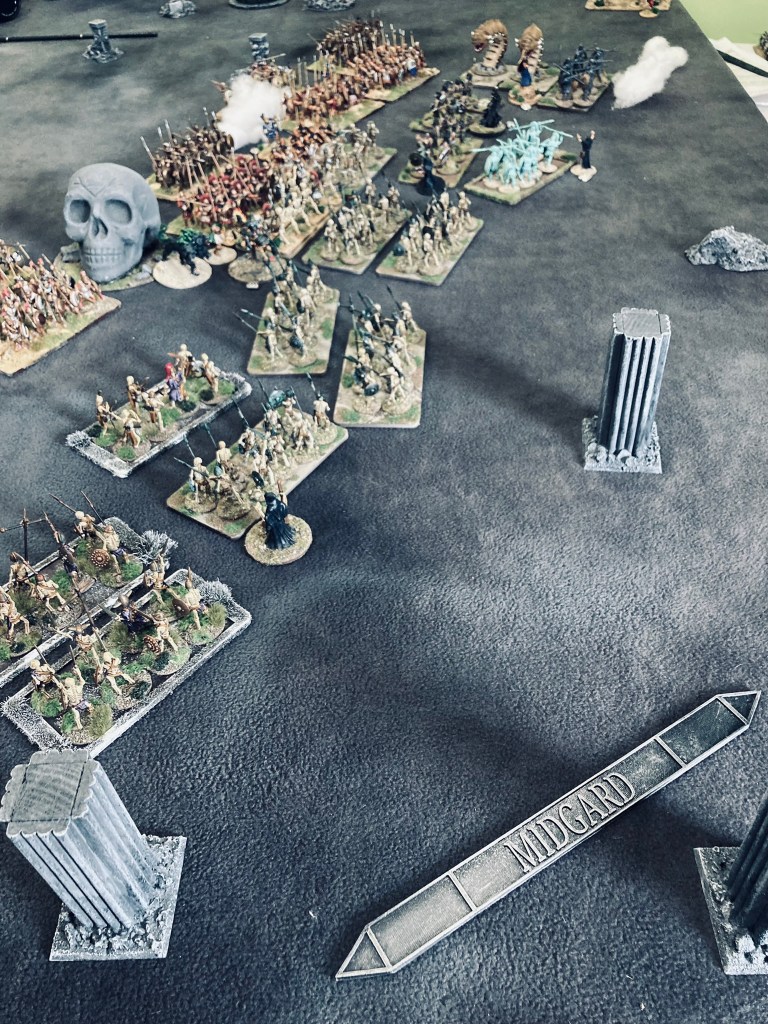
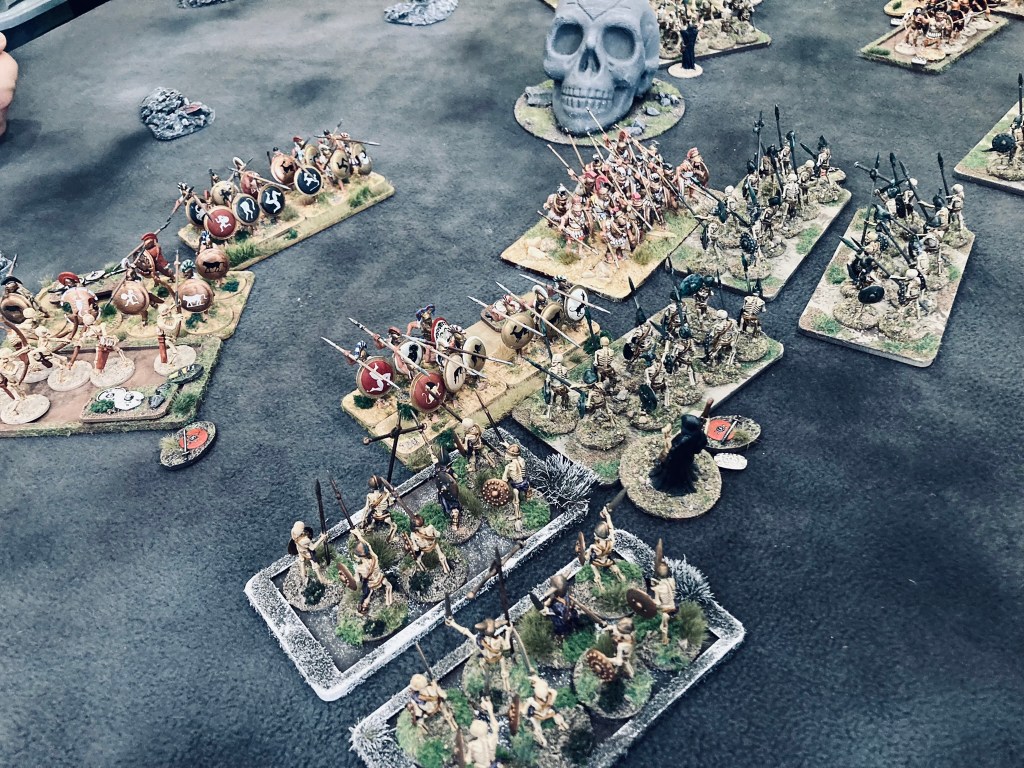
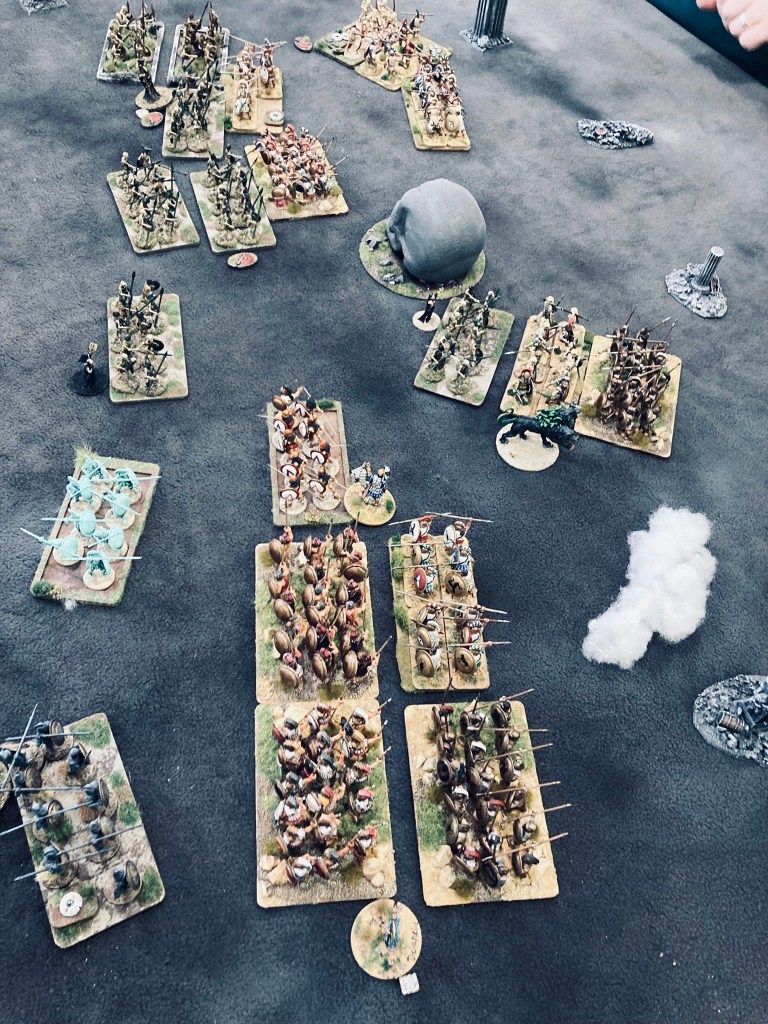
Battle in the Underworld – Greeks on the left, army of Hades on the right
The forces deployed looked roughly like this:
FOLLOWERS OF BASILEUS
Basileus, Greek Hero and Army Commander
Deianeira, Priestess of Athena
Orpheus, Bard
Parthenios of the Winged Sandals, Greek Hero
Haplus the Steersman, Hero
Eryx the Marksman, Archer
10 x Hoplites
3 x Archers
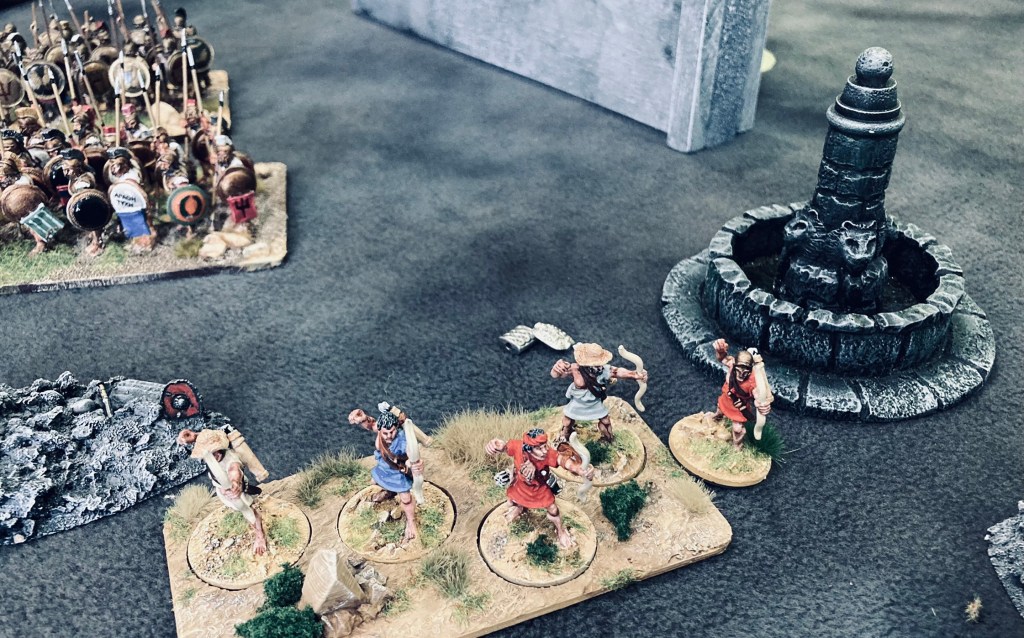
Eryx the Archer and his men. Eryx couldn’t hit anything for toffee for the first few turns but his followers did the job!
FOLLOWERS OF HADES
Hades, King of the Underworld (arriving later in the game after being invoked by his followers)
High Priest of Hades
Priest of Hades
3 x Skeleton/ Shade Warleaders & Champions
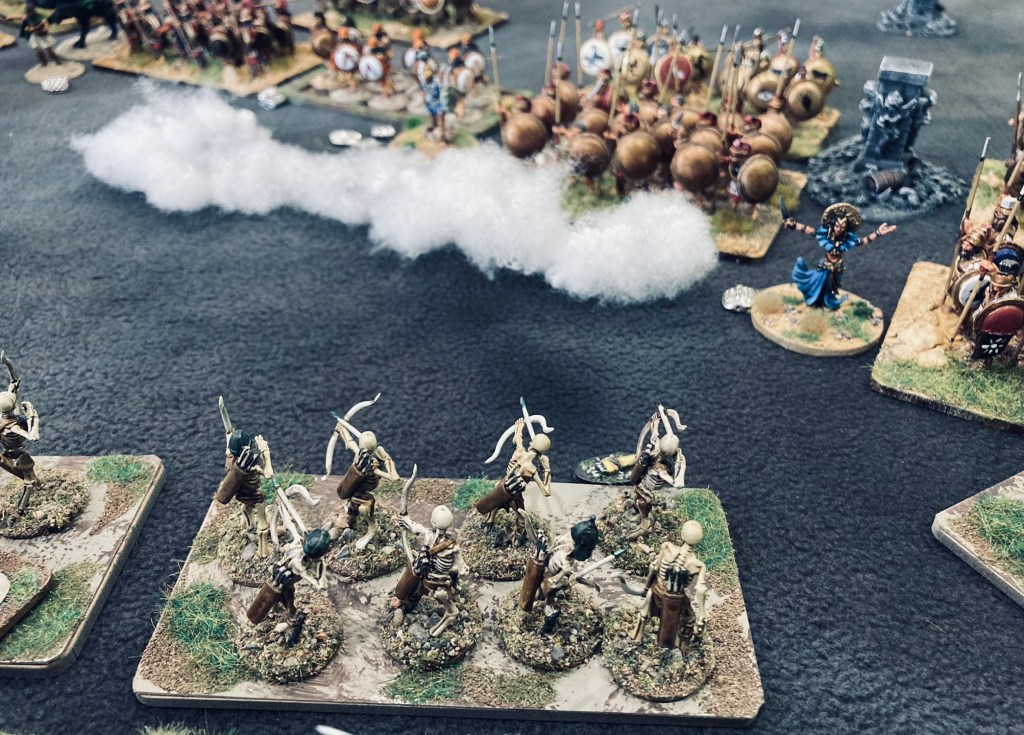
5 x Skeleton Archers
9 x Skeleton Warriors
2 x Shade Warriors (summoned during game)
1 x Wurms of the Underworld (summoned during game)
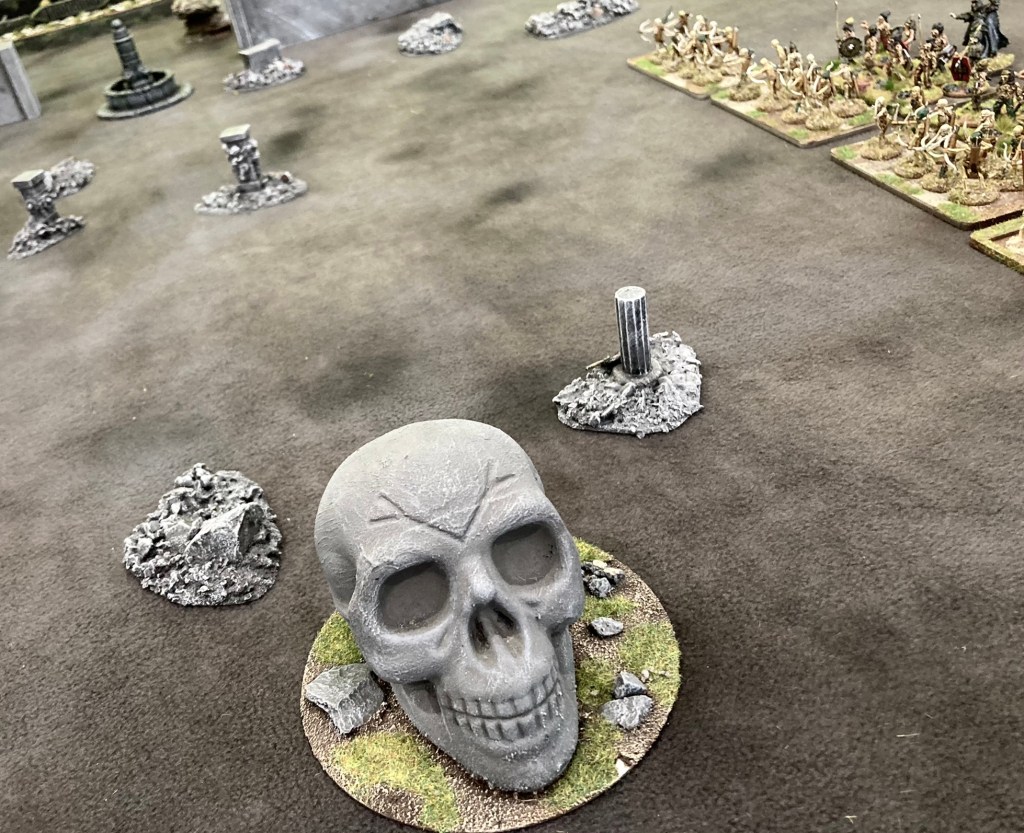
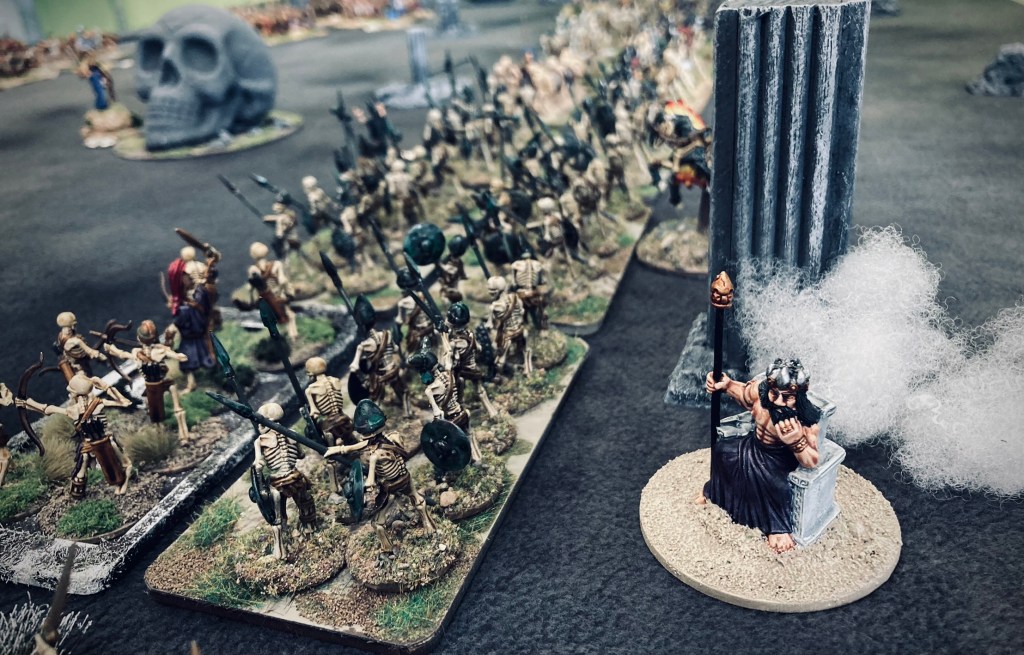
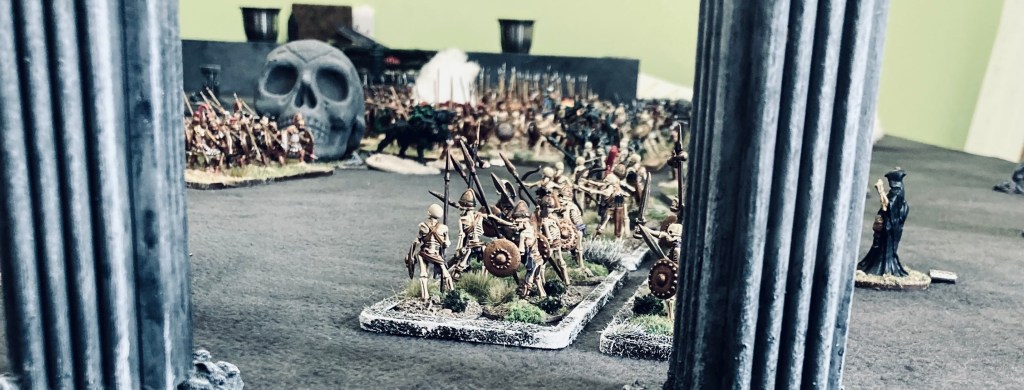
The Legions of the Dead deploy for battle – mostly Oathmark skeletons in these pics, painted by Martin. There are some Alternative Armies Celtic undead at the back. Terrain: a piece of painted dark grey polar fleece fabric that Tom created for Frostgrave games, with various drop-on pieces of terrain. Big pillars are pieces of wood with wooden moulding from the DIY store, based on slottabases.This skull has been living on the shelves in Tom’s gaming room for some years but I’ve never seen it used in a game (obviously playing the wrong stuff). If you can’t use this in Hades, where can you use it?Mucking around with camera settings – we quickly discovered that the ‘Dramatic Cool’ filter sucked out some of the colour, perfect for the Underworld. Tom, you’ll notice, has also made the correct colour choice of shirt for the day 🙂
The battle opened cautiously, with both sides advancing into bow range. The left flank on each side was slightly overlapping, as you can see, and that became the focus of the action.
Eryx and his men exchange arrows with the skeletons on the flank
Hades’ forces were praying for the arrival of their God, who took his time and didn’t turn up until Turn 3! Once on the table, he moved down the line and summoned the ‘Wurms of the Underworld’ to support the undead on the exposed right flank.
Hades finally turns up but is deep in contemplation! SHQ Miniature painted by Tom.Orpheus advances his men, keeping a close eye on Cerberus. Footsore (Orpheus) and Reaper (Cerberus) Miniatures respectively, again both painted by Tom.
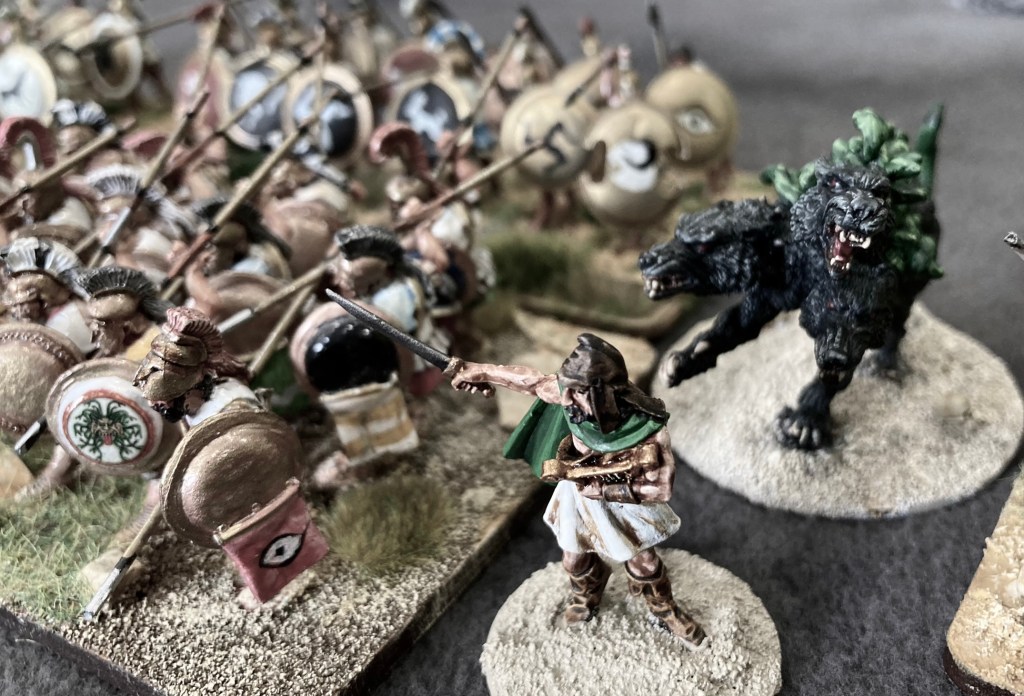
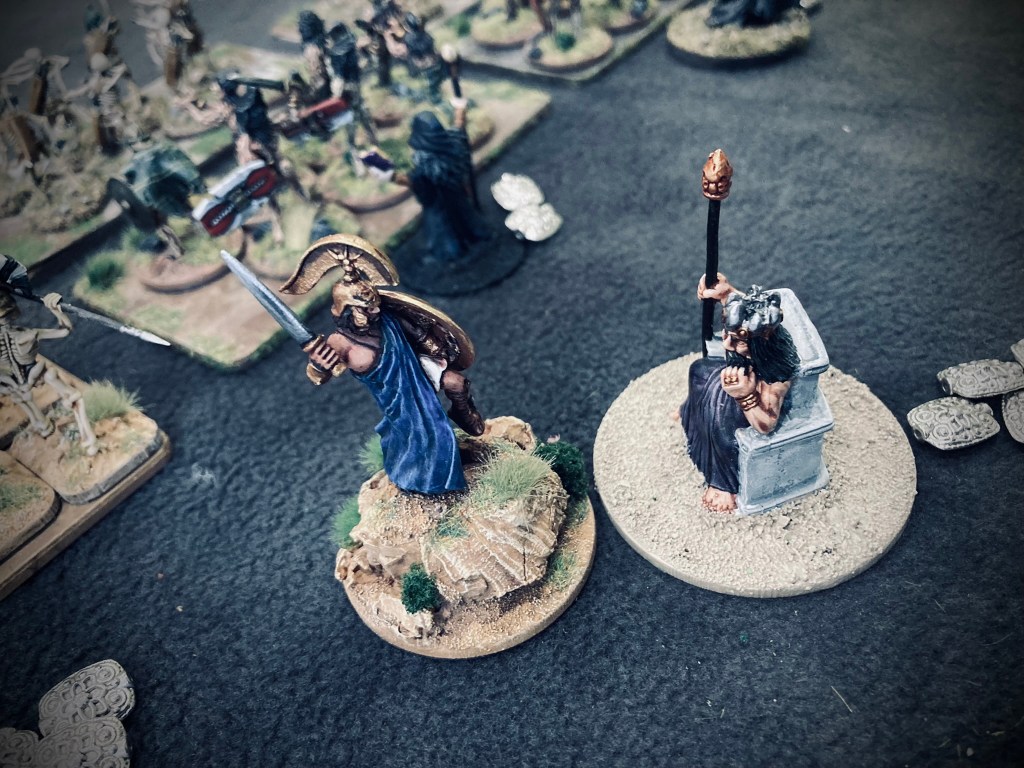
With Hades flexing his godly muscles, the Greeks decided to act. Parthenios of the Winged Sandals drew his legendary blade and was sent to challenge the King of the Dead to single combat. The Priestess of Athena had used her ‘I Foretell Mighty Deeds’ trait to give Parthenios extra, er, Mighty Deeds in the turn that followed, and Parthenios decided to blow the lot in the first round of combat. The gamble paid off! Hades disappeared in a puff of blue smoke, not to return – a huge blow to the Army of the Dead (but cheers all around from the Greeks).
Parthenios of the Winged Sandals takes out the Ruler of the Dead in a daring single combat
The Greek line was now advancing across the field against the skeleton archers. Casualties were inflicted on both forces, but the Priests of Hades were replacing their losses as quickly as they occurred. Clearly the hoplites would have to get stuck in to break some bones!
Deianeira casts a wall of mist to protect the advancing hoplites from Hades’ archers.
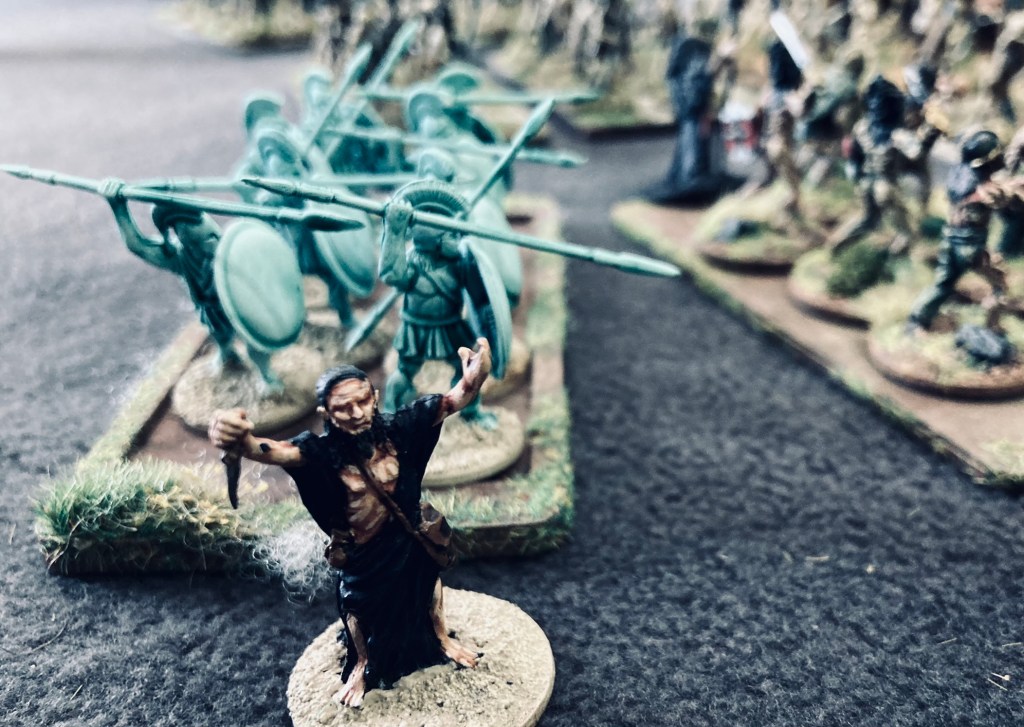
It was crunch time, literally, and the hoplites crumbled their way through a couple of units of skeletons with a clear view to rolling up the flank. The Priests of Hades summoned some shades to bolster the line and the Wurms of the Underworld were sent forward to do their deadly work.
Yet more shades are summoned by the High Priest of HadesCrunch time for Hades’ bony buddies
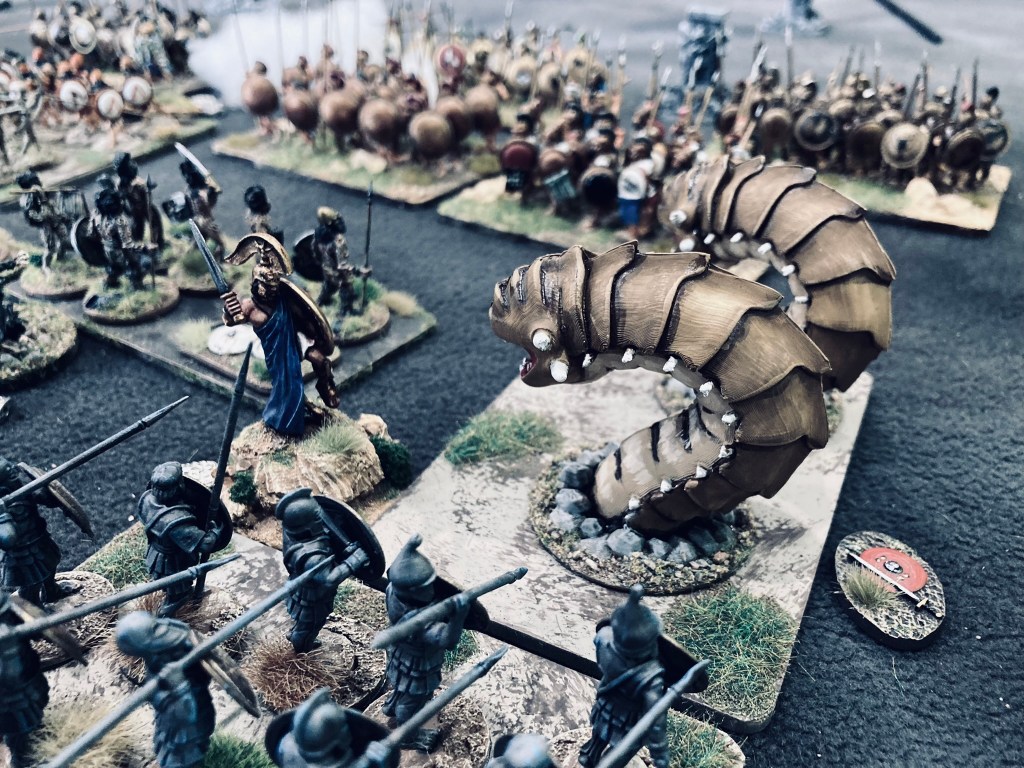
Seeing the threat, Parthenios of the Winged Sandals and Eryx the Archer attempted a pincer attack on these thirty-foot long monstrosities – I say ‘attempted’ as it all went wrong. The Wurms turned on Parthenios and swallowed him whole in the following round of combat. Ah well, it was heroic!
Farewell, Parthenios of the Winged Sandals. The Wurms of the Underworld are 3d prints from Martin’s collection.
The High Priest of Hades now decided to commit everything to the battle and there was a huge melee in the centre of the field. Orpheus and Basileus found themselves engaged by different units of skeletons.
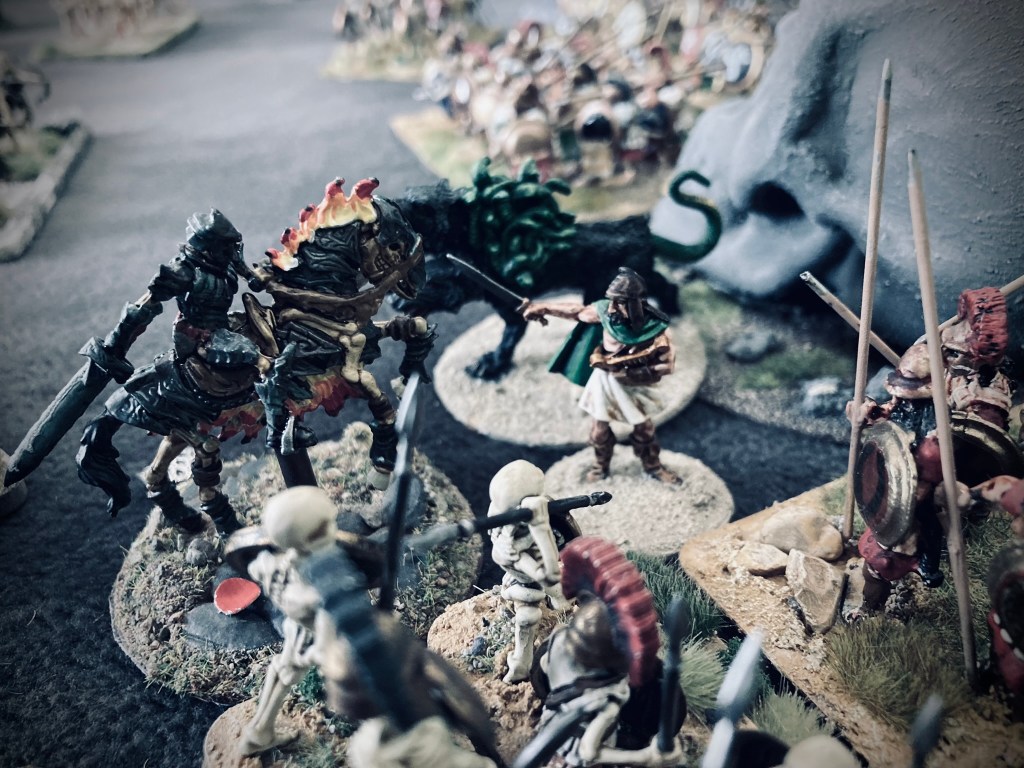
With Basileus’ unit pinned on one side, one of the skeleton warleaders led a charge against Orpheus and his men. Clearly inspired by the flaming skeleton and his dreadful steed, the skeletons won the combat decisively. Not only that, but Orpheus was slain (rolling a double one on his Risk to Heroes dice). Cerberus was free!
Orpheus falls in combat with the skeletons
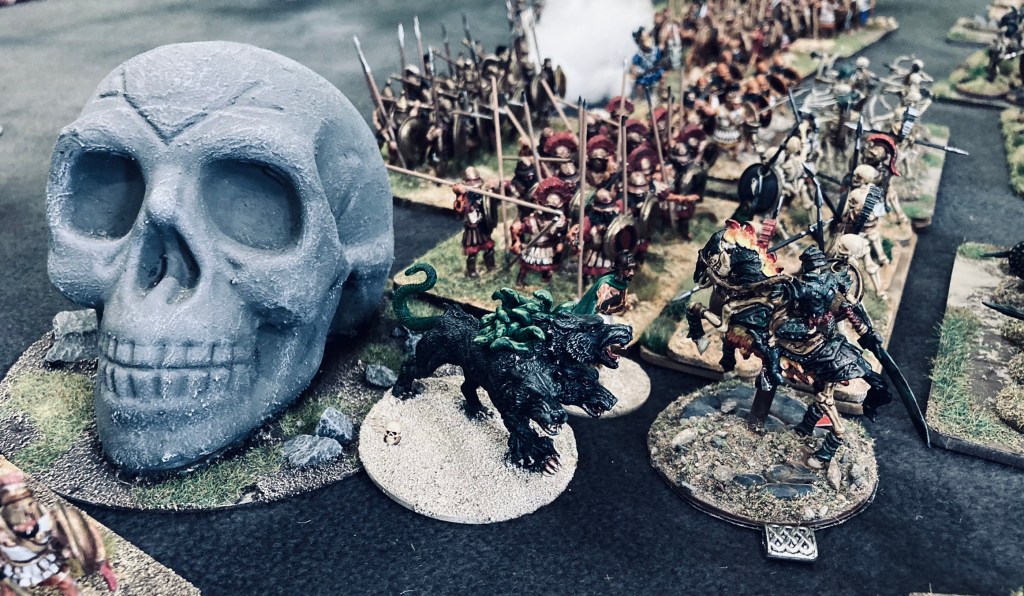
Unleashed, Cerberus reverted to being Hades’ big, brutal watch dog (a Legendary Hero in the game) and proceeded to rip chunks off the hoplites encroaching upon his territory.
Hades’s forces caused chaos on the Greek right flank, winning several combats and causing the hoplites to fall back in fear. The goblet of Reputation for the undead briefly ran empty – but was refilled by successful charges and spell-casting from the Priests of Hades. With Cerberus back in his role as the watchdog of Hades, it was time for Basileus and his surviving warriors to beat a hasty retreat, albeit with a glorious tale to tell on their return.
What unpleasant task will the King of Athens dream up for Basileus next?
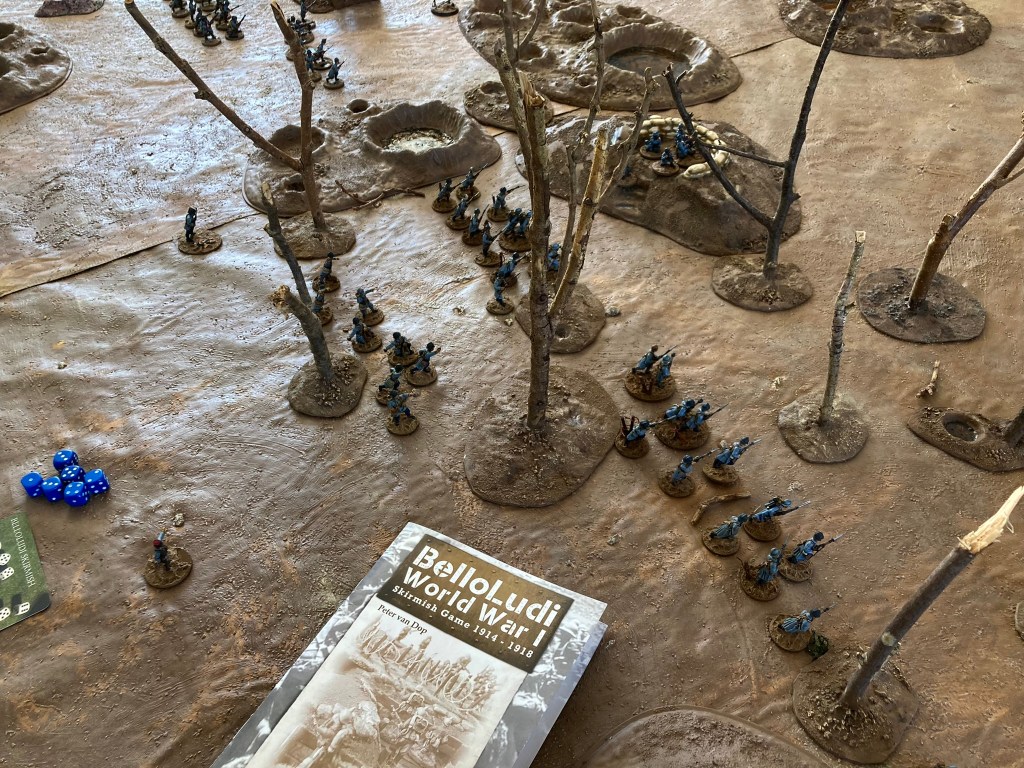
After a gap of a couple of years, I got the urge to get the First World War collection out for another game. This was partially because Scrivs was back in the country with his substantial collection of minis that we’d used for our Verdun campaigns back in 2015-16, and partially because I’d liked the sound of the Bello Ludi rules after catching a post about them on Instagram. After a bit more research I decided to take a punt on the rules and bought them from Caliver Books along with a set of cards and a couple of the game-specific command dice.
Bello Ludi are a Dutch publisher that has created a core set of rules based around the command dice and cards – which are transferable across the various BL games. A large part of their business is using wargaming as a team-building activity, often for non-wargamers, so the rules are designed to be simple and easy to pick up.
I was surprised how slim the Bello Ludi WW1 rulebook was – just 24 sides of A5. It contains all the core rules with some additional rules for flamethrowers, tanks, planes and so on. There are no force or platoon organisations – I would have appreciated even just a couple of sample platoons for the Western Front as an example of where to get started. As an experienced gamer, it wasn’t too hard to put together some French and German lists of my own for our first game, but I did feel that a newer player might have been put off by this. (Stats for different nations’ artillery and vehicles are available on the BL website).
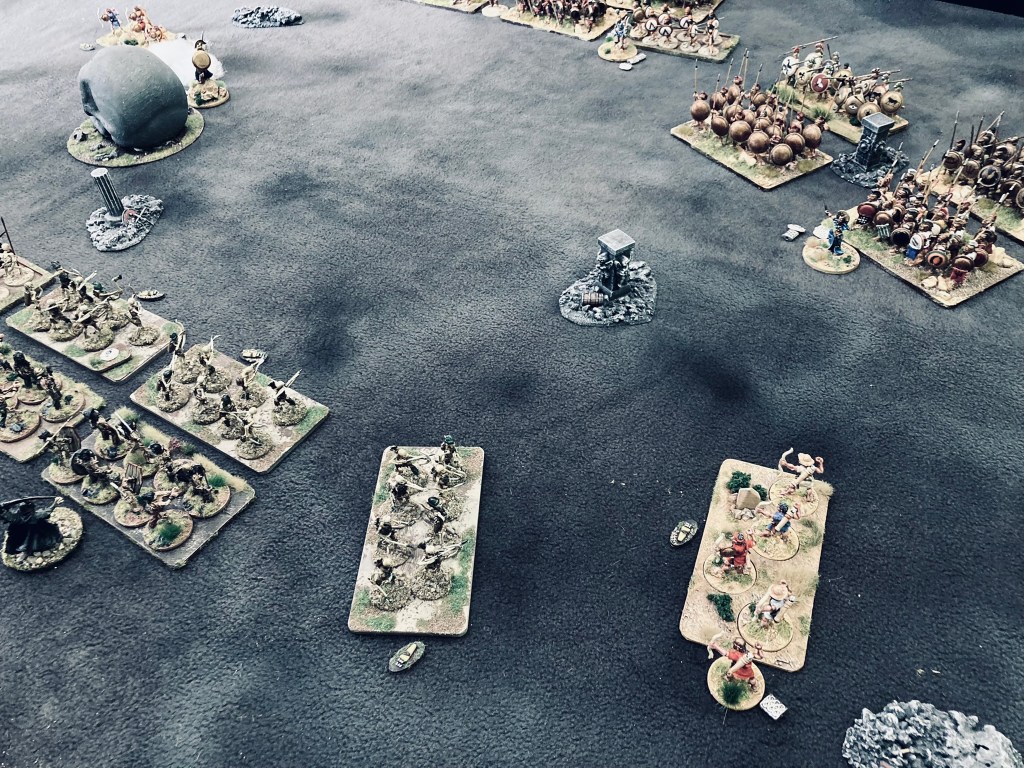
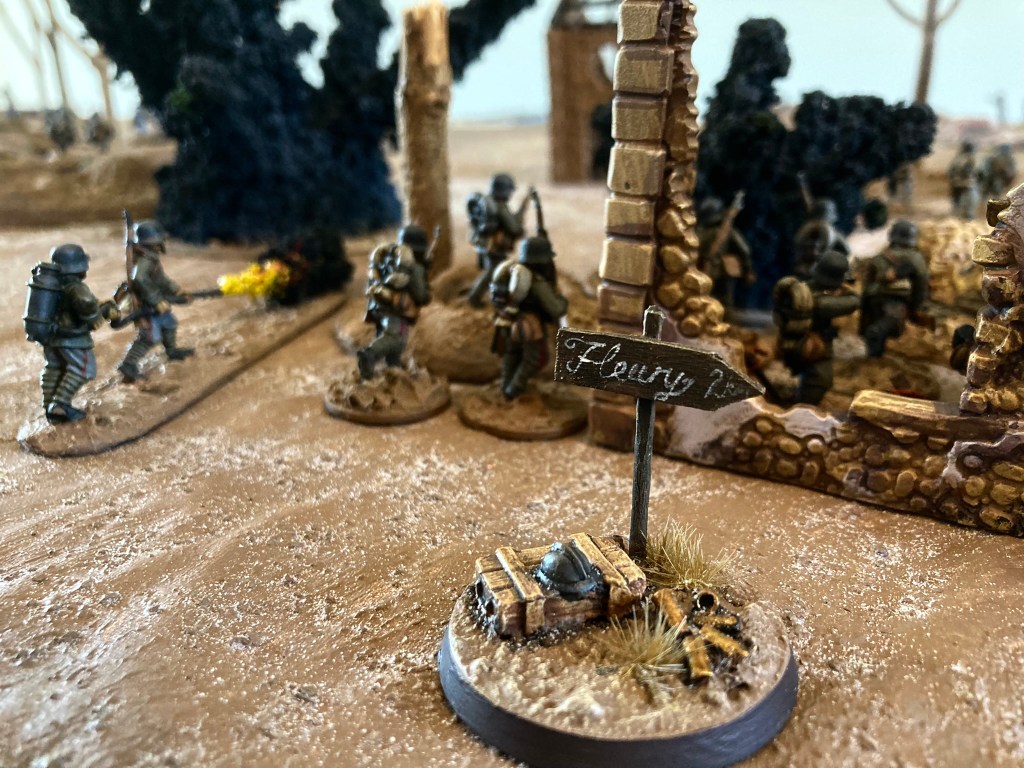
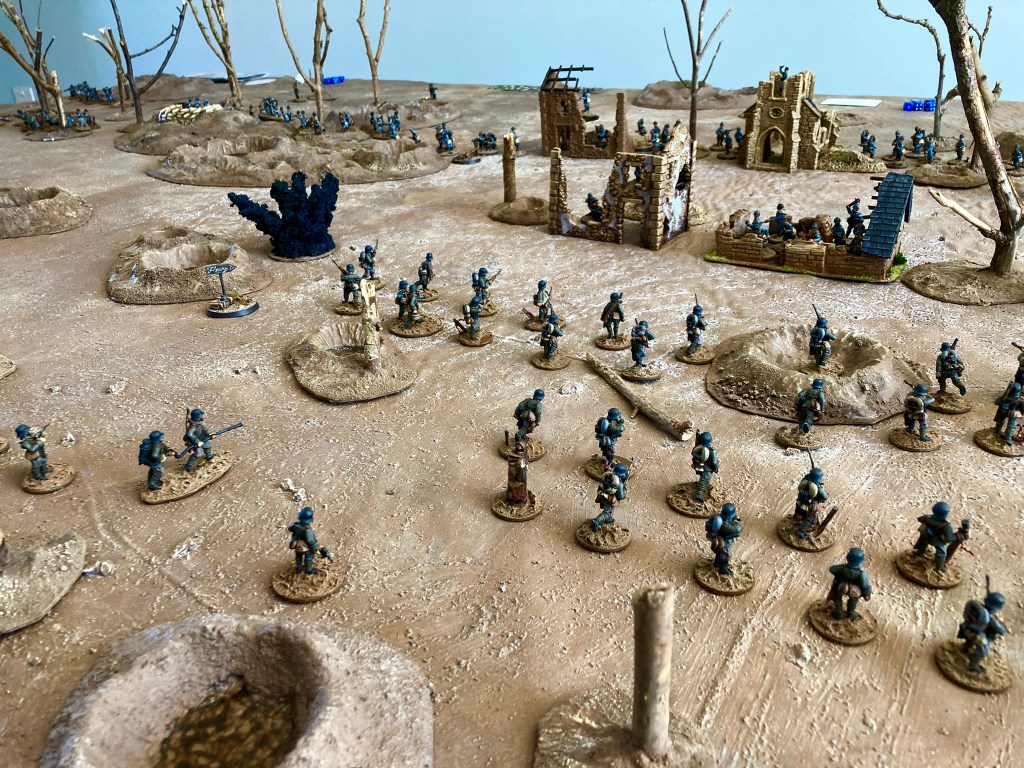
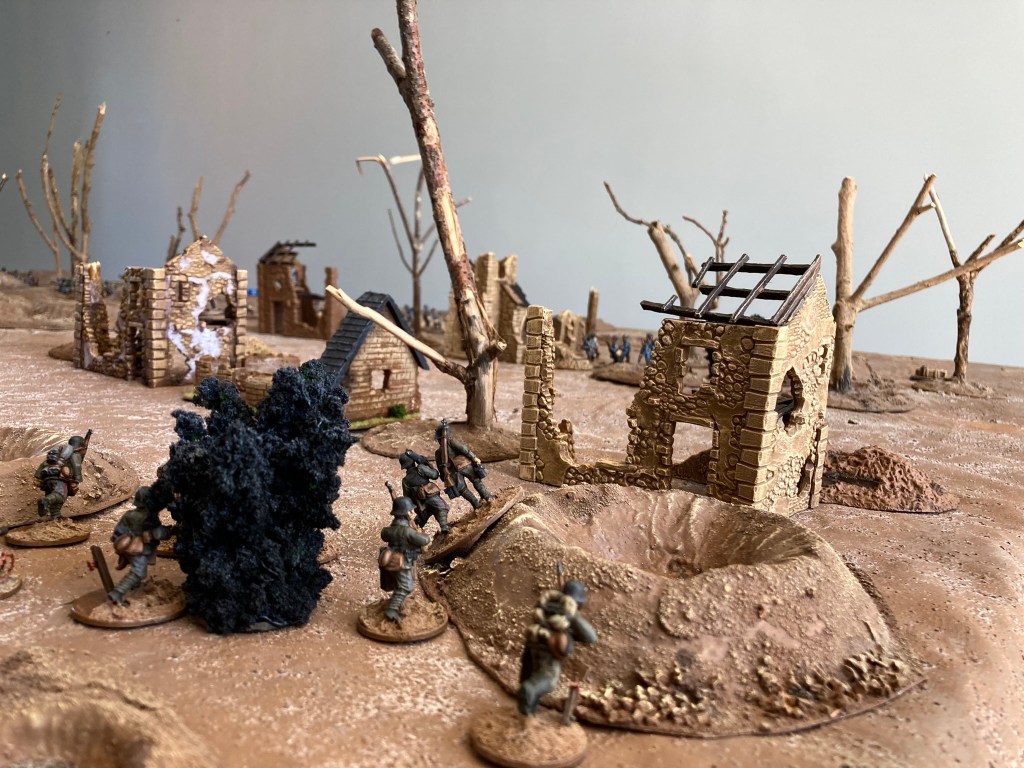
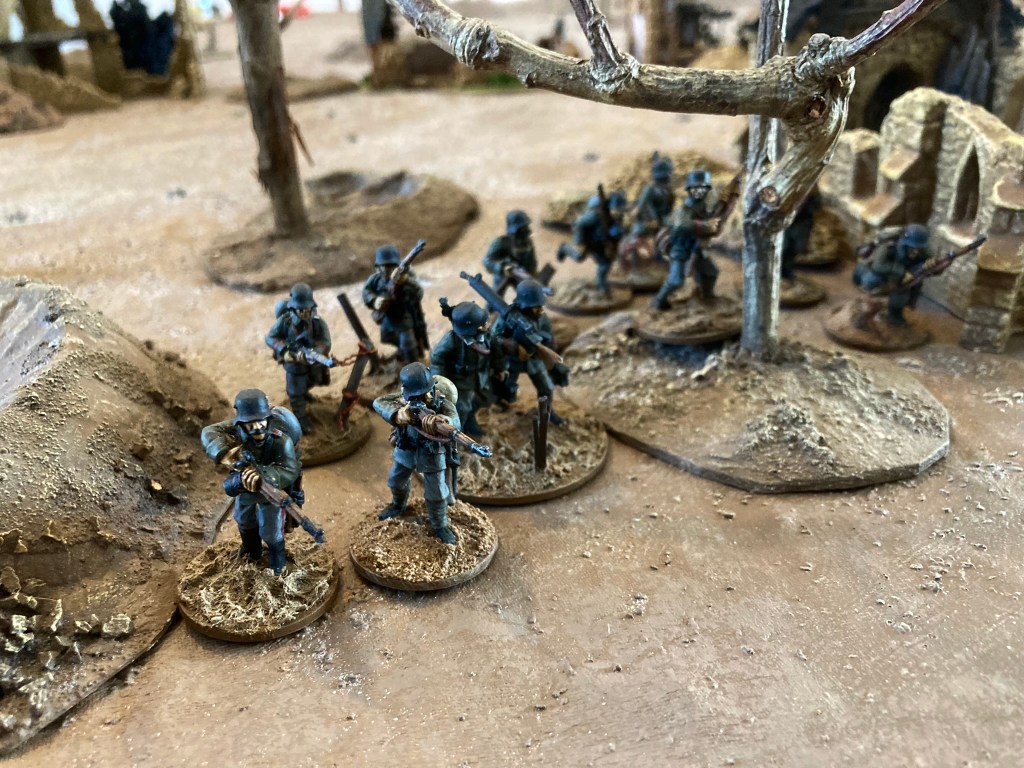
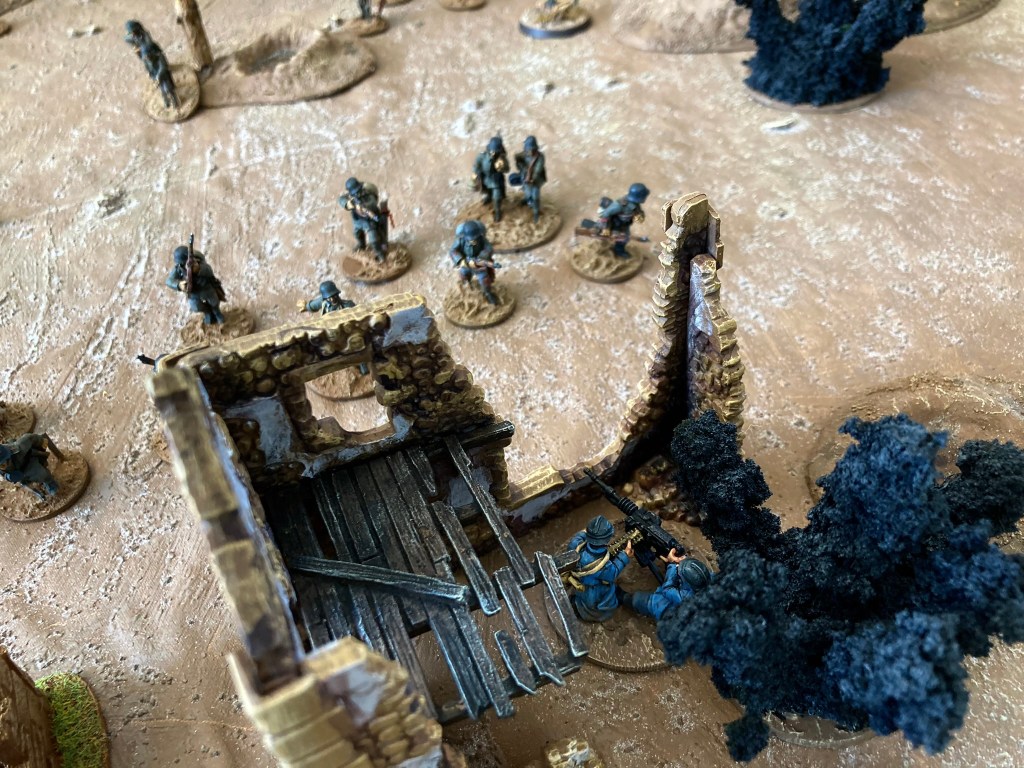
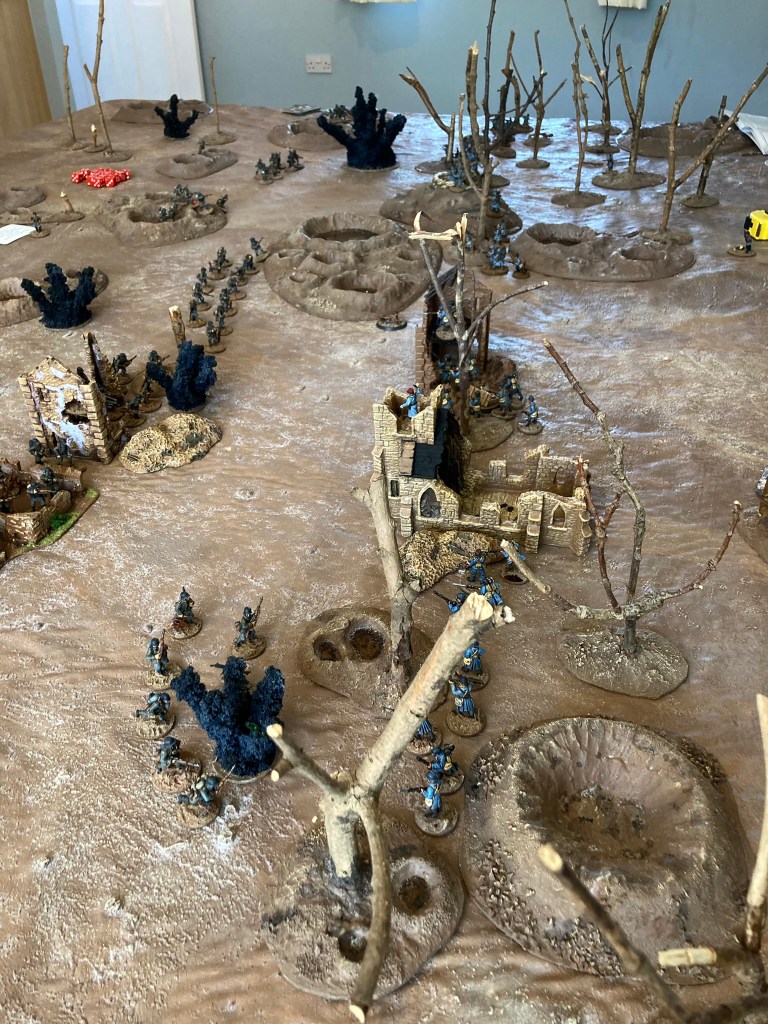
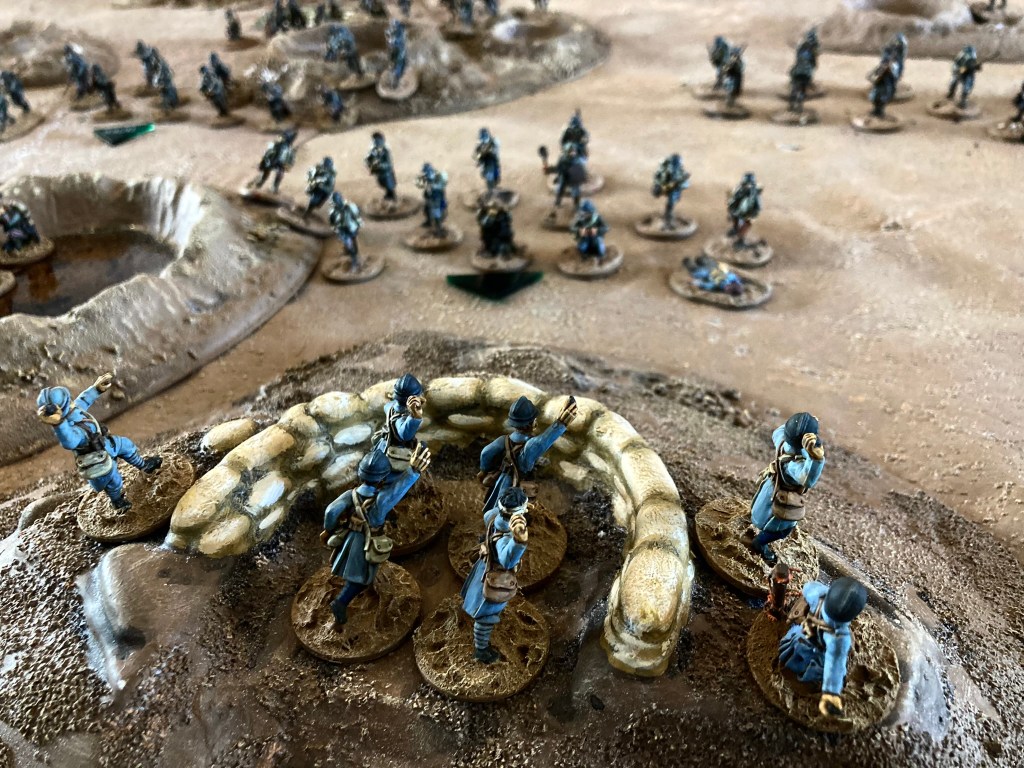
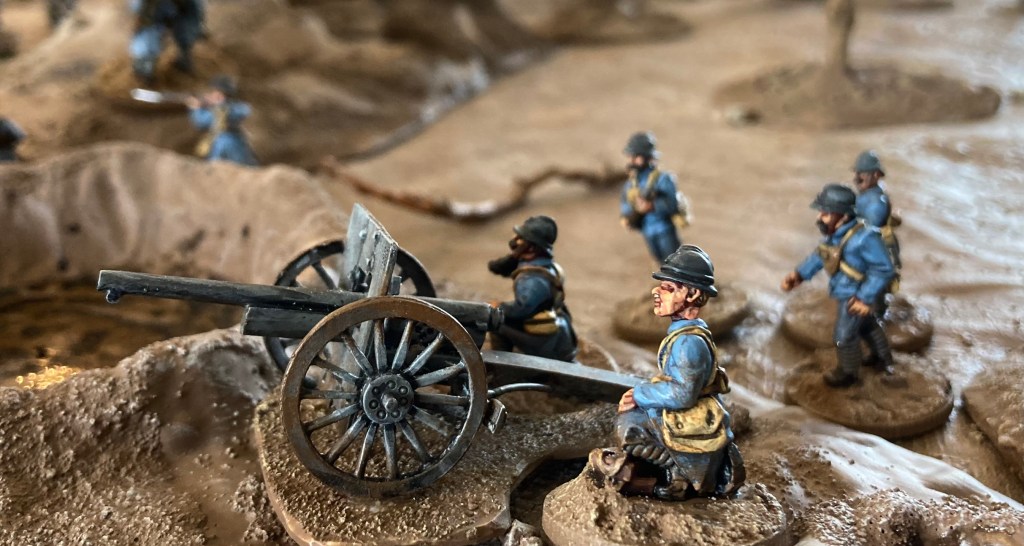
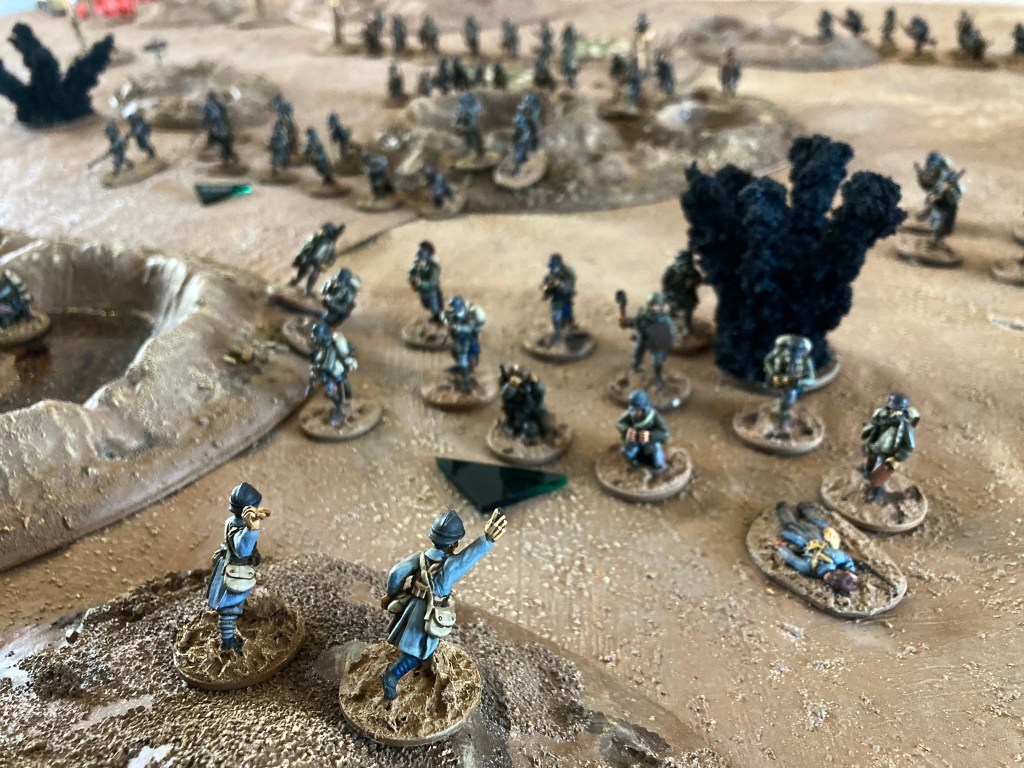
One of the big attractions of Bello Ludi was the fact that the game has been designed for multiple players a side, each controlling a ‘group’ of units, without the complexity of some rules systems. I put together a scenario loosely based on the struggles for the village of Fleury-devant-Douamont during the battle of Verdun: two French machine-gun teams were holed out on the outskirts of Fleury but the Germans were mounting an attack with three platoons supported by flamethrowers to drive them out. The French HMG teams had a pair of platoons in reserve but would be outnumbered by the Germans.
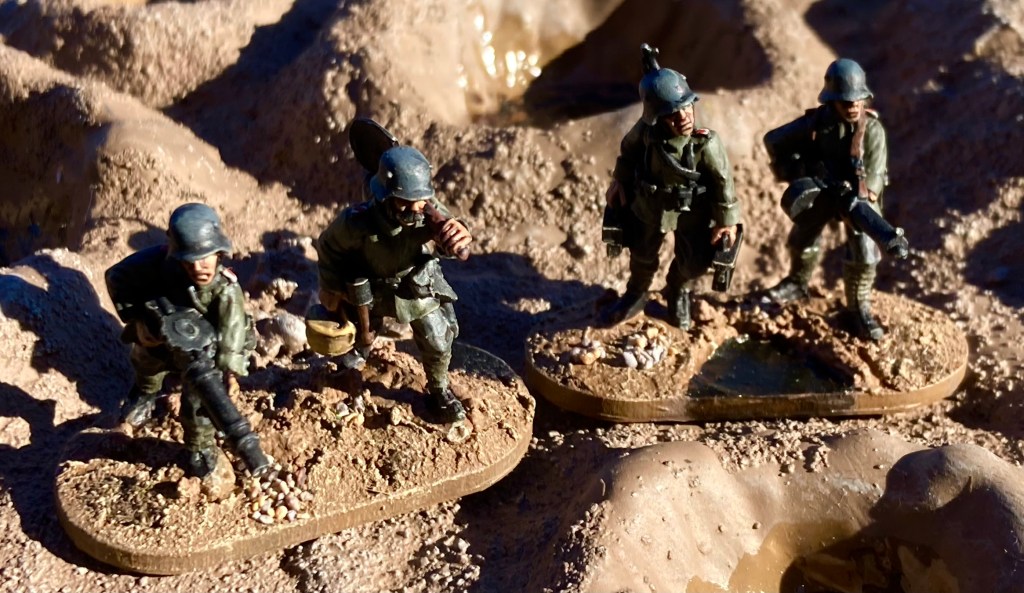
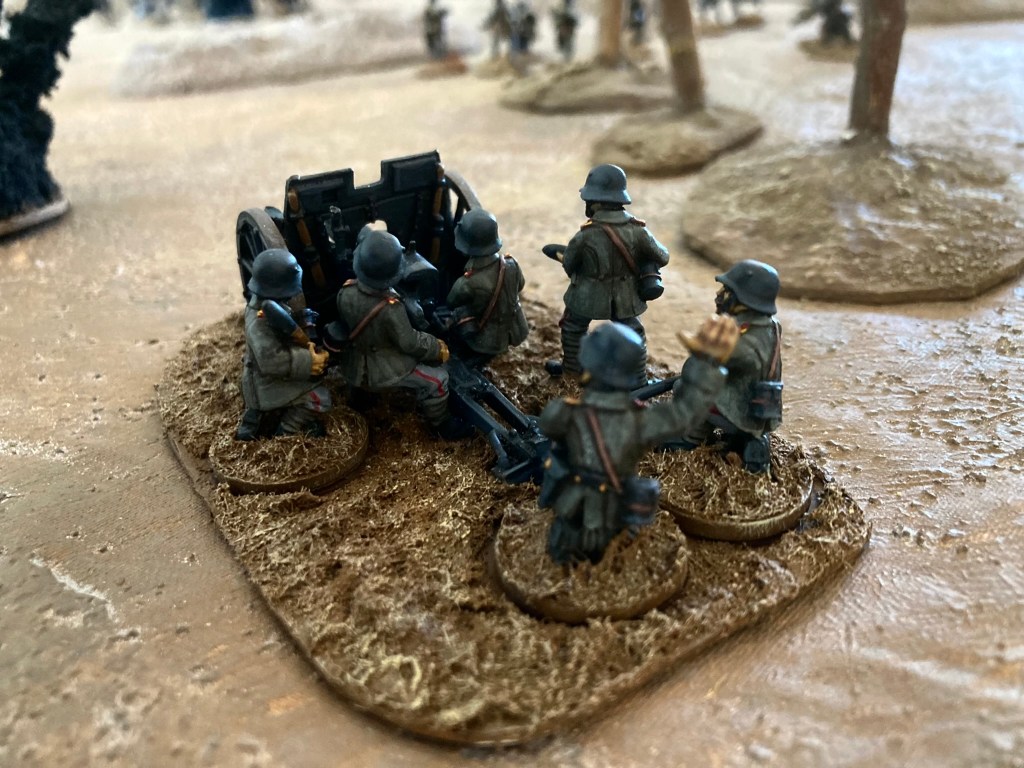
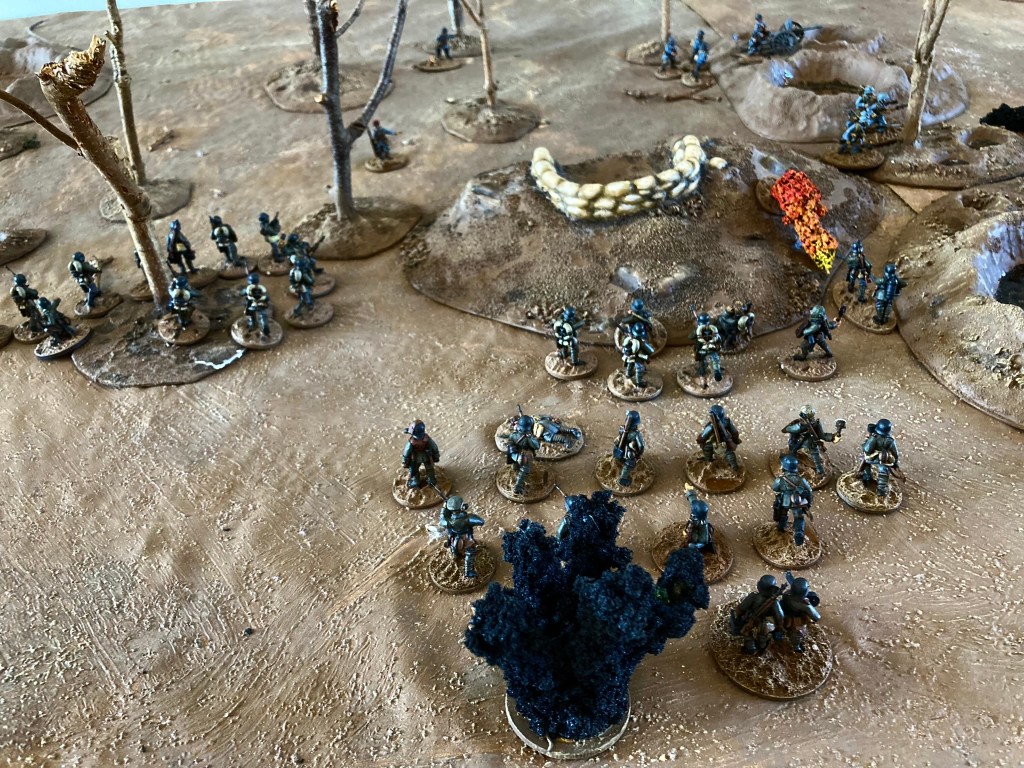
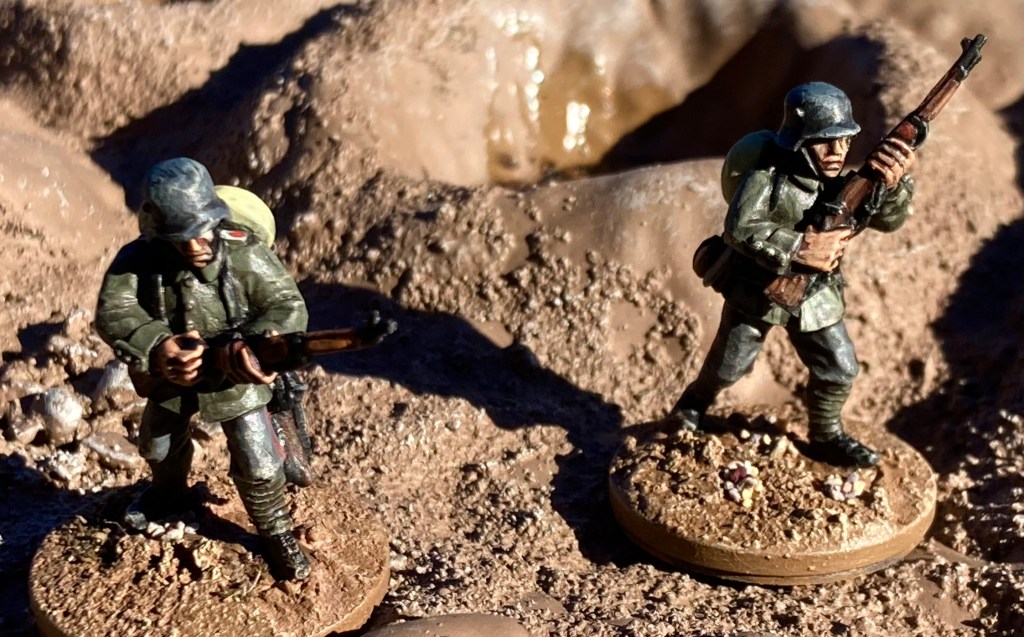
All the Germans in our collections are the lovely Great War Miniatures painted by Scrivs and myself. We both used the Scrivsland paint recipe which you can find here.Our French come from Woodbine Designs (pictured), Brigade Games, Scarab Miniatures and Old Glory.
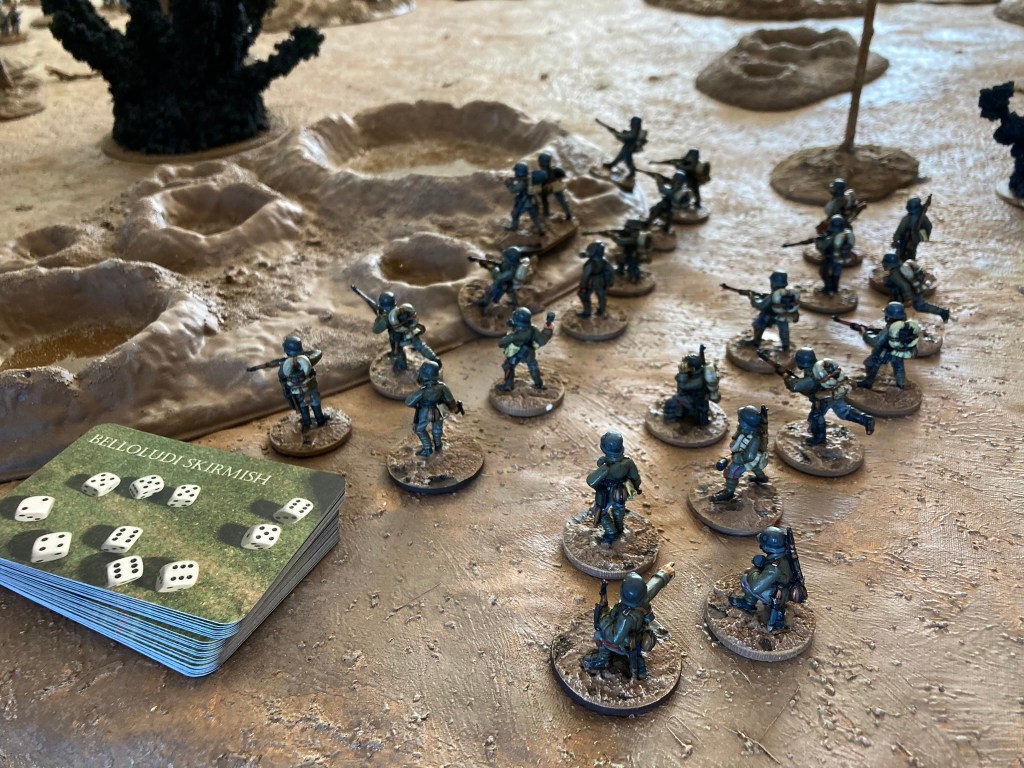
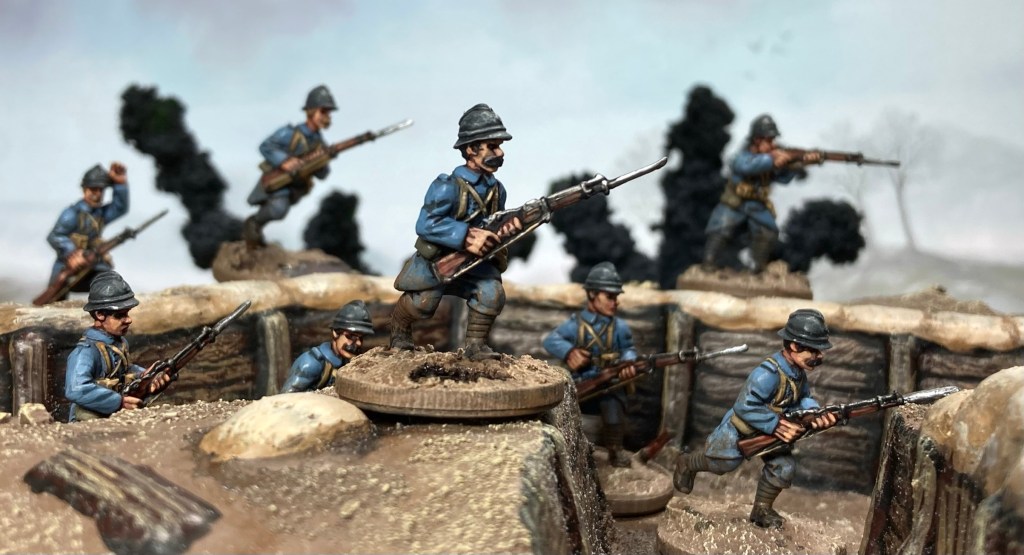
The standard unit in the BL rules is given as 12 miniatures, and although historical sections varied in size, I stuck with this for the basic rifle units, but created 8-figure units for the French grenadiers. Some sections had LMGs, bombers (qualifying them as ‘Assault Troops’) and VB rifle-grenades – more of which later.
One interesting feature of the BL rules is that, although 1 model = 1 soldier. the overall model count in a unit is used as a combination of casualties and morale – so a Rally order (and certain cards) will restore a soldier to a damaged unit. There is no separate ‘shock’ (as in Two Fat Lardies’ games) which provides a fast game, albeit with less granularity. One dice per figure is rolled when shooting or fighting with modifiers for close range, cover and the like, but any hit removes a model without a ‘saving throw’ or other mechanic. Again, this keeps the game cracking along.
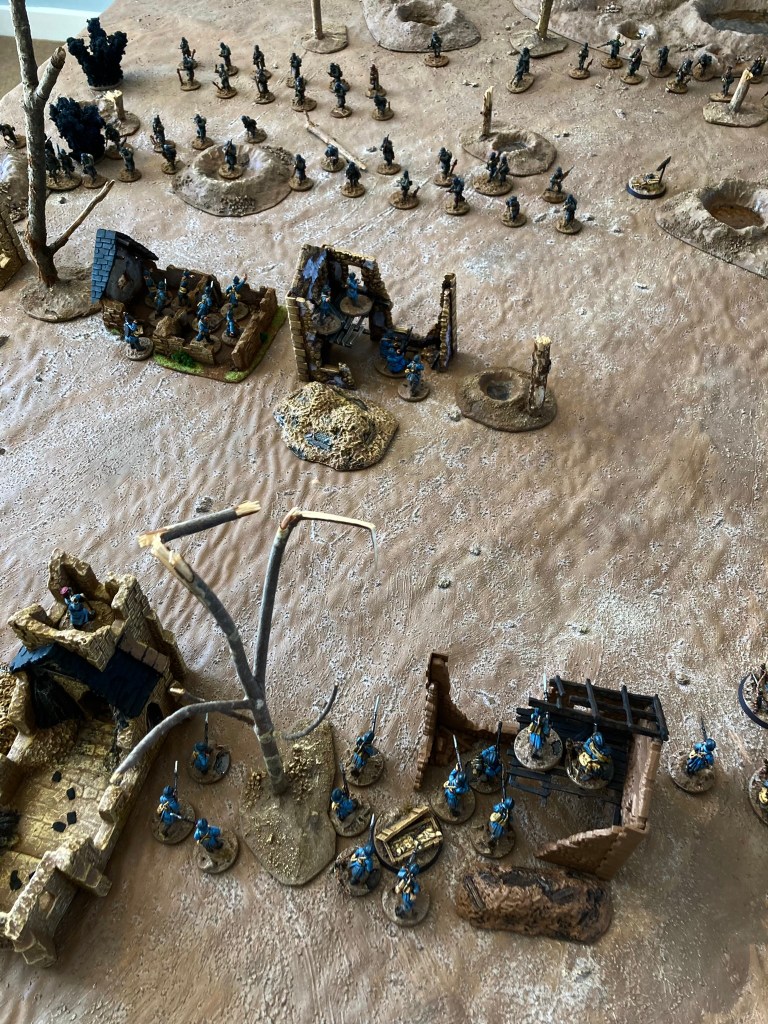
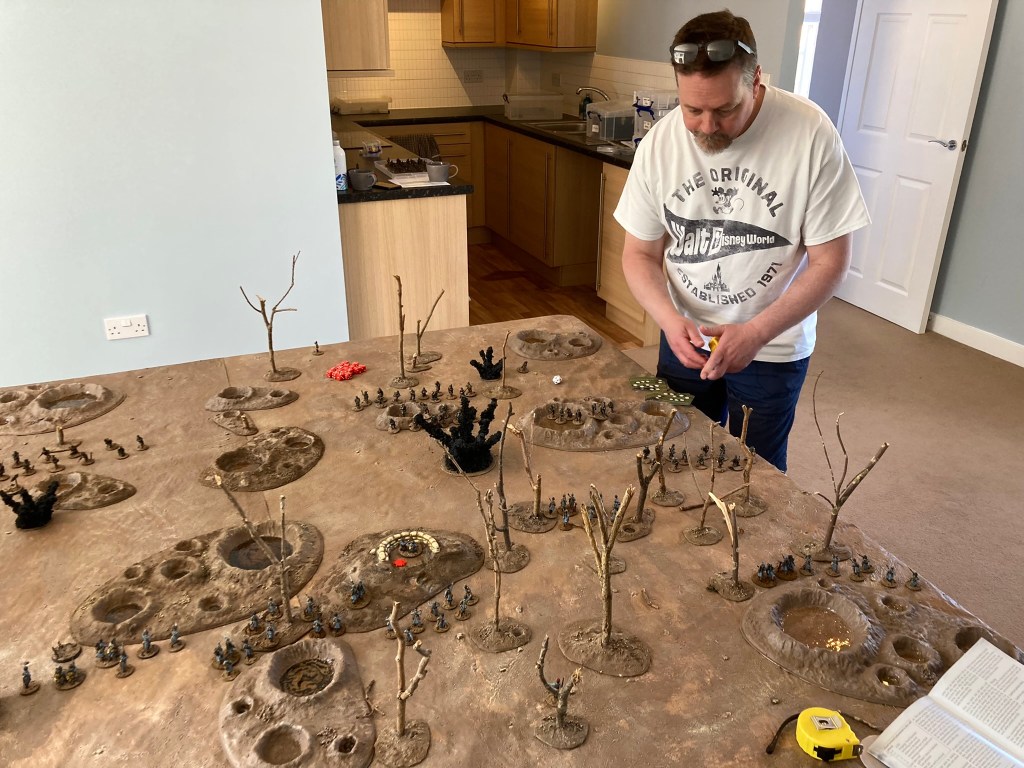
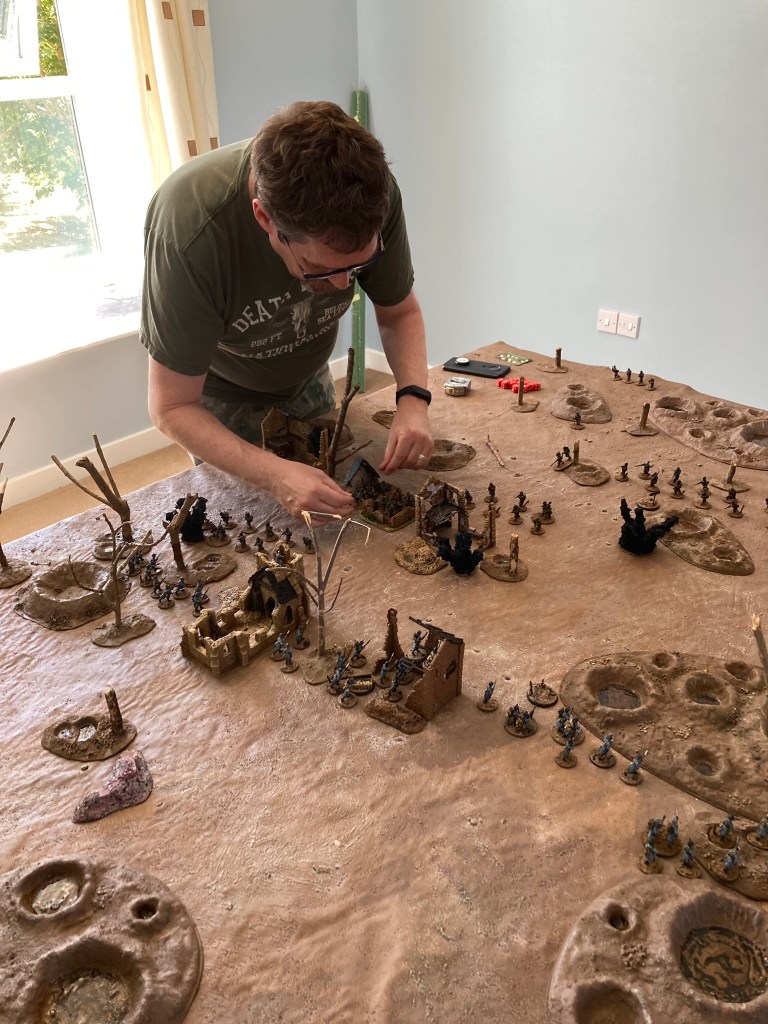
Martin marshals the Germans attacking the French right.
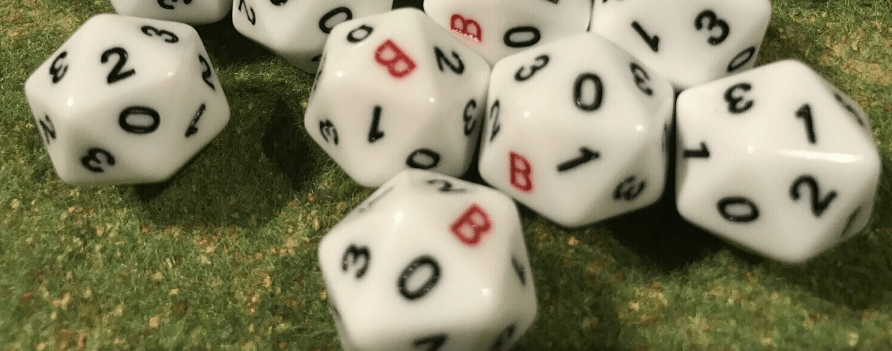
We got the game underway, with the French getting the initiative for the first turn. Units activate using the special Bello Ludi commander dice – a d20 marked with a B (Blunder), and a number of 0s, 1s, 2s and 3s. The digit rolled determines the number of actions the unit can undertake, with a Blunder resulting in a roll on the blunder table (very similar to the one in Black Powder). Actions include movement, taking cover, rallying and throwing grenades, although shooting and close combat happen later on in the turn as a free action. The system is quite random in the number of activations you get, but leaders within 12″ can use their actions to activate units as well.
The French HMGs failed to make much impression on the Germans, but the platoons of Poilus activated well and advanced up in support. As we worked our way through the shooting sequence, we found that the French VB launchers were rather more effective than we expected! Despite their shorter range, they caused havoc in the German ranks. As the French player, this was obviously welcome, but as the game went on it became clear that they were a little over-powered. (Grenades and rifle grenades use a 2″ template and the command dice to see if they hit, deviating by up to 3″ – which isn’t a great deal if you place the template right in the centre of a unit. The resulting blast then wounds each soldier under the template on a roll of 3+ – hefty stuff, and more powerful on average than an HMG or artillery piece). This felt odd – possibly exaggerated because some of the French sections had two VBs each – and we adjusted it later in the game.
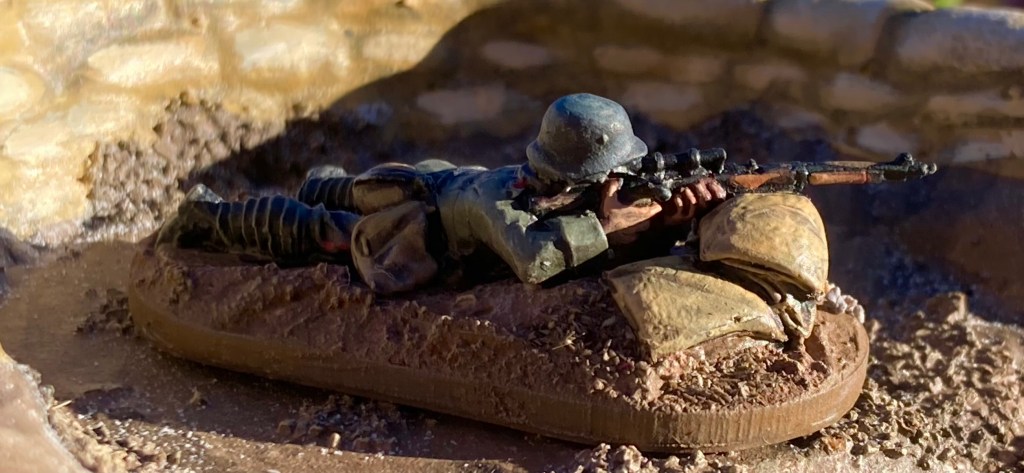
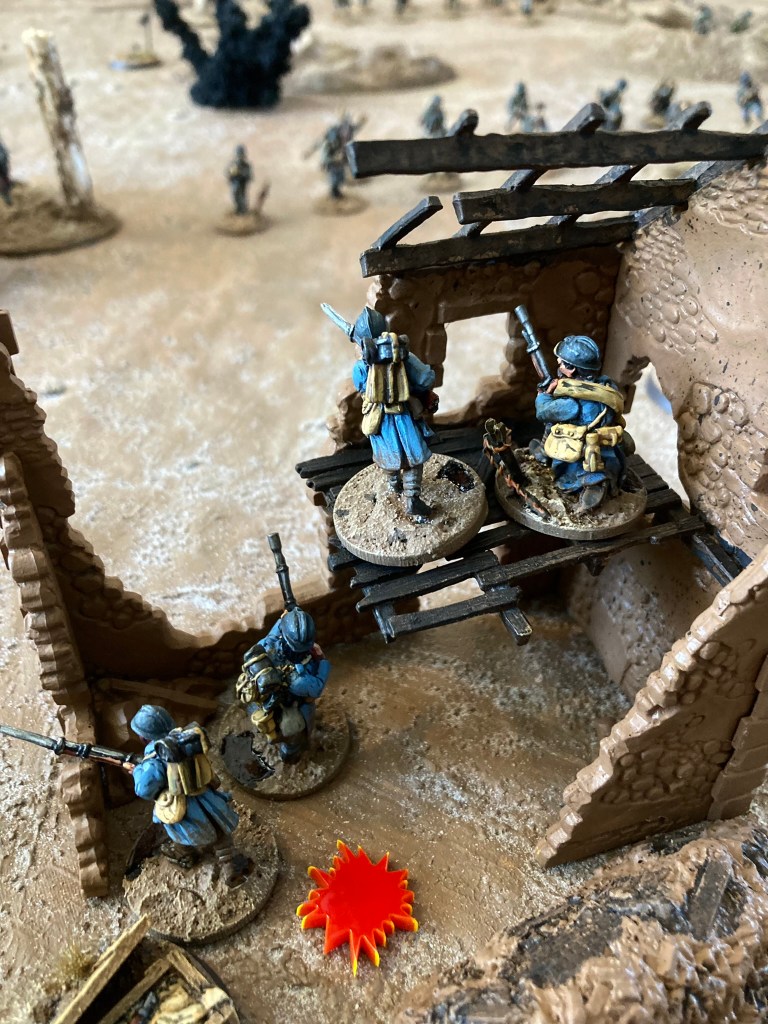
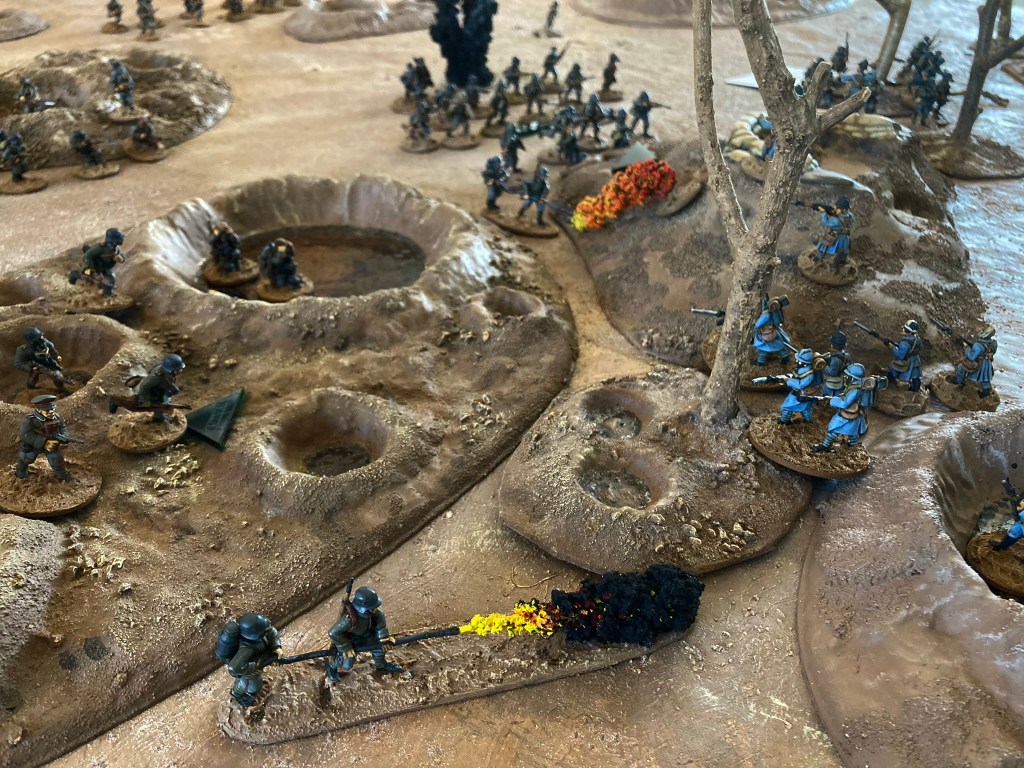
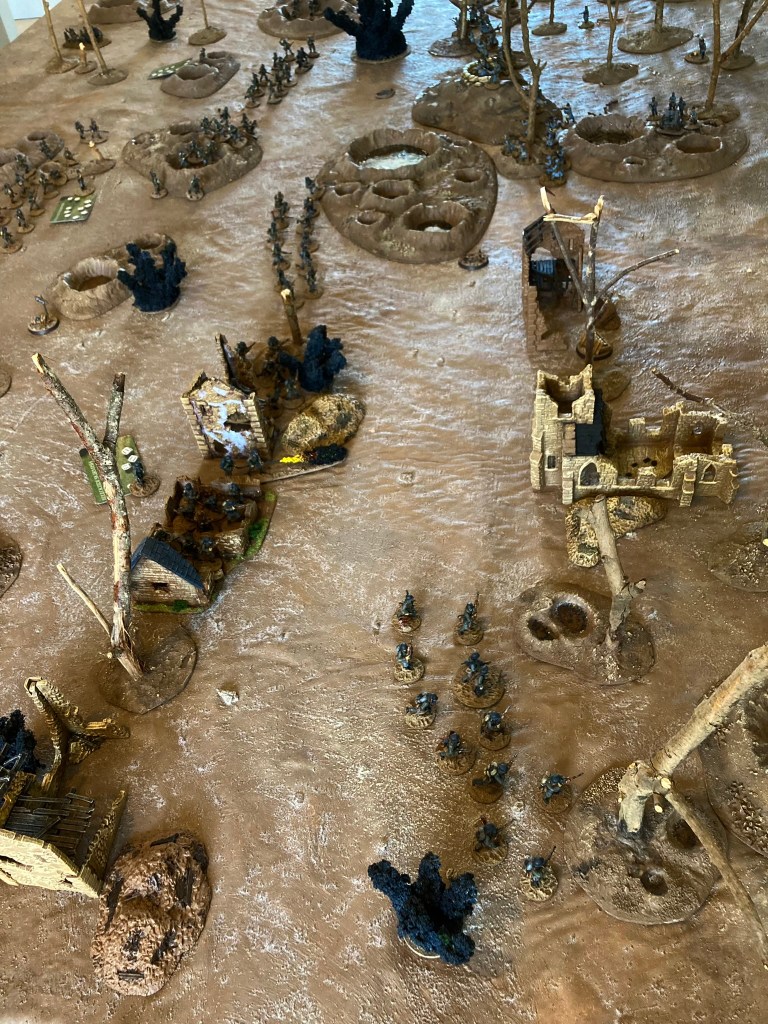
Moving on, the Germans surged forwards towards the ruins of Fleury, where the French had a Hotchkiss firing from a low window. After a brief firefight where the HMG struggled to hit anything, German grenades cleared out the house. Objective 1 achieved!
A French MG team is finally bombed out by the Germans.
On the French right, the other Hotchkiss team perished after multiple rounds of German rifle and LMG fire. Working on a d6, shooting and combat hits are usually scored on a roll of 5+ with some simple modifiers, e.g.+1 shooting at 8″ or less, -1 shooting at dispersed troops, -1 shooting at troops taking cover, -1 at units in cover etc. However, a roll of 6 always hits. This left us with a slightly unusual situation where an HMG team in a sandbagged dugout would be hit on a roll of a 6, and the Germans they were shooting at (in the open but taking cover) would also be hit on a 6. Although the HMG had the longer range, once the Germans were within 24″, they were shooting on better terms than the dug-in Hotchkiss (German section with LMG shooting with 13 dice; Hotchkiss with 6). I had no problem with the HMG being taken out, but I’m not sure that a WW1 section would have fancied their chances in this situation.
Despite the village of Fleury being taken, the French had reinforced the position on their right and had the Germans pinned in front of the wood with their VB fire. Lunchtime was approaching, so we took a trip to the pub, where we enjoyed a couple of beers and some tapas while discussing the game so far.
We all agreed that we were enjoying the simplicity of the game – things were moving along at a pace with little reference to the rule book – but that we didn’t feel the balance was quite right for WW1. Inveterate tinkerers that we are, we resolved to play on after lunch with the following tweaks:
Grenades and VBs would cause hits in the open on a 5+ (and only 3+ in an enclosed space).
2. Units in hard cover such as dug-in positions and trenches would ignore the first hit from each round of shooting.
3. Units hit by HMGs, flamethrowers and artillery would become Disordered if the hit dice had more 6s than 1s (a common mechanic in Two Fat Lardies’ rules).
To try these out, we played out the second phase of the battle. The Germans brought on their third platoon and both sides dragged up a 75/ 77mm gun as well as another Hotchkiss for the French.
All three amendments worked pretty well – the French in the sandbagged position were far more resilient with the extra cover bonus, the VBs felt less over-powered, and a number of units became Disordered from shooting – the flamethrowers were particularly effective.
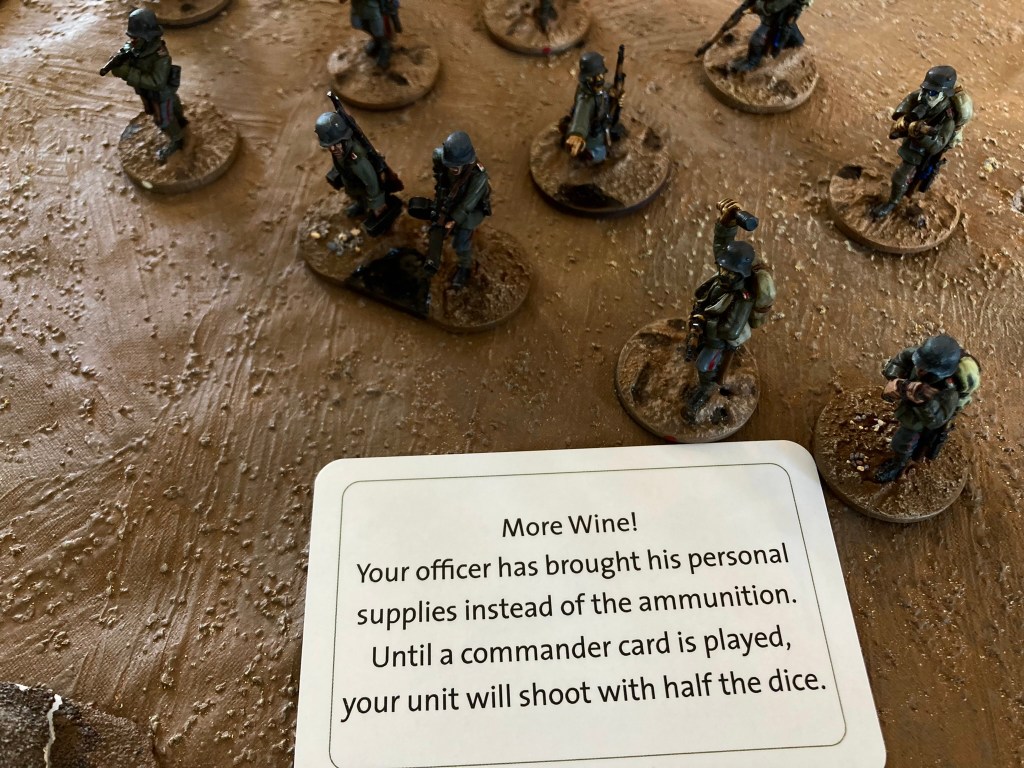
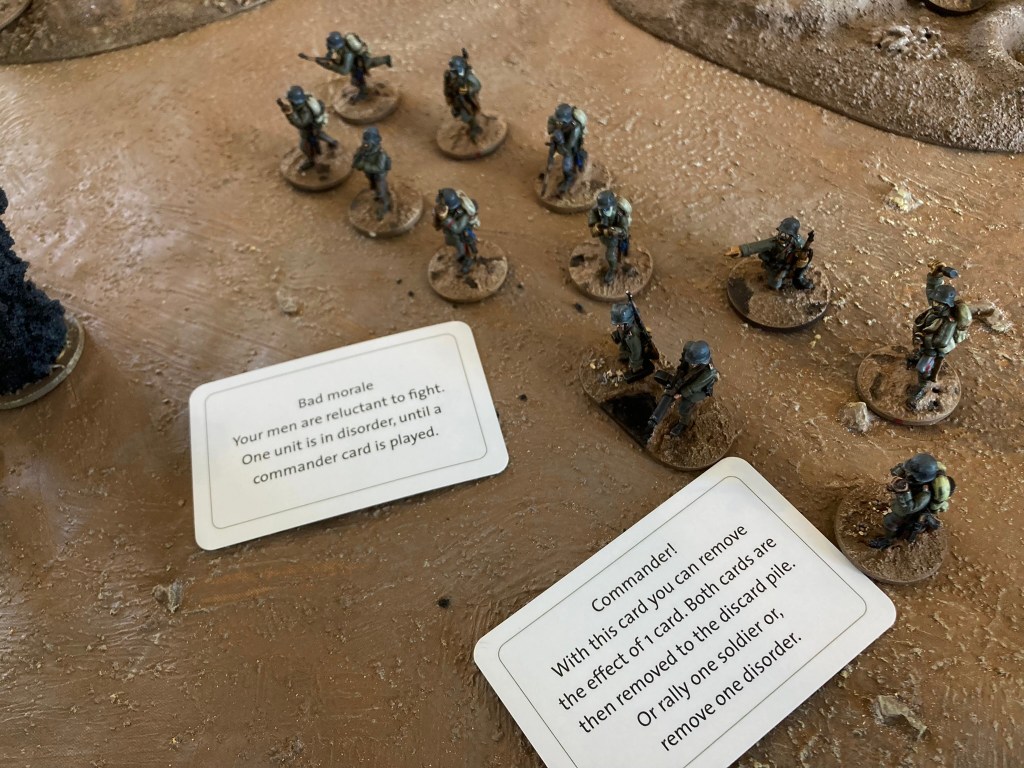
Becoming more familiar with the rules, we also had some fun with the cards in this section of the game – effects like units shooting at half strength due to lunchtime drinking added a dash of colour. Another card that extended a unit’s range by 6″ was used by Scrivs to great effect with a German flamethrower team – clearly a crack unit with the latest equipment!
Fun with the cards! These are usable in any BL game
Despite a brave resistance, the Germans eventually rolled up the flank by the wood and cleared the French position, forcing the others to retreat.
Bello Ludi gave us a fun, fast-moving game as promised. We picked it up very quickly and I had some excellent support on the run-up to the game by messaging BL to get clarification on the rules. That said, I felt that it needed some adaptations to get the right balance for WW1, and the lack of army lists of any sort required some work before the game. I applaud the simplicity of the rules and the willingness to engage new gamers, but feel that its potential is not quite being delivered by its current incarnation. I will definitely play again with our amendments and look forward to seeing how the Bello Ludi line of games develops.
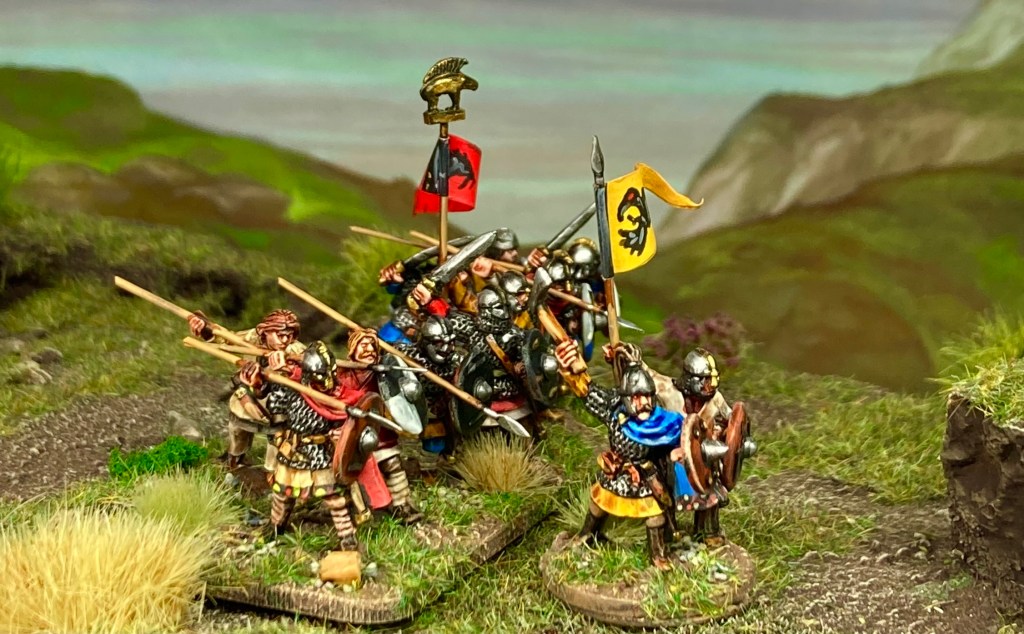
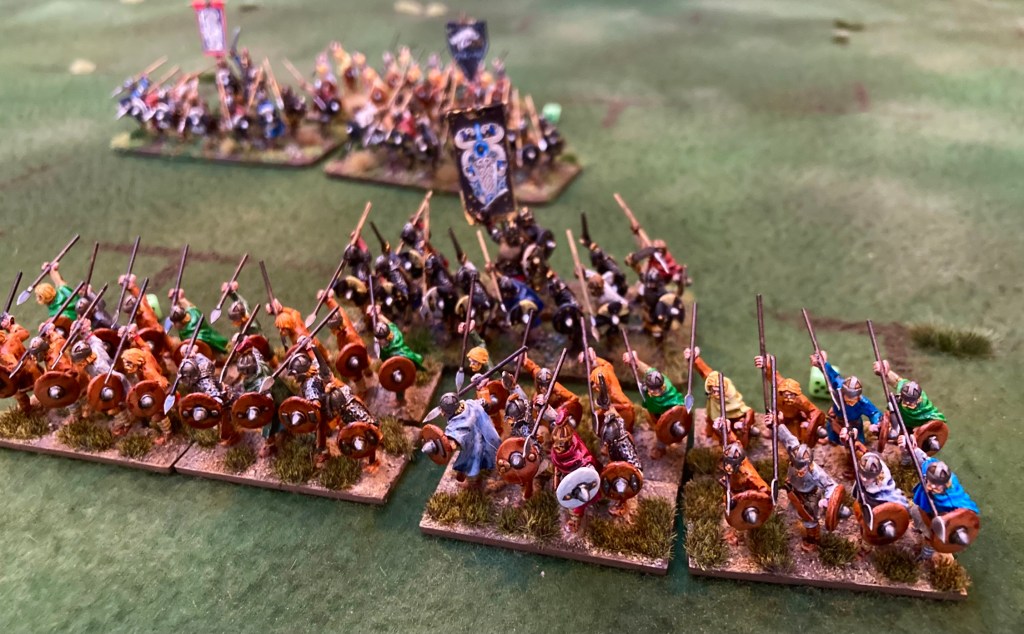
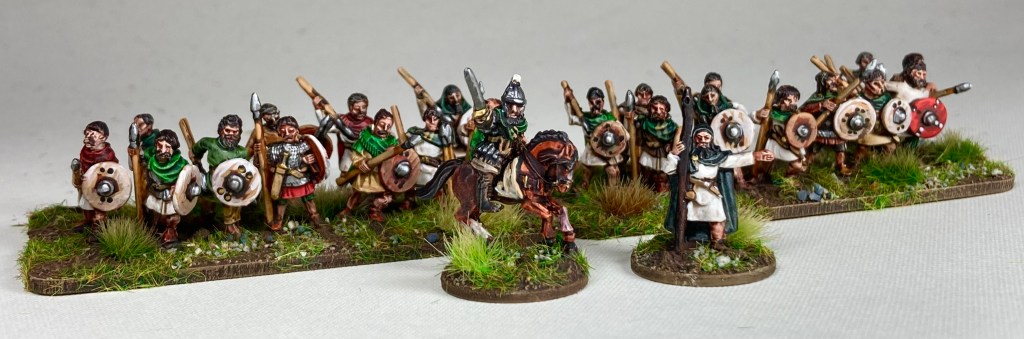
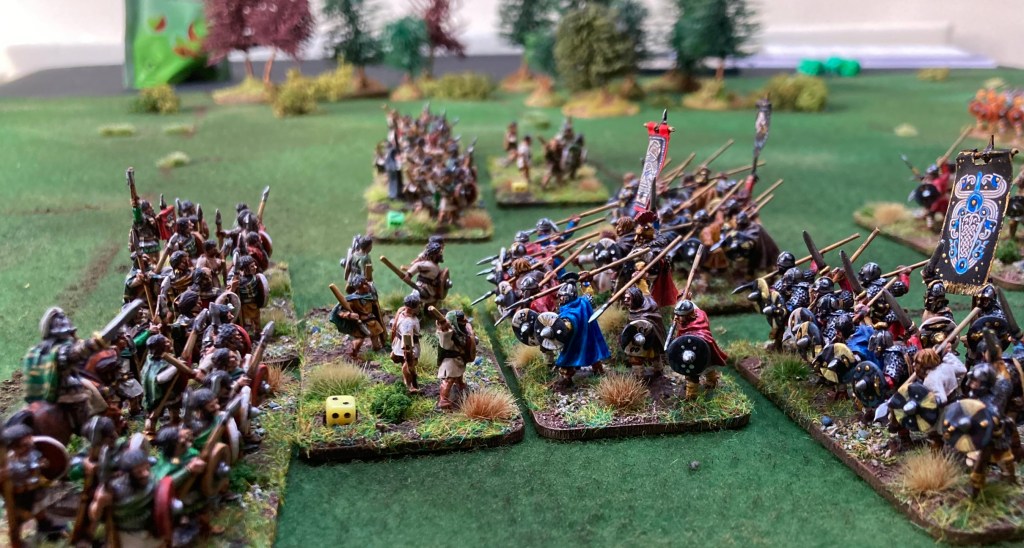
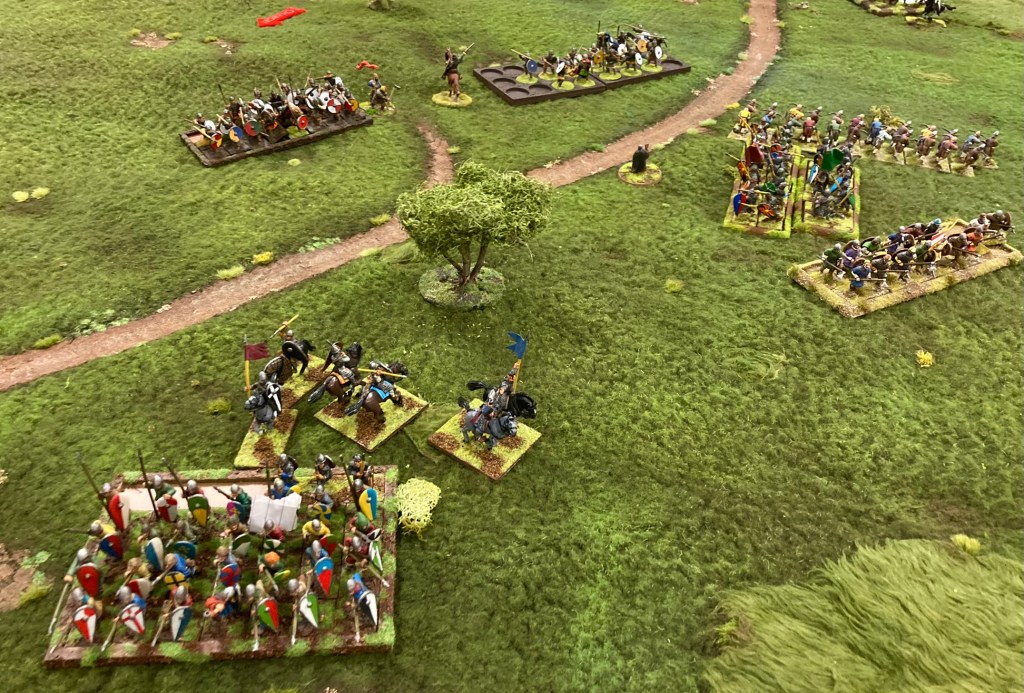
After both getting sucked into painting up ‘just a few’ of the marvellous 18mm Wiglaf Miniatures, Nick and I got our act in gear and tried a couple of games using Dan Mersey’s Age of Penda rules. Intended for the 7th century early medieval period – my favourite era of the so-called Dark Ages that saw the reigns and campaigns of Cadwallon of Gywnedd, Penda of Mercia and Aethelfrith of Northumbria – these rules are very abstract and simple. Dan refers to them as a ‘light’ set of wargames rules, which is an apt description – they are fun and quick to play, not requiring too much space or too many minis.
The front units here are all Nick’s work using Army Painter Speedpaints – you can see the project on Lead Adventure Forum
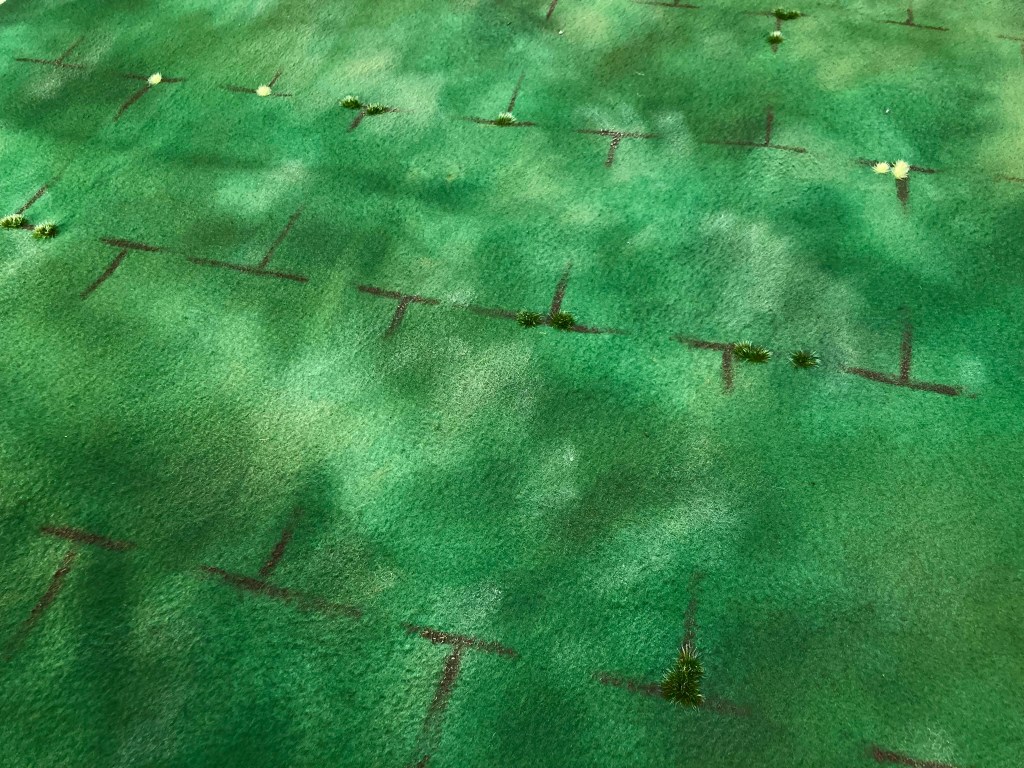
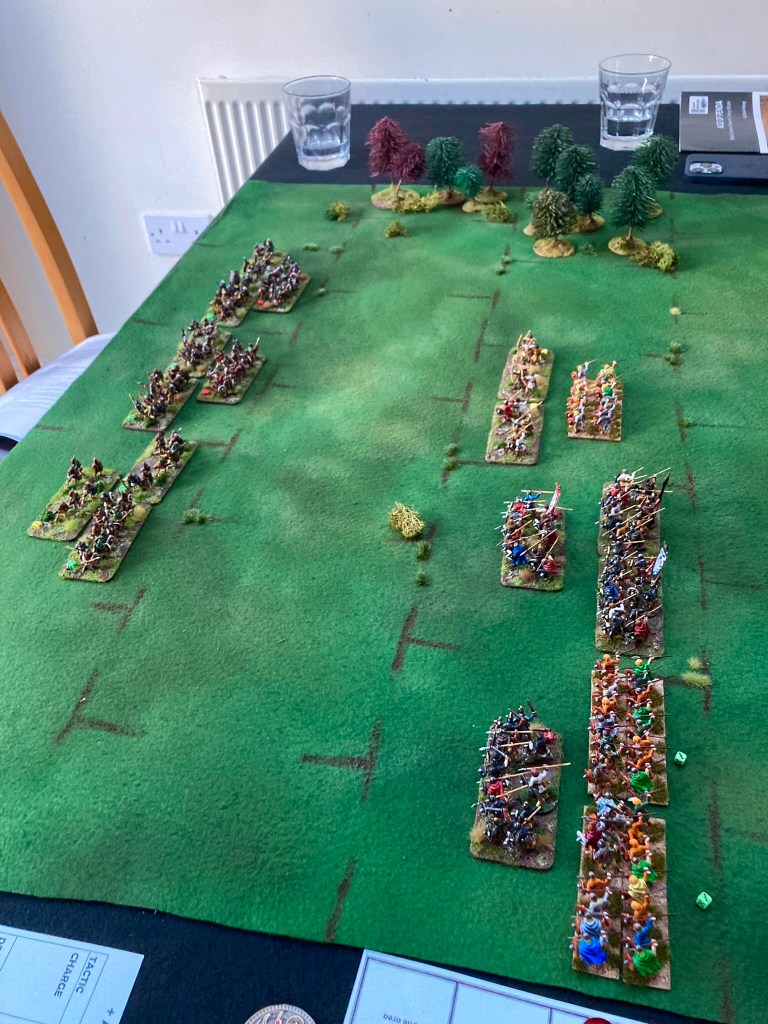
The game is played on an offset grid (or hexes can also be used), five rows wide and five deep. In about an hour, I knocked up a quick cloth to try out the rules. I cut a 90 x 90cm piece of green polar fleece fabric, dusted it with a few shades of green and brown from my spray paint collection, then added a grid with brown paint and a few tufts from Gamers’ Grass. It’s not award-winning stuff but I just wanted something to get started. The grid, by the way, is 18cm squares – in Age of Penda, you need to have room for 6 units (3 friendly and 3 enemy) in each space, so with my 80 x 40mm unit bases, this was about right.
Quick gaming cloth made from polar fleece
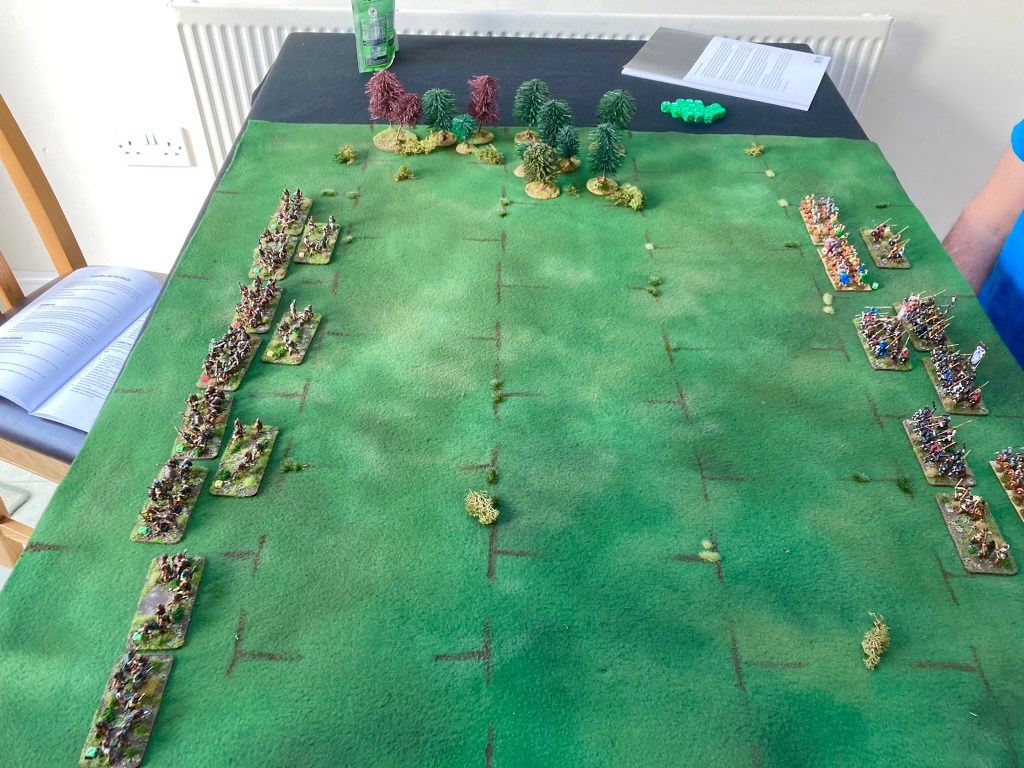
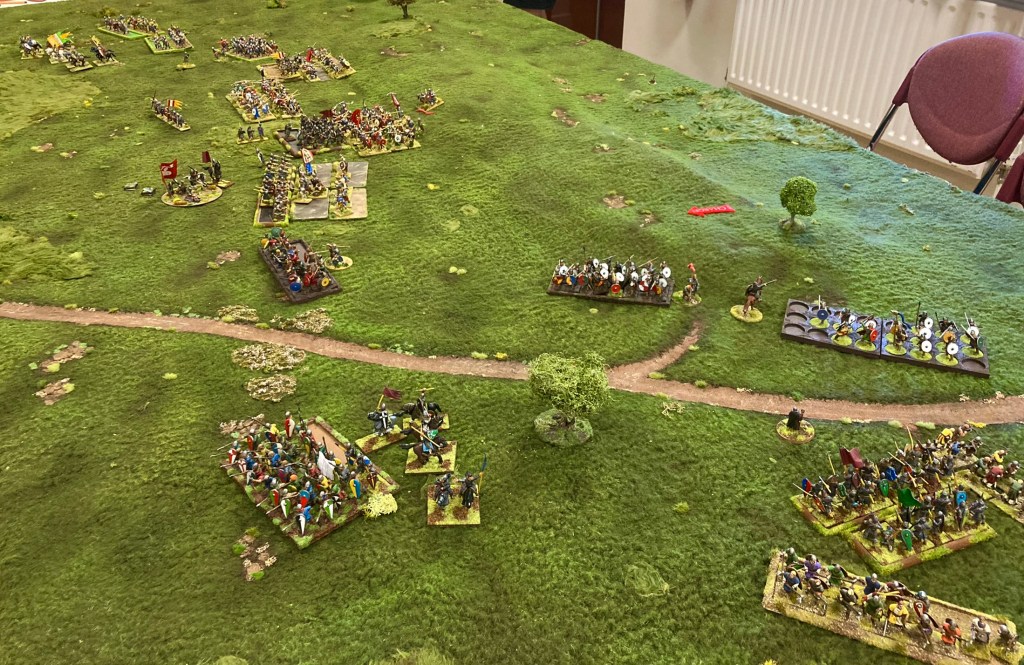
The cloth was, fortuitiously, a perfect fit for my kitchen table, which was to be the field of battle for the evening.
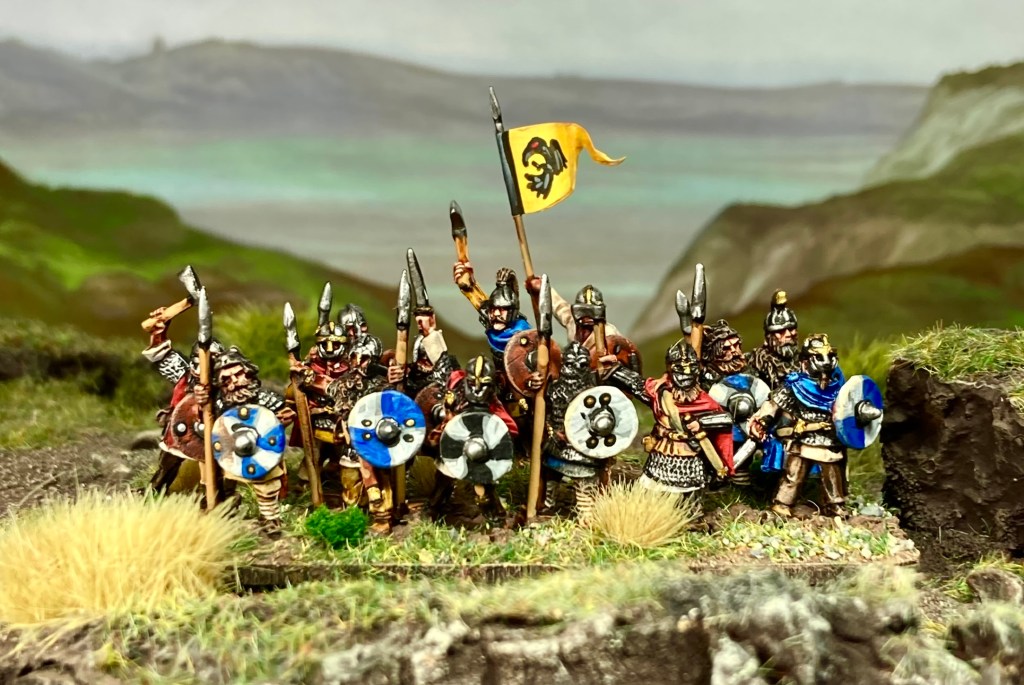
Army generation is very simple as there are only four troop types (armoured and unarmoured warriors, mounted warriors and skirmishers) so I was able to quickly knock up a couple of forces using the combined figures from Nick’s, Matt M’s and my collection of Wiglaf 18mm and Forged in battle 15mm figures:
SAXONS (66 points)
4 x armoured warriors (including Leader) @10 pts
3 x unarmoured warriors @ 6 pts
2 x skirmishers @ 4 pts
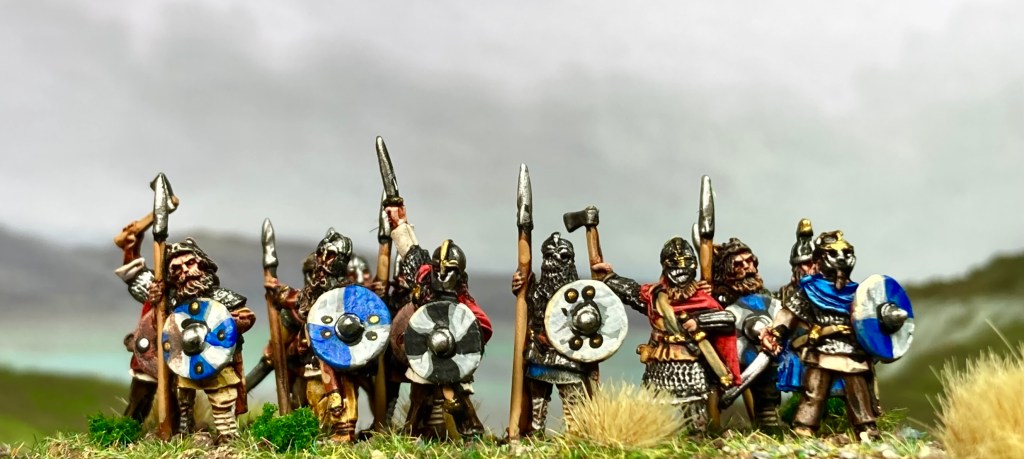
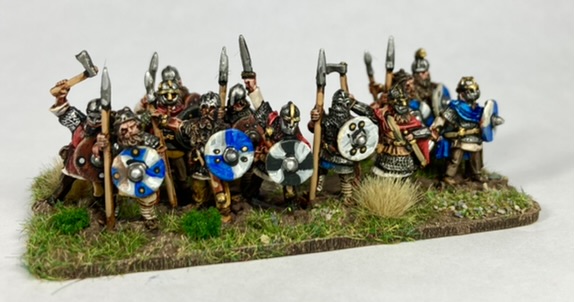
Some of my Wiglaf Saxons, painted with GW Contrast Paints – read about my work on these here
IRISH/ WELSH (68 points)
2 x armoured warriors (including Leader) @10 pts
6 x unarmoured warriors @ 6 pts
3 x skirmishers @ 4 pts
Welsh from Forged In Battle miniatures – see blog entry here for more
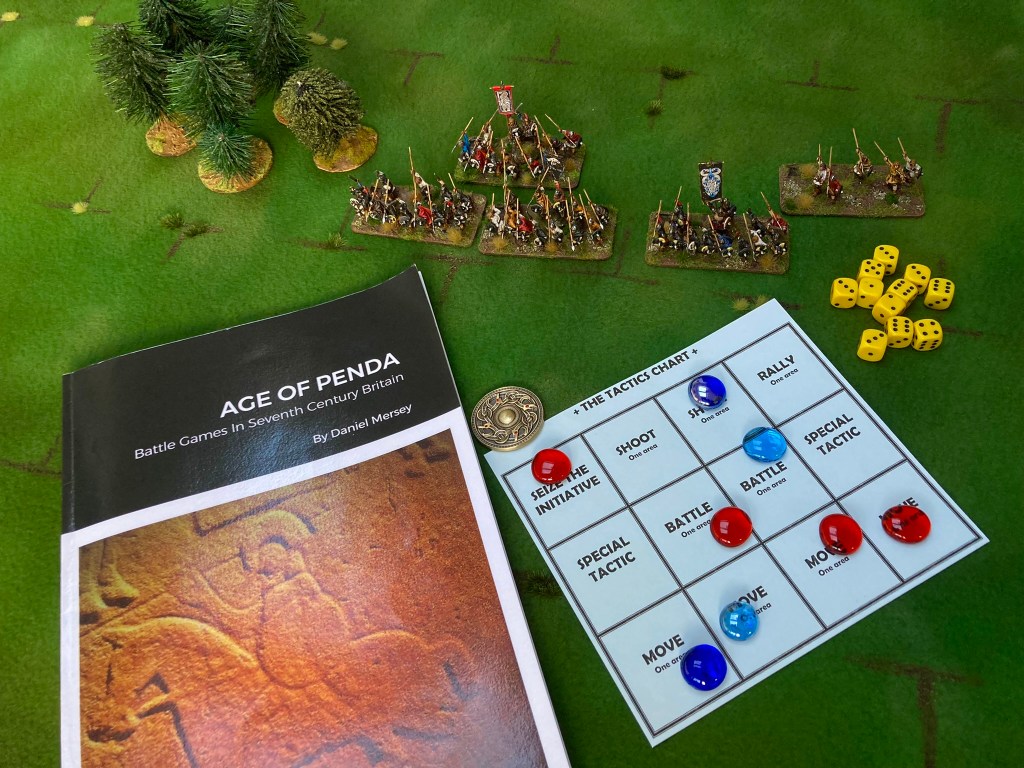
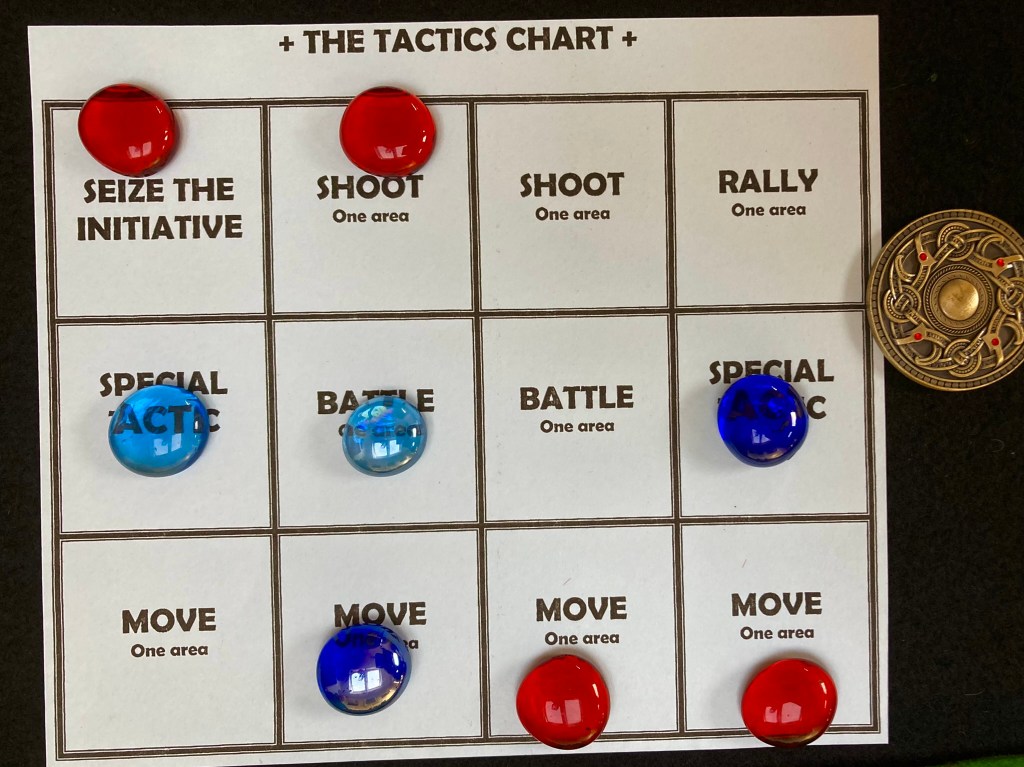
With that sorted, it was quickly down to business. Like Saga and boardgames such as Colt Express, the game turn has two phases: Tactics and Actions. In the Tactics Phase, players place their Tactics tokens on the chart, a sort of shared battleboard. This is great fun as each tactic can be chosen only once, therefore you have various options to stymie your opponent’s plans.
In our two games, the two Special Tactic spaces seemed to be at a premium, as they give a range of useful options, including the much-desired Charge tactic that allows a player to move and fight in the same activation. Seize The Initiative also saw a lot of use as the player with initiative gets the first placement of a Tactics token each turn. (The rather lovely coin we used for initiative is an inspiration token from the Beowulf RPG.)
Eyrefrith of Northumbria hatches an evil plan…generally involving ‘charge everything’
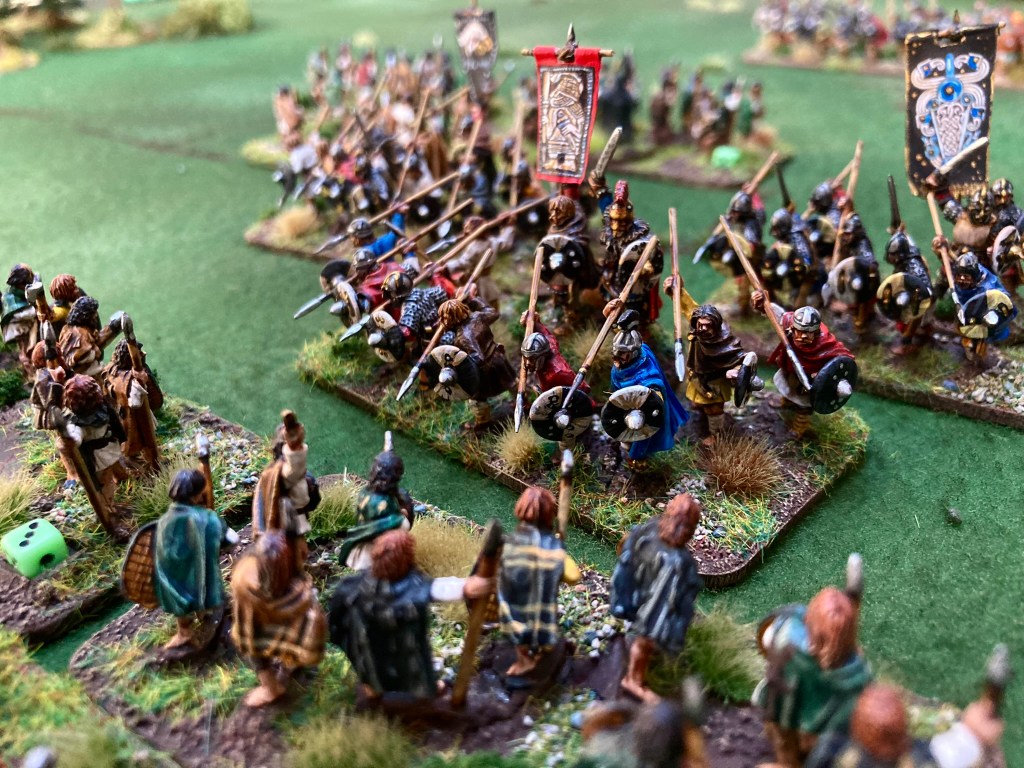
And so, to battle. Game 1 was over in about thirty minutes. I tried to make use of my superior number of skirmishers to pepper the Saxons with arrows, but quickly learned that unsupported skirmishers die quickly! There is a Skirmish option that you can choose if you pick Special Tactic, but I hadn’t worked out how to use it at this point and got royally stuffed by heavily-armoured vengeful Saxons.
Oh *&£%! Vengeful Saxons headed our way with file-hard spears and 16 dice!
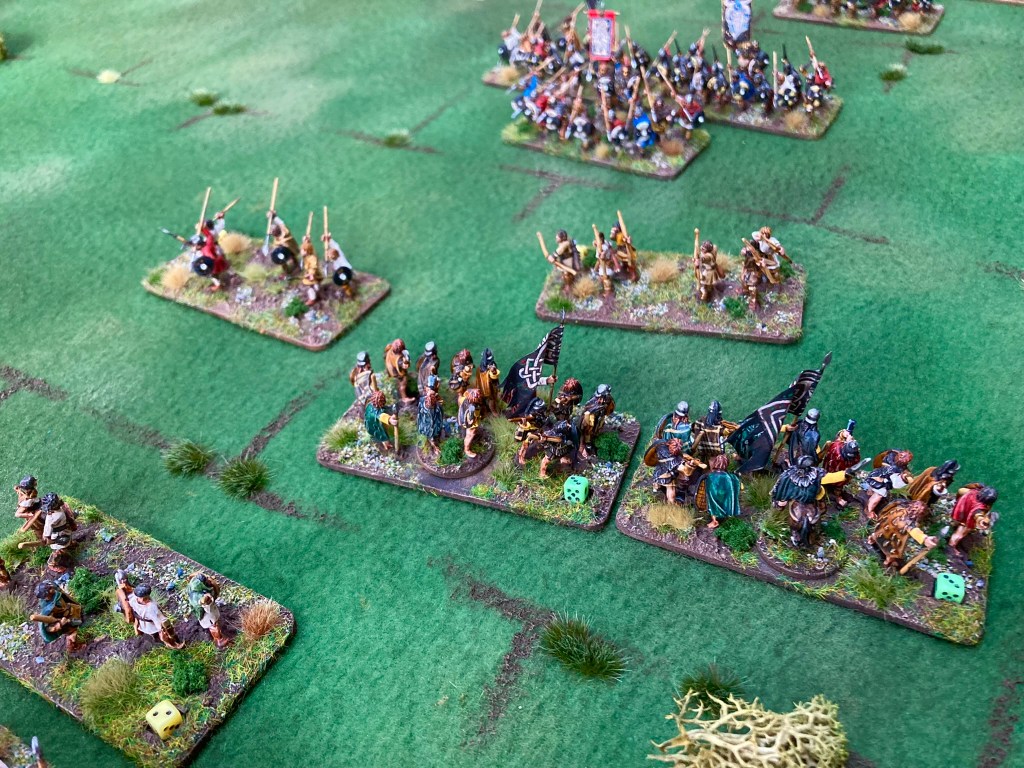
The vengeful Saxons then charged my Welsh King and his bodyguard – which didn’t go well for me! By placing three of his armoured units into one space, Nick had the maximum amount of fighting dice (each unit has a Battle Rating of 5, meaning they were rolling 15 dice, plus an extra 1 for his leader). Hits were inflicted on a 4+ which pretty much destroyed my opposing forces (1 armoured warrior unit with leader, 1 unarmoured warrior unit and 1 skirmishers). The charger has a distinct advantage in that their hits reduce the Battle Rating of the enemy units who only fight back (‘Battle Back’) with what they have left…in my case. nothing!
Nick’s armoured spearhead punches through the Welsh
This concentration of force felt quite appropriate for early medieval combat, if a bit bruising for my first big combat! The loss of my leader reduced my Tactics tokens from 4 to 3, meaning that I had less options next turn, by which time I was reduced to 3 warrior units – army broken and game over.
Well, after getting the initial scrap out of the way, we re-set for game 2.
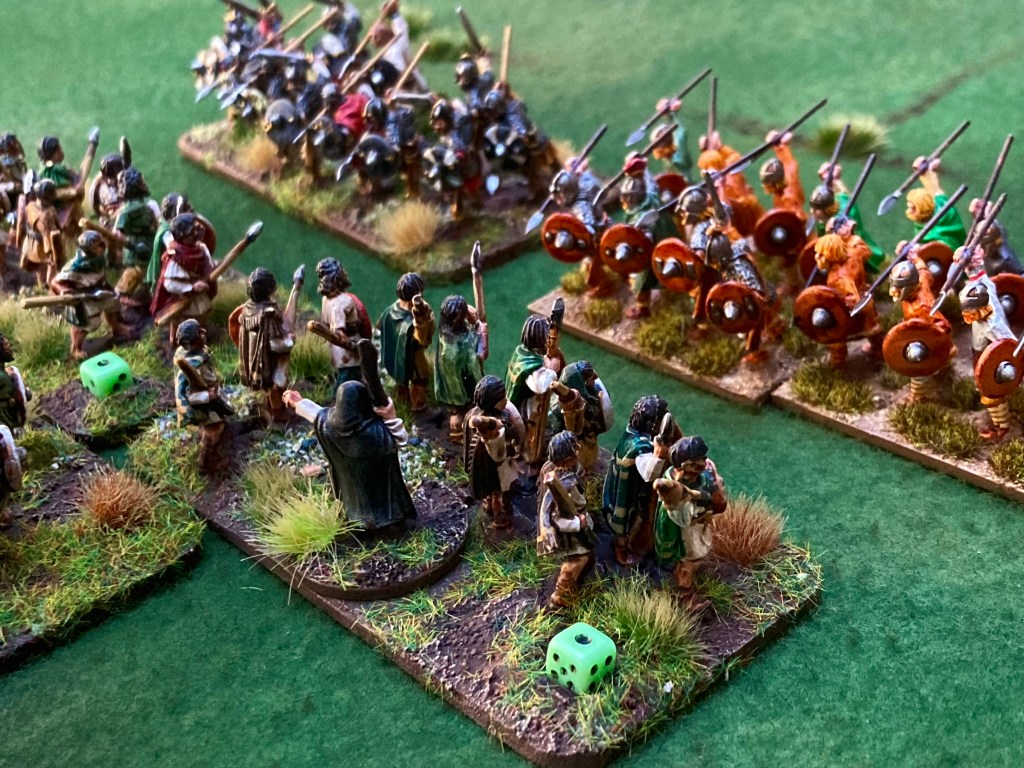
Game 2 was a more cagey affair to start with. Having learned my lesson about getting too close to charging Saxon nobles, I held back the Welsh and Irish line and instead sent forward all my skirmishers. They used the Rush special tactic to get close to the Saxon vanguard and then unleashed a hail of javelins, causing a few casualties. Units can activate more than once, so I then used a Move tactic to get them out of the way.
Skirmishers rain javelins on the Saxon vanguard.Welsh and Irish hold backThe Irish sense weakness on the Saxon flank and charge home!
There then followed some back-and-forth shooting as both sides took hits and then used Rally actions to try to recover. One thing we were beginning to understand at this point was that keeping 3 units in a square was critical for success (as you can share out hits on your own units, which have the opportunity to rally), but isolated units were more likely to die quickly.
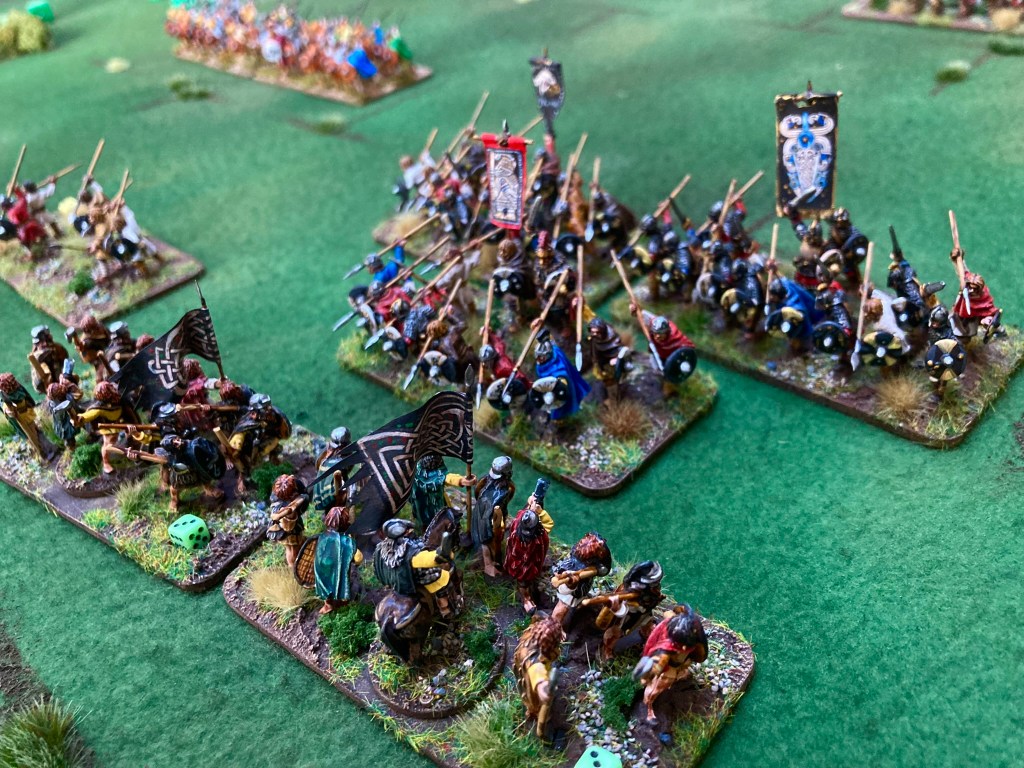
Seeing an opportunity on the left flank, I sent forward three Irish warrior units to take on two Saxon skirmishers and a unit of warriors. Predictably, this went in my favour, destroying the two skirmishers and damaging the warriors. Unfortunately, killing the skirmishers freed up space for two enemy units in my square, which promptly saw me getting charged from behind by Eyrefrith and two fresh Saxon noble warrior units! There’s no actual rear or flank charge rules in Age of Penda but the damage was real enough as my brave Irish were battered. I managed to hang on by spending multiple Tactics tokens on Rally actions (there’s also a Special Tactic that allows an extra Rally action), but of course this took up most of my turn and held up the rest of the army coming to help.
Eyrefrith and his thegns arrive with sharp spears in the Irish rear…
Eventually, the Saxons crushed the Irish who had been cut off from the rest of the force and took out another Welsh warrior unit, which pushed my army past breaking point. I thought I had been doing quite well but my impetuous flank attack cost me the game, and rightly so.
Nick and I thoroughly enjoyed our two games. As DBA players in days past, we both felt like it had that ‘fast play’ feel, especially working in a compact space and being able to get more than one game in of an evening. The Tactics Board was a fun concept which forced much decision-making, but unlike Saga, we didn’t spend half the game looking at the battleboard – it felt very much like a miniatures game driven by the board.
In terms of period feel, the simplicity of troop types, emphasis on attacking in force and vulnerability of lone units all worked well. The grid allows very quick, no fuss movement and shooting (I was always surprised when playing To The Strongest! how much time you save by not measuring at all, and it’s the same here.) By the same token, you don’t get the fine detail of shield wall tactics as units can be arranged however you like within the grid squares, but Age of Penda is very much a ‘top-down’ game and so this isn’t really within its remit. Likewise, individual leaders do not feature, apart from the option to buy more or less Tactics tokens to represent better or worse leadership. That said, it’s a highly refreshing and enjoyable game that Nick and I are both keen to play again soon.
Age of Penda is available from Wargames Vault as a PDF or hard copy; hard copies are also available from North Star in the UK.
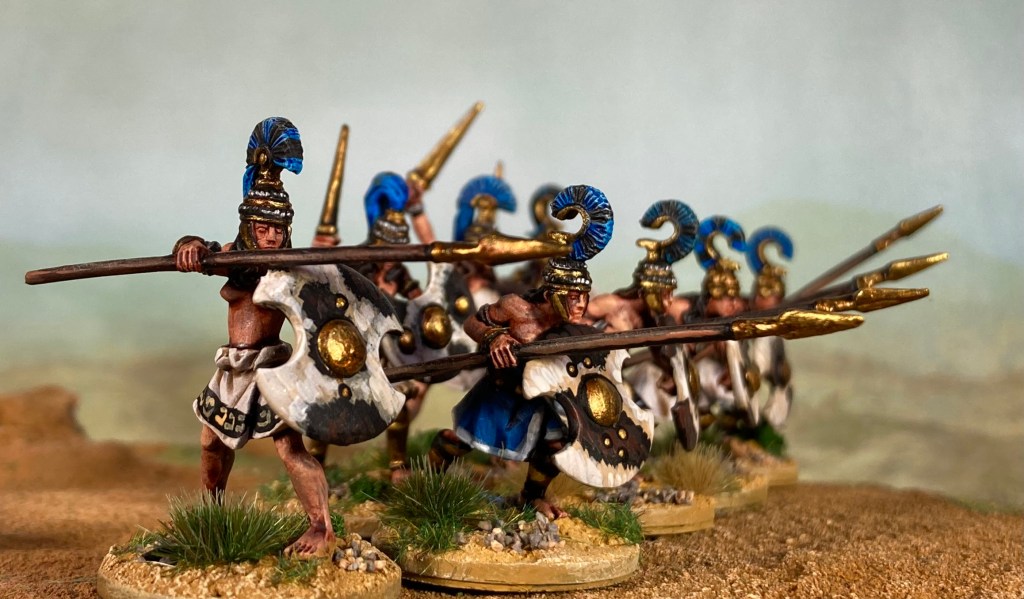
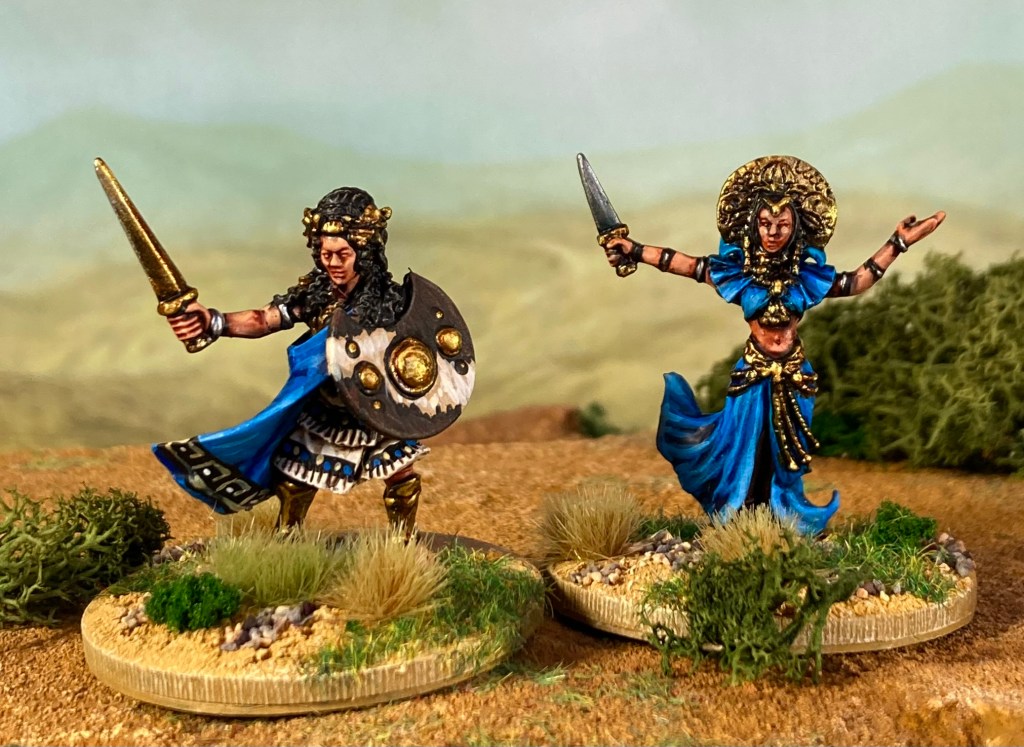
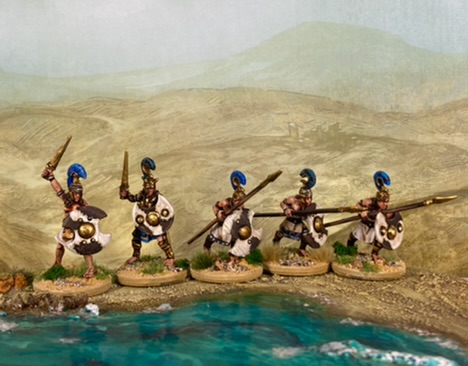
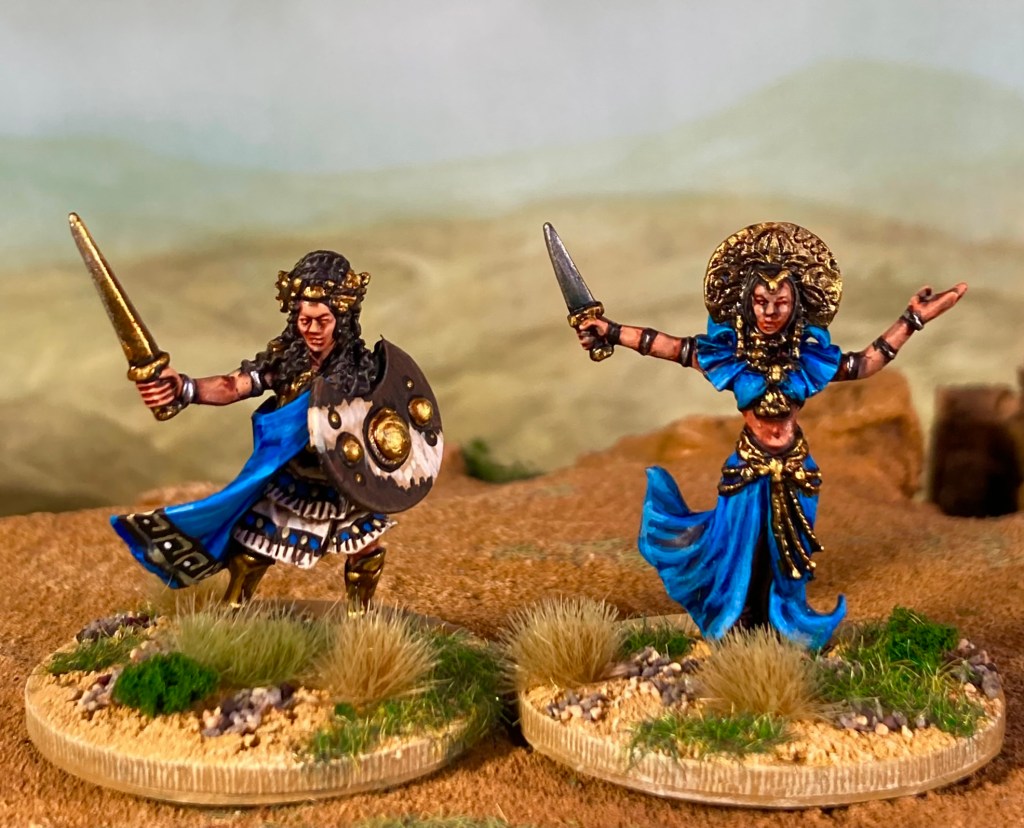
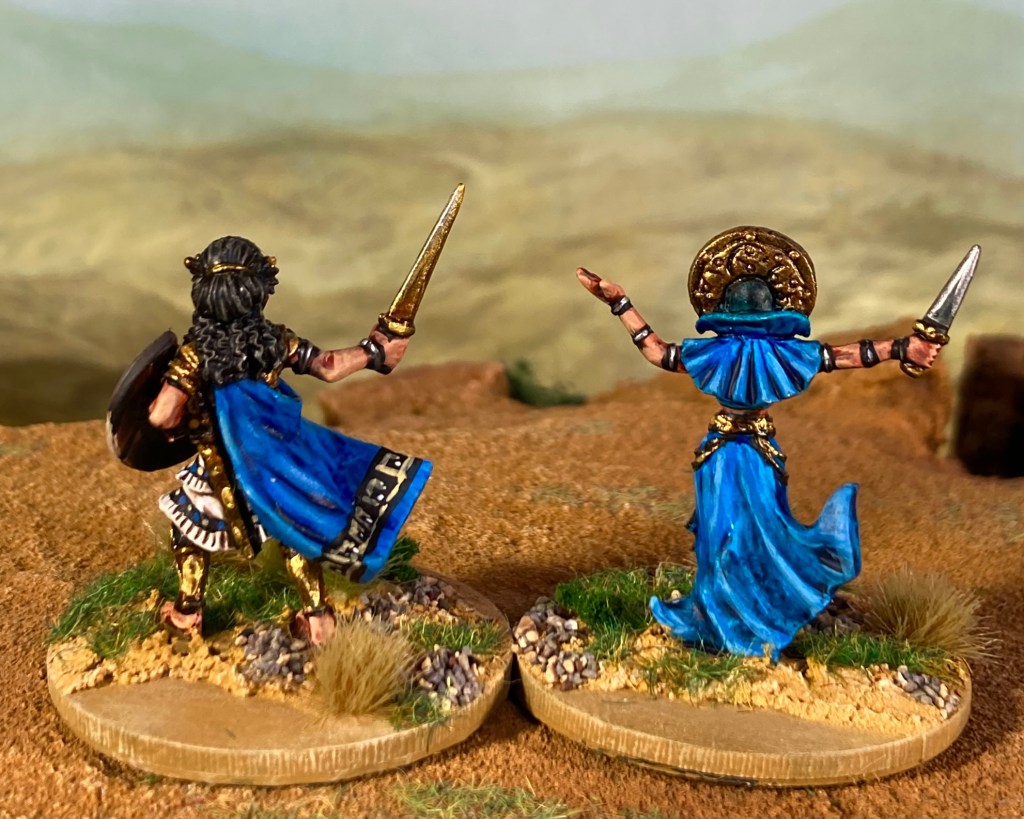
Amazons from Lucid Eye. The background used throughout this photo shoot is a download from the Jon Hodgson Maps Patreon site which you can access for a mere $2.50 a month, including all the previous mini backdrops. This one’s called ‘Desert Background’. Well worth a look!Amazon warleader and priestess, both from Lucid Eye
The Greek Myth ‘side project’ has taken on a distinct whiff of Troy recently! While I press on with the excellent Lucid Eye Amazons, I bought a copy of Rosemary Sutcliff’s Black Ships before Troy and very much enjoyed Alan Lee’s superb illustrations as well. Lee’s depiction of Memnon, King of Ethiopia, caught my imagination and I thought I’d have a crack at creating a few African warriors too..
Memnon of Ethiopia and his warriors as depicted by Alan Lee in Black Ships before Troy
[Note to self: this is NOT the start of a full-on Trojan Wars project. Signed me, 26.6.22 🙂 ]
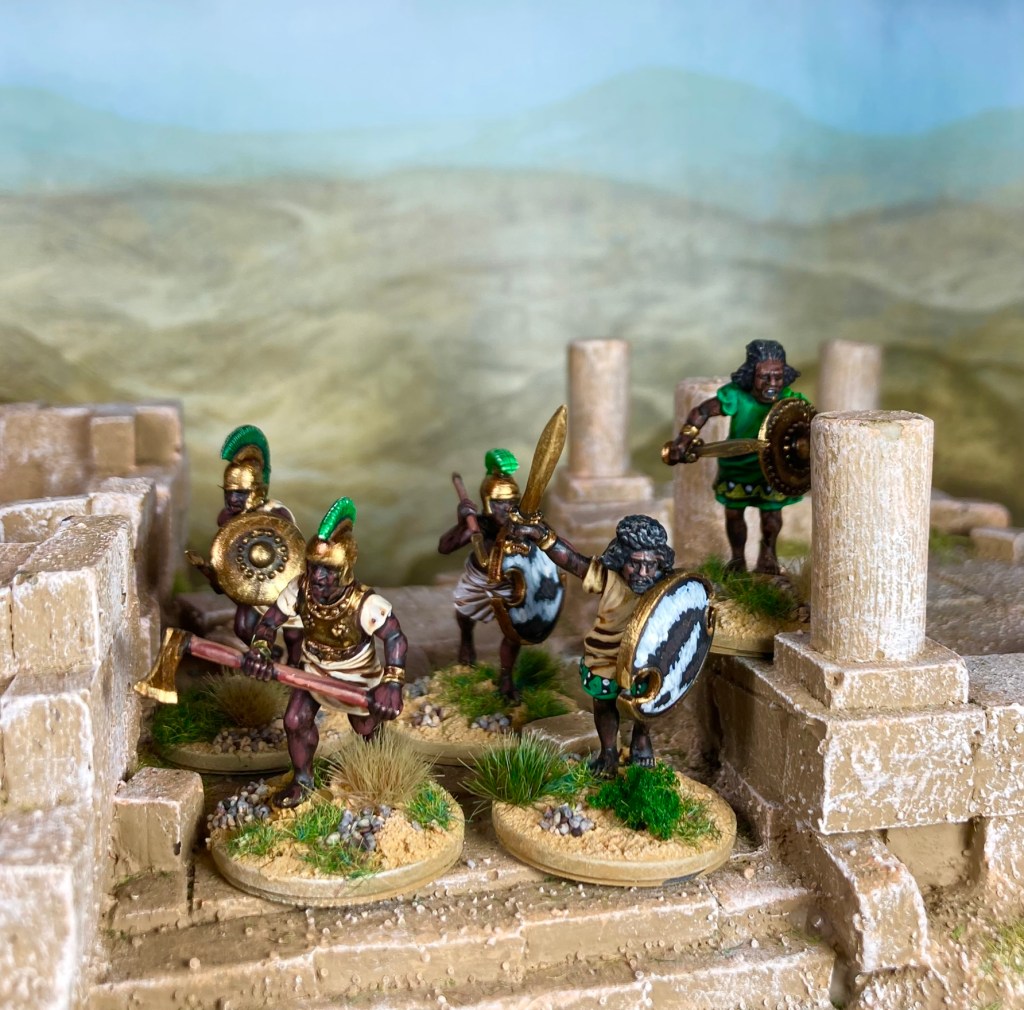
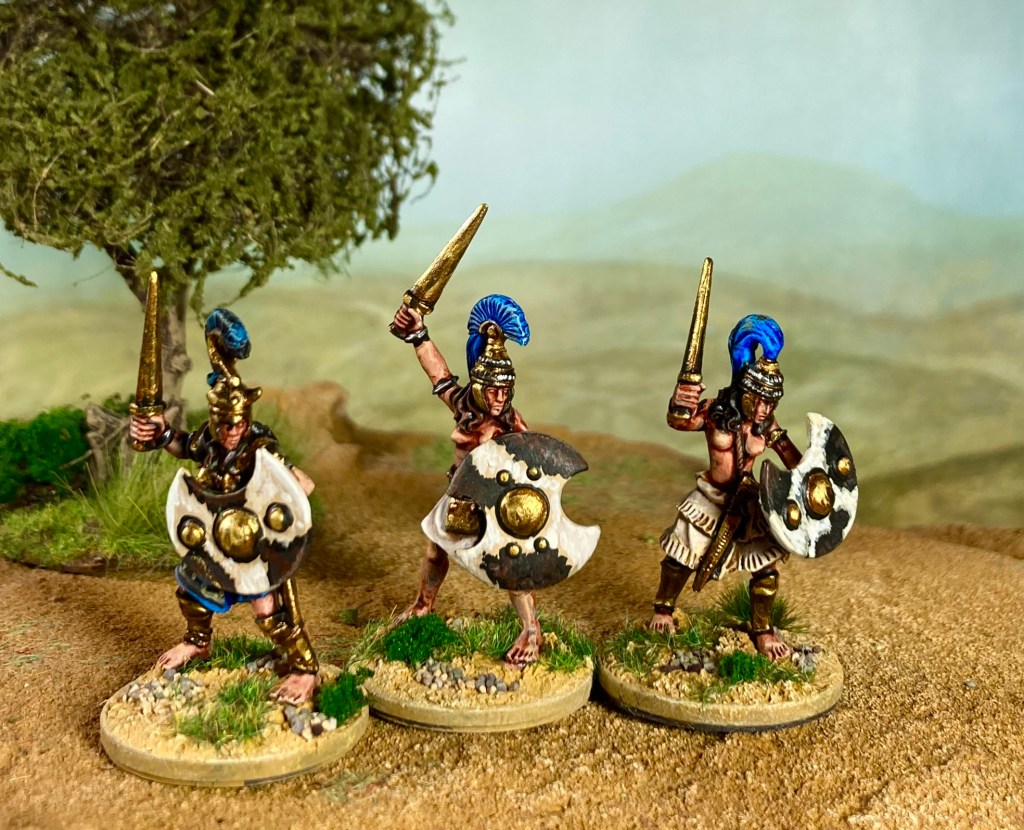
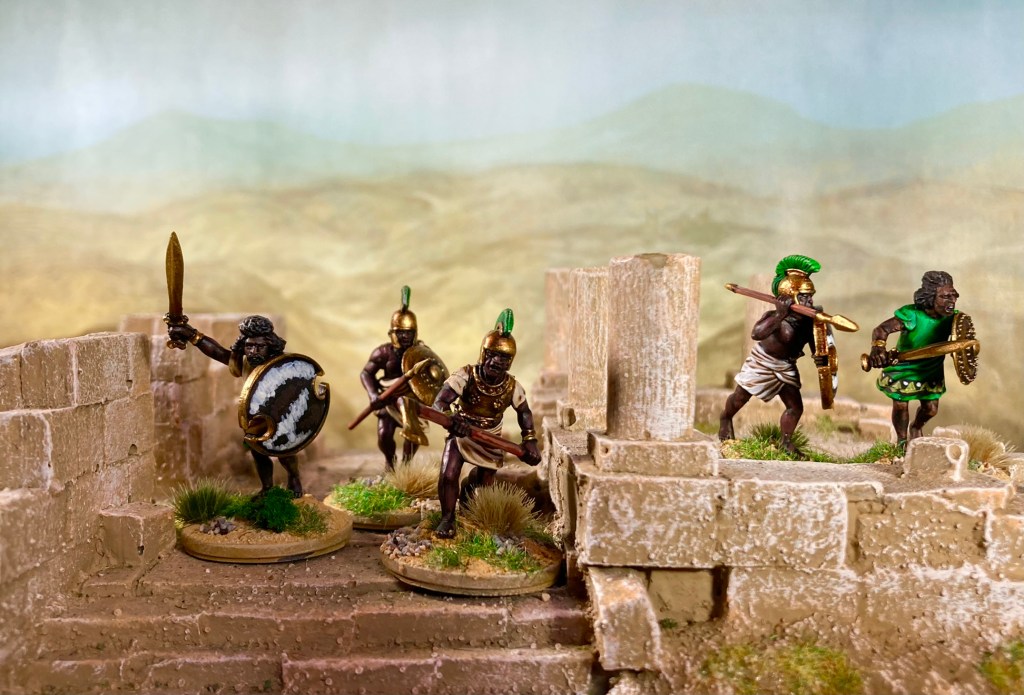
My initial take on Memnon’s Ethiopians
Sutcliff’s book has the Amazons as horse-riding warrior-archers and Alan Lee shows them as a mix of Scythian and Greek. Lucid Eye’s Steve Saleh has chosen a more overall Mycenean look and organisation for his Ziggurat range; his vision has warriors and archers on foot, combined with noble warriors in chariots with some light horse archers alongside. I like both but don’t have any of the horse archers yet, so that’s probably my next purchase.
Penthesilia by Alan Lee from Black Ships before Troy
Anyway, on with the Amazons themselves. I’ve already covered the initial painting and assembly in my previous blog article so I won’t go into too much detail here, but suffice to say my base colours are nearly all GW Contrast paints. Metallics have been added after varnishing to get that shine that I like!
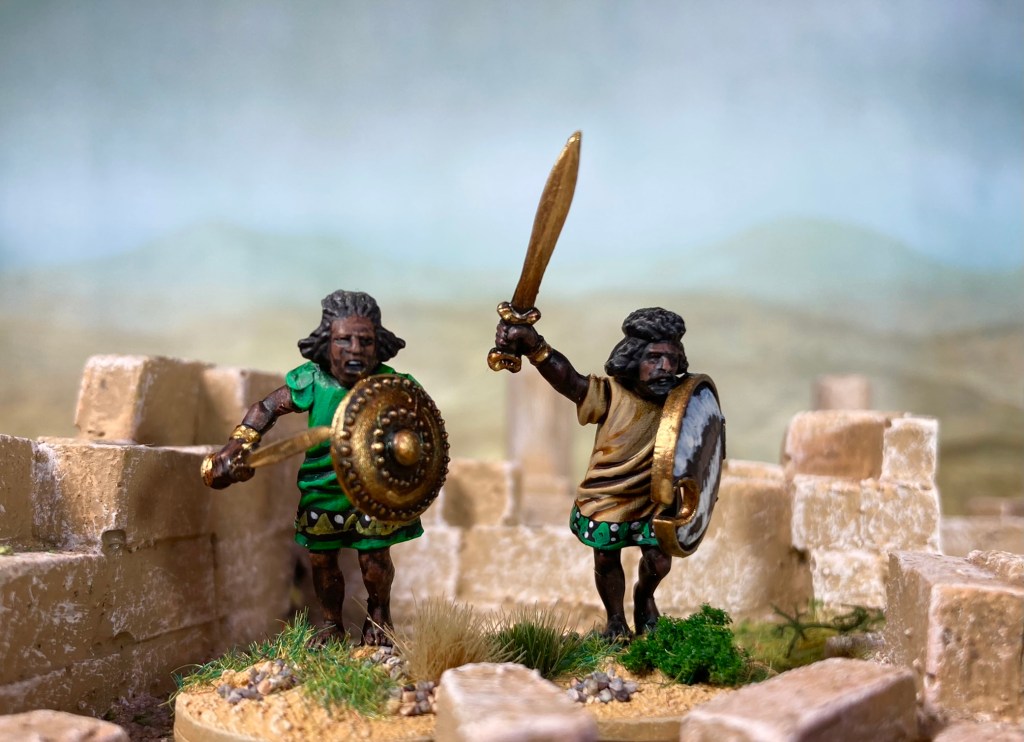
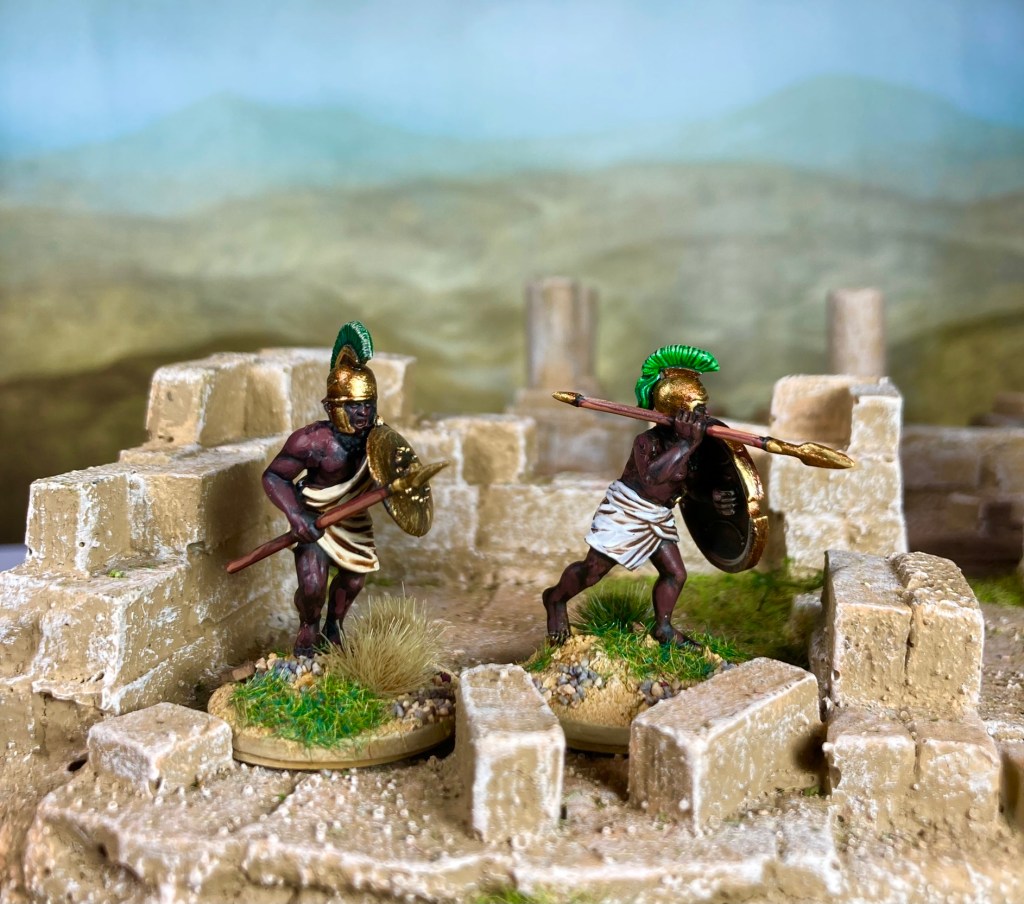
And now, Ethiopians. I’ve got a very large collection of Ethiopians for the late 19th and early 20th century already, but these chaps are something different. As has been pointed out, many Greeks probably had little idea who Ethiopians were apart from their dark skin, so I had pretty much free rein here. I’ve gone for a rather fantastical mash-up of different plastic kit components. The main ingredient is bodies from the Perry Miniatures Ansar boxed set; this has been combined with some of the Beja Perry heads alongside crested helmets which were made from Victrix Iberian warrior heads with crests taken from Victrix Greeks. I fancied using green to tie all the models together and helmet crests were an ideal way to do this.
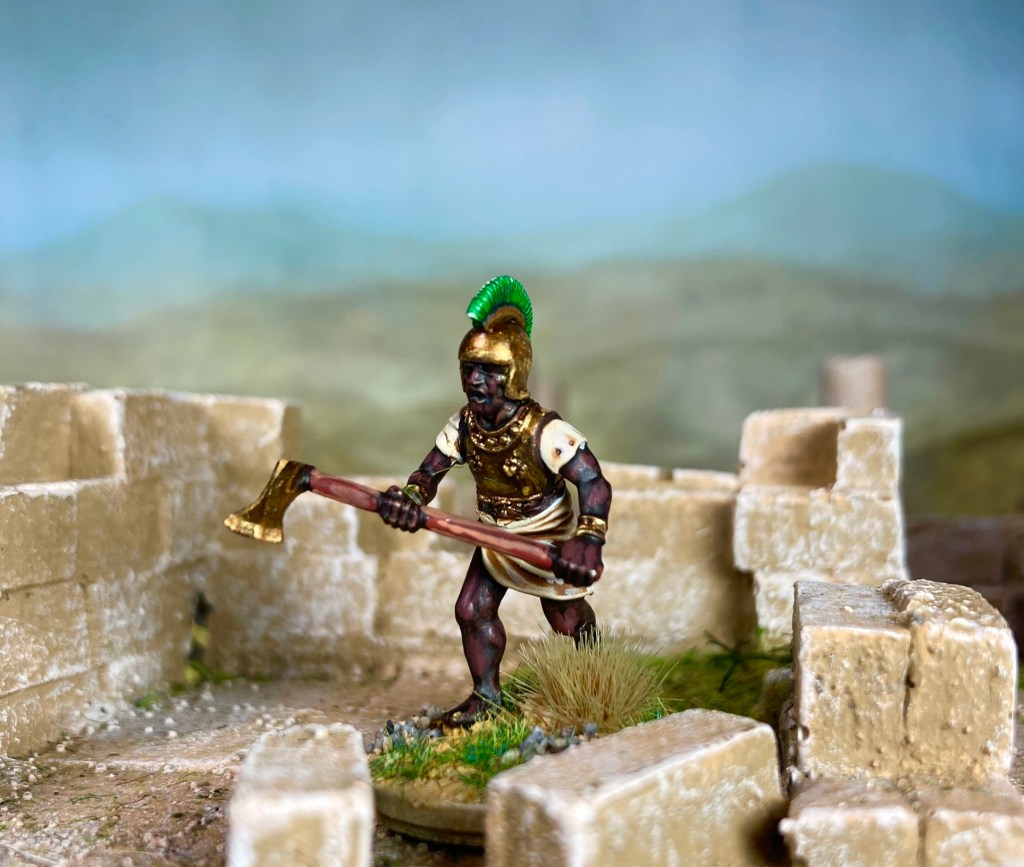
Some (admittedly North European) Bronze Age elements were added from the Oathmark Revenants and Skeleton sprues using the shields, swords and axes. Additional spear arms came from the Perry Ansar set and also the Wargames Atlantic Irish, which is rather handy for bare muscled arms. The large ‘cut out’ shields were robbed from the Wargames Atlantic Skeletons sprue (only fair, since those skellies have taken a lot of my Greek shields in the past.) It’s been said many times, but the availability of plastic sprues on eBay is a huge boost to this kind of kit bashing project.
With all this done, I green’stuffed a few gaps, gave the Ethiopians a quick coat of Halfords white primer and got to work with the GW Contrast paints. I played around with using different mixes of Cygor Brown, Wyldwood and Black Templar, and eventually settled on a roughly 50/50 mix of Cygor and Wyldwood. When dry, this got a lightly-applied highlight of Foundry Dusky Flesh 6A to pick out faces and raised muscles.
I painted on a few rough geometric patterns to enliven the tunics.
Clothing was Skeleton Horde or thinned-down Wyldwood (both highlighted with Vallejo Off-White acrylic when dry) or Aggaros Dunes (highlighted with Vallejo Dark Sand). The green helmet crests and the green tunic were a mix of Contrast Warp Lightning and Dark Angels Green.
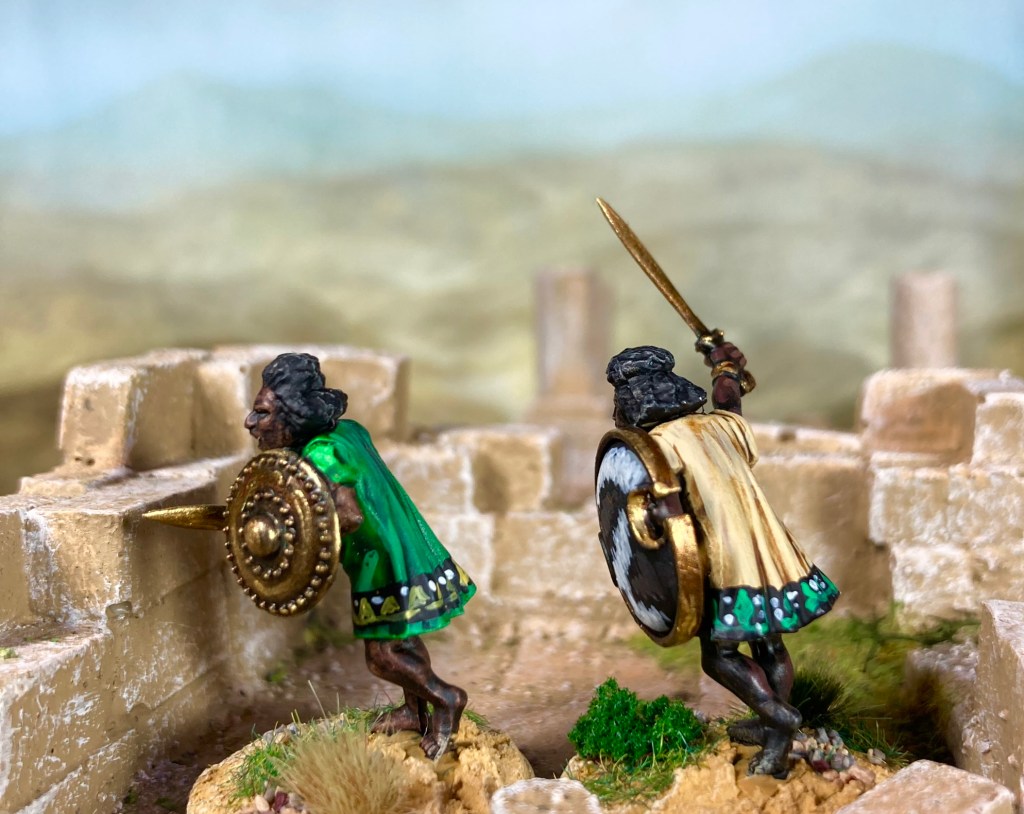
The backs of the shields and the weapon hafts were painted with Wyldwood. The weapon hafts then had a coat of Miniatures Paints Chestnut Brown followed by streaks of Foundry Butter Fudge 55A to create a woodgrain effect.
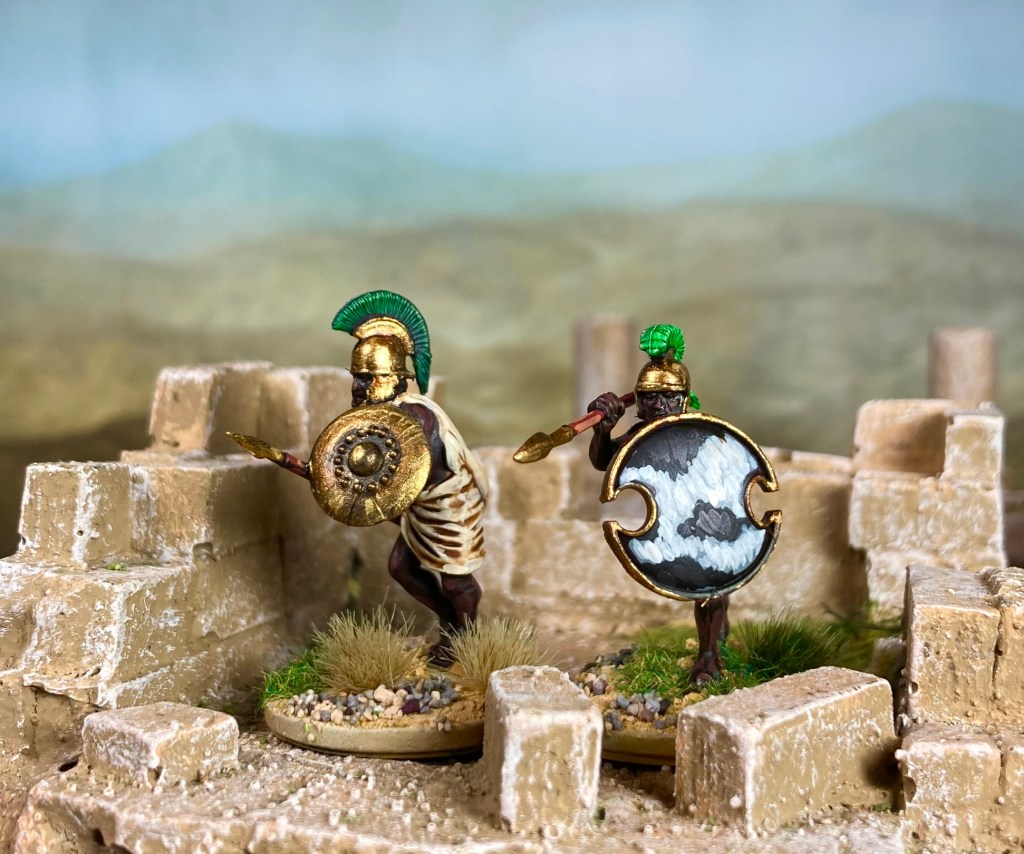
The cow-hide shields were painted in a similar method to the Amazons with a base coat of black followed by Miniature Paints 84 Umber and 83 Chocolate Brown for the dark areas, Miniature Paints Mid-Grey + highlights of Vallejo Off-White for the light ones.
A very light dry brush of Vallejo Iraqi Sand was applied to bring out the details on some parts of the figures, e.g. over the hair (base coated in black) and the edges of tunics.
As with the Amazons, the bronze areas were base-coated with either black or GW Contrast Wyldwood, then painted and highlighted after varnishing to preserve the high shine that you can see in the photos. Colours used were Vallejo Brass with a wash of Winsor & Newton Nut Brown ink and a highlight of Vallejo Gold.
I’m pretty pleased with the Ethiopians as a fantasy/ Bronze Age mash-up – next step needs to be finding a chariot and miniature for Memnon himself, plus adding a few extra warriors.
My WAC rule book goes into action behind the Saxon line
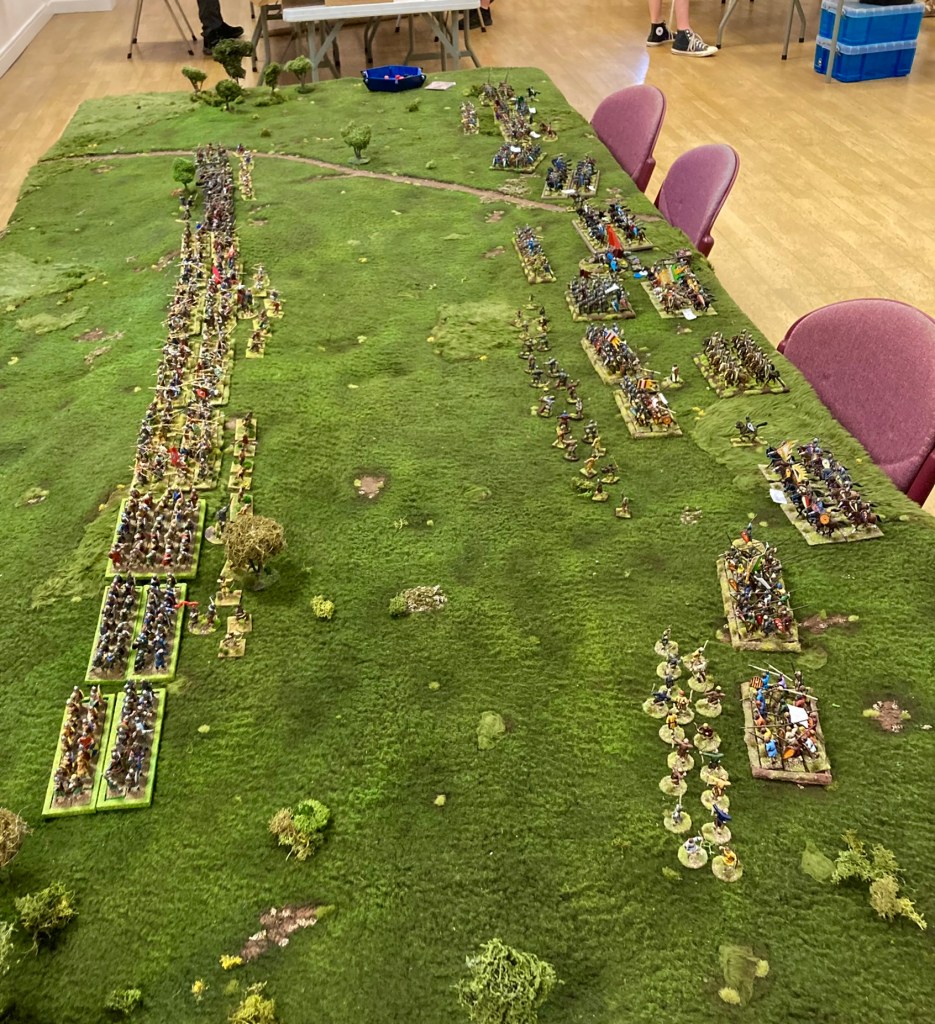
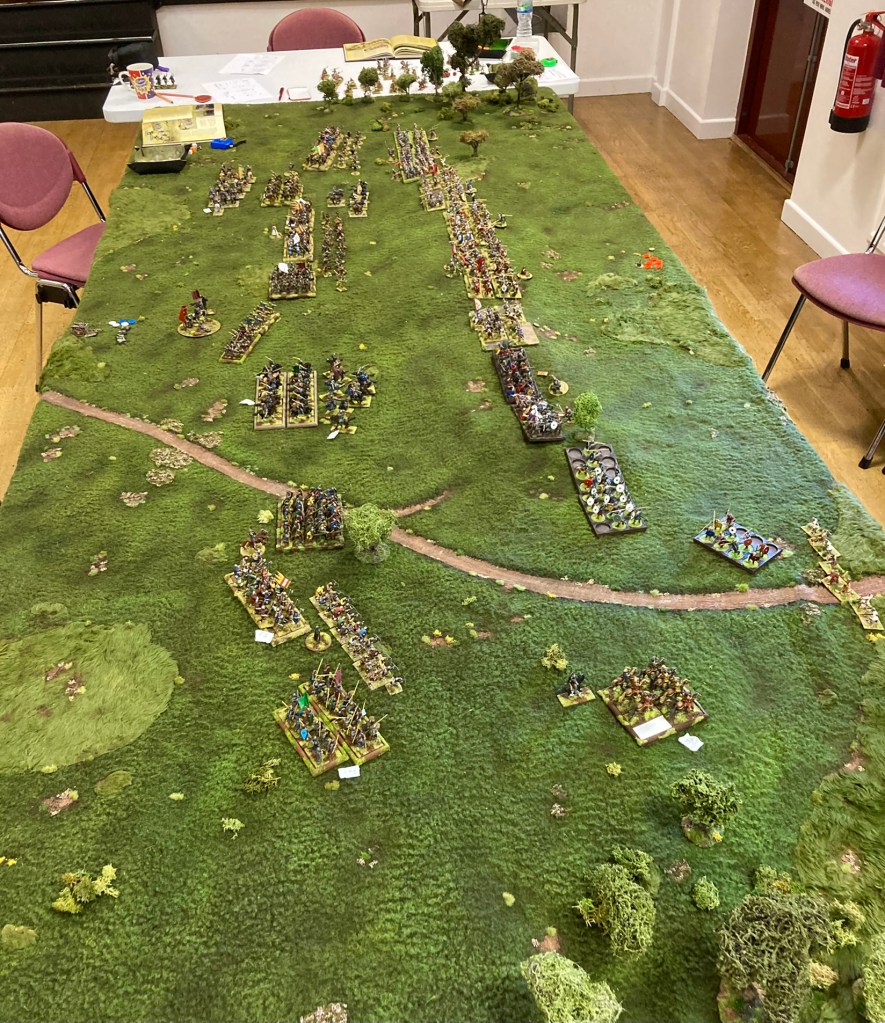
In a break from Midgard and everything else, I took a trip down to Bristol to celebrate my old chum Rob’s birthday. As part of the festivities, Rob had laid on a day of gaming at his club venue (Bristol Big ‘Uns at Iron Acton Village Hall) where I was due to participate in a large Battle of Hastings game using his own War and Conquest rules.
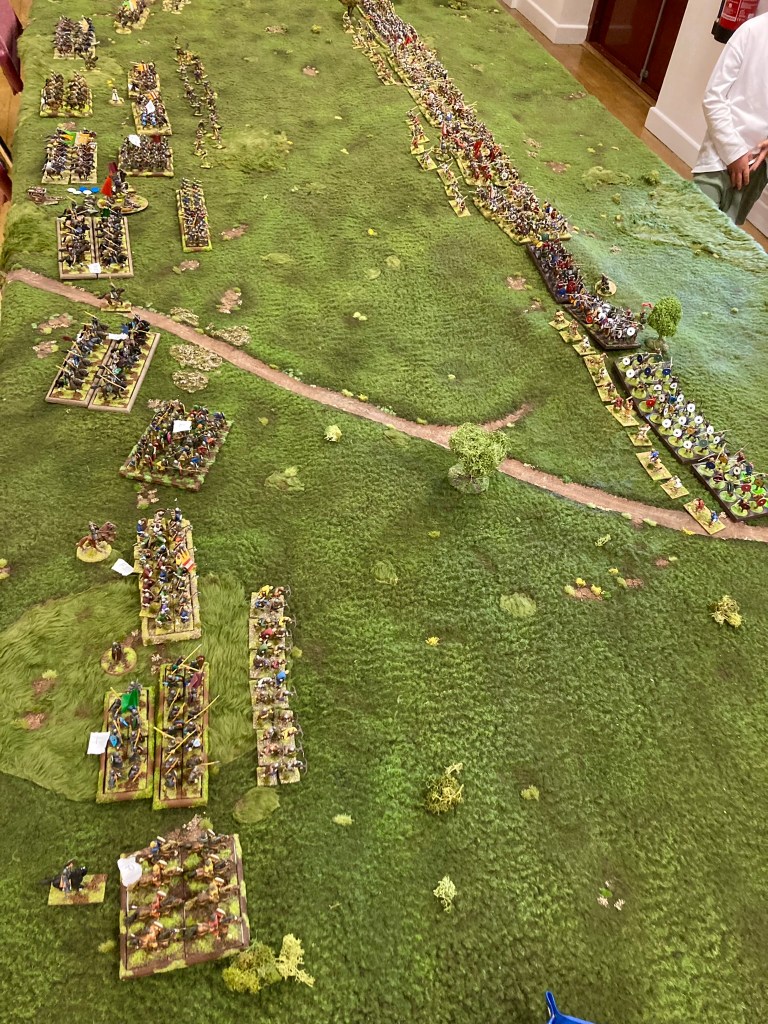
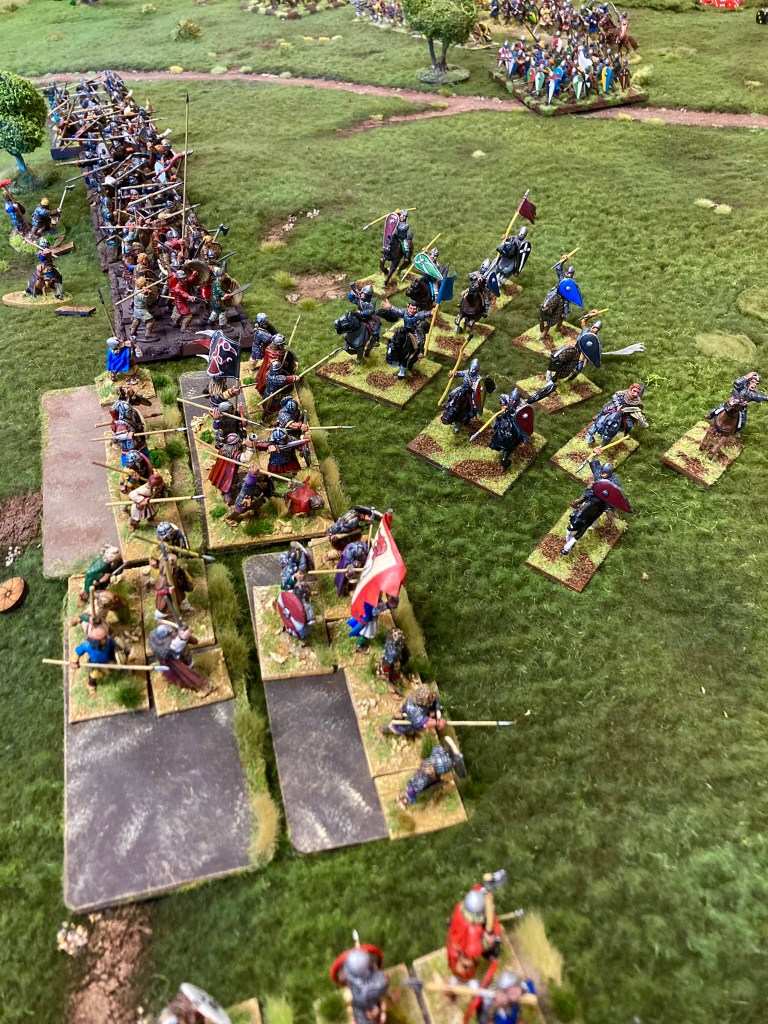
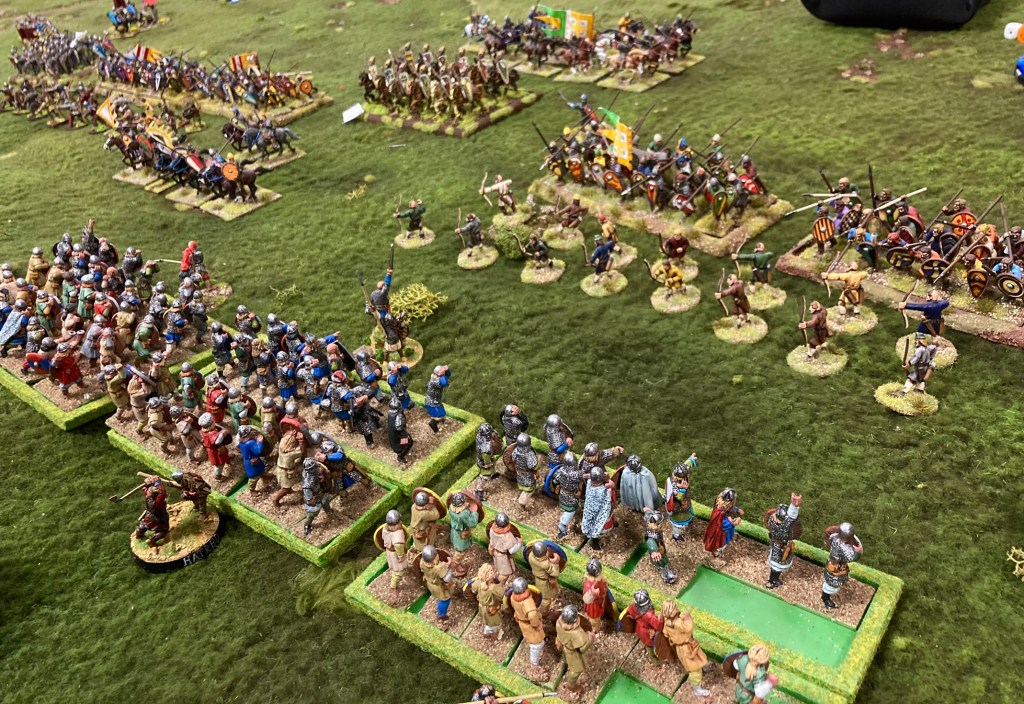
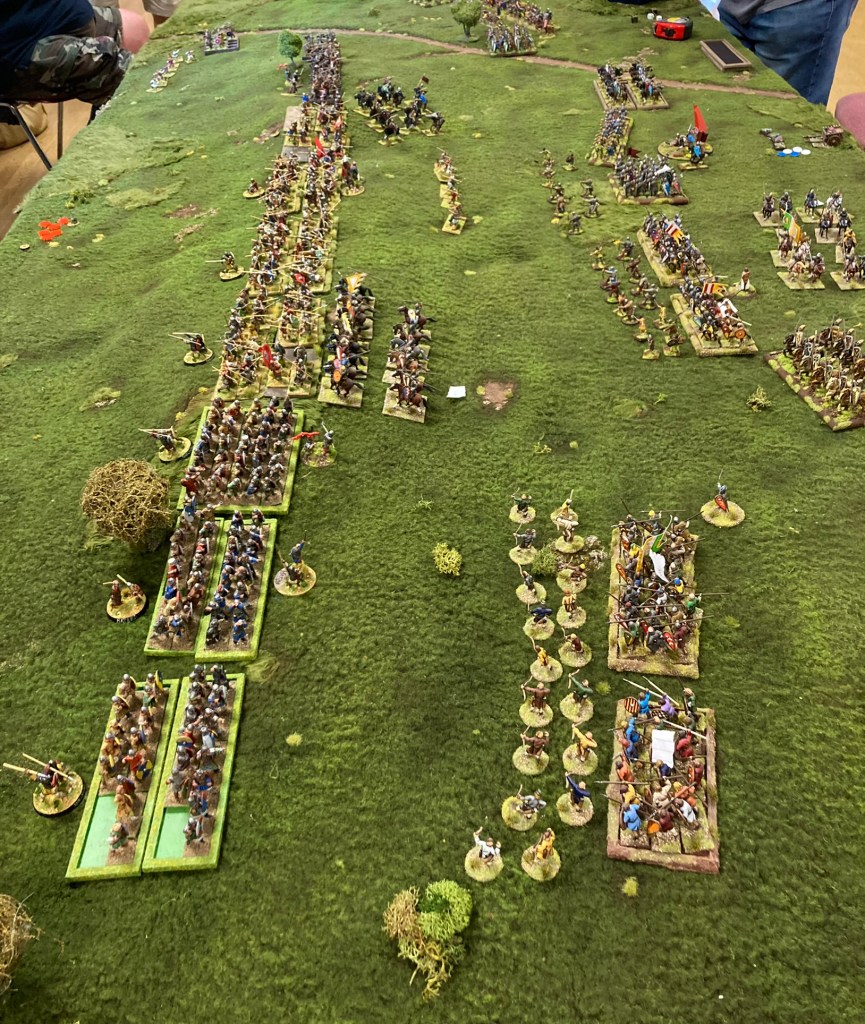
Saxons face off the Normans on the slopes of Senlac Hill. Norman cavalry can be seen in the centre making a speculative attack on the English line, with archers and crossbowmen (top) peppering the shieldwall with missiles.Harold Godwinsson’s Saxon Huscarls – a unit that I created about 25 years ago using Gripping Beast 28mm metal miniatures, but had never served at Hastings! Shame!
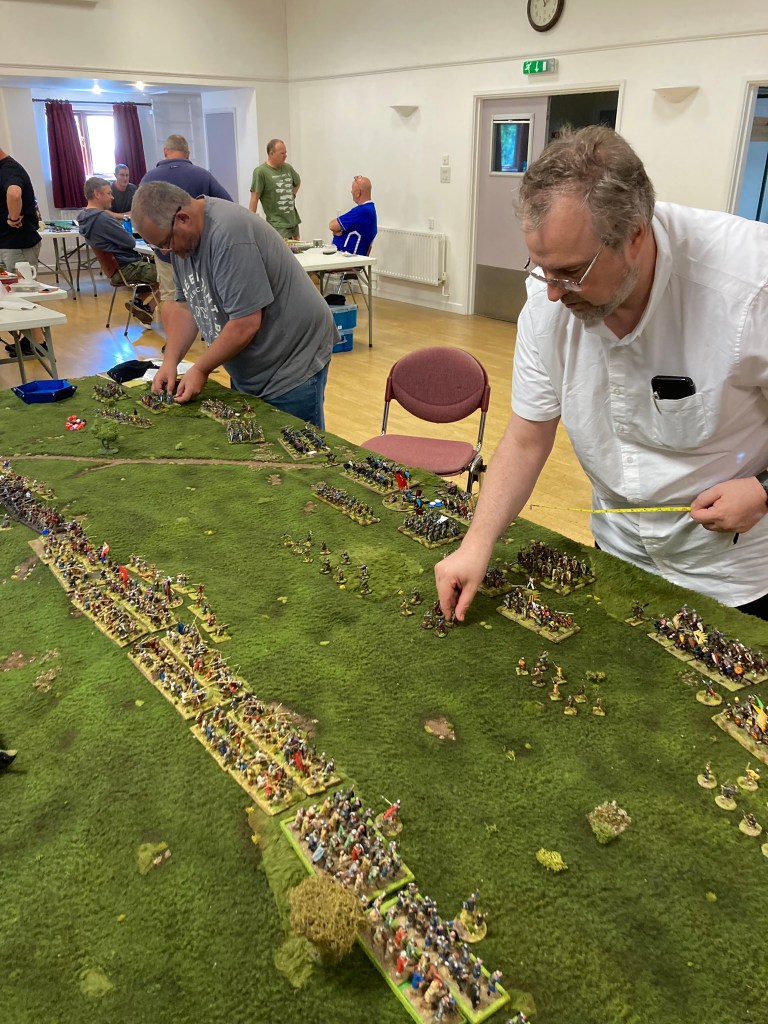
Now, two confessions: despite being a huge fan of the Early Medieval period, I’d never refought Hastings; and, despite having owned a copy since its release, I’d never actually played War and Conquest! I was hopeful that my knowledge of Warhammer Ancient Battles and a quick flick through the rule book would see me through. Fortunately, all my companions for the game had all played before – and the author of the rules was on hand. As it was, it was a pretty straightforward task and great fun.
I was joined by Jordan with his two boys on the Saxon side; we faced off against the very genial duo of Simon and Dave with their immaculately painted Normans. Although Rob had written the scenario and provided the Godwinsson brothers from his collection, we unfortunately had a last-minute drop out so had to cobble together the rest of the Saxons from Rob’s nearly-finished Vikings. This wasn’t too much of a problem but we lost track of the points values! In the end, we put the units out, the game looked right, and we got down to starting the battle.
It kicked off, as you’d imagine, with the Normans sending their archers and crossbowmen out to launch a hail of missiles against the Saxon line. We forgot about the shield wall rule for a couple of turns before Harold and his boys decided to form up to deflect the enemy arrows!
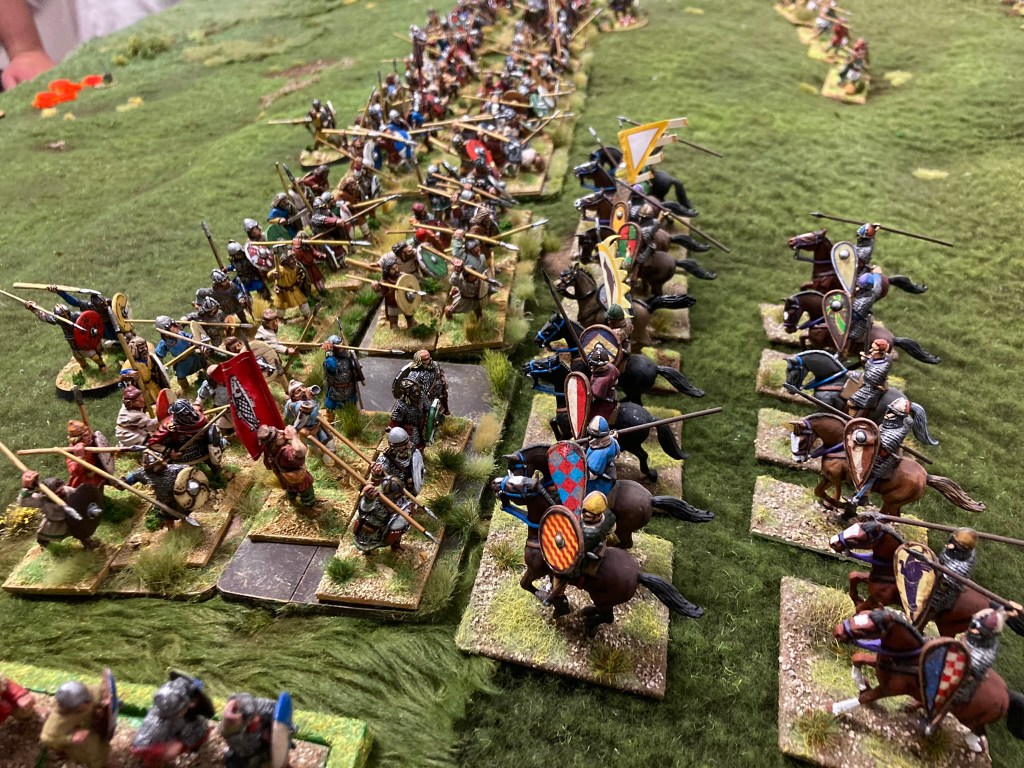
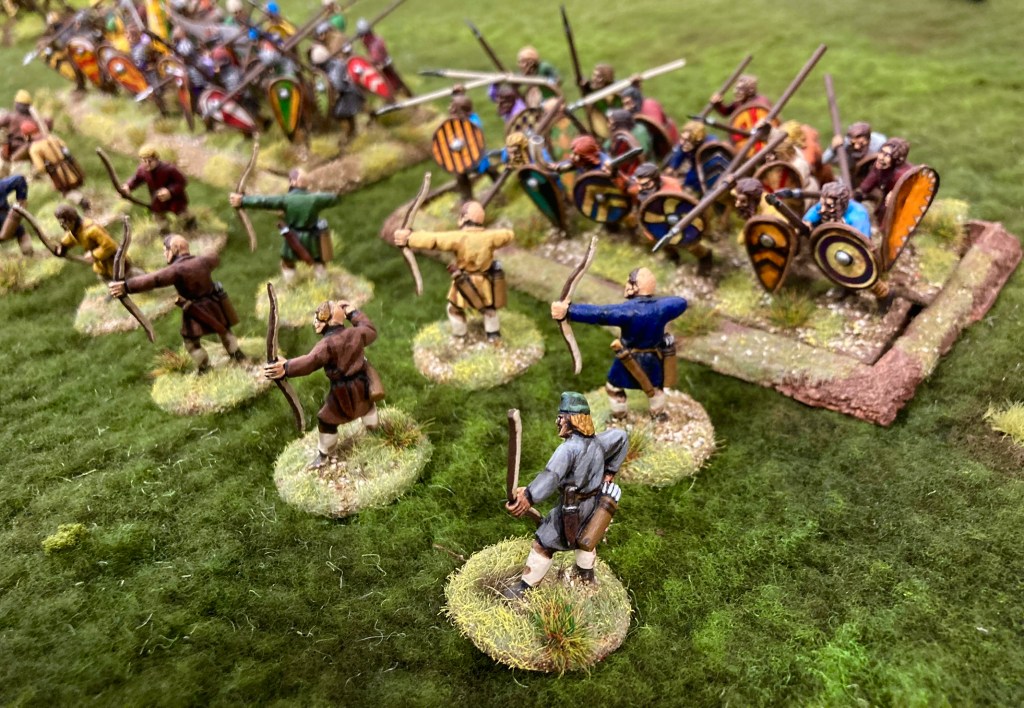
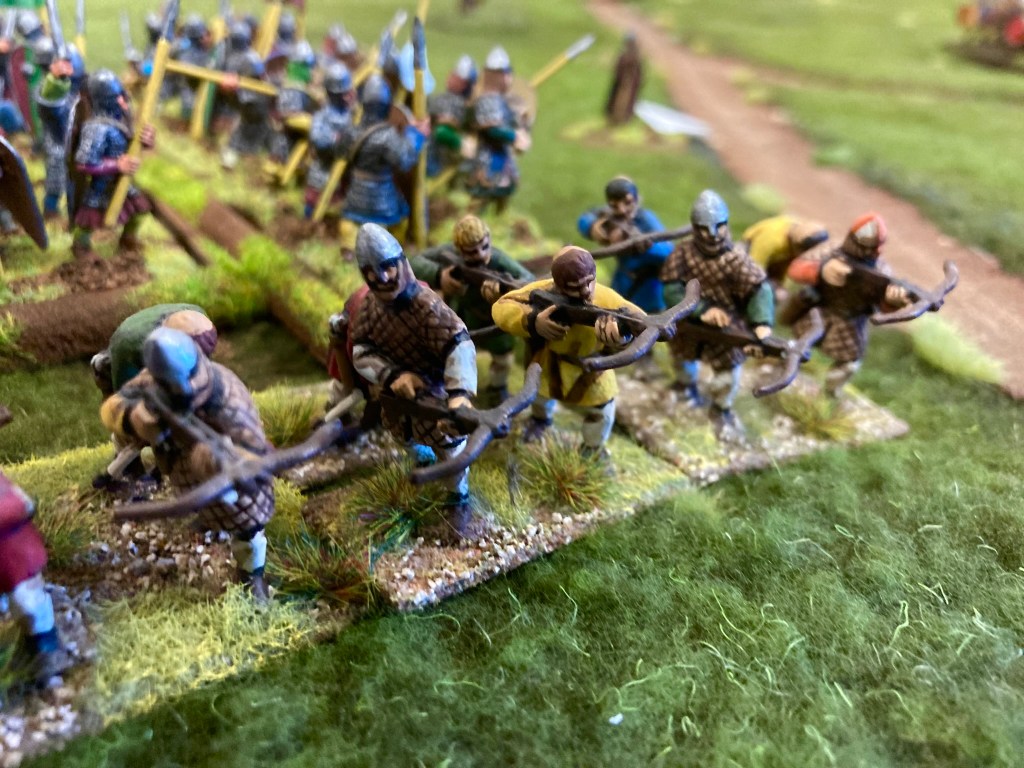
Norman archers ply the English line with arrows
We had just three units of 12 skirmishers each, and the Normans had at least double that in archers and crossbowmen. After a few rounds of missile fire, the Saxons had lost the shooting match and a couple of the units in the shield wall were beginning to look very battered. However, there was nothing to be gained by moving off the hill – yet.
Hit and run!
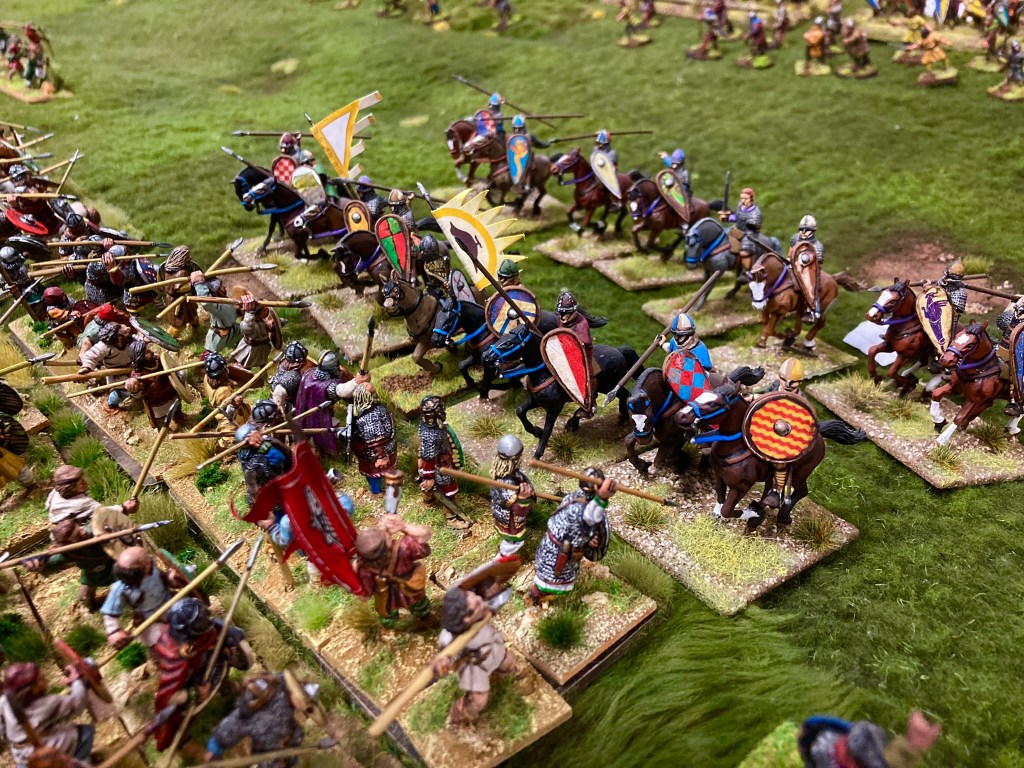
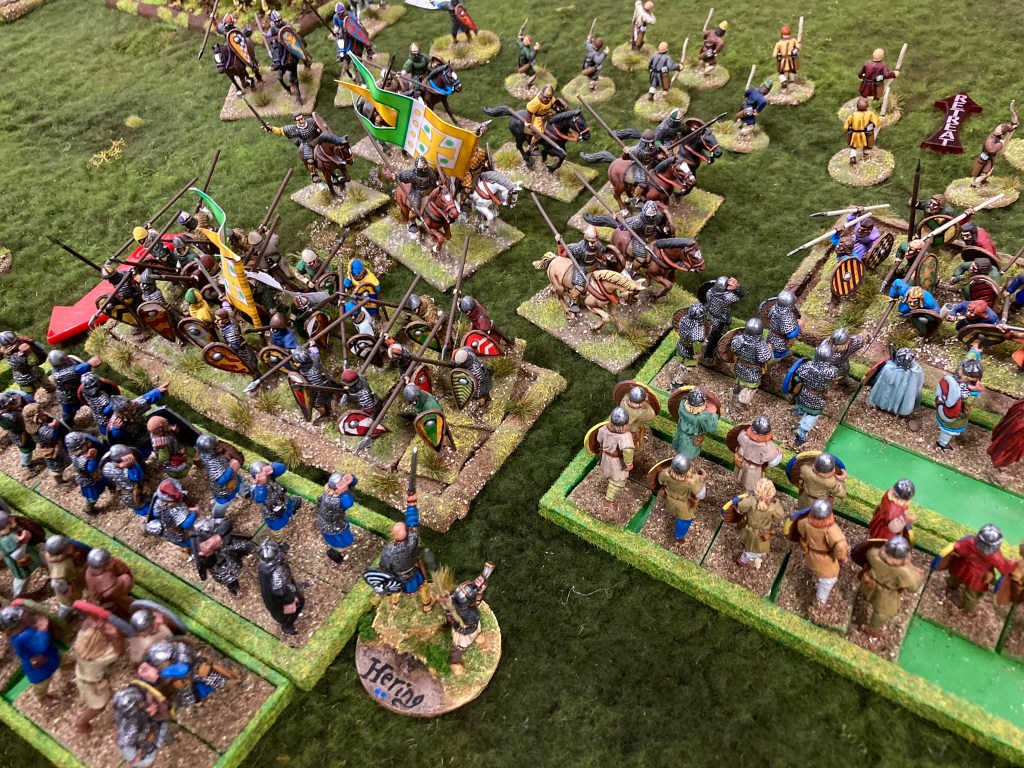
The Normans then started advancing across the line, sending several units of knights and cavalry up the hill to mount speculative ‘hit and run’ attacks against the Saxons. There is a rule in WAC called ‘Glancing Attack’ that is a special ability for troops in skirmish order, and it was absolutely tailor made for this situation. A Glancing Attack allows the skirmish unit to run in, attack with every model within 6″ (while only suffering half return attacks) and then scamper off d6″ (or 3d6″ in the case of this scenario).
Units suffering a Glancing Attack do not usually pursue, but we decided that it would be right for them to do so in this particular scenario (one of the commonly-held theories of the Battle of Hastings is, of course, that the Saxons broke ranks to pursue fleeing Normans in either a real or feigned flight). However, the discipline held until near the end of the game when one of Gyrth Godwinsson’s units on the left flank eventually chased les Normands down the hill.
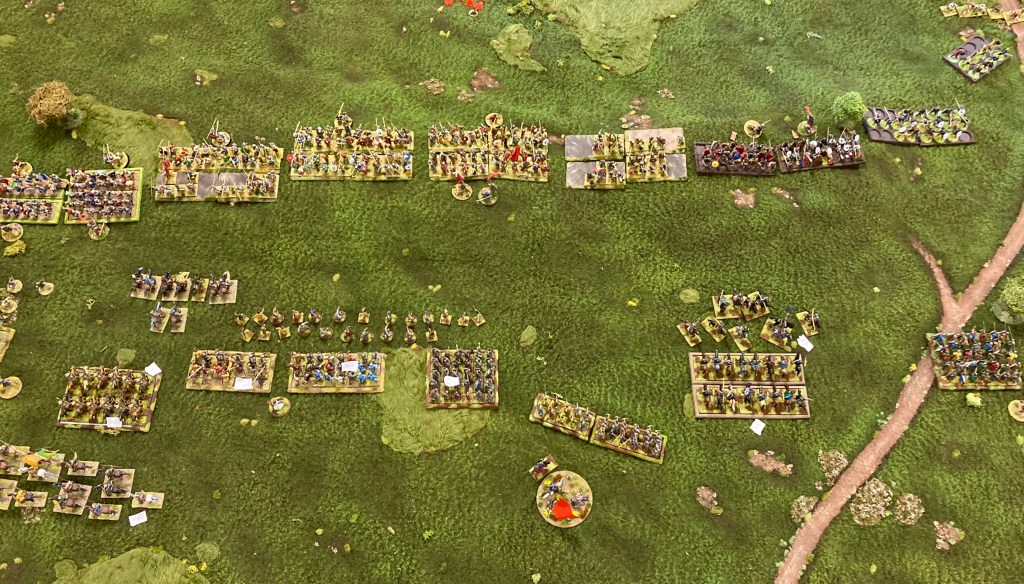
The battle in progress. The terrain mat is the same sherpa fleece one that I used at Partizan in May 2022.
In what was, appropriately, a day-long game, the combination of Norman missiles and hit and run cavalry attacks seriously weakened some of the Saxon units. Worse, the Saxon left flank was in danger of being outflanked by speculative Norman advances. To counter this, I decided to send Leofwine and the units on the Saxon right in a slow advance down the slope to put some pressure on the invaders. In WAC, shieldwalls can advance 2″ per turn, so it was a slow crawl forwards, but it had the desired effect of disrupting the Norman archers and giving the cavalry less space in which to operate.
Leofwine leads the right wing down the hill to force the Normans to give ground
When we got within 8″, the Saxons were able to return fire with javelins, which proved devastating. Like Warhammer Ancient Battles, javelins in WAC do not suffer a move and shoot penalty, and my dice were rolling hot for once! Little by little, the Saxons ground down the Norman left. Bishop Odo was busily running up and down the line, keeping the troops going, but his soldiers were gradually running out of space, and the cavalry units mounting the Glancing Attacks were losing men. A unit of Norman milites managed to flank charge a large body of Saxons, but the plucky English held on until help arrived.
Plagued by Norman knights, but a stout round of dice rolling drove them off!
Although much of its Warhammer heritage is clear, WAC has a number of differences. We had a number of SIPS (Strategic Initiative Points, I think) that we could spend to influence the course of the battle. This is a lovely mechanic, but I don’t feel I can comment further as every attempted use of SIPs by the Saxons went heavily ‘Pete Tong’! On critical turns of the game, where we wanted to move first, we would throw in 2 SIPs in order to add +2 to the d6 roll-off for initiative. Of course, when you roll three consecutive ones, what can you do? 🙂
Anyway, back to the battle. On the Saxon left, Jordan had managed to fend off the Normans with a combination of refusing the flank and chucking javelins. When Gyrth’s unit broke its discipline and charged off into what should have been the jaws of death, it got lucky and put a Norman unit to flight.
Last ditch attacks by the Normans
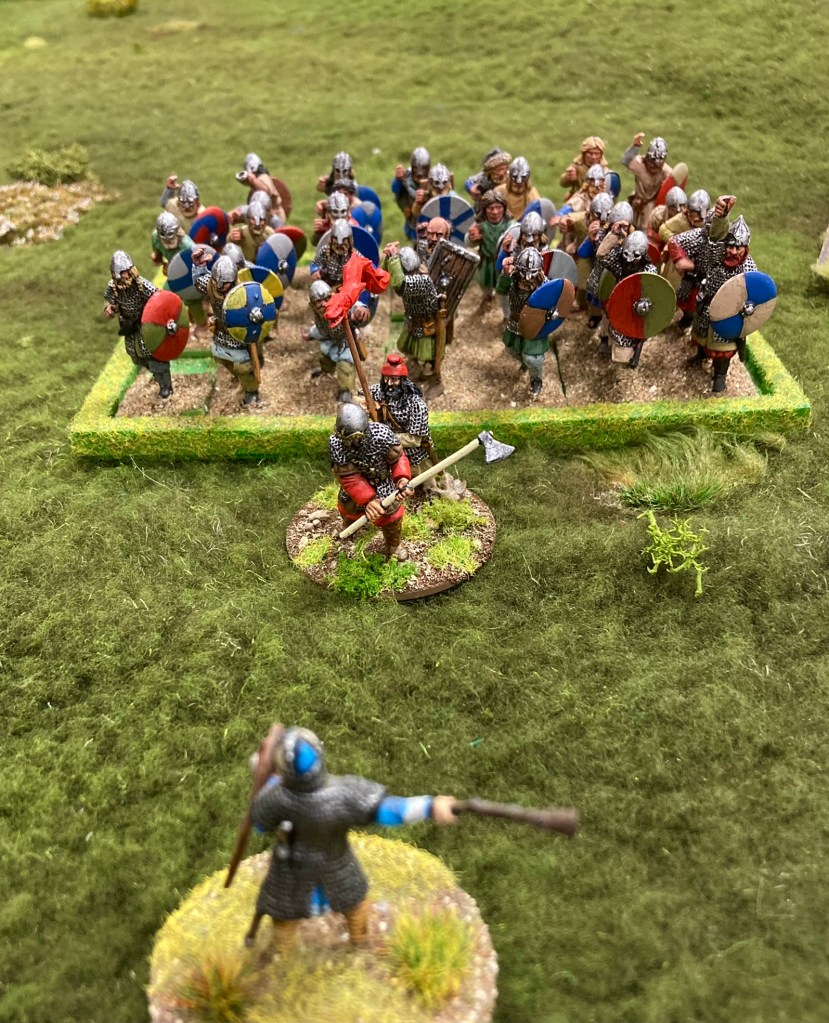
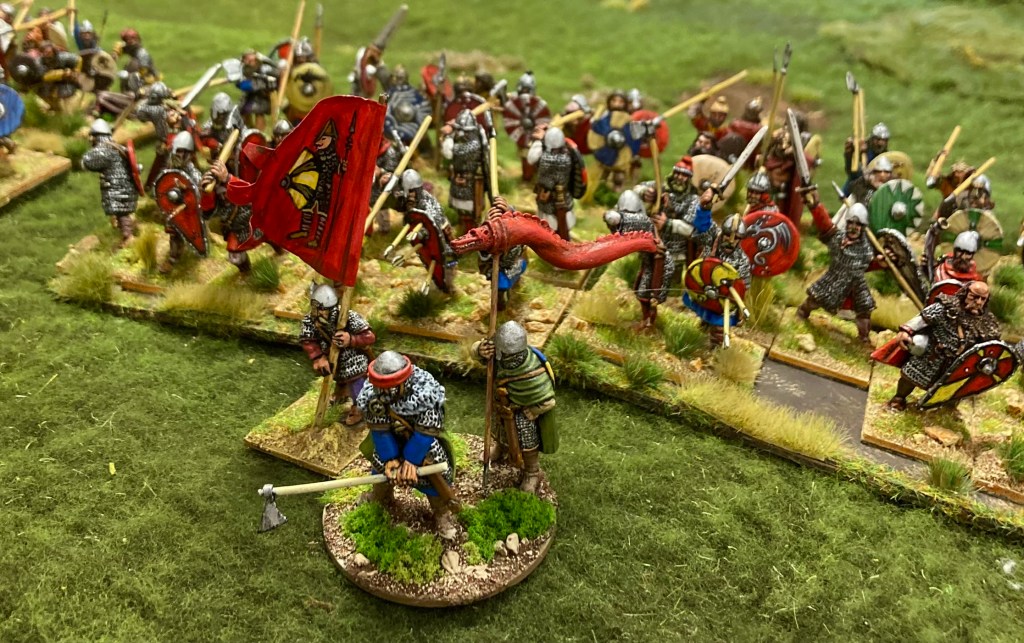
By 4:00 pm, the Normans were struggling to make a sustained impact anywhere along the line. William threw in a final attack all along the front with his remaining spear and cavalry units, but the Saxons soaked up the charges with a combination of thrusting spears, numbers and – surprisingly good dice rolling. Now Harold’s unit of 48 Huscarls marched down the hill and created a pile of bodies as they took vengeance on the weakened Norman units. Duke William was busy trying to rally his troops, but in this case, even the Bastard had to concede it was time to head back to the ships. Bishop Odo was last seen waving his club and cursing Leofwine in French!
It was a brilliant day out and I cannot speak highly enough of the friendliness of the chaps playing our game; if that’s any indicator of the club, it may well be worth an occasional two-and-a-half hour drive to visit the Bristol Big ‘Uns. I also enjoyed War & Conquest – enough of a WAB vibe but with many neat features and modifications that made for an enjoyable game. Some of the fiddliness of WAB is still there (individual figure removal leading to a large ‘dead pile’ to sort out at the end of the game, counting up exact figures in combat and calculating casualties from mixed units), but if you can cope with that, I can thoroughly recommend WAC.
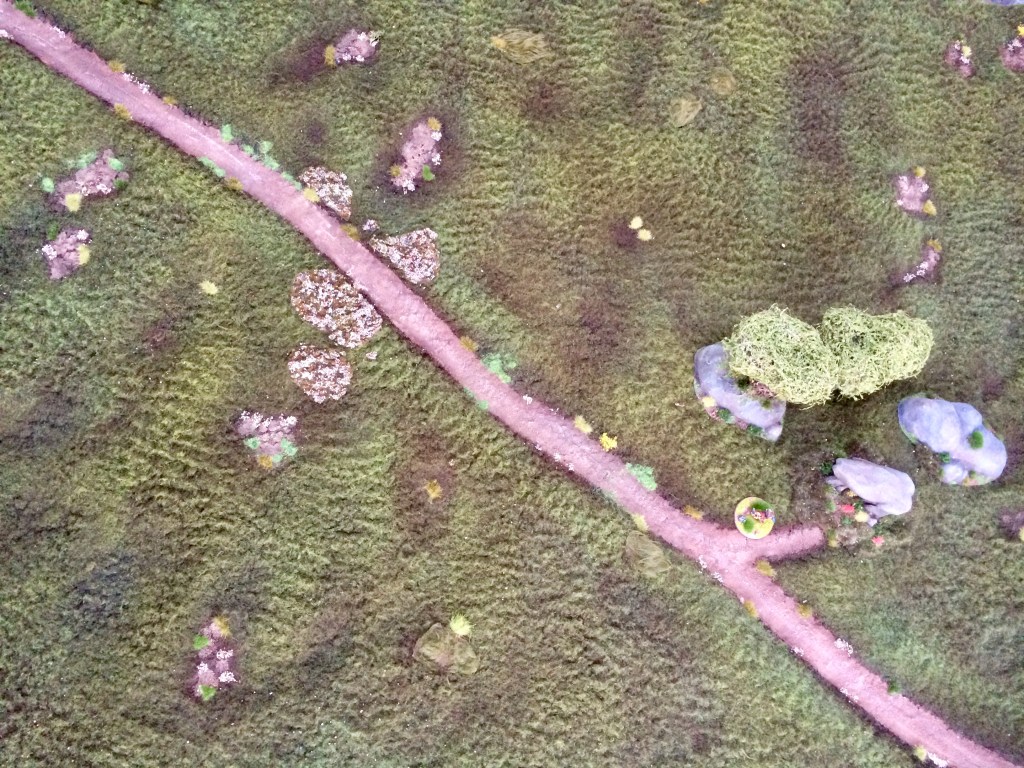
There were numerous requests after the recent Partizan show for a ‘how to’ on the terrain cloth that we used for our Battle of Degsastan game, so I’ve hauled out the photos from when I made it and written a short piece.
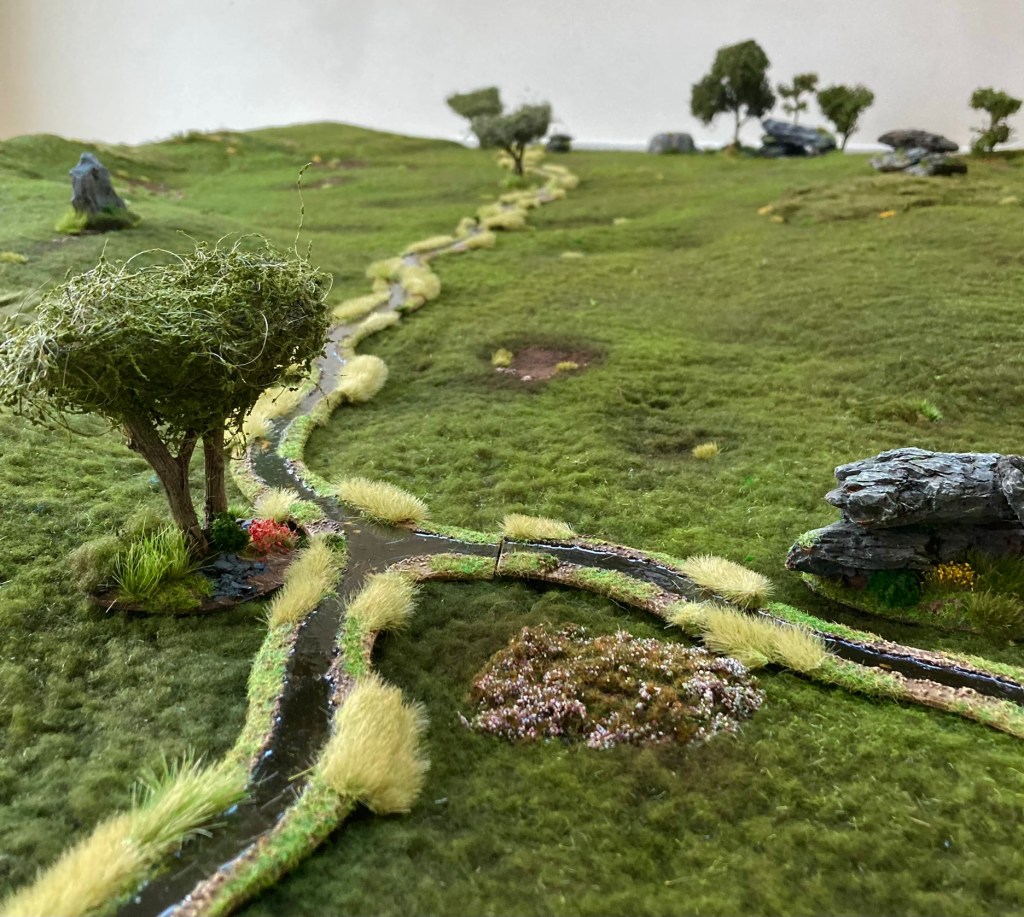
Rocks and dolmens, of course, on my sherpa fleece cloth
I spent years as a child gaming over a plain green table tennis table, which was just fine, but I distinctly remember every time I went for a walk in the countryside thinking ‘my terrain looks nothing like this.’ And it doesn’t really matter, does it? Gaming terrain has to be practical: you have to be able to pack it away easily; miniatures need to be able to stand on it; and it needs to be portable. [Points 1 and 3 can, of course, be solved if you have a large wargames room and plenty of storage for your collection of sculpted terrain boards – but I’ve never lived like that and am unlikely to do so. ]
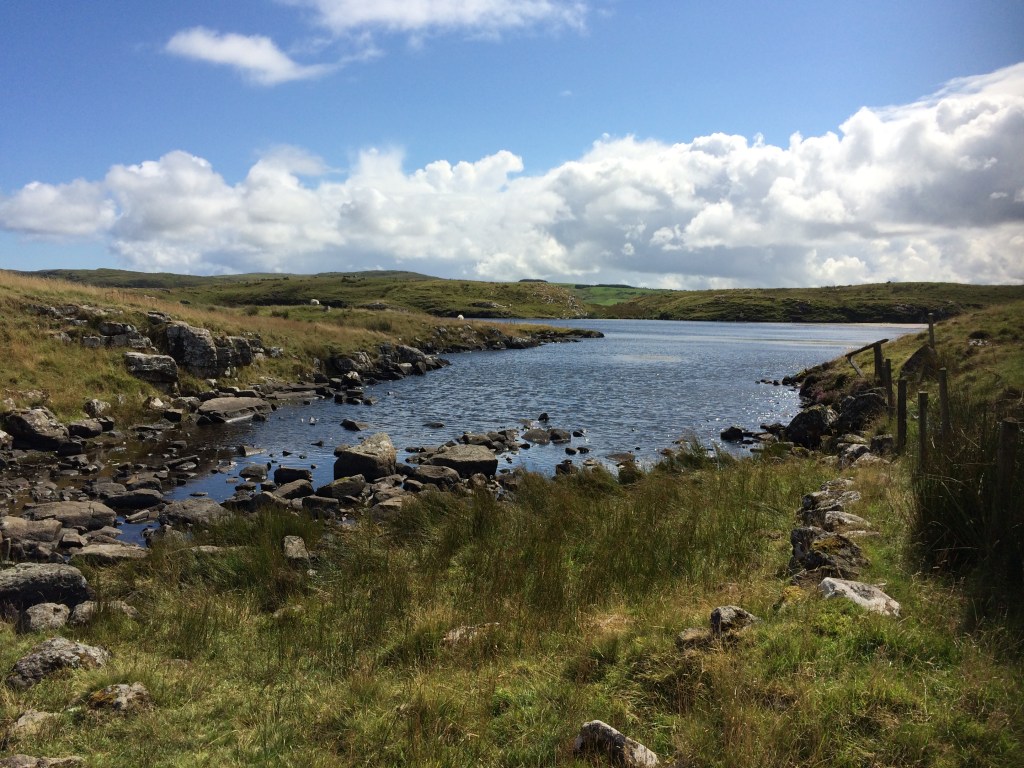
The Lake District, England – one of my constant inspirations for terrain.
But, y’know, to me it does matter. Gaming with miniatures is a visual hobby – we try to create our own little worlds to create an illusion where our heroes and monsters battle it out with each other for a evening. We often spend hours on individual models, swapping tips over social media about the best ways to paint mail armour, eyes or bronze helmets. When you look at a game, however, the biggest visual impact is the terrain, so I think it’s always been worth investing some time in that.
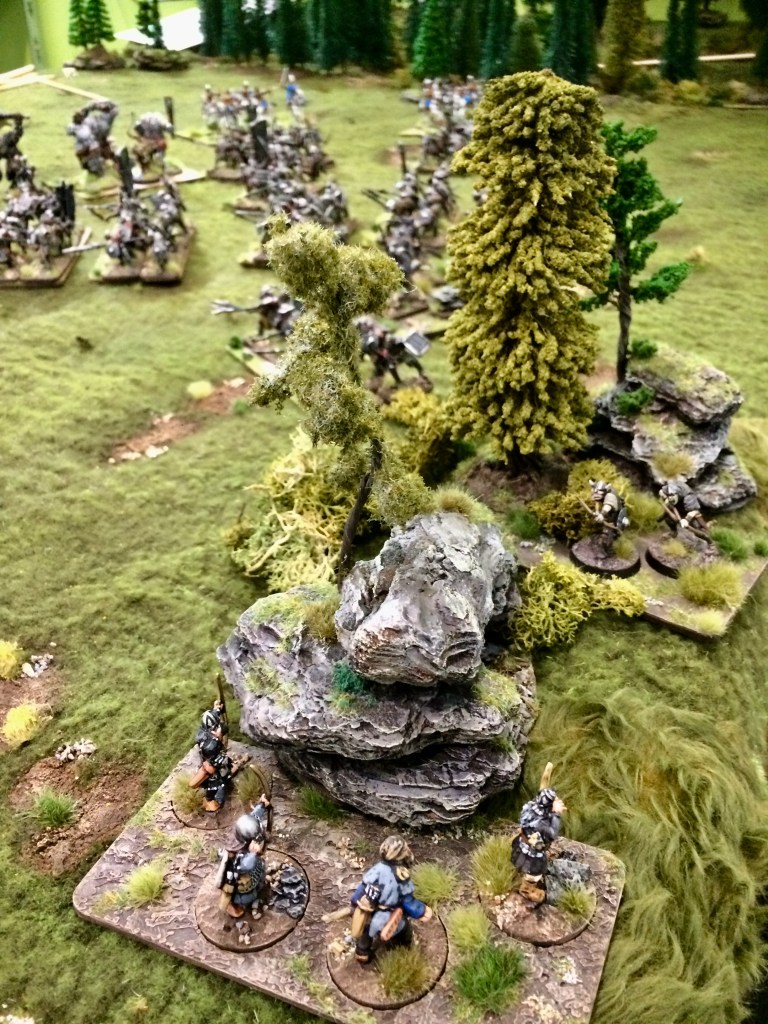
Noldor and Orcs scrap it out in Middle-earth on the sherpa fleece mat. Hills and slopes are incredibly easy to create under this material.
After the ubiquitous TSS expanded polystyrene terrain tiles of the 1980s and 90s, printed terrain cloths have been one of the huge breakthroughs of recent gaming history. Cigar Box Mats and Geek Villain (to name but two) now provide highly portable and visually stunning cloth mats. Unfortunately for me, I like making stuff, which is what led me to the sherpa fleece solution.
The sherpa fleece mat set up for for Dark Ages gaming
A few years ago, inspired by some of the stunning tables on the internet, I’d been toying around with various types of teddy bear fur fabric, trimming and painting away, but hadn’t quite found the right solution for what I had in mind. Teddy bear fur actually requires quite a lot of work to create the illusion of grass, and also, for me, conjures up a great impression of the Russian steppe or African savannah, but wasn’t quite right for the moors and valleys of the British Isles (mythical or otherwise) where my games were taking place. Eventually, a trip to Northern Ireland – surrounded by the most beautiful scenery – pushed me over the edge, and I decided to go looking for something else.
One of my holiday shots from Northern Ireland which was constantly in use while making my terrain cloth.
I’d always purchased any fabric for terrain projects direct from a market where I could physically see and feel what I was buying, but this is becoming harder to do and there’s actually a wider selection of fabrics out there online. Fortunately, many ebay sellers provide a posted sample for a nominal fee, so I decided to invest in a whole variety of these and see what came through the door. I have fond memories of the fleece that would have been ideal for making a Kermit the Frog puppet but was somewhat out of kilter for a Dark Age moorland!
Some of my Wood Elves. These GW plastic minis stand up well enough on the mat, having 25mm metal bases to weight them down, but other individual figures will struggle. Sherpa fleece is best used for units on big bases.
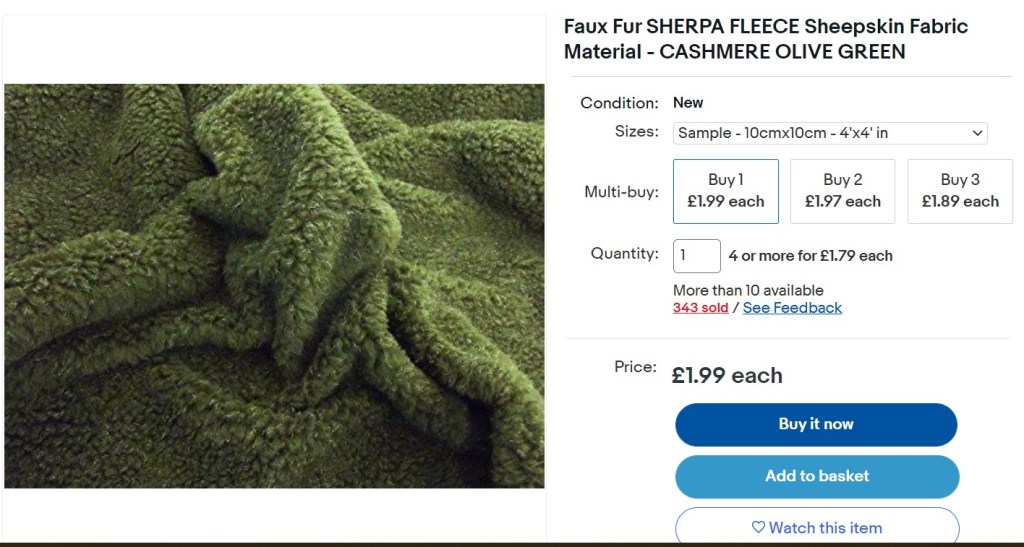
When the sherpa fleece sample turned up, I nearly discounted it immediately: it didn’t look like what I was after. However, once I’d started giving it a brush-through with a wire brush, it started to transform into a more grass-like texture. I experimented with all kinds of different techniques
Olive green sherpa fleece as sold on ebay
NB: before you rush out and buy some, you need to know that sherpa fleece is quite a ‘bouncy’ material; it has a fair bit of depth to it and is not ideal for single-figure based skirmish gaming. It can be shaved, trimmed and melted down to a lower level, but it is best suited for gaming using figures on large bases. (My games generally involve units on 120 x 60 mm bases and heroes on 40, 50 and 60mm round bases.) Dice trays are also useful to avoid cocked dice!
Another holiday shot of the stunning location that is NI
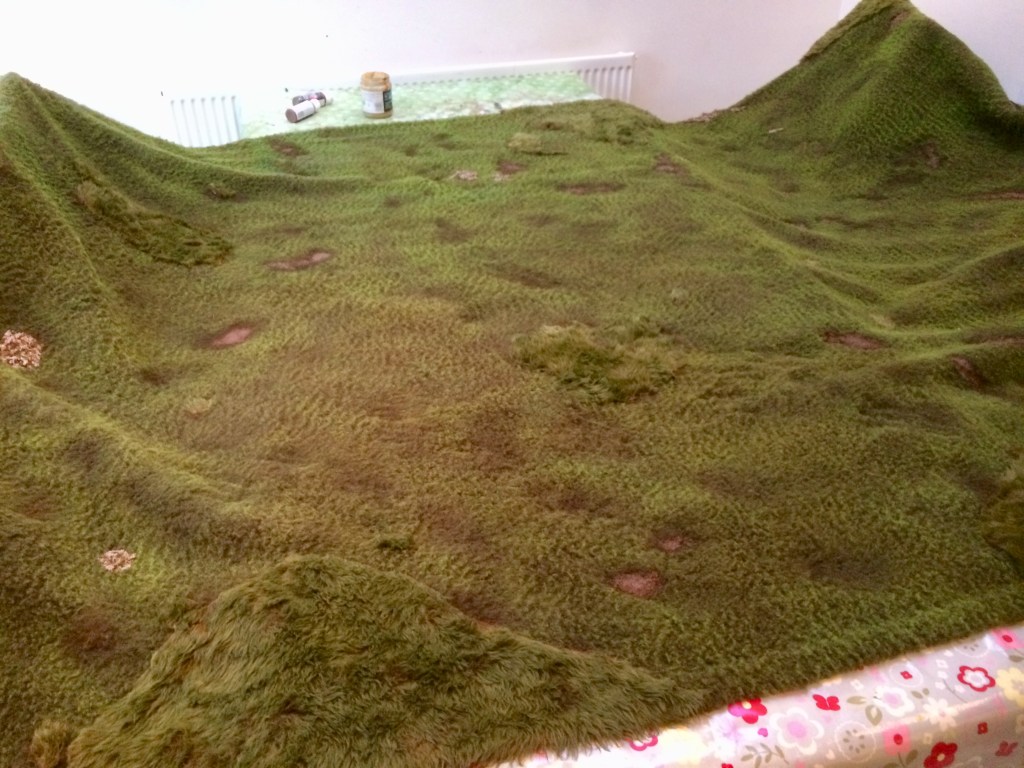
After a load of experimentation with my sample pieces, I decided to go for broke, working on a 12′ x 5′ cloth and recording my progress as I went along, so this is what follows.
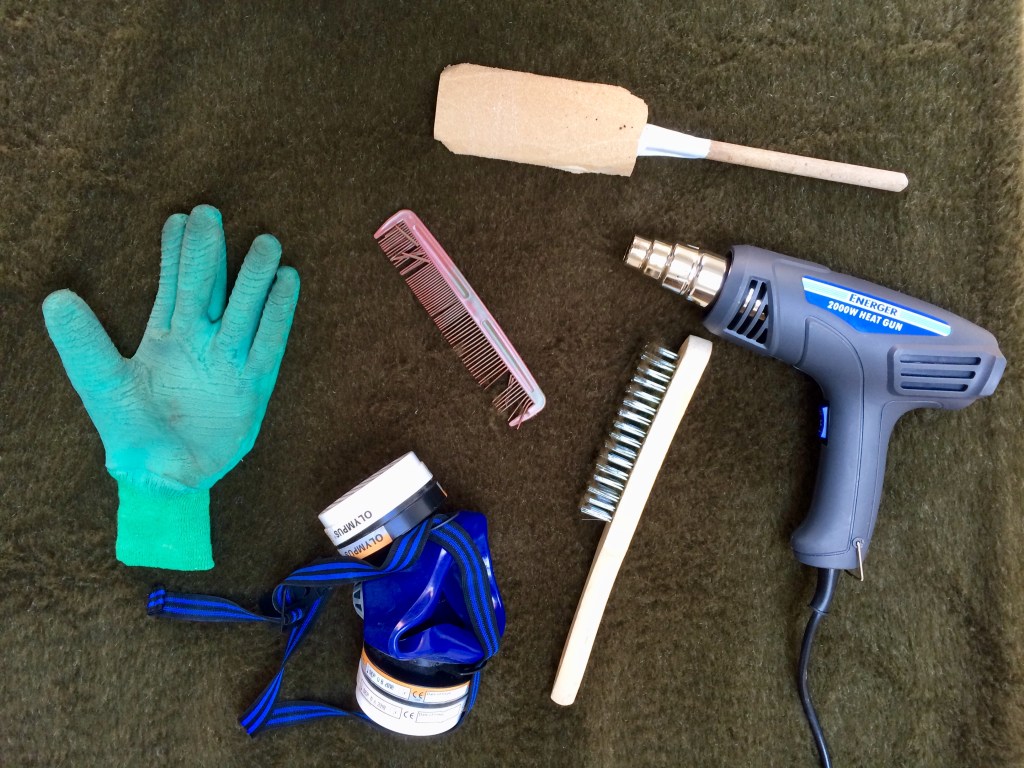
STEP 1: Wire-brush the whole fleece to remove fluff and create texture
Wire brushing instantly changes the nature of the fleece and removes excess fluff.Tools used for the job: the bizarre implement top right is sandpaper folded over a wooden spoon to allow me to press down large areas of fleece after heating with the hot air gun. The thick glove is for protection while pressing down any areas of heated fleece, while the respirator provides some protection from fumes in addition to working outside.
STEP 2: use scissors to trim down areas of the fleece and then a heat gun to flatten areas
Here I have trimmed and melted some patches in the sherpa fleece to break up the uniformity of the texture. This was done outdoors on a non-flammable surface (old patio tiles in my case) wearing the respirator and gloves.
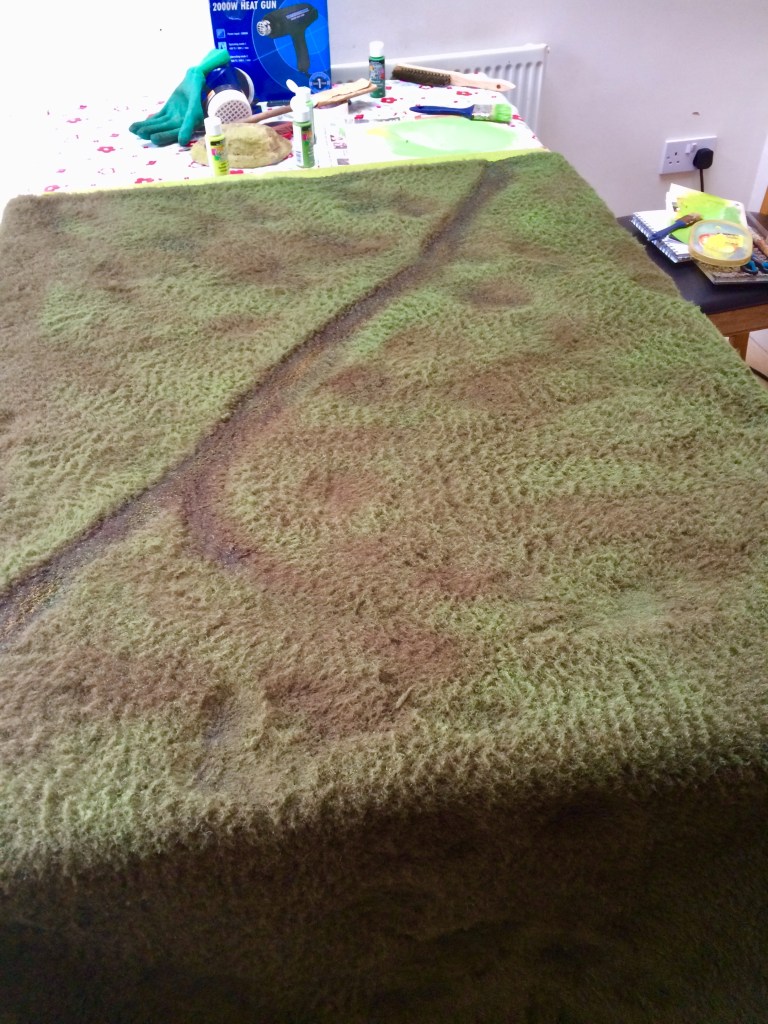
STEP 3: using the heat gun to create roads. I decided that I wanted a trackway crossing my mat at an angle, so I carefully melted this in with very gentle blasts of the heat gun, flattening down each area with the sandpaper/ wooden spoon combo as I went.
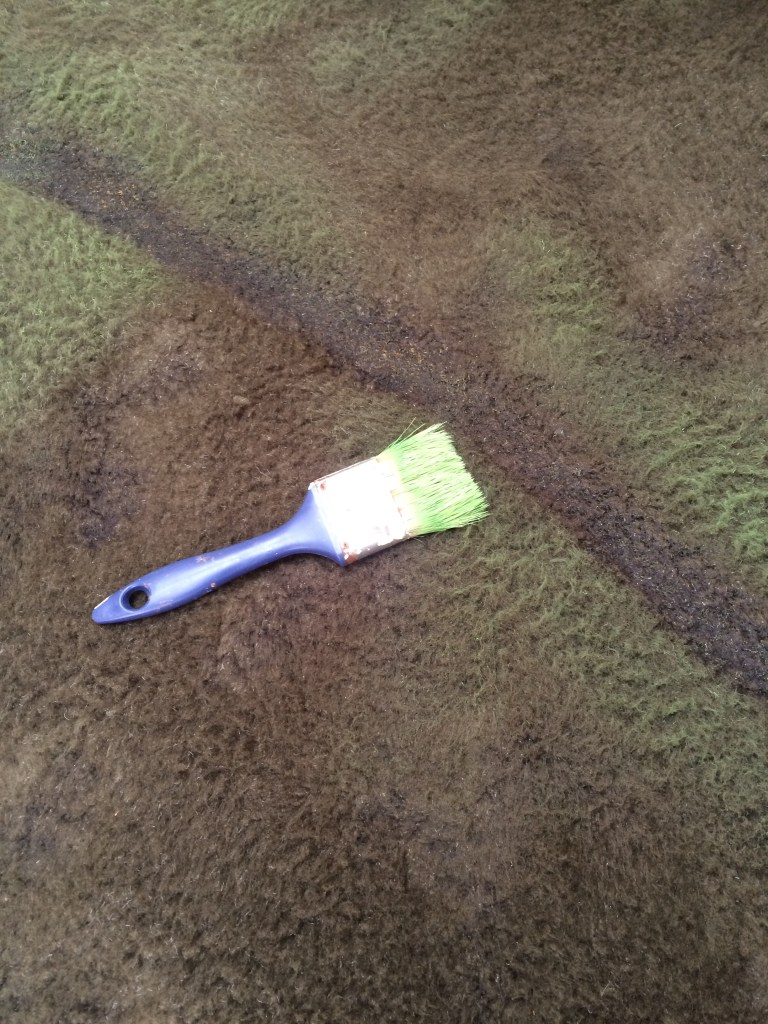
STEP 4: initial painting. Using a house decorating brush, I dry-brushed the cloth in various different shades of green. All the paints were bottles of acrylic craft paint.
Craft paints can be seen at the back of the table during painting
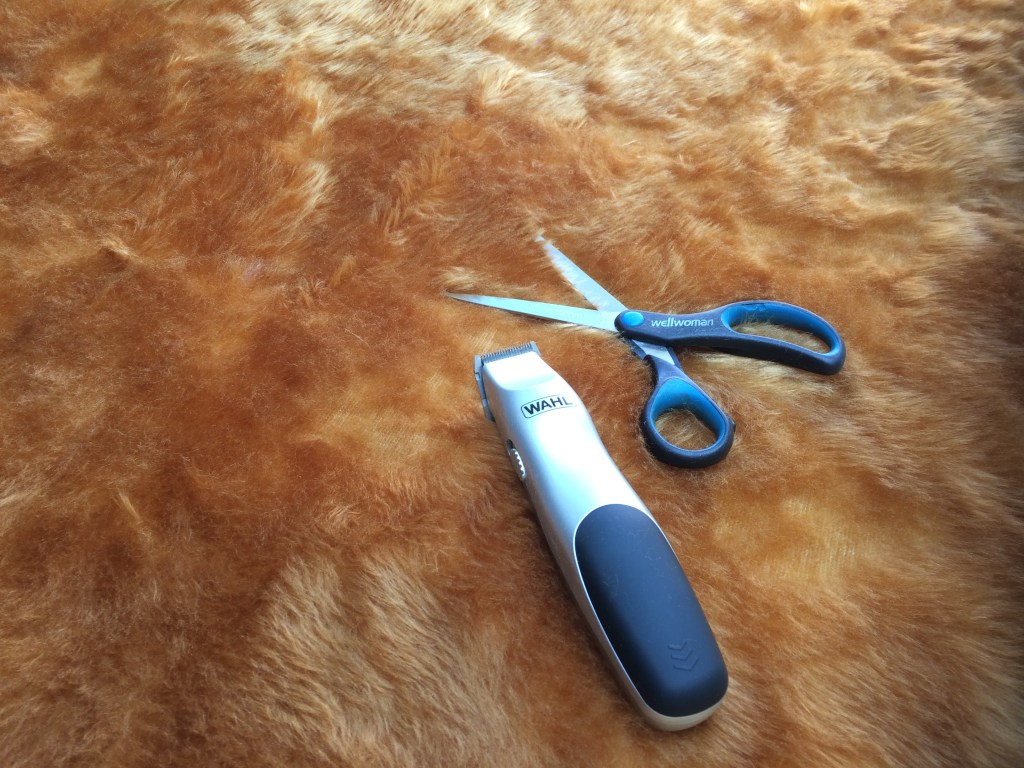
STEP 5a: creating some longer ‘grass’. To get the mix of grass lengths that I was after, I’d decided to combine some patches of longer pile fabric made from teddy bear fur. This was prepped by wire-brushing and trimming as usual.
Trimming the teddy bear fur with pet trimmers and scissors to create an irregular finish.
STEP 5b: painting the teddy bear fur. This was a seriously messy process involving a 3″ fence brush and some green fence paint – basically slapping it on both sides of the fabric before combing it through to involve clumping.
STEP 5c: drying the teddy bear fur. Best done outside if you value your marriage/ significant relationship/ pets!
When it’s dry, sometimes it needs a bit more wire brushing to bring it back to life.
STEP 6: adding the ‘longer grass’ to the cloth. I cut irregular sections of the teddy bear fur and used them as a template to cut out slightly smaller sections of the sherpa fleece cloth. The teddy bear fur was then hot-glued into its place and very firmly pressed down.
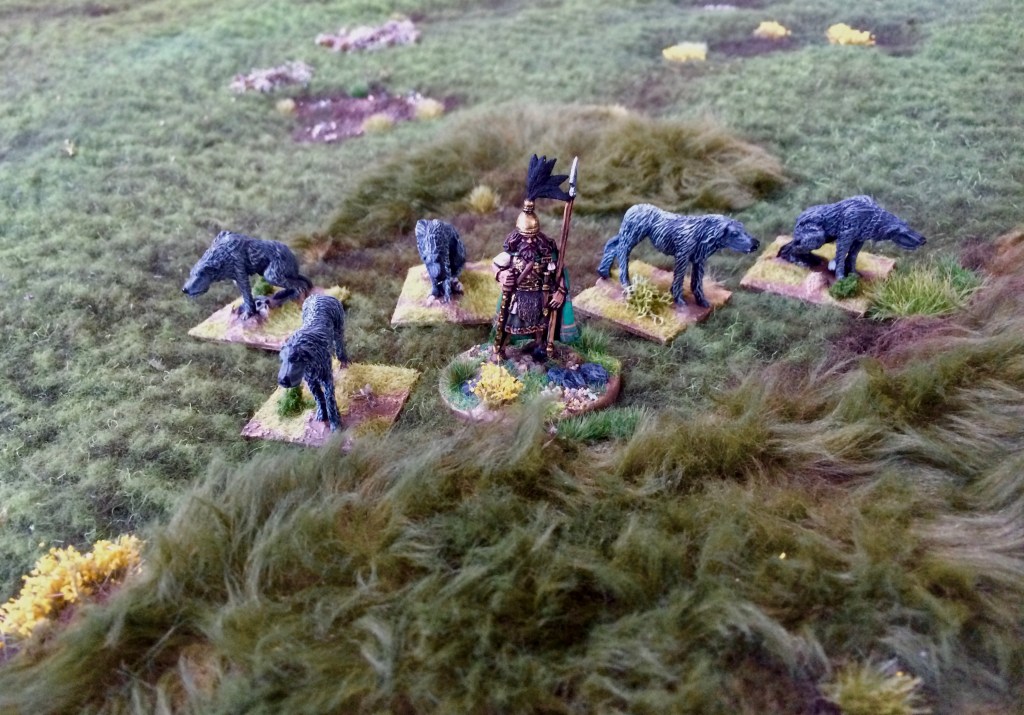
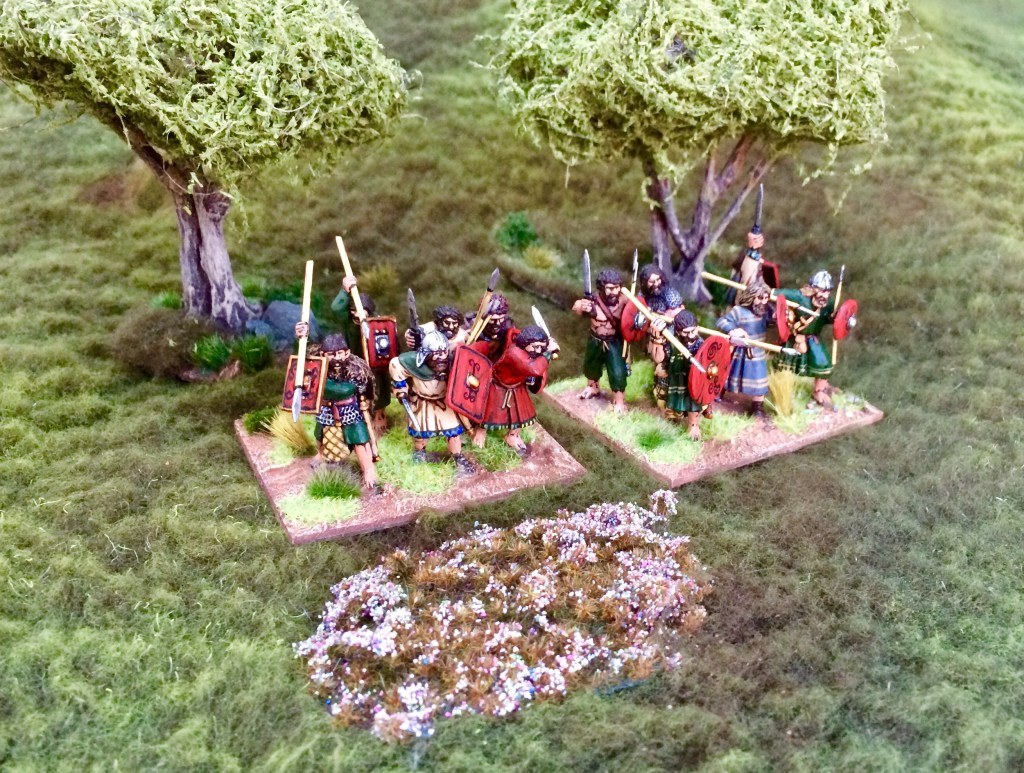
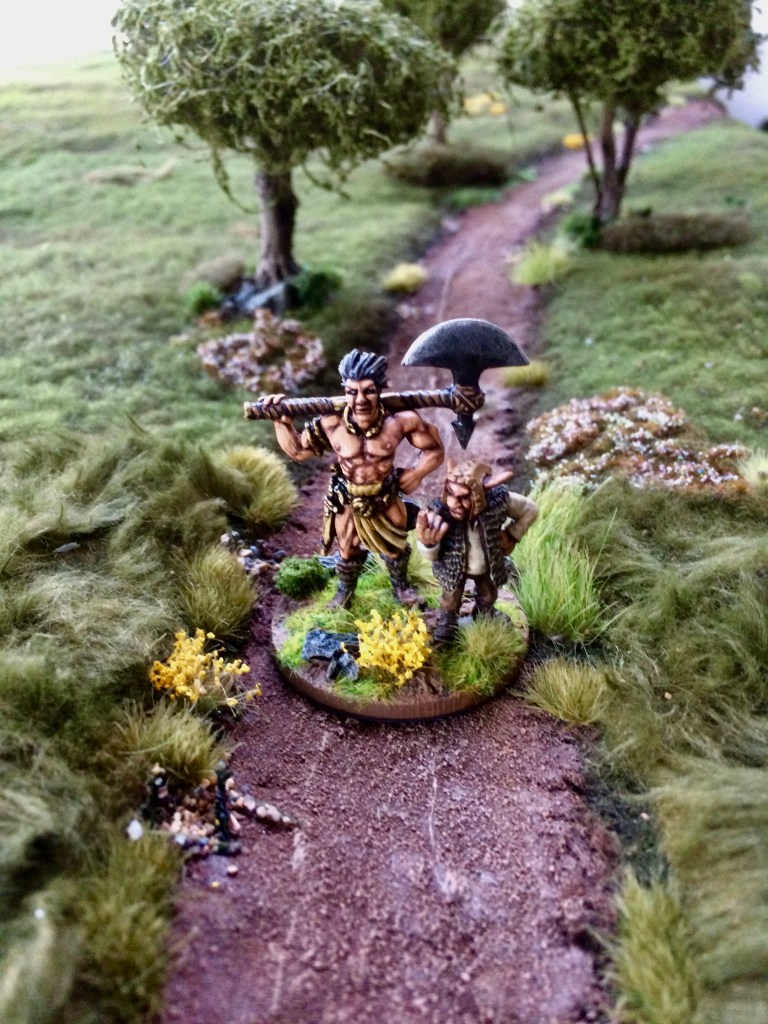
A Northstar Celtic chieftain and his Alternative Armies wolf hounds show off the long/short grass effect
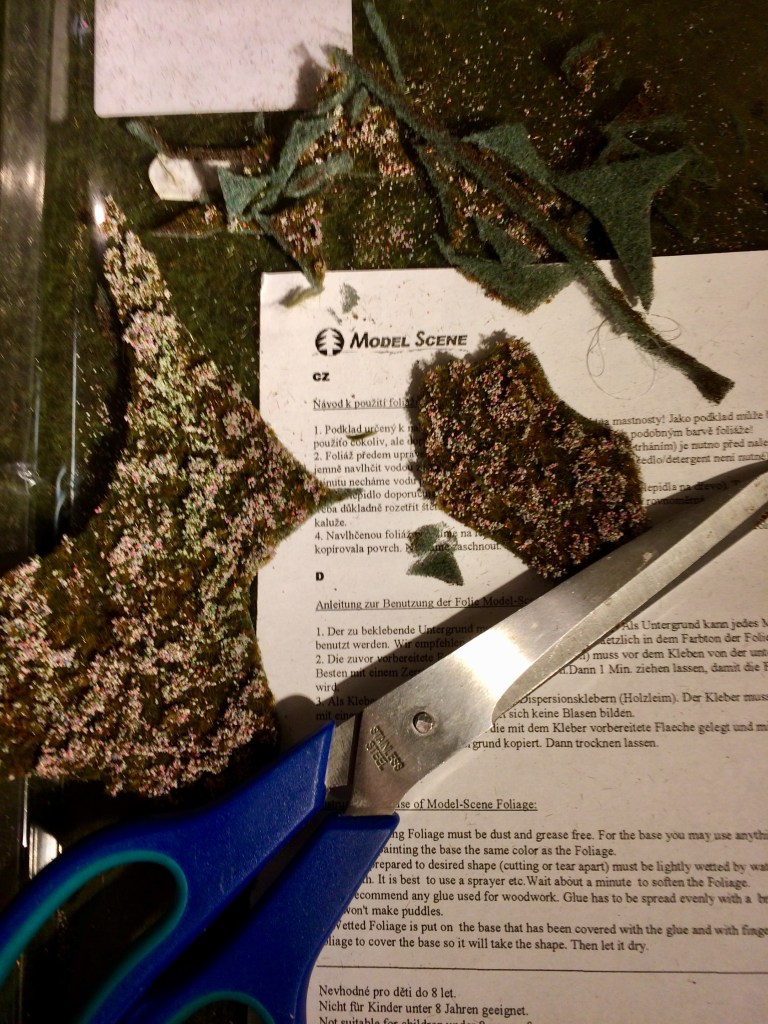
STEP 7: adding heather. I invested in a pricey (£20) but lovely sheet of fake heather from Model Scene, cut it up into small irregular patches and then stuck these on to the base cloth (again with hot glue) in strategic places. This kind of fine detail, while expensive, lifts the visual impact of the whole cloth.
Heather patches in position with an Alternative Armies Fir Bolg warrior
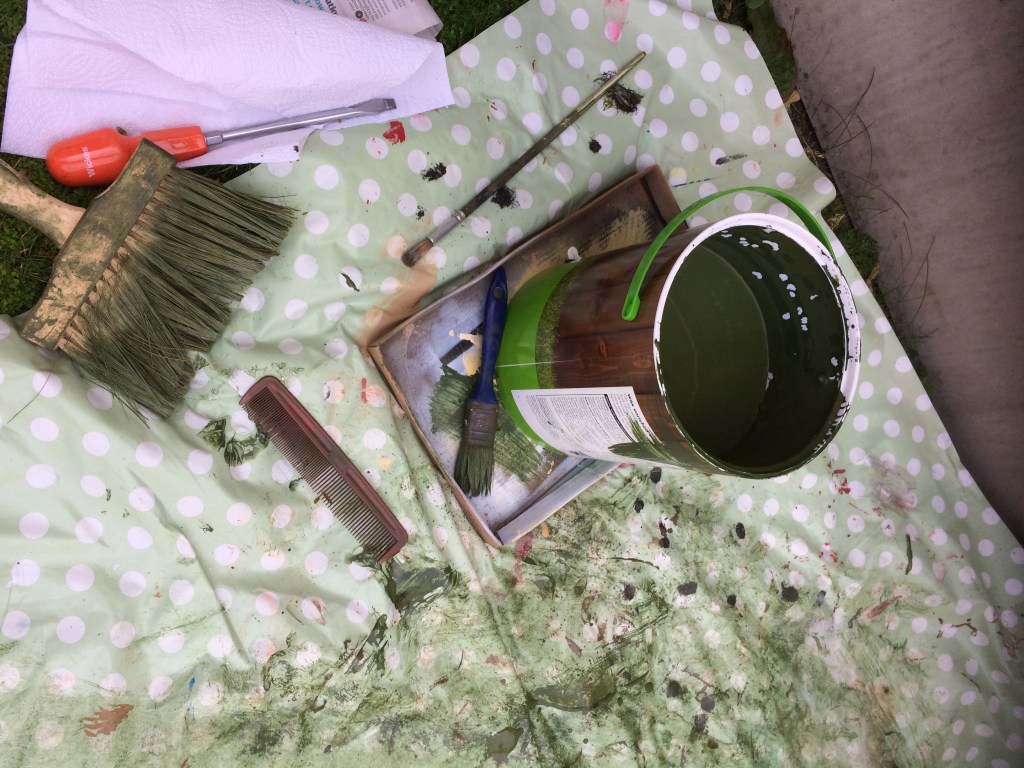
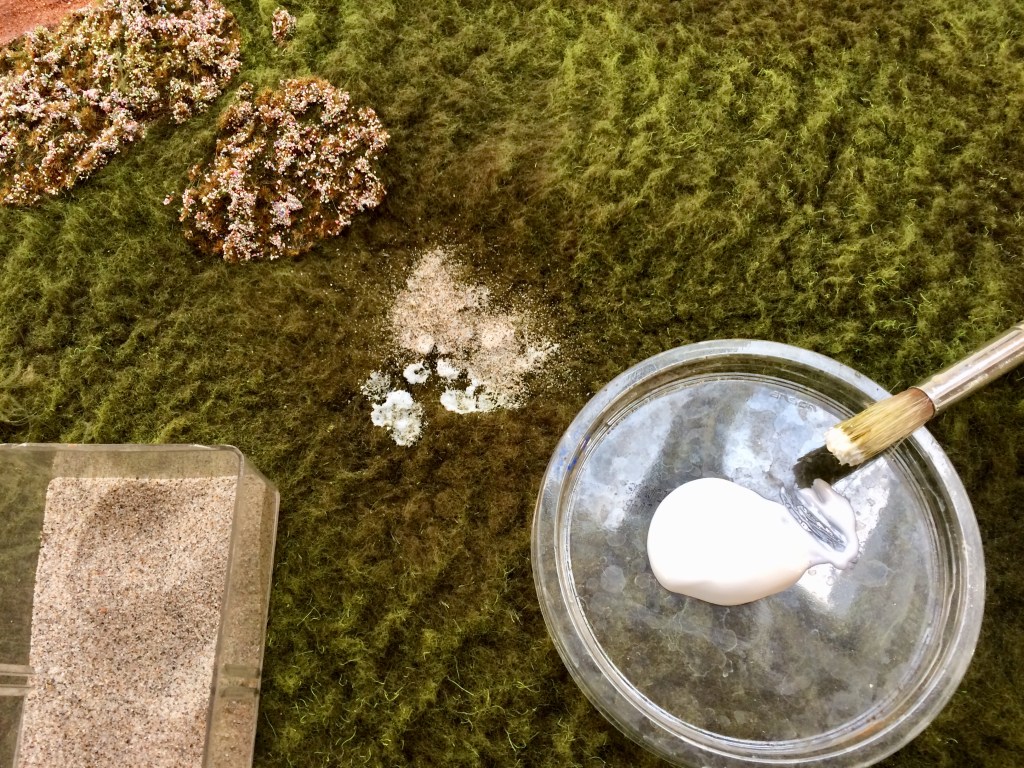
STEP 8: the road. A bigger road would probably have been better created as a separate ‘drop on’ piece of scenery, but in this case I wanted a winding track crossing the moor. I reckoned that I could get away with flexible frame sealant as long as it wasn’t too thick or wide, and I was right. This is cheap brown frame sealant spread thinly over the (heavily flattened) track area, which I then pressed sand into while it was still set for added texture.
Pressing in some sand for extra texture.
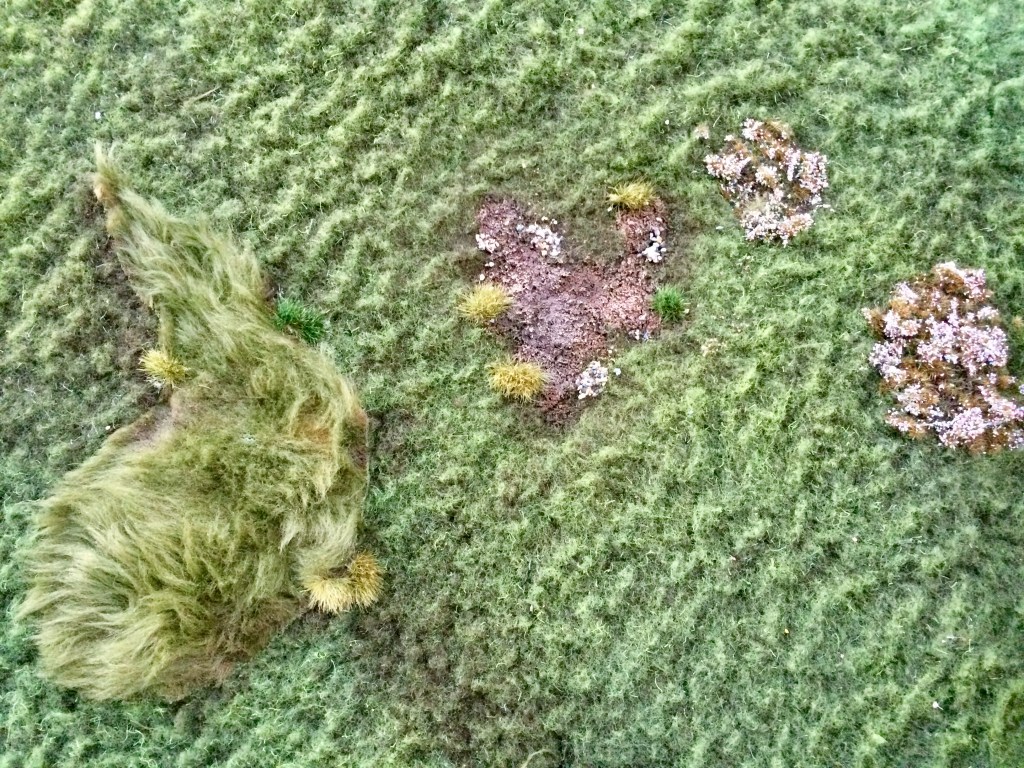
STEP 9: earth patches. These were created by applying patches of PVA wood glue (good quality thick stuff from a DIY shop, not the thinned down ‘craft PVA’) with sand scattered on to them.
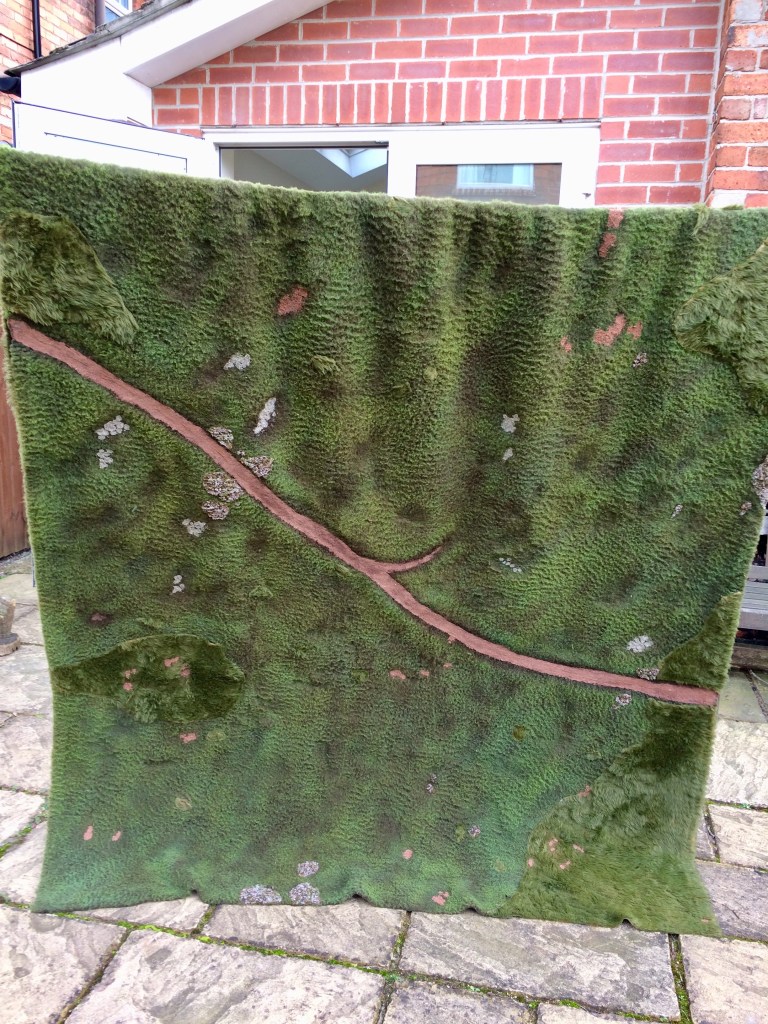
Sandy patches prior to paintingHere;s the whole thing getting a shake down on the washing line
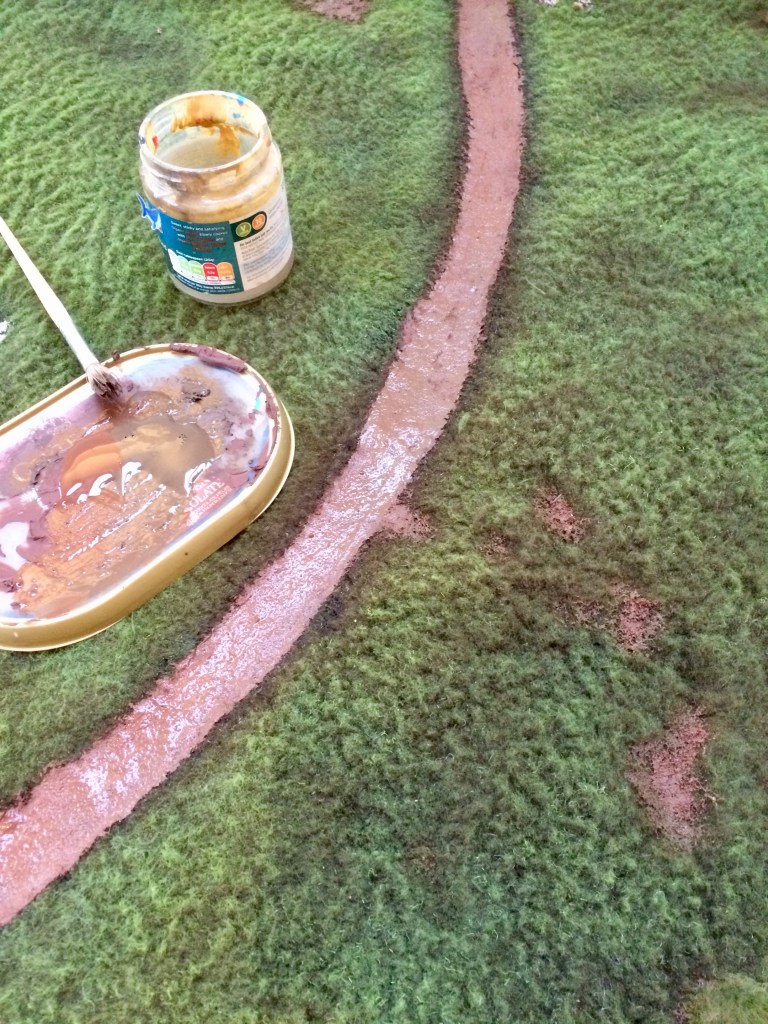
STEP 10: selected painting and staining. Burnt Umber craft acrylic was used to wash over the road and sandy patches to create a uniform base colour.
STEP 11: when dry, the road and soil patches were dry brushed with a light brown to bring up the detail and create contrast
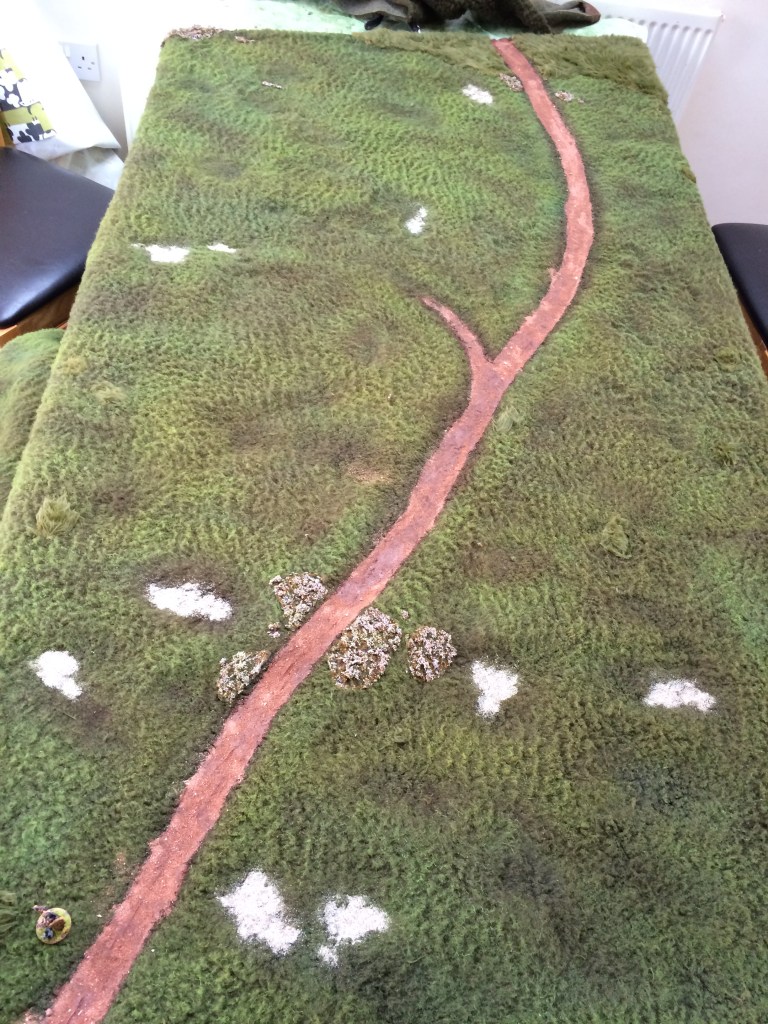
STEP 12: scatter material was glued on with more PVA glue at the side of the roads and around the exposed soil patches. Various tufts and flowers were also added (these are from Gamers Grass) to create interest and variety around the cloth.
At this point, the cloth was pretty much finished. It was difficult laying the whole thing out at once on my kitchen table so I worked on sections at a time, adding tufts and scatter here and there until I was happy with it.
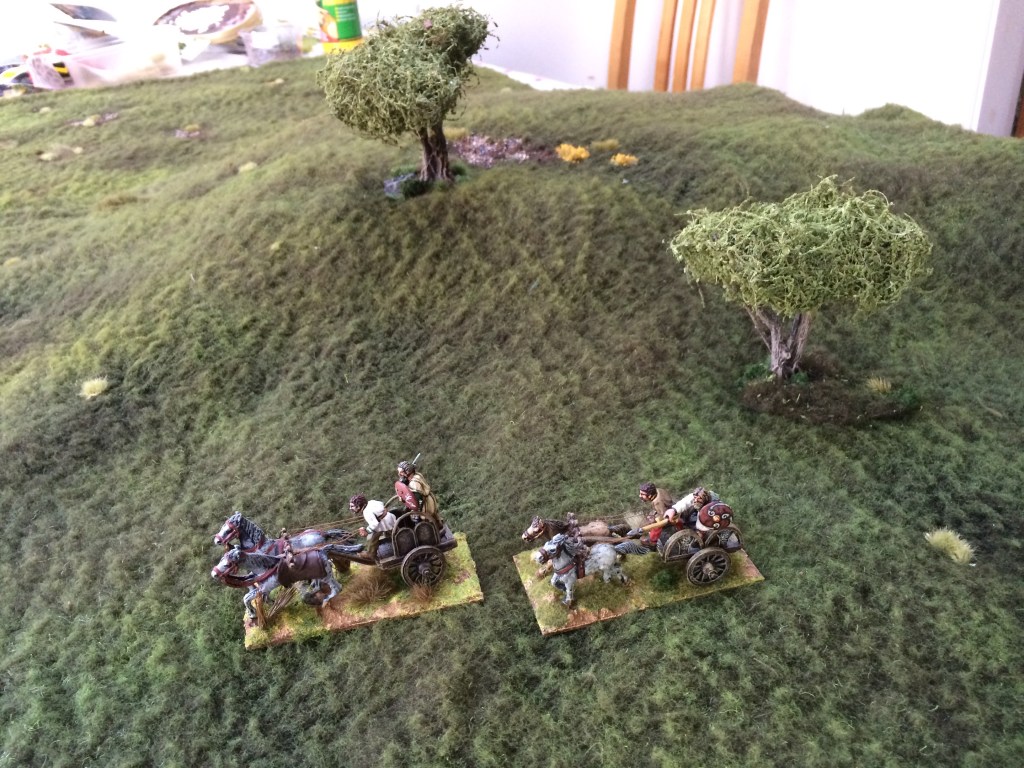
I rebased my Last Valley trees to fit with the table, adding matching tufts and cloth to the new bases, as well as some weighting underneath the base to help counteract the ‘bounciness’ of the sherpa fleece.
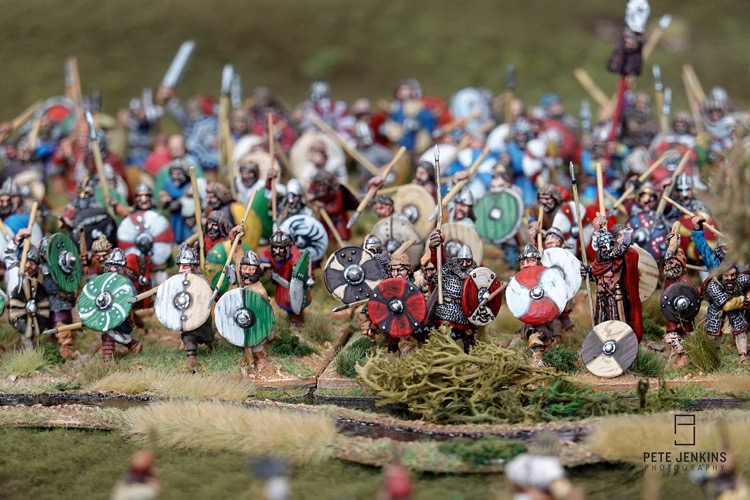
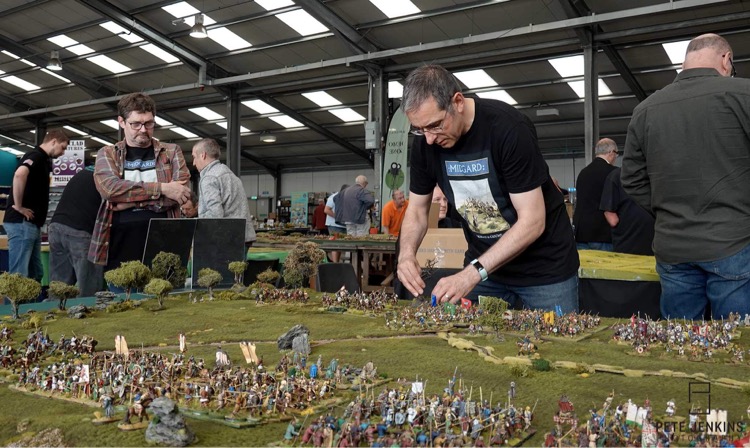
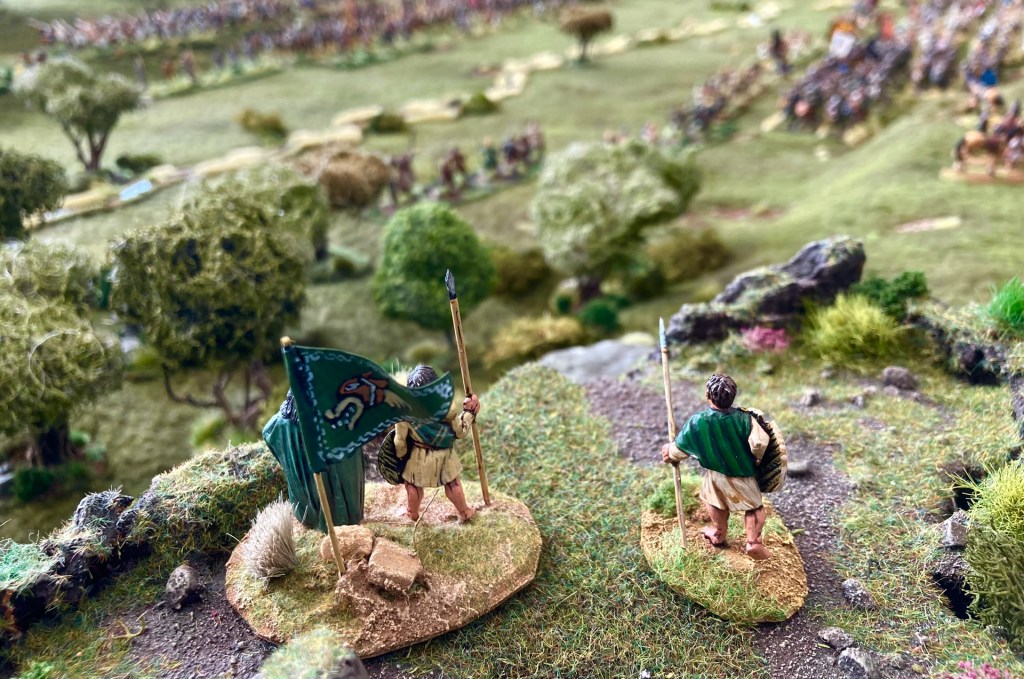
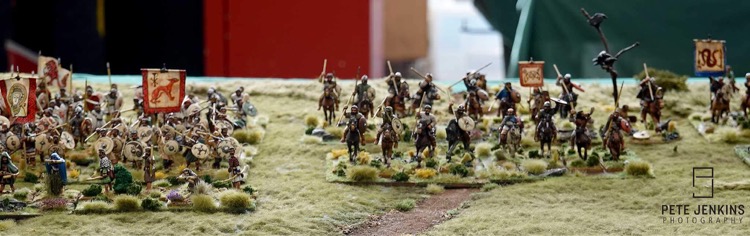
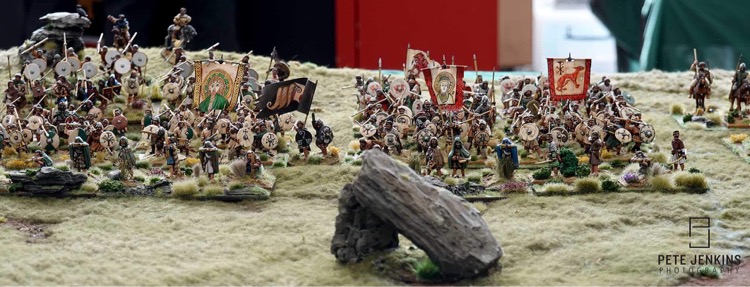
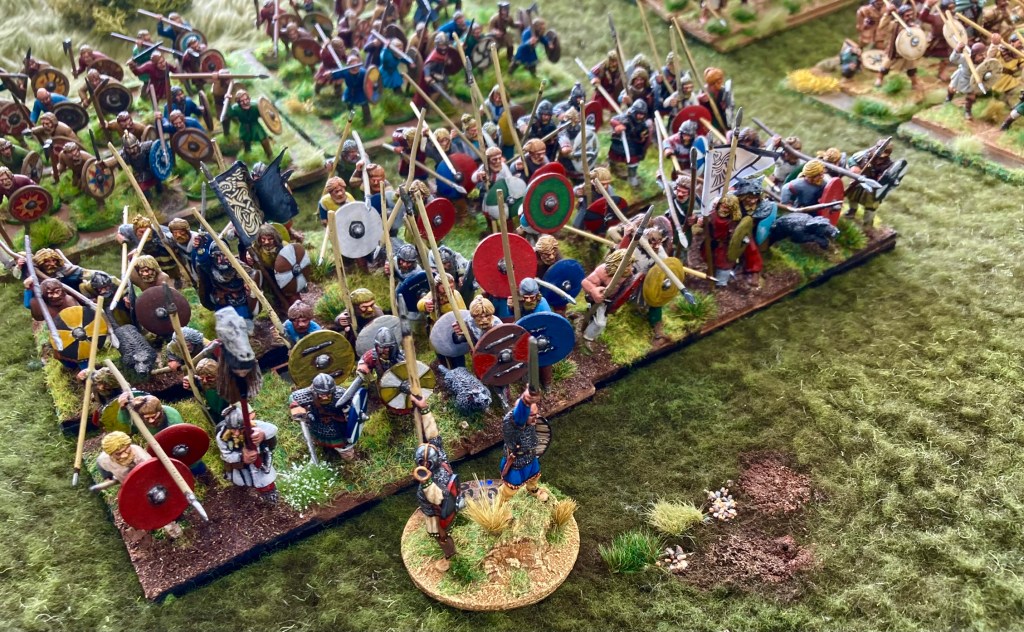
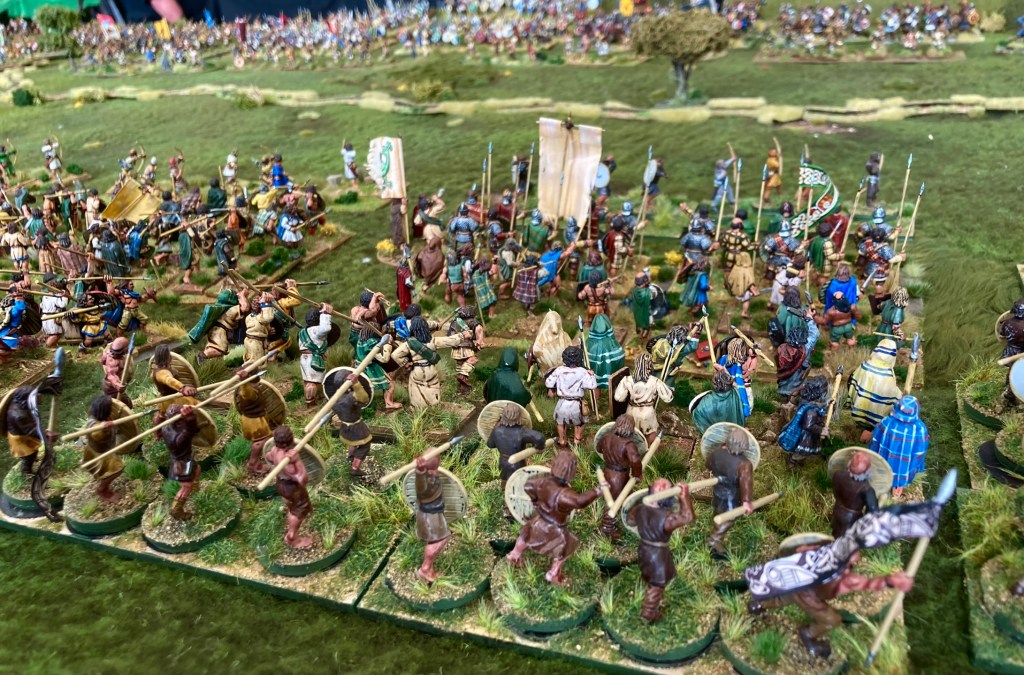
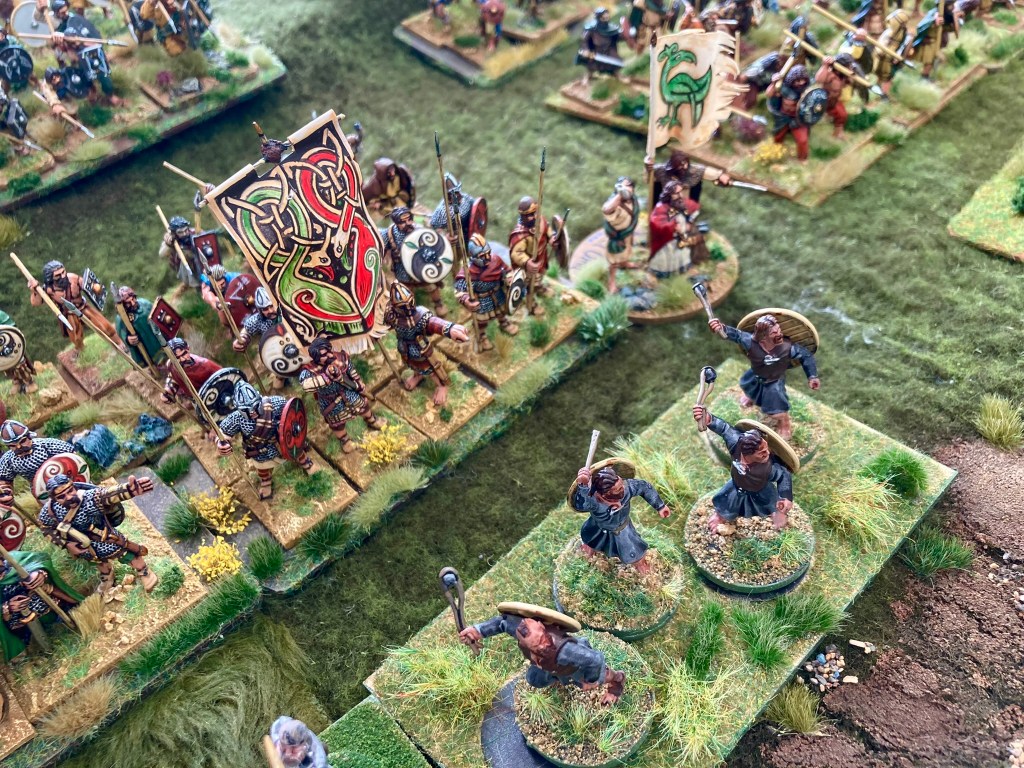
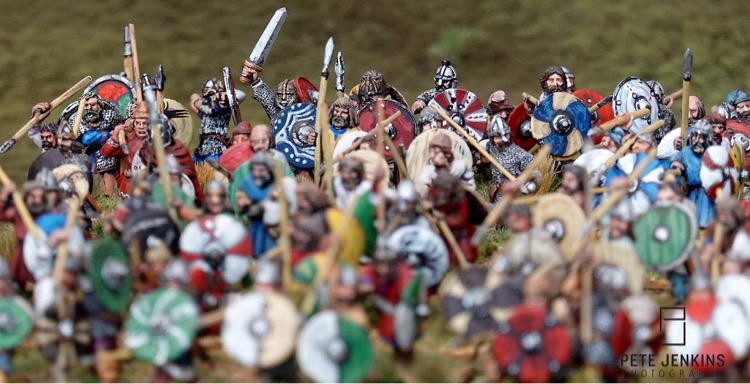
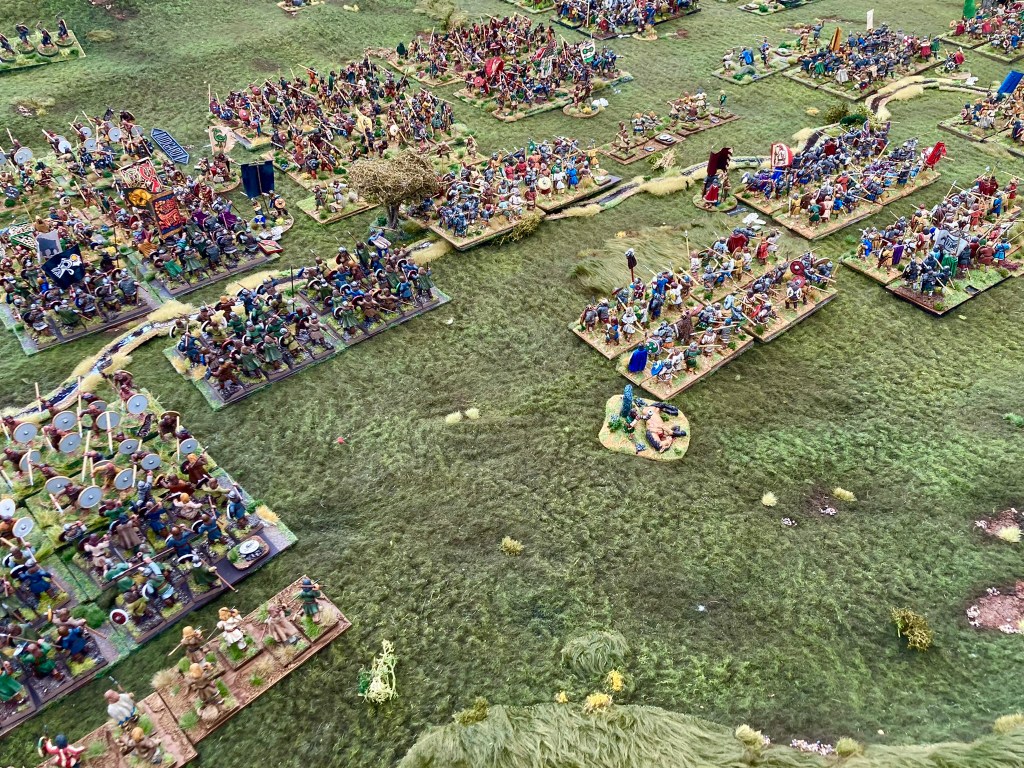
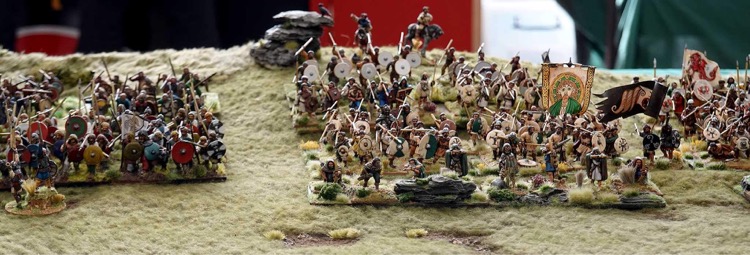
The Northumbrian front line reaches Dawston Burn – a smashing shot of nearly all Gripping Beast miniatures. Photo by Pete Jenkins Photography, as are many others in this piece.
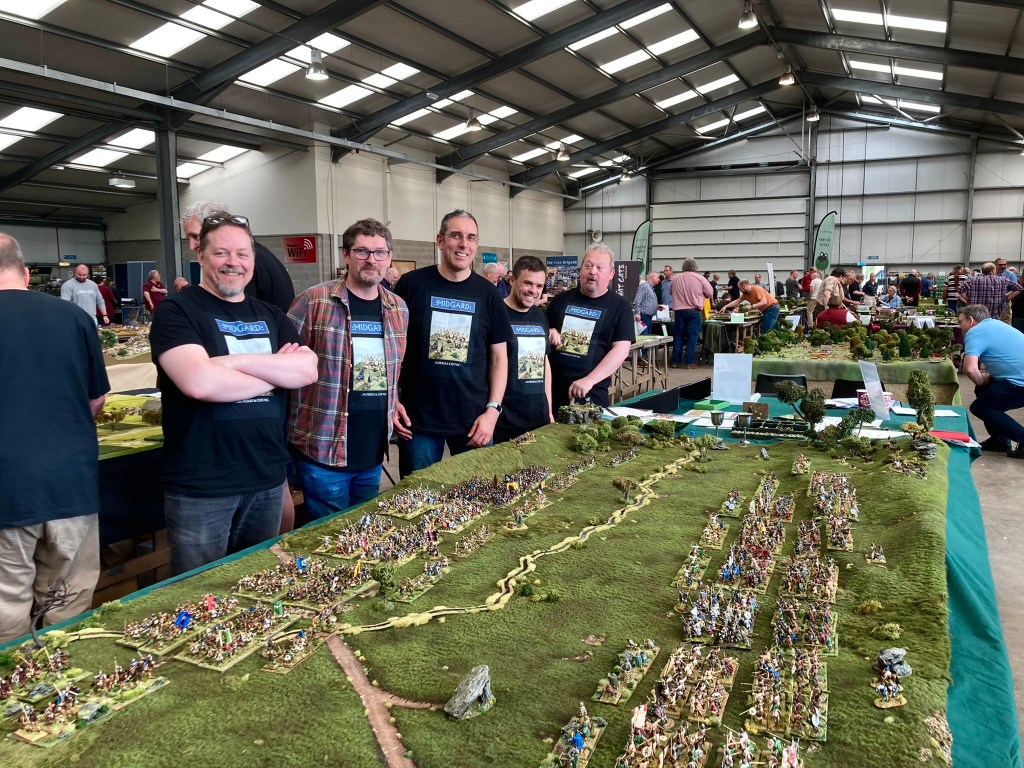
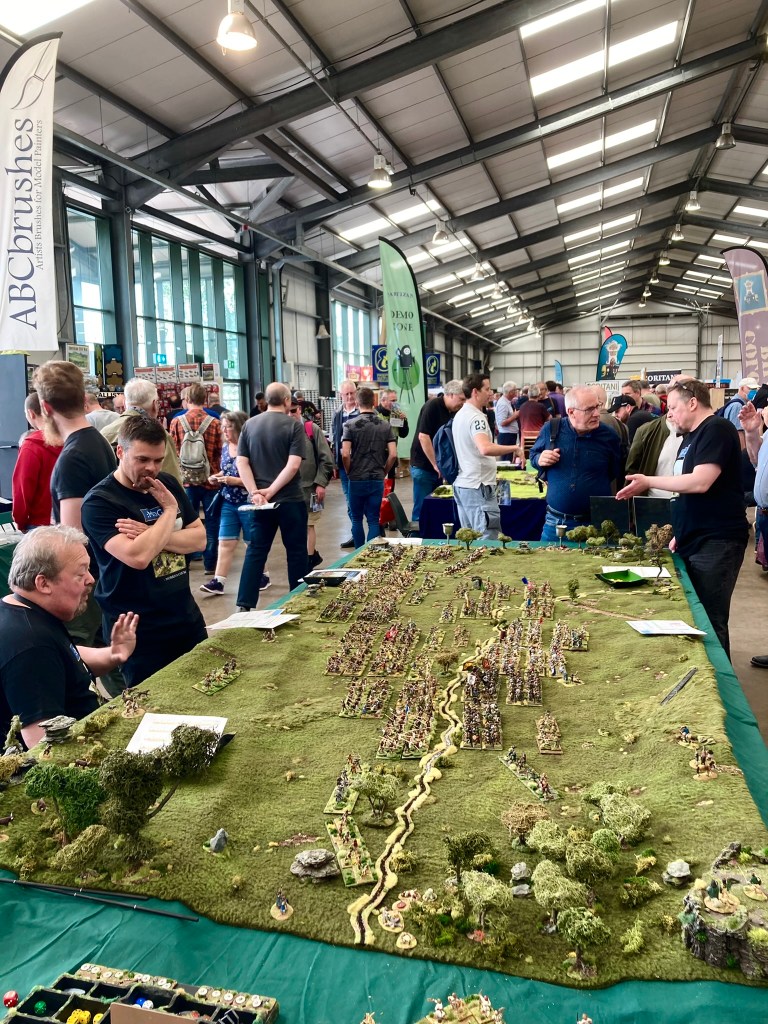
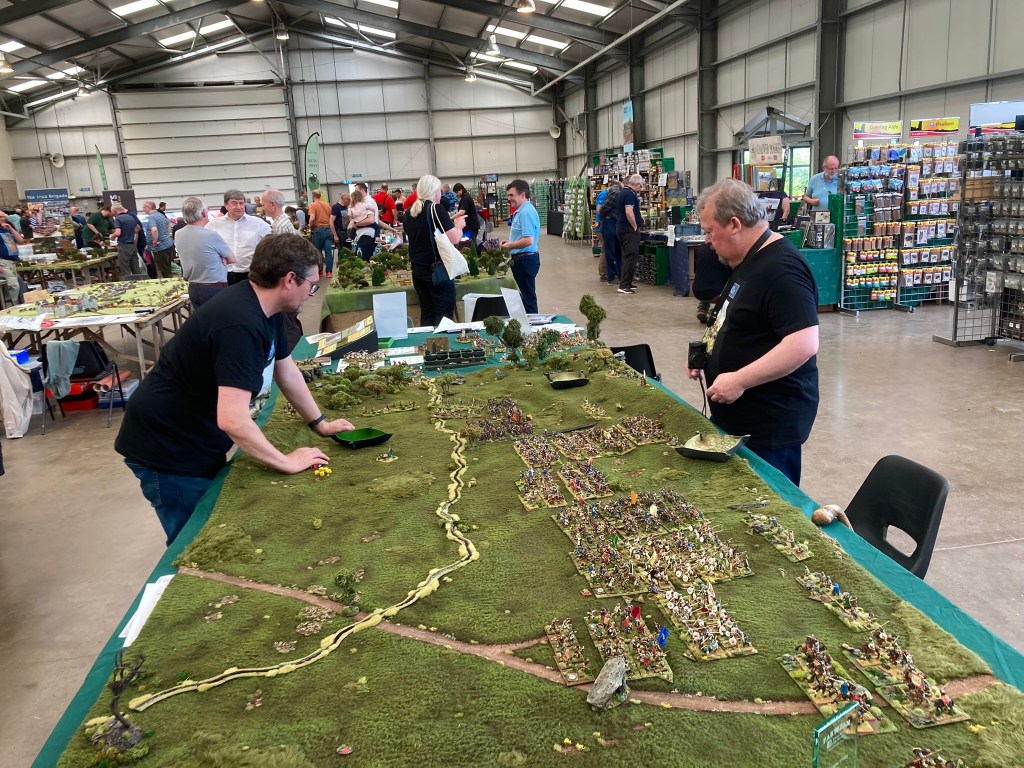
Sunday 22nd May saw an early start for the group as we all made our respective ways to the Newark Showground for the greatly-anticipated Partizan Show. I was reflecting that my first visit to Partizan was pretty much exactly 29 years ago; in 1993, my chum Jon and I caught a train to Newark Castle Station, followed by a leisurely two mile walk across the fields to get to Kelham Hall (the venue for much of Partizan’s history).
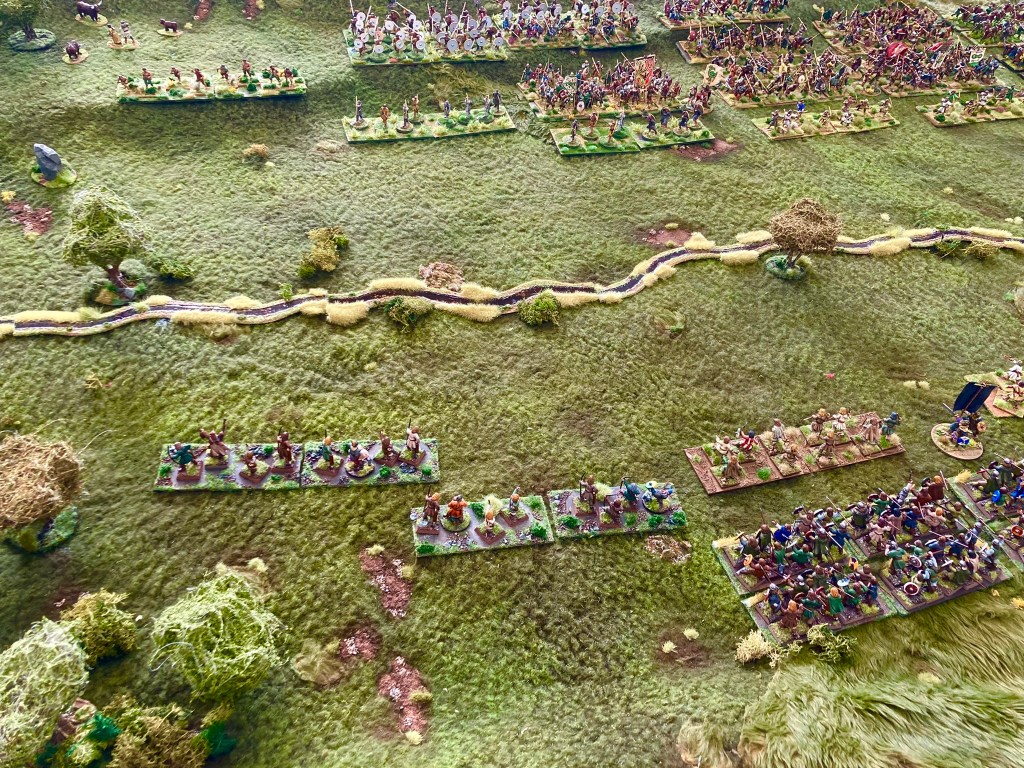
All set up and ready to go: Dal Riada on the left, Northumbria on the right
This day in ’93 was formative for me in many ways, but one memory sticks out: the Late Romans vs Picts affair being run on some of the Perry Twins’ stunning terrain boards by Jervis Johnson & co using a version of Warhammer rules – that later ended up in print as the much-loved Warhammer Ancient Battles. I remember being awed by the superbly-painted minis, the rocky crags and the ruined broch, thinking: “This is what I want to do!” (Being a skint student at the time, I bought three (individual) Foundry Picts from Dave Thomas, and that was it.)
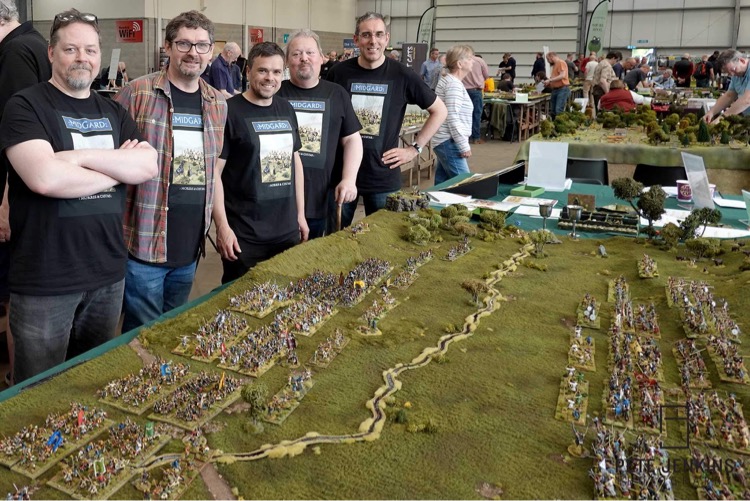
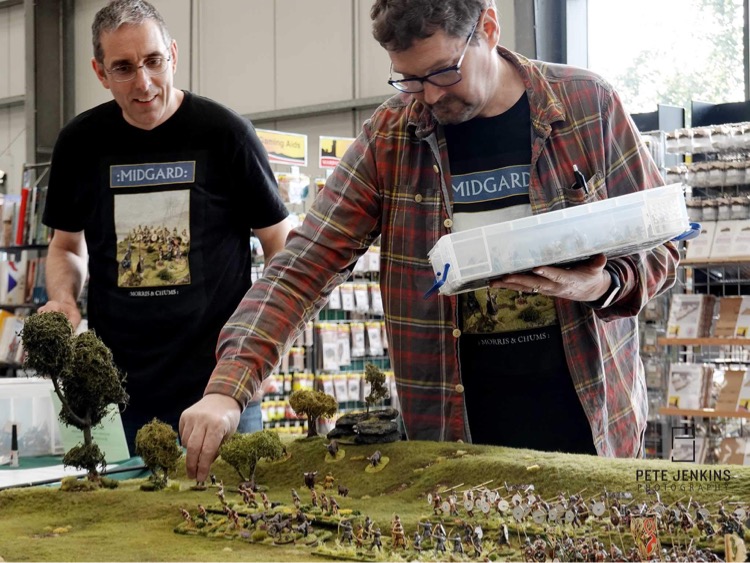
Team photo: Martin, Paul, Chris, Pete, myself. Steve Jones’ top Battle of Freeman’s Farm game can be seen just to the right.Set up: Scrivs adds the wilfdlife to the slopes of the battlefield
Fast-forward to a slightly older me with a slightly bigger figure collection, and that’s exactly what we were up to at Partizan 2022 – and literally next door to the Perrys running their Battle of Dorking game. As we were setting up, Michael Perry wandered in with a characteristic handshake and friendly greeting before we got on with the business of the day: toy soldiers!
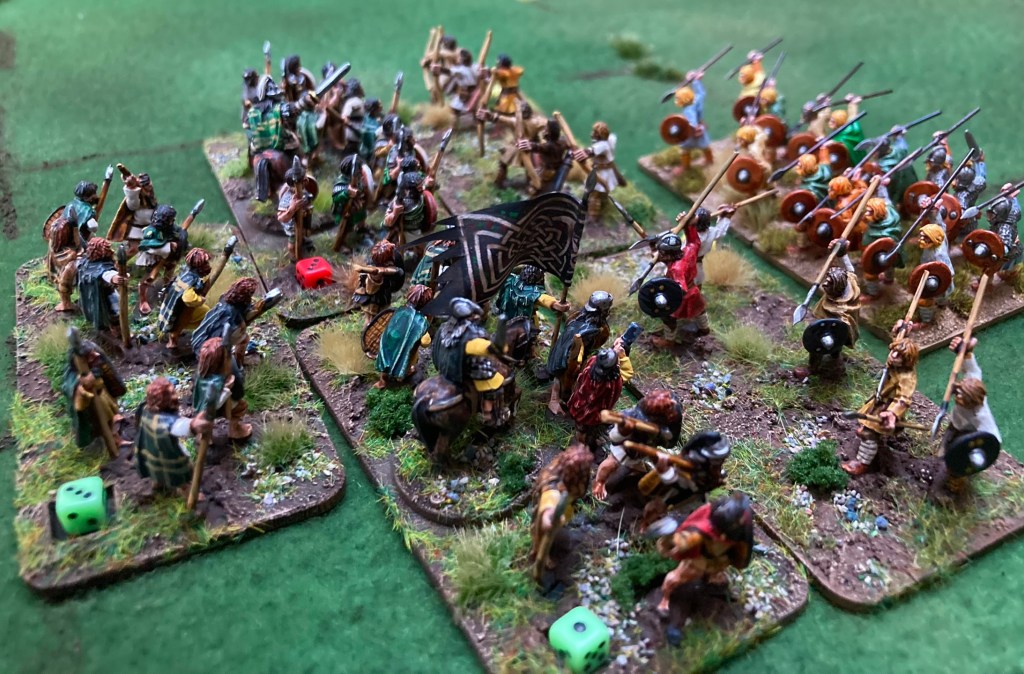
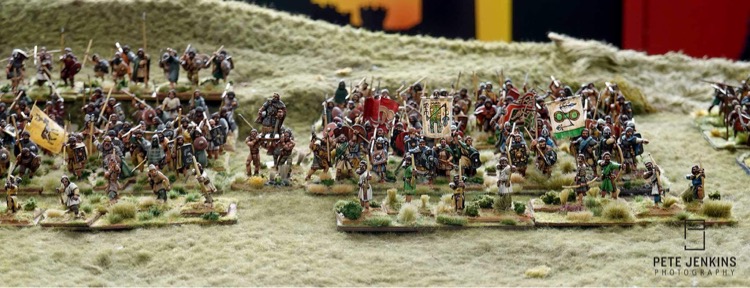
While I co-ordinate the games we run and usually sort the terrain, the actual running and set-up on a show day is most definitely a team effort. All five of us present – Paul, Chris, Pete, Martin and myself – had been busy re-organising and pooling our various Saxon and Celtic miniatures to create a spectacle involving around 1,000 figures on the table. (Not forgetting Tom, who put his lovely Footsore Saxon army into the pool despite getting double-booked and missing the show.) You can also read Martin’s blog on the game and the show here.
In addition, Martin did the graphics for the t-shirts and designed and printed the rather natty Midgard sticks that measure ‘Spear Throws’ in the game. But most importantly, everyone mucked in, talked to folk and kept the game running – unquestionably one of the hardest things to do at an incredibly busy show.
My Midgard ‘desk tidy’ featuring Martin’s 3d printed measuring sticks!
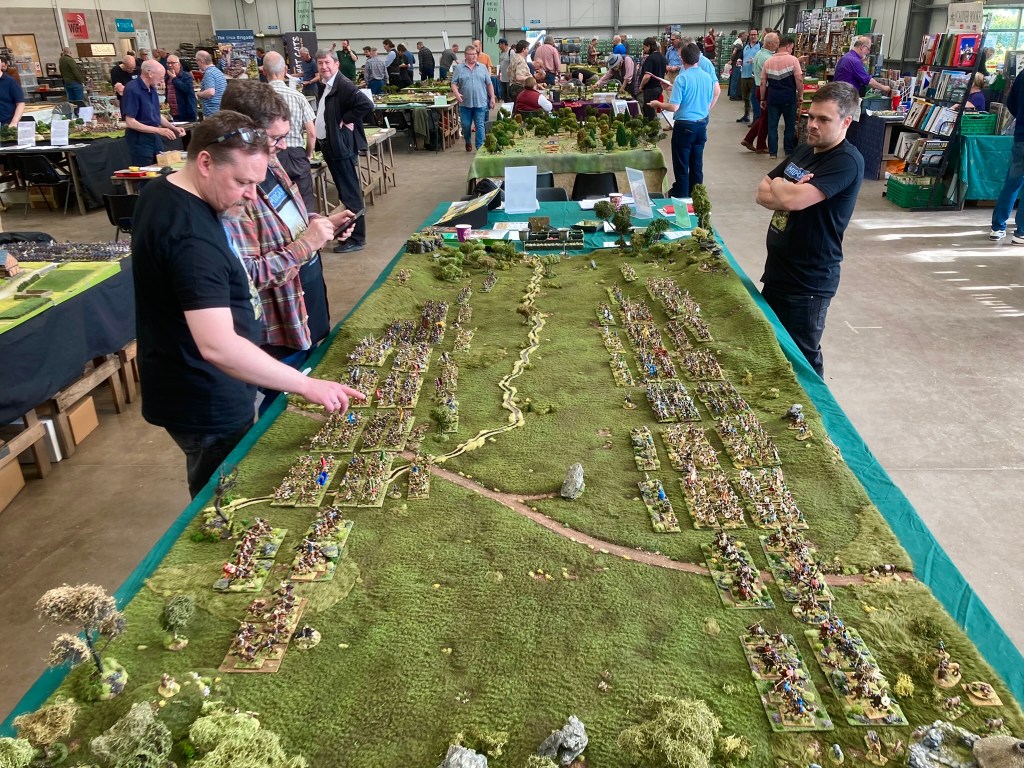
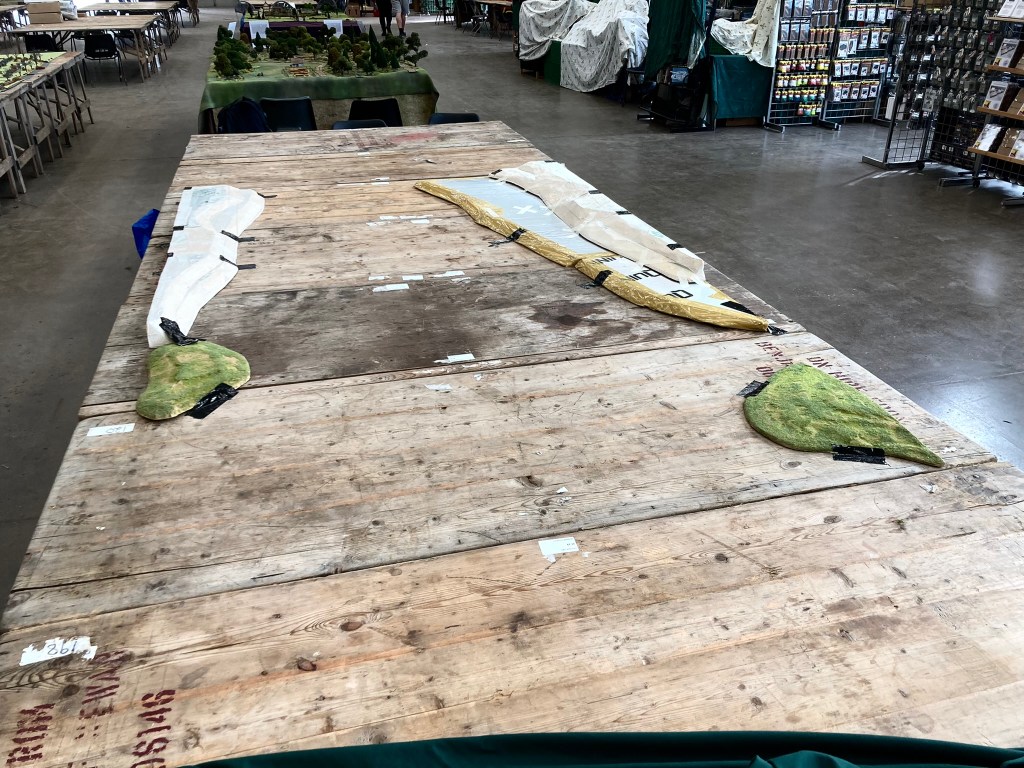
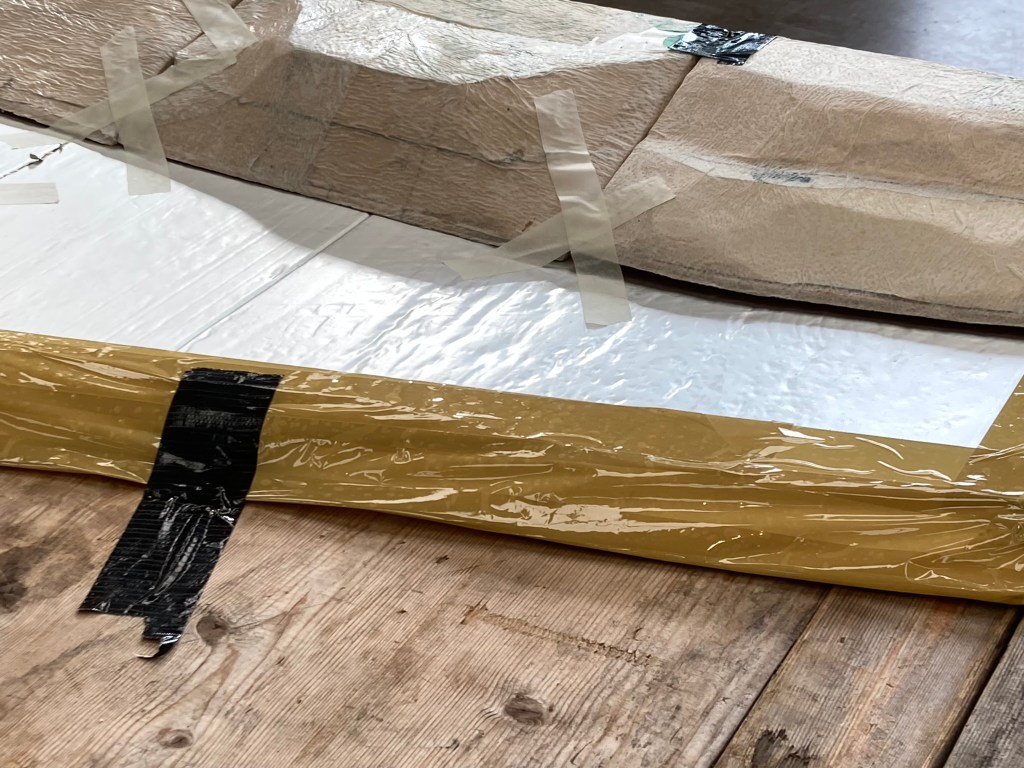
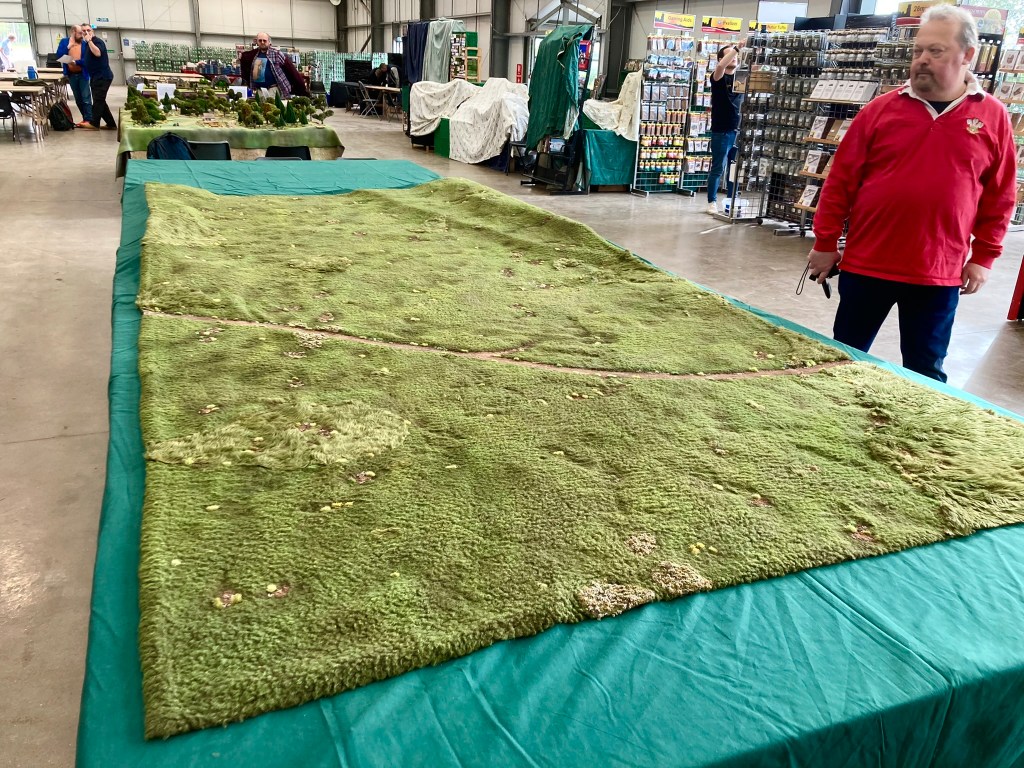
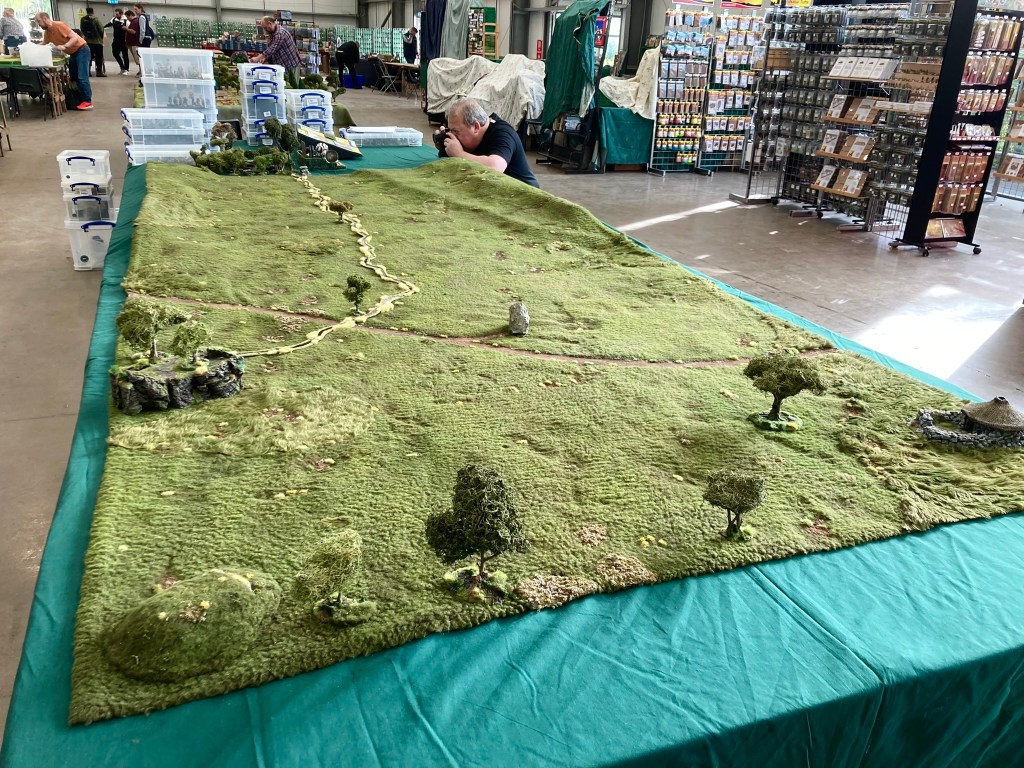
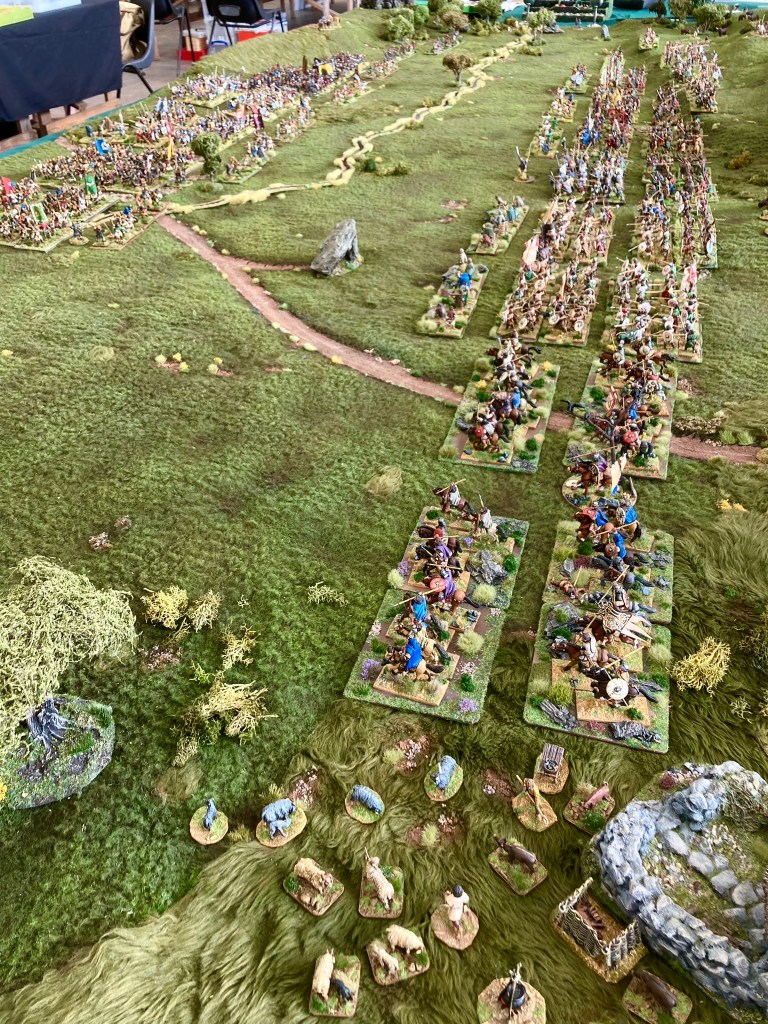
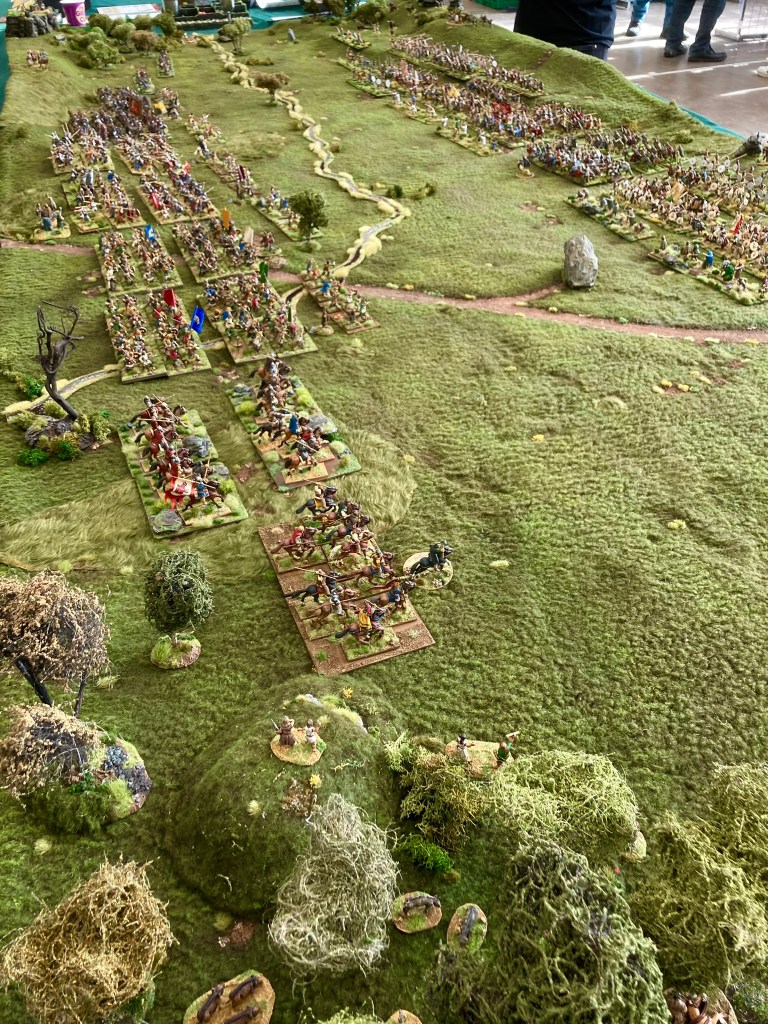
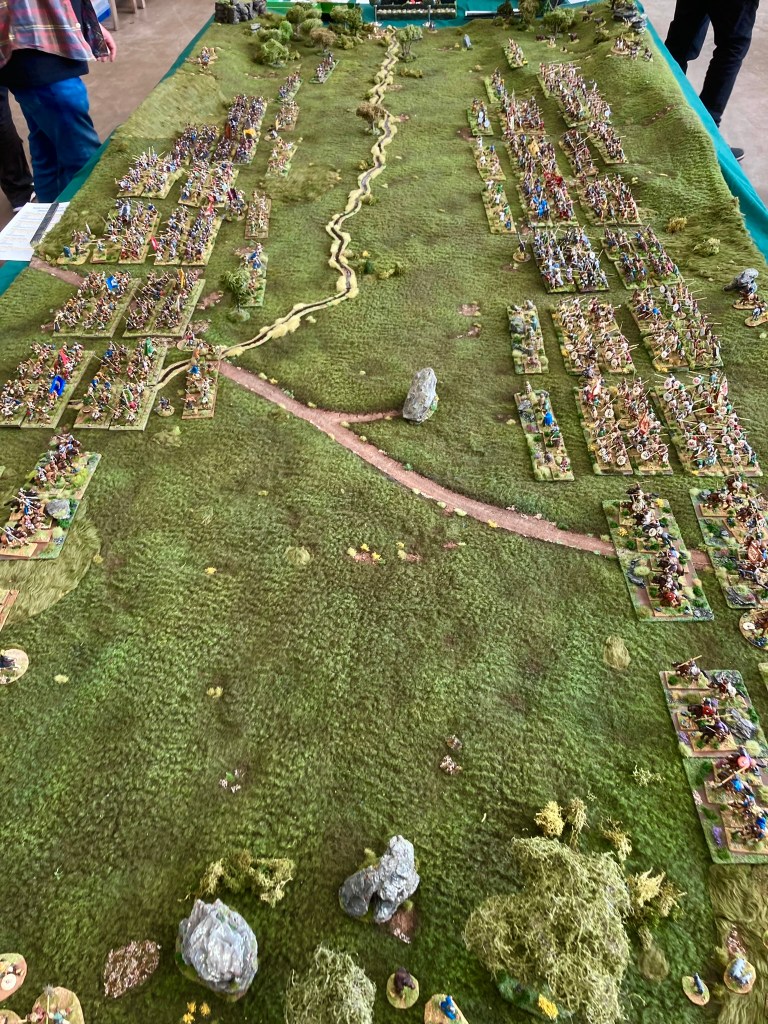
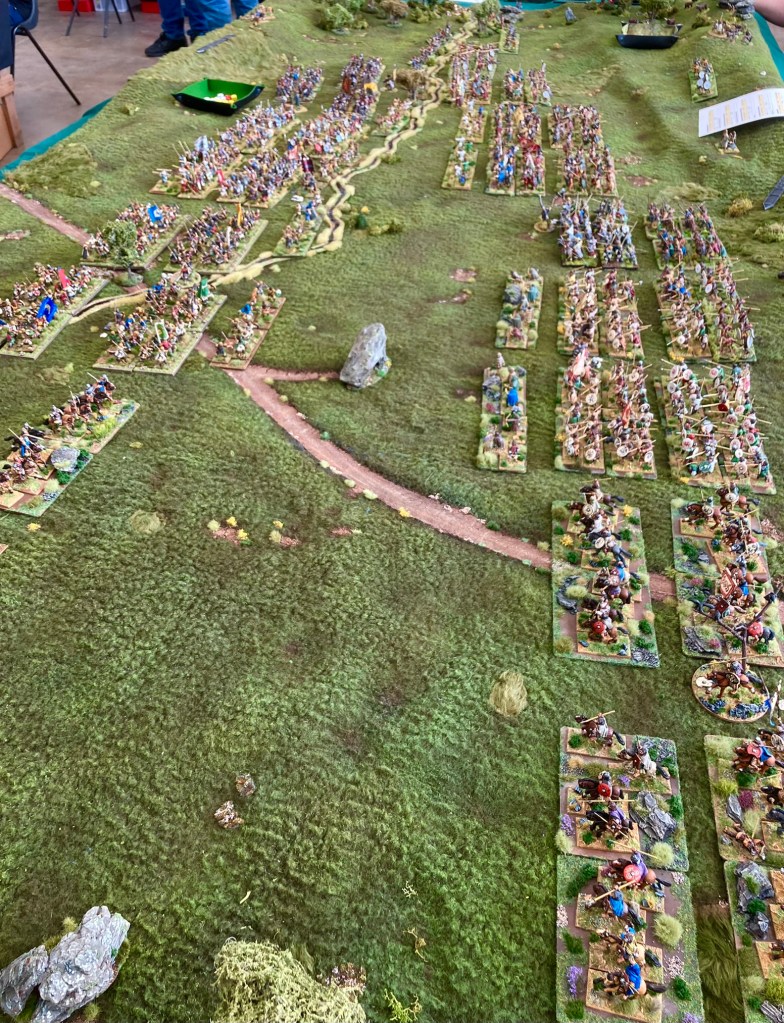
We were asked a few times about how we did the hills so here’s a few photos of the table set-up in progress. The cloth is home-made from a material called Sherpa Fleece – I may well do a blog article about this sometime if people would like to read it.
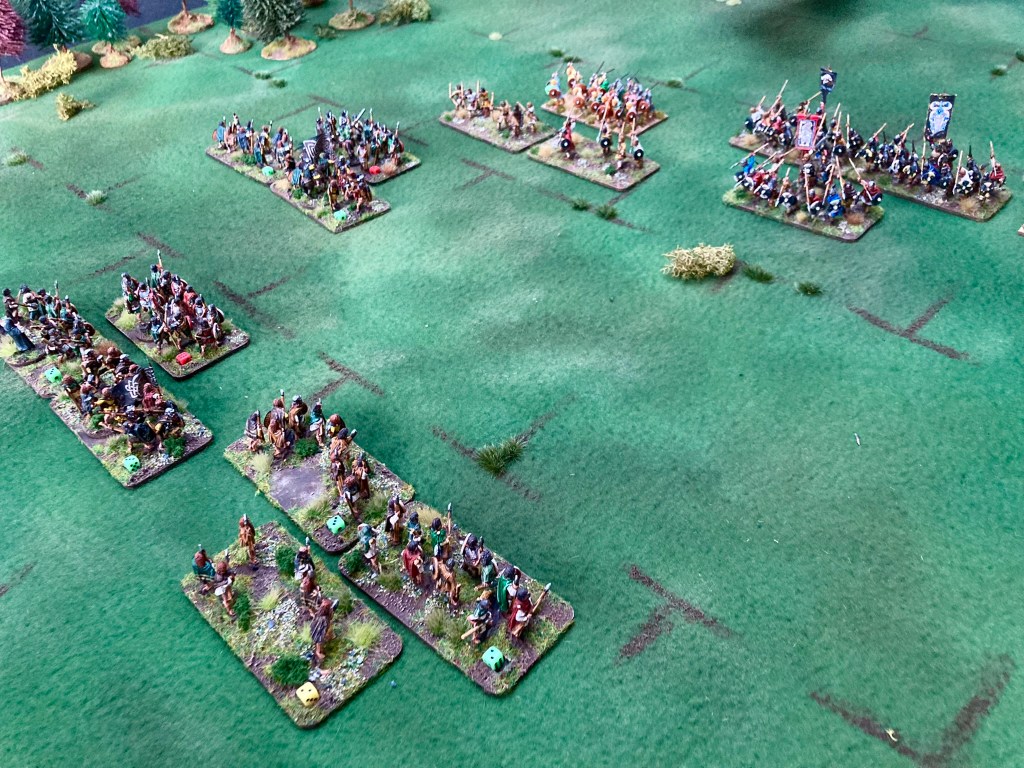
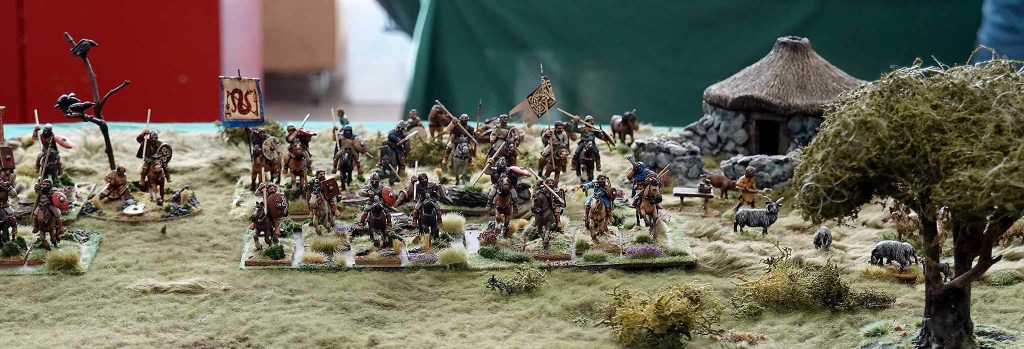
Tables from the Newark Showground were a bit rough and ready this time – fortunately I’d brought cable ties and tape to hold everything together. I’m not sure this particular table is in danger of resale (except as firewood) 🙂 Hills are placed in position and taped directly to the table. Nothing fancy, just some 25mm insulation board carved to shape.A close up of the hills!The large dark green cloth covers up the foam – and cleans up the table at the same time. The terrain cloth is then draped over the whole thing. As sherpa fleece is a pretty thick material with a little bot of stretch, it copes very well with this.‘Drop on’ terrain is then placed over the cloth. I’ve weighted the tree bases so that they sink into the cloth and are harder to knock over when gaming.More views of the British/ Dal Riadan forcesThe British (Welsh) continent in the Dal Riadan battle line – Degsa’s Stone in the foreground.
I’ve already written about the Degsastan scenario that we were playing and the forces used (see here if you want to know more), so I’ll cut to the action – as best as I can remember it! The very genial Alex from Storm of Steel dropped by and filmed a short interview about the Midgard rules, which you can see (about 3 minutes in) along with a full video report of the show – watch this here.
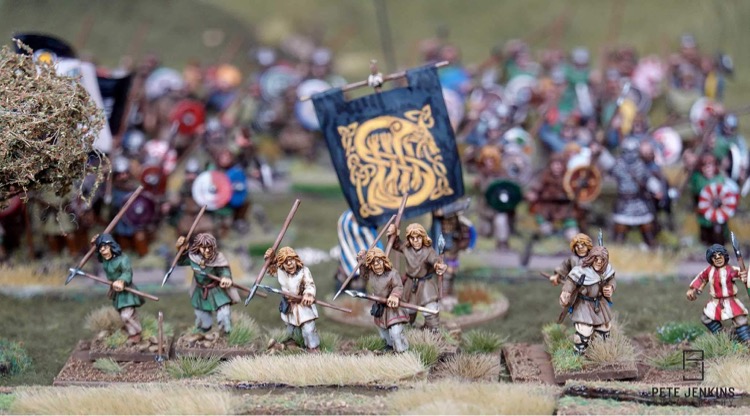
Aethelfrith of Northumbrian in all his martial glory – Gripping Beast figures painted by Paul.
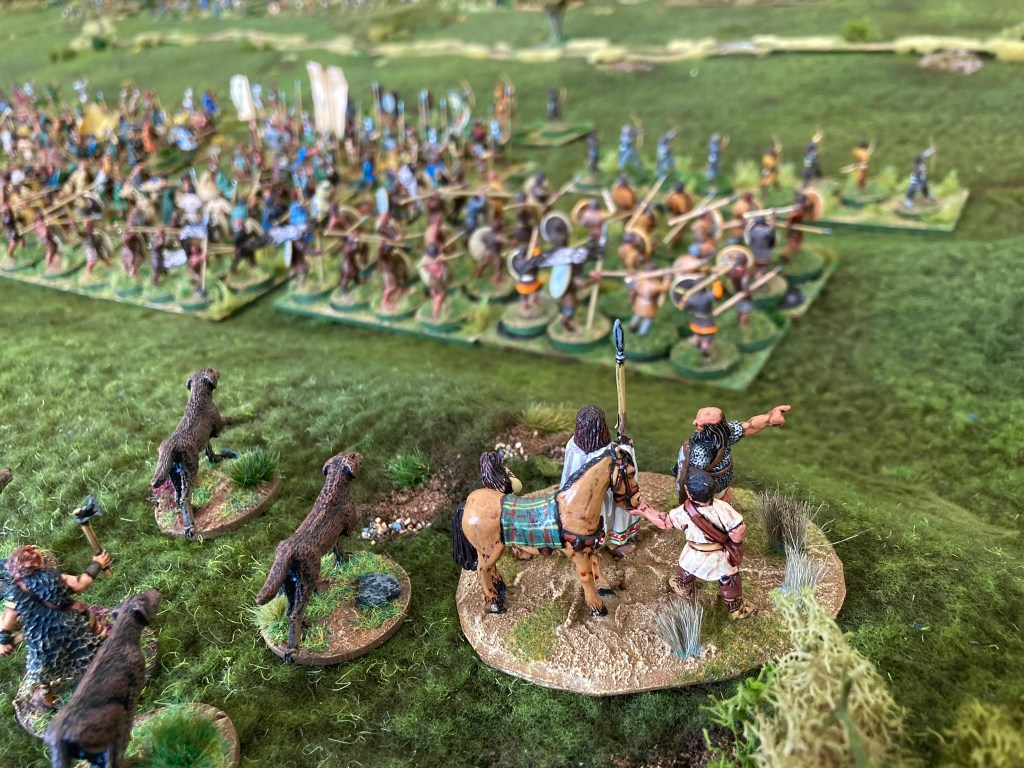
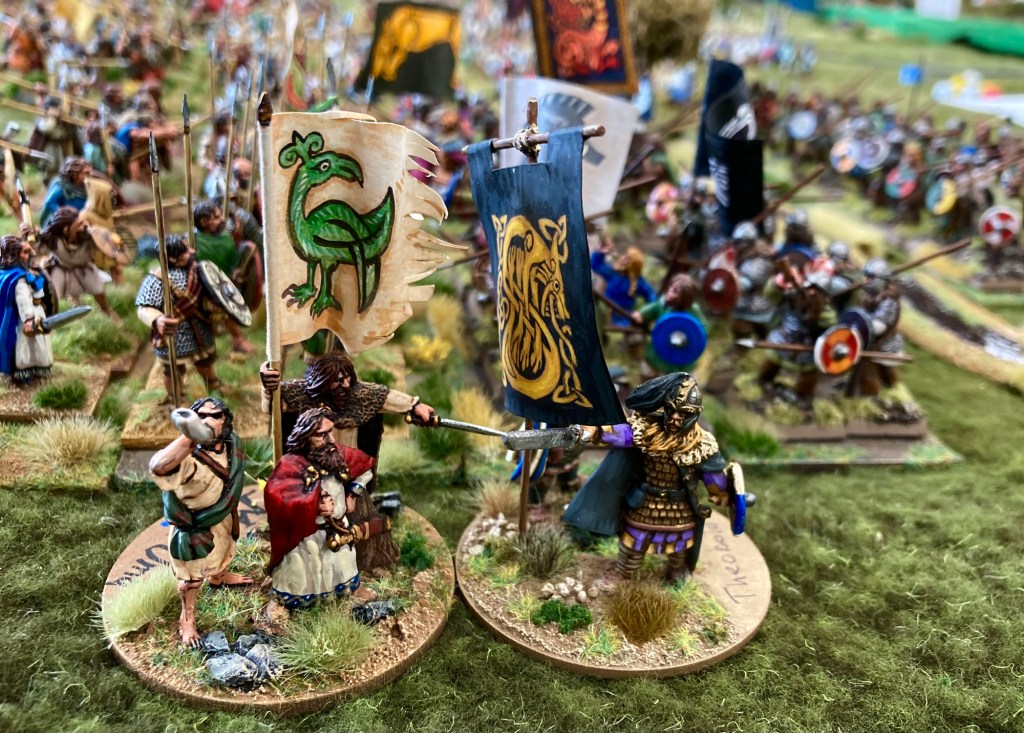
With both armies deployed for battle, the commanders carried out sacrifices in return for the favour of the gods (this is a special trait within Midgard that allows an ‘Omens’ roll at the start of the game with a random – hopefully favourable – result.) There were jeers as the Northumbrians’ sacrifed horse came up with a bunch of stinking entrails (rolling a one); across the dale, the Gaels cheered when a six was rolled and the goat sacrifice dictated a bonus of three Reputation tokens in Aedan’s goblet. Unfortunately, the priests also foretold that one of the Heroes would become Fated (this unfortunate trait means that a character is more likely to die, although hopefully in a heroic manner) – and that Fated hero was none other than Aedan himself, the King of Dal Riada.
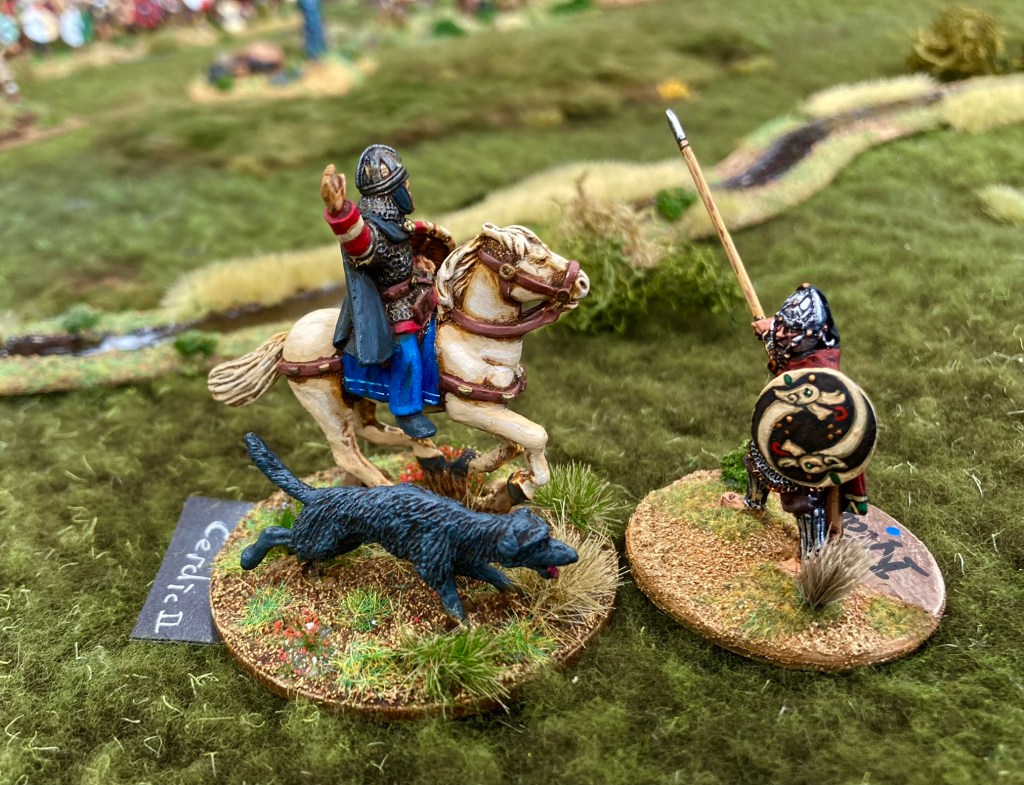
The omens are good! (Thanks goat)Aedan Mac Gabhran, King of Dal Riada, is carried into the fray by the biggest blokes in his army. Fated or just over confident?
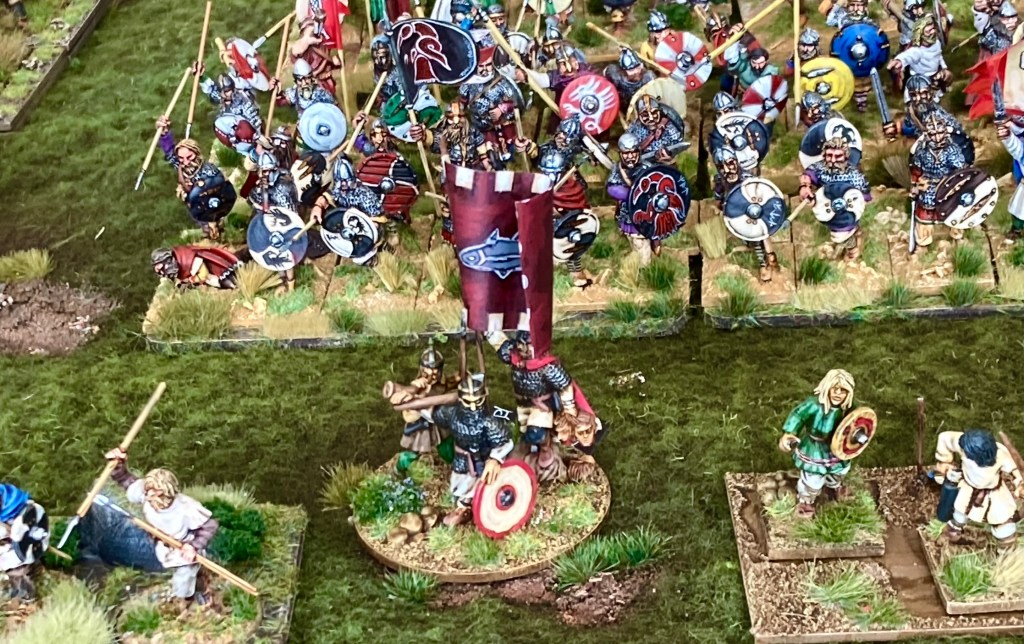
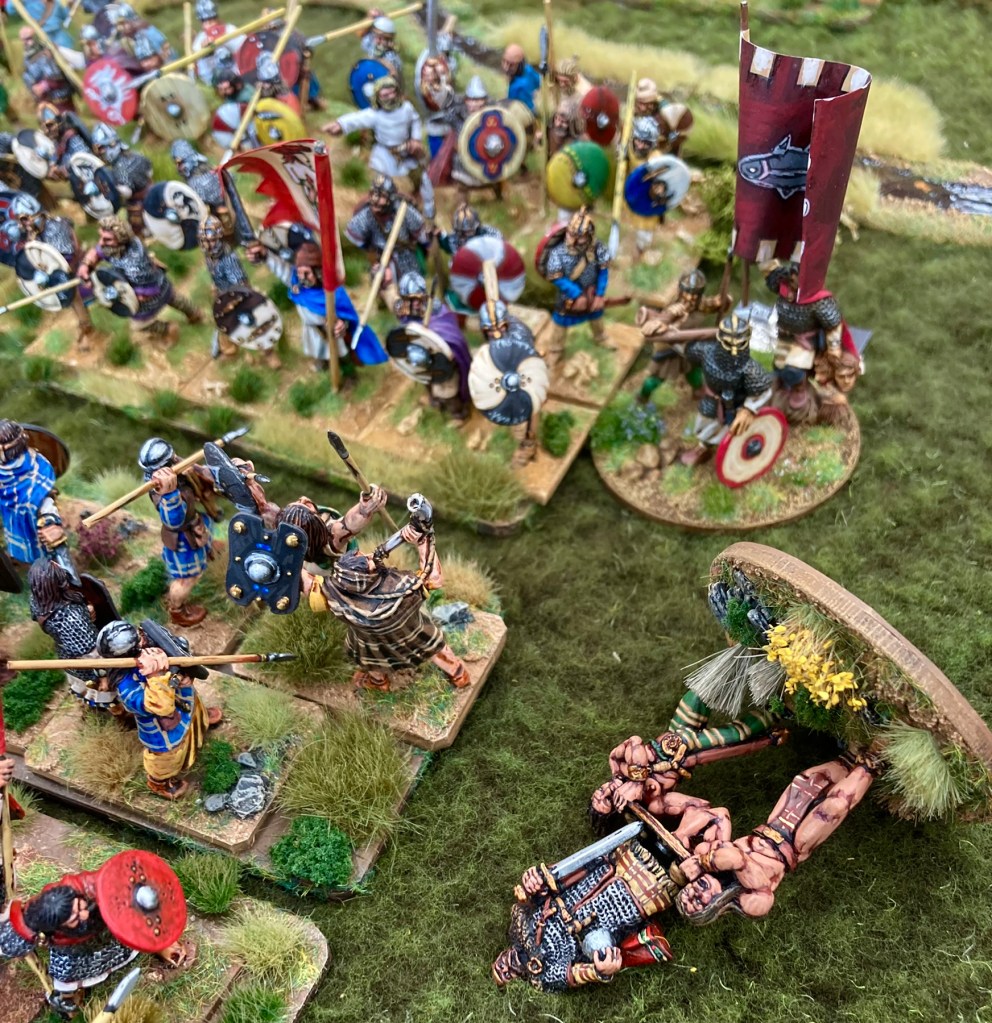
With both forces deployed for battle across the Dawston Burn, Niall of the Swift Blade, champion of Dal Riada, was sent out to challenge the Northumbrians to single combat. Unwilling to lose any more face after the disastrous horse-sacrifice incident, Aethelfrith delegated Osric, one of his renowned thegns, to get out there and win some glory for Northumbria.
‘Hey! I said single combat! You’re not allowed your pets.”
However, the Saxons ended up wincing as Niall lived up to his name and sliced a chunk out of Osric’s leg to the cheers of the Gaels. Both warriors circled the other, sparks and splinters flying from board and blade as each tried to gain the decisive blow. In the end, Niall thrust his blade over Osric’s shield, but not before the Saxon landed a mortal wound on his opponent; both ended up as food for ravens!
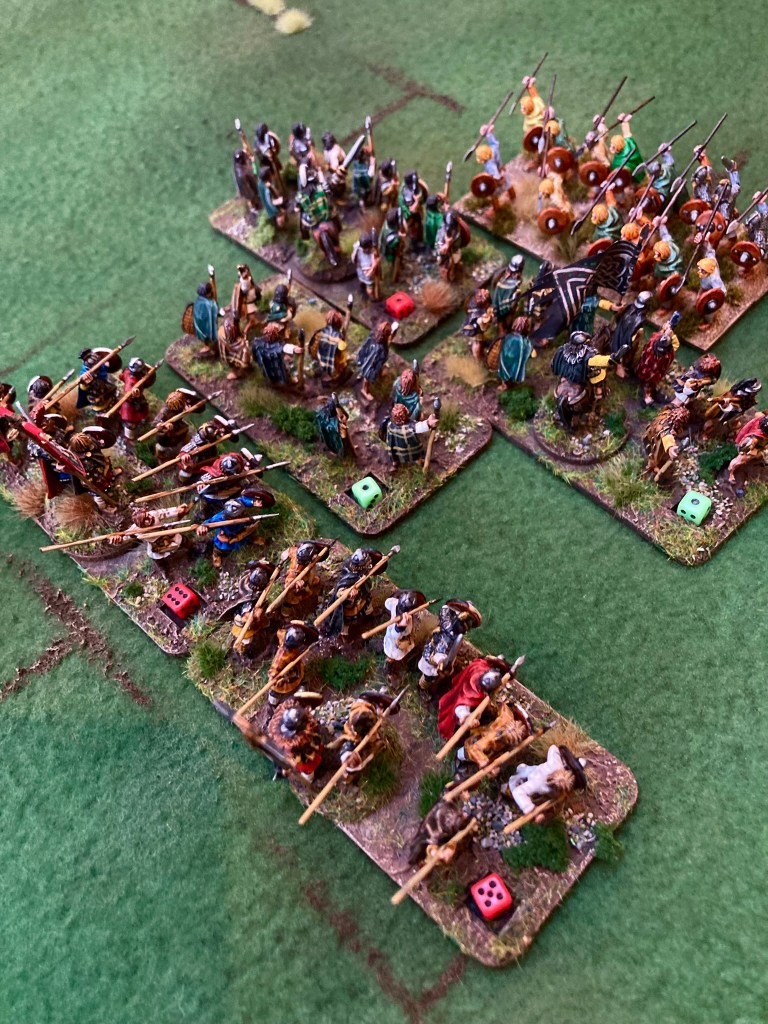
Nonetheless, this heroic challenge had stirred the blood of the watching armies and both sides advanced, hammering spear butts and sword pommels on their shields as they did so. On the Dal Riadan right, Mael Uma, a famous warlord from Ulster, saw an opportunity to strike the first blows of the battle and surged downhill towards the Dawston Burn (in Midgard, there is a reputation bonus for leading the first charge of the game.) Unfortunately, Mael Uma’s men couldn’t quite follow at the same speed, and he ended up fighting a losing battle against Theobald’s Saxons, despite the Irish skirmishers driving off a good number of Saxon archers.
Hering, son of Hussa leads his renegade Northumbrians. Minis by Martin (front) and Chris (back)
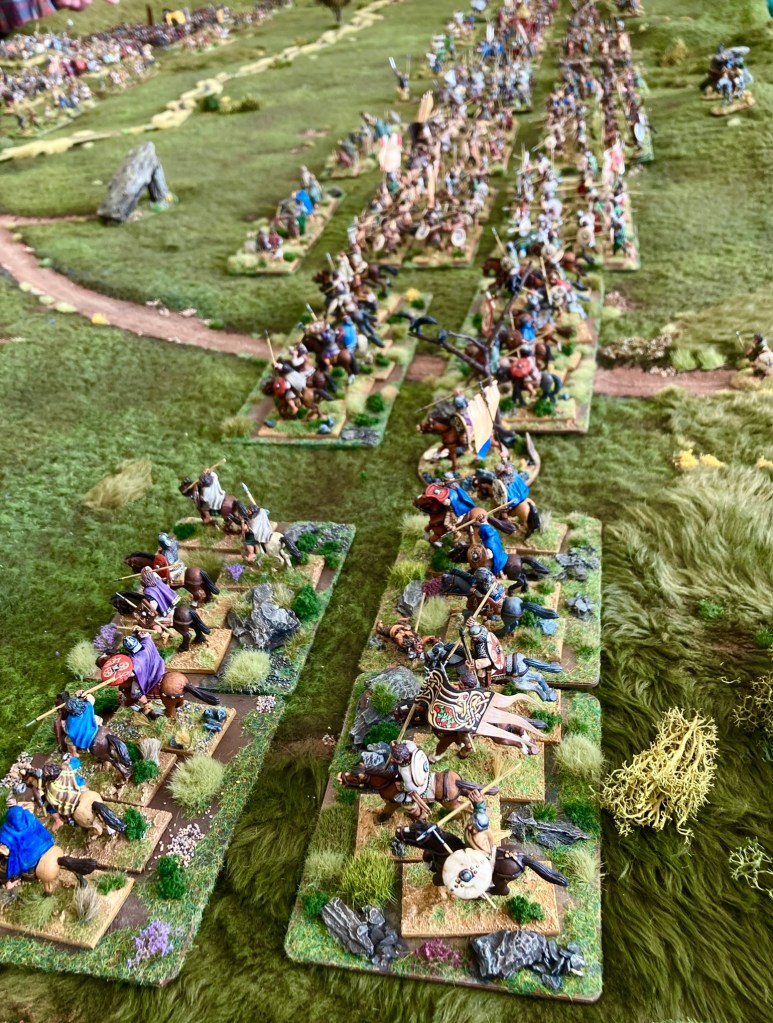
The Irish attack on the right prompted the Saxon horsemen on the left to put the various Pictish and British riders under pressure, which they did with some alacrity. (The Saxon cavalry drew some discussion, as expected. I believe that the warriors of this era did fight mounted sometimes, but probably not in full-scale battles like this one. My scenario excuse is that this contingent turned up late on their horses and just rode straight in; the truth is that we had some nice mounted units which looked good skirmishing on the end of the line, so on they went!)
I’ll confess that the course of the battle then flowed on in the background as I ended up chatting to many lovely folk who had come over to watch the game or ask about the rules. A bit like a bard with one horn of mead too many, I noted the key events but may have missed some of the details.
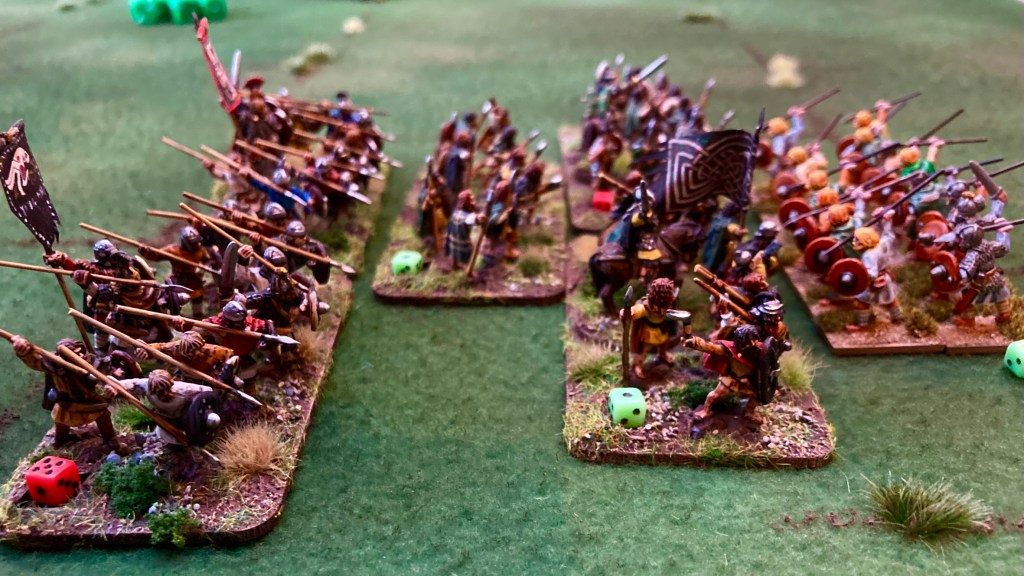
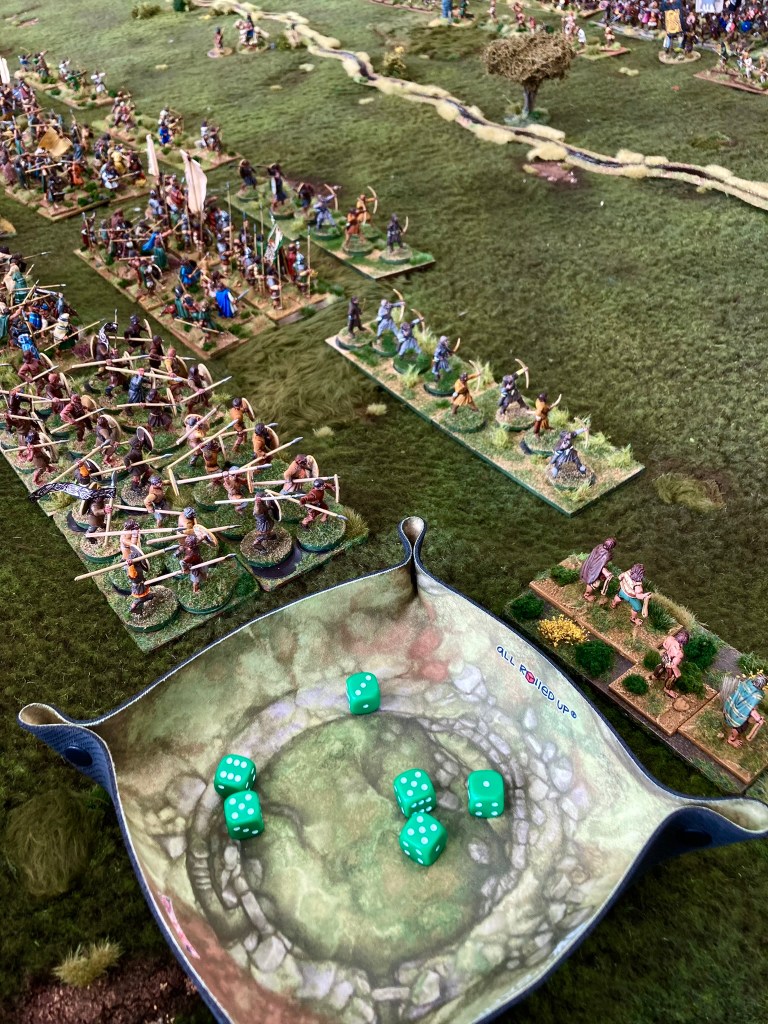
‘Why are the smallest ones always at the back?”Rather nice dice tray from Handiwork Games delivers some good rolls!The game in full flow with battle all along the Dawston BurnMael Uma and Theobald clash in single combat. Mael’s regretting leaving his choice of outfit, I think.
The Saxons pushed forwards all along the line; Mael Uma was wounded in a single combat and then killed along with most of his brave Ui Neill warriors. Hering, son of Hussa – Aethelfrith’s estranged cousin, exiled from Northumbria – died in the press of bodies in the centre. But the most dramatic event occurred when King Aedan led his household warriors in a savage charge against Aethelfrith himself.
Hoping to break the Saxons in the time-honoured way of killing their leader – as well as gaining Reputation for the heroic act of charging the enemy commander – the Dal Riadan king found himself facing a hail of javelins. Rolling dice with the aplomb of a 12-year old, Paul scored an outrageous seven hits (this is a lot in Midgard), resulting in a faltering unit of Gaels. Worse, the ‘Risk to Heroes’ roll that Aedan needed to make to avoid the javelins himself ended up with a classic double one – which he could do nothing about, being Fated! (It’s possible that it was entirely his own fault for being carried around the battlefield on a shield.) Crunch.
‘No comment’
After this, it was all downhill for the Gaelic forces. The death of Aedan caused a major loss of Reputation from the goblet which was compounded by the Saxons rolling up the damaged Dal Riadan units in the centre. When the army finally broke – just twenty minutes before the end of the show – Aethelfrith had clearly won a great victory. Five of the six Gaelic commanders were dead and Aedan’s son Domingart sorely wounded.
It was a fitting result to what had been a glorious day out, albeit one that left all of the team with sore throats and aching arms and legs from reaching into the centre of the six foot table to move the minis! I’ll admit that I did consider running a skirmish game for the next show as I was repacking 19 boxes’ worth of figures and terrain, but I’ll probably forget that by October!
If you came along for a chat or to watch the game, thank you very much indeed.
And those three Foundry Picts that I bought from Dave Thomas at Kelham Hall in 1993? Well, they were on the table 29 years later.