Well, it’s been quite a week with advanced orders for Midgard Heroic Battles going live on October 21st and all the attendant promotion! Thank you if you have placed an advance order – it is very much appreciated.
Since I last wrote, we have been kindly featured by On Table Top in both their news and YouTube weekender (see the team discussing Midgard from 1:05 in the video).
I was interviewed last week by Mike Whitaker for The Miller’s Tale Podcast – this is quite an extensive chat about my gaming history and probably the most in-depth recorded conversation about the core values behind Midgard so far. Definitely worth a listen while painting!
I’m updating the Midgard Heroic Battles page on mogsymakes.net every couple of days – this contains all the up to date information and links, however you like to get your news. Richard is about to share the fourth video in the YouTube series, with others following every couple of days. We will also be recording further footage this week for future release, this time focusing on the more legendary and fantastical side of things.
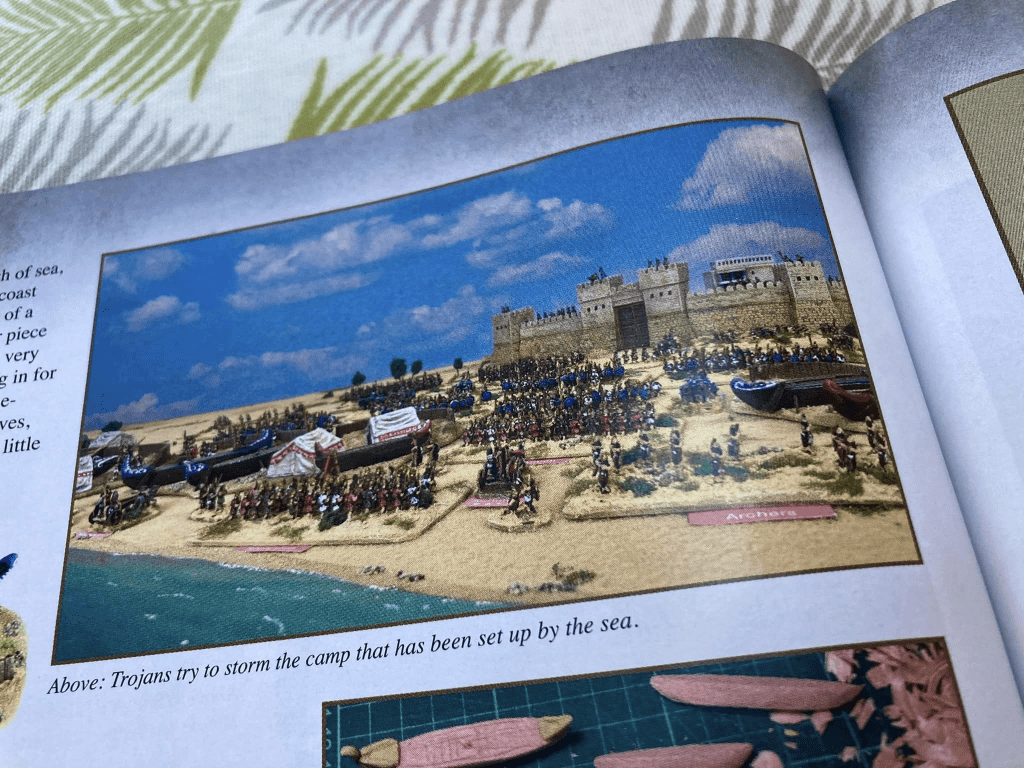
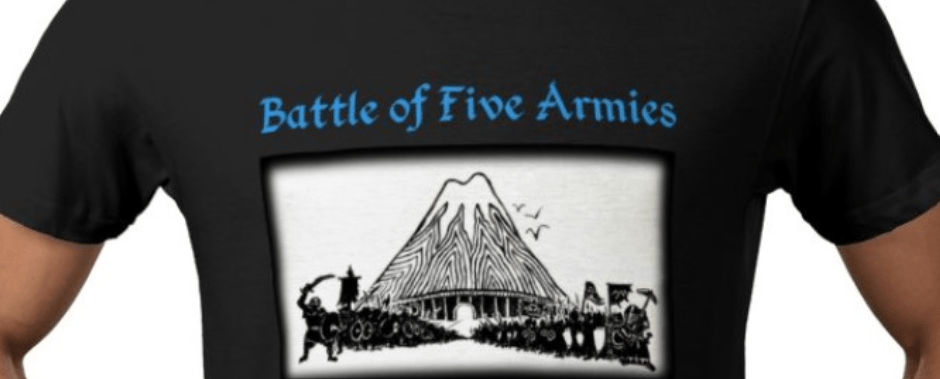
I was very chuffed to have my 6mm Trojan Wars collection featured in an article in Wargames Illustrated magazine (Issue 443, Nov 2024). This creates both Trojan and Greek 300 point Forces from the rulebook using 6mm miniatures on 8cm wide bases, giving an 8cm Spear Throw and a 3×4′ playing area, hopefully showing that not all Midgard games need to be on the scale of the Battle of Five Armies at The Other Partizan a few weeks ago!
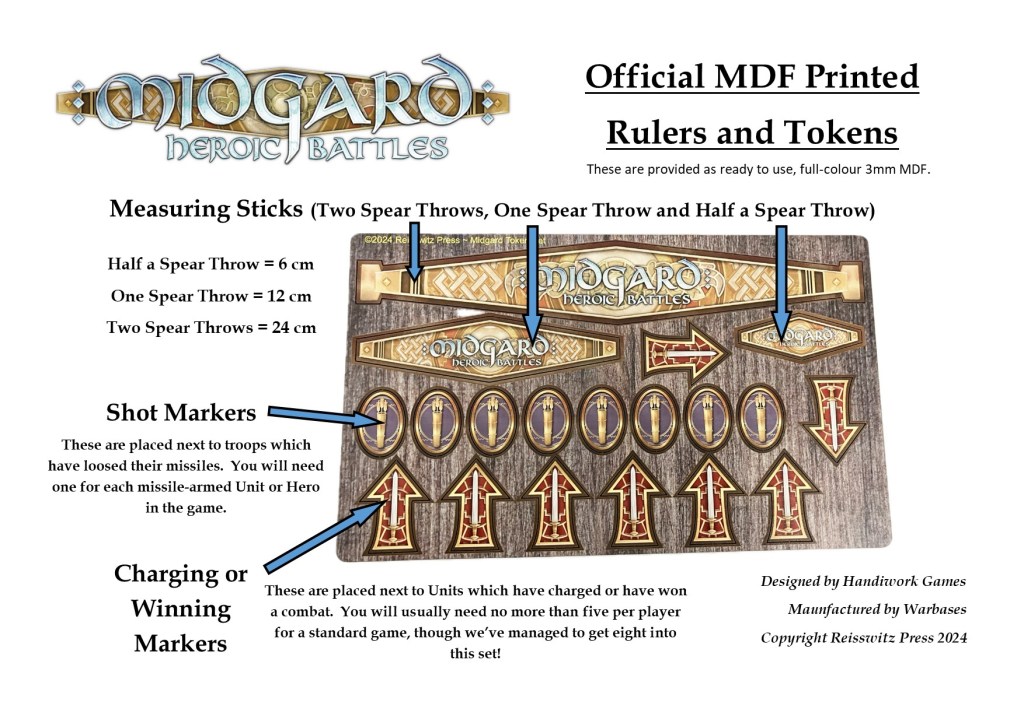
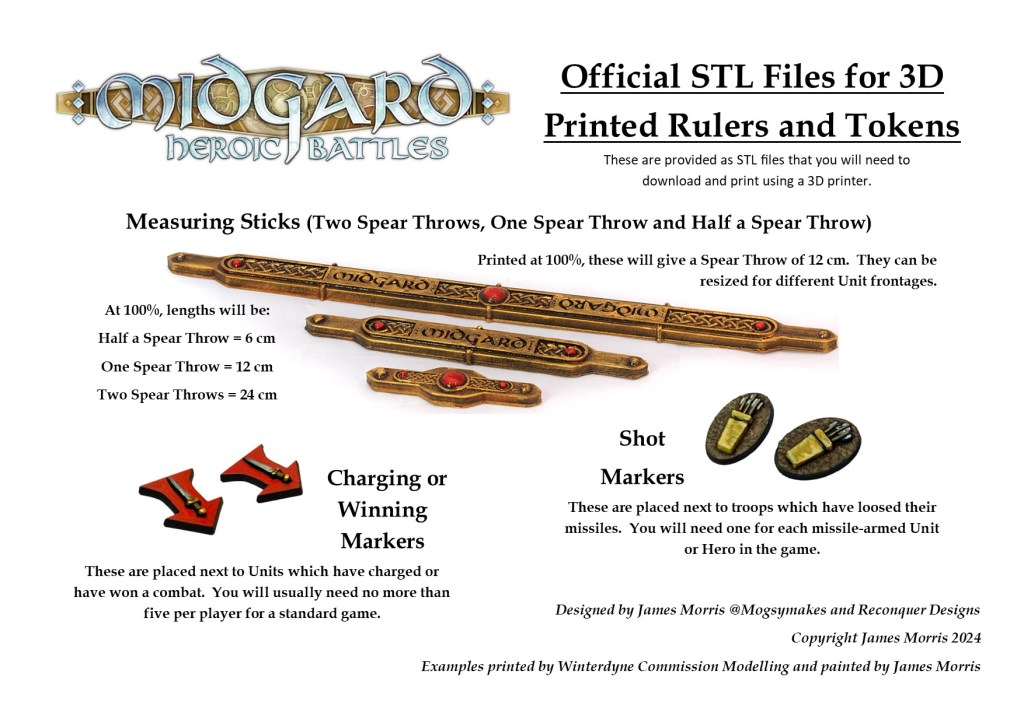
There are two official sets of Rulers & Tokens, detailed in the images below. First is a set of 3mm MDF measuring sticks and tokens which will be available from Reisswitz Press and are also included in bundles in the advance orders. These are only available in the one size (12 cm Spear Throw) as shown below. The outstanding art on these is by Handiwork Games, who also designed and illustrated the rulebook for that proper heroic battle feeling!
There are also STL files for 3D printing your own measuring sticks and tokens. These will be available from Reisswitz Press as STLs only from 18th November 2024. Being print files, they can be scaled up or down for different sized games. There will be an option to purchase the STLs for both personal and commercial use.
These were designed by me and then turned into STLs by the 3D wizard behind Reconquer Designs, whose superb miniatures also feature prominently in the rulebook!
Not only that, but the first official video has been released on the Too Fat Lardies YouTube channel. It’s already garnered 2.5k views in less than 24 hours, quite an achievement! Watch it here:
That’s all for now, but we’re expecting the next official video to drop tomorrow! All the best, James
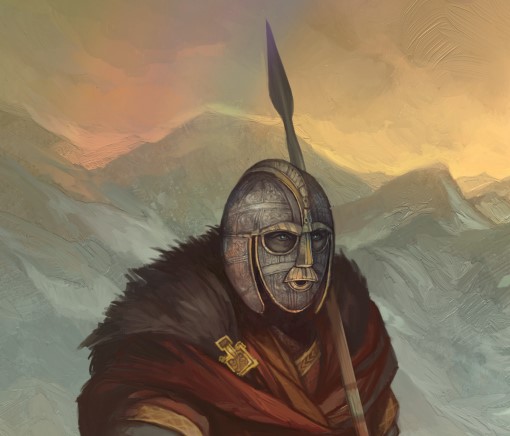
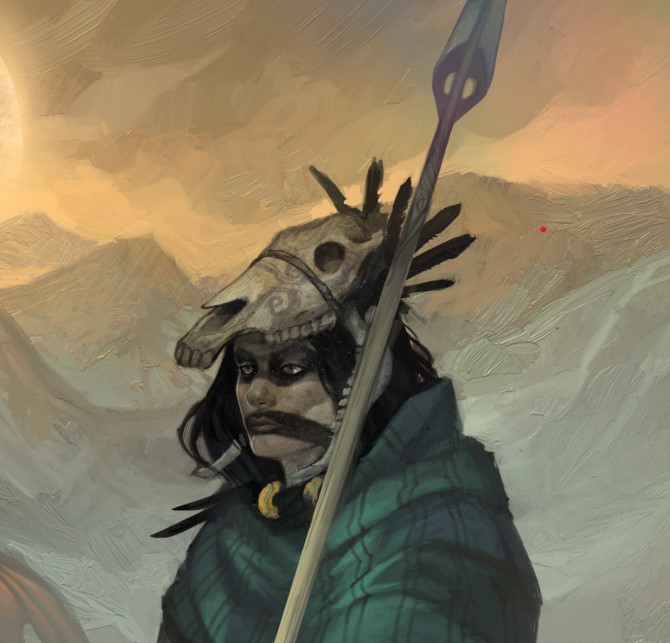
Just a short post today, but a momentous one: I’m delighted to be able to show you a low-res version of the cover art for Midgard Heroic Battles. We wanted something that encapsulated the ‘Historical, Legendary and Fantasy Battles’ referred to in the tagline, and Jon Hodgson of Handiwork Games has delivered that and more!
Art by Jon Hodgson of Handiwork Games, copyright Reisswitz Press 2024
On the cover, we see Raedwald, King of the East Angles in the first quarter of the 7th century, (representing the ‘Historical’ element) and Celtic Goddess Morrigan (pushing ‘Legend’ and ‘Fantasy’) – these two act as guides within the rulebook, offering advice to the would-be warrior and hero throughout its pages.
Art by Jon Hodgson of Handiwork Games, copyright Reisswitz Press 2024Art by Jon Hodgson of Handiwork Games, copyright Reisswitz Press 2024
Behind them, the ‘Battle’ element is fully in progress in a mountain valley, with warriors facing off, a challenge to single combat being issued, and some fearsome beasts pushing their way out of the tales of myth and legend onto the battlefield.
Art by Jon Hodgson of Handiwork Games, copyright Reisswitz Press 2024
Of course, in addition to Jon’s outstanding art, the whole thing is topped off by the awesome logo by Paul Bourne of Handiwork Games. Gentlemen, a heartfelt thank you to you both.
Logo by Paul Bourne of Handiwork Games, copyright Reisswitz Press 2024
Midgard Heroic Battles is due to be published by Reisswitz Press in November 2024, with pre-orders going live soon.
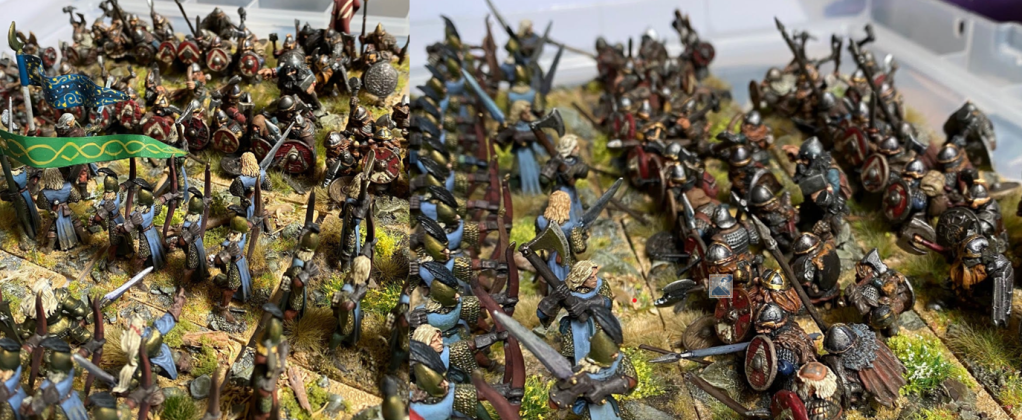
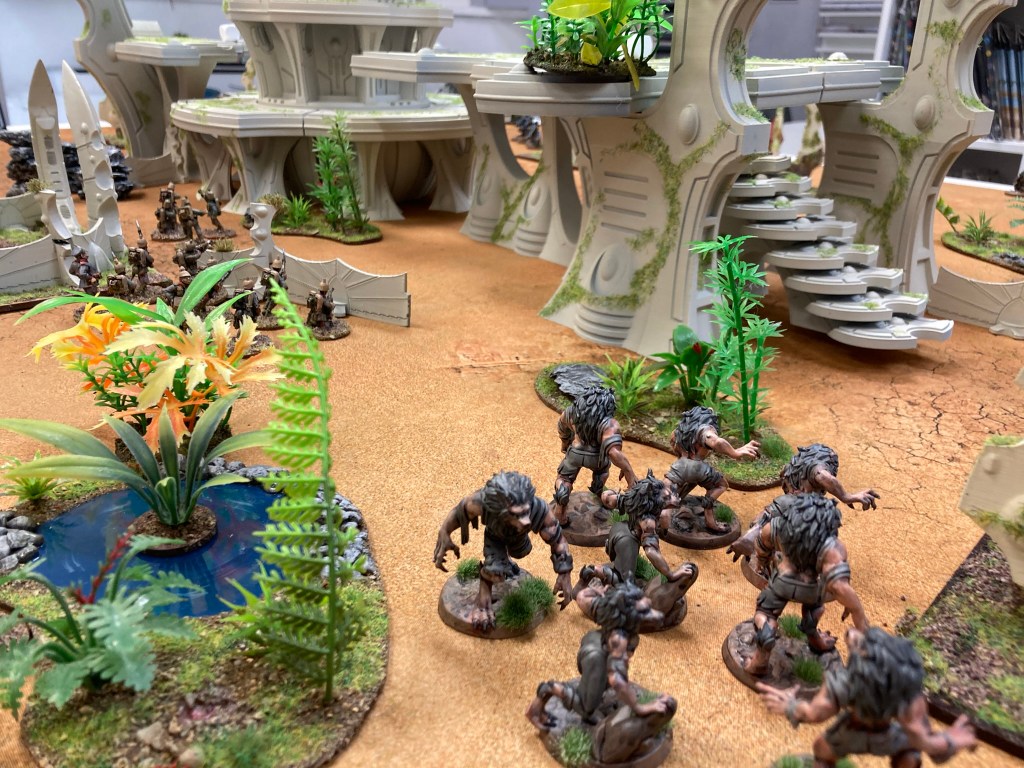
Somehow the second Partizan show of the year has snuck up on us, so it’s time to show what I’ve been quietly working away on over the last six weeks. This is the biggest game that I think Morris & Chums have ever put on, with around 1500 28mm miniatures on a 12′ x 8′ L-shaped table. It’s part wargame, part art project, and I hope you enjoy it!
Tolkien’s 1937 artwork for the Hobbit book jacket, which has influenced the colour scheme for our terrain
I reckon the project started when I was around 15, creating a large sculpture of the Battle of Five Armies at school, having been inspired by reading The Hobbit and playing Warhammer.
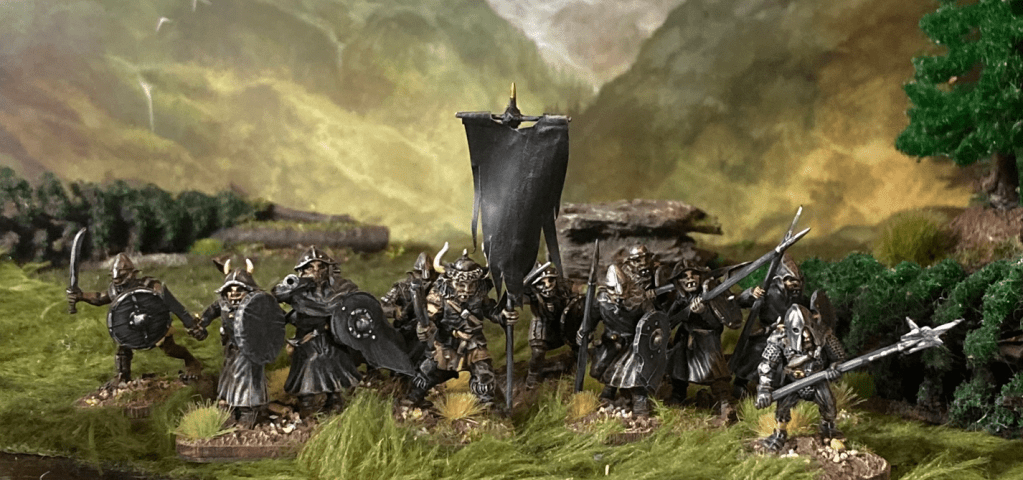
Lake Men from Simon Toey’c collection – all manner of 28mm conversions
Sadly this clay artefact has been lost to the mists of time, but the idea remained, and was poked back into life by two things: reading The Hobbit graphic novel to my son (a joy) and then watching the Peter Jackson Hobbit movies with him (some fun bits but largely a travesty of JRRT, especially the Battle of Five Armies).
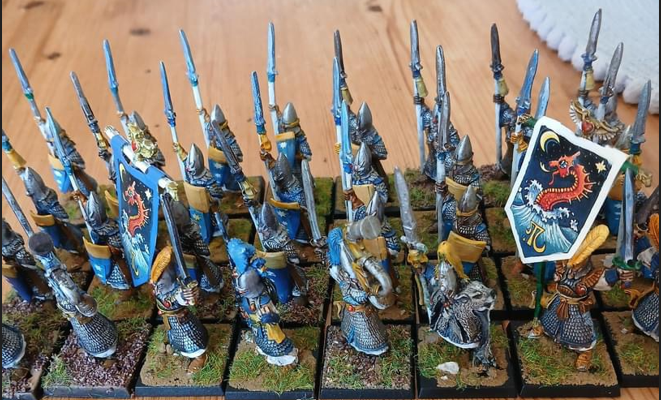
Just part of Paul Welsh’s rather superb collection of 1990s Elves who will be gracing the table at Partizan
While browsing pics of Historicon 2021, I also came across a lovely game of the Battle of Five Armies by David Kujit. What struck me about this was the painted backdrop, immediately setting the scene for the battle, which planted the seed for our game.
David Kujit’s game at Historicon 2021 that got me thinking. Fab terrain and backdrop!
The plan then went a step further as Middle-earth games became very popular within the Midgard Heroic Battles play test group and Dave Hunter – a bit of a Tolkien fan – joined and got involved with running games. We’re going to be playing the Midgard rules on a grand scale at the show, hopefully their final appearance before expected release by Reisswitz Press in November 2024.
Converted plastic 28mm Orcs by me in front of a Jon Hodgson Backdrop. There will be many hundreds of these making an appearance at The Other Partizan!
From there. it was perhaps a slippery slope. I can’t remember what finally pushed the button, but it may have been James Deering from the play test group suggesting he come up to Nottingham and we put on a big Middle-earth game. Anyway, one day I woke up, and told myself that’s what we were going to put on at Partizan in October. And here we are.
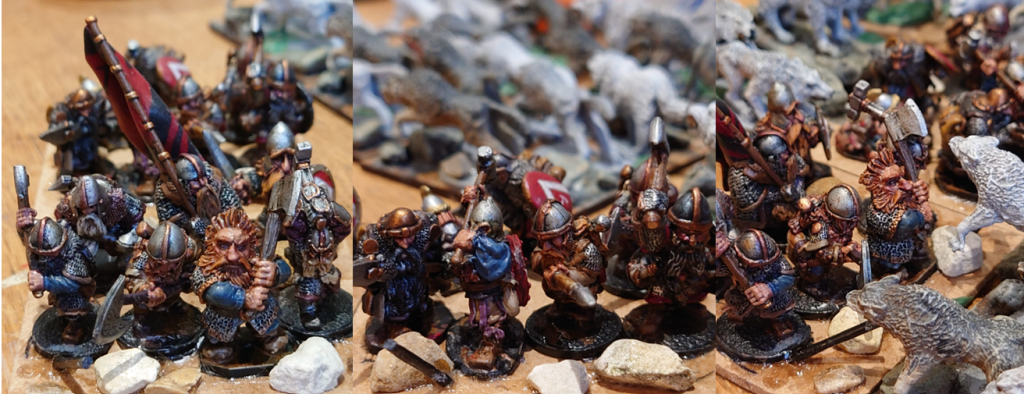
Top drawer WIP – Dwarves of the Iron Hills from Simon Toey’s workbench
I dropped a line to Simon Toey, well-known on the Facebook Wargaming in Middle-earth group for his cracking Tolkien miniature projects. I’m a huge fan of Simon’s style, where he combines classic metal and newer miniatures onto diorama-style bases with some conversion and stunning basing.
28mm Elves and Dwarves by Simon Toey from a variety of manufacturers
Not only did Simon agree to get involved, but he also added additional pieces to the collection to bring units up to size.
A tiny portion of Simon’s box of wolves and wargs!
Simon’s dedication is demonstrated by his new Beorn model; we had a brief discussion about the original Reaper mini being a little small for the scale of battle that we had planned.
A few minutes later, he’d ordered up a new model and then set to work swapping heads and sculpting new fur as soon as it arrived. Following a quick suggesting from me about basing, and he was hard at work putting together Beorn’s goblin victims…
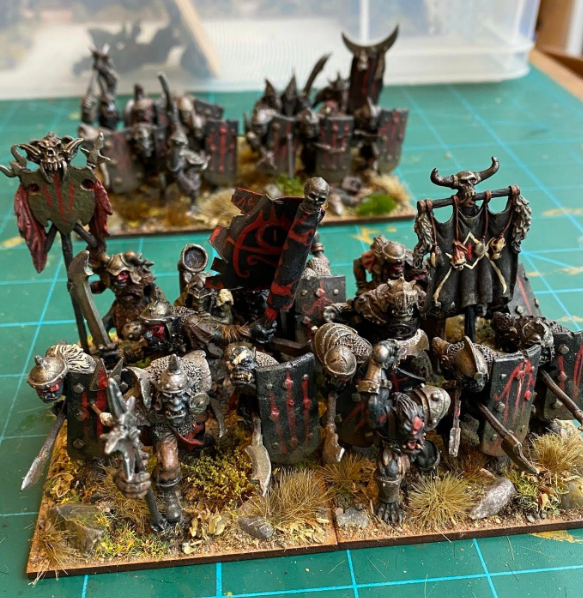
Other members of the group have also chipped in and we hope to have a veritable host of Goblins, Wolves, Dwarves, Elves and Lake Men to show you at the weekend!
An honourable mention needs to go to Sam Lancashire, who is pitching in with the hobbit himself, Mr Bilbo Baggins (wearing his magic ring, of course).
Dave Hunter and I sketched out the plan for the table with help from the Facebook group; I had an idea for an L-shaped table, leaving out the ruins of Dale but keeping in both spurs of the Lonely Mountain involved in the battle. With Dave’s expert Tolkien knowledge, we put together a possible battlefield that would also meet our gaming requirements and I built a maquette to test it out.
The initial maquette – you”ll have to wait to see the real thing!
After several design changes, I got to work creating the battlefield. This is all work in progress at the moment – I’ll do a full photo game report once Partizan is over.
Colour schemes and designs were heavily influenced by Tolkien’s artwork for the book, as this was very much the inspiration for the game.
Anyway, I need to head off and finish the layout, so hope to see some of you at The Other Partizan on October 13th!
This was an excellent question that I was asked last week on the Lead Adventure Forum (a very civilised corner of the internet, if you still do forums), so I thought I’d tackle it in this week’s Midgard article. While it’s not difficult to adapt historical rules sets for fantasy, and vice versa, I always saw Midgard operating on a spectrum of historical – legendary – fantasy, so felt it’d be useful to explain this a bit further. You can read the latest article here: https://mogsymakes.net/fantastical-elements-in-midgard-heroic-battles/
As you can see, all these articles pertaining to Midgard Heroic Battles are being stored up on one page to make them easy to share.
Cheers!
28mm Draugr from Ragnarok Miniatures, background by Jon Hodgson Backdrops, painting and photo by James Morris
Hi all! I’ve spent part of this week remodelling the Midgard Heroic Battles page on the site and have included a number of links to help out with FAQs, including: What is Midgard Heroic Battles? and a list of Key Facts and Game Synopsis, all illustrated with photos from this summer’s games. Hopefully this will answer a fair few questions and help to define what Midgard is actually about.
In addition, I’ve been getting the official Facebook page ready – watch out for another post on Friday 20th Sept to launch this with a link. And expect a daft membership question! (creative answers welcomed) 🙂
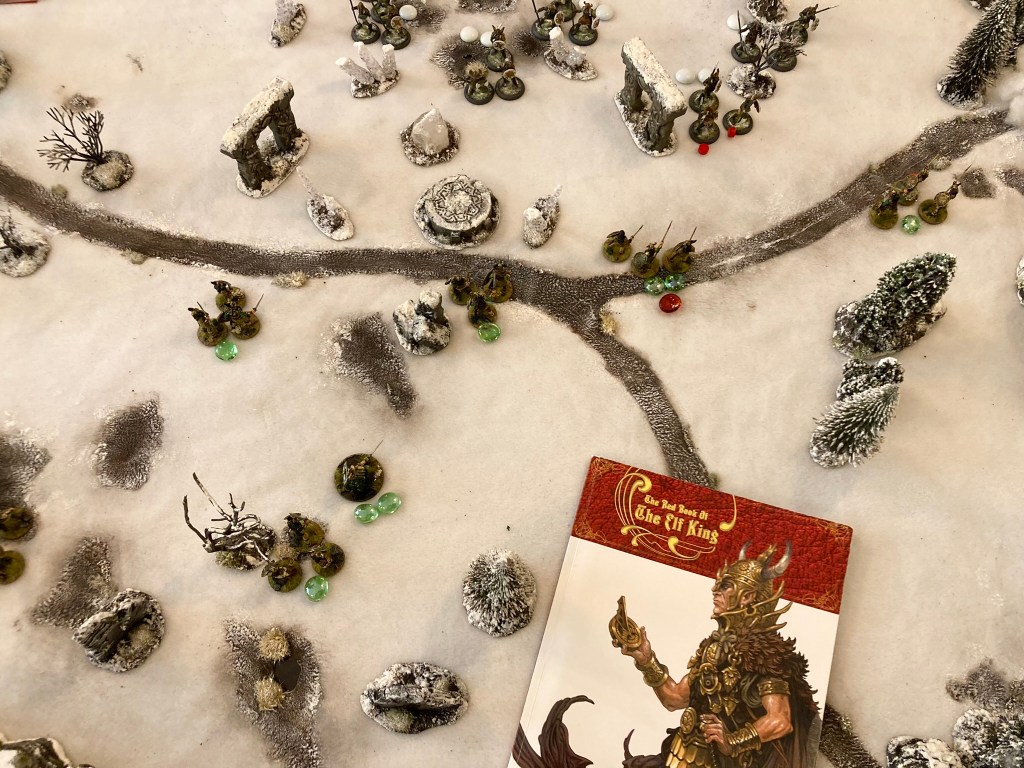
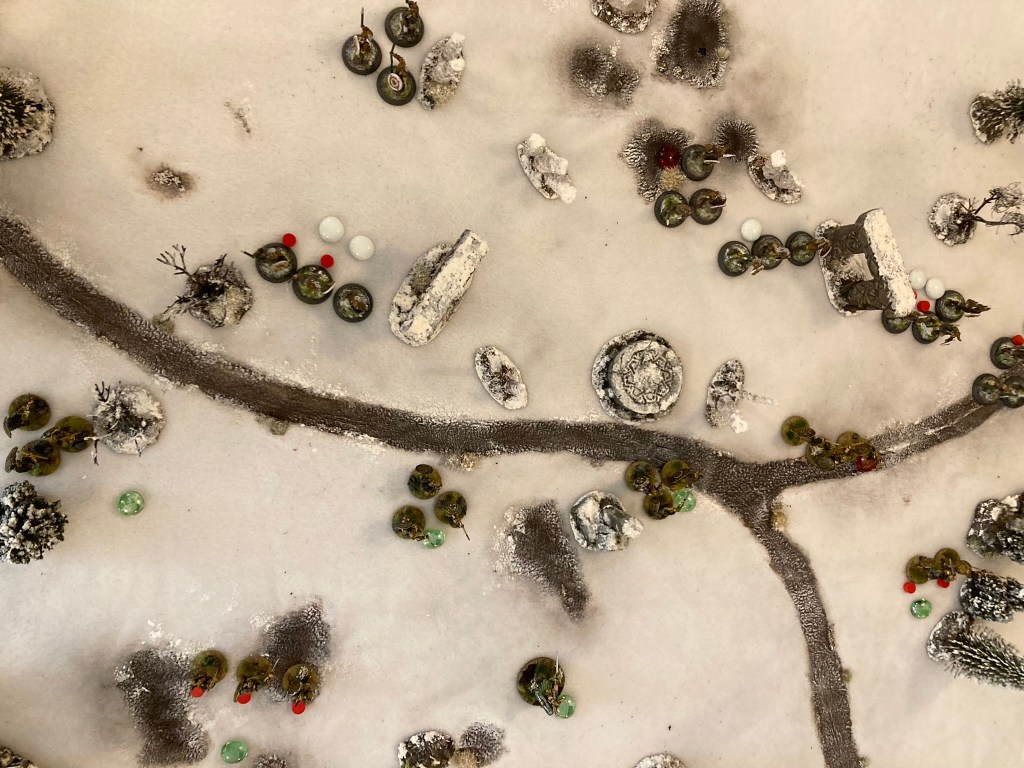
Red Book of the Elf King in play. The green and white glass beads are activation counters, with the red ones being penalty counters. The little red markers are wound markers, as each model in Red Book can take 2 or more wounds. All minis in this report are from Lucid Eye; the terrain mat and much of the scenery was made by myself, apart from some model railway trees and some of the fab Viking runestones from Fenris Games
Looking for a break from Midgard and Xenos Rampant, Paul W and I decided to pull out Red Book of the Elf King for a fun Thursday night game, and it didn’t disappoint. This is a brilliant little set of rules by Rick Priestley, written back in 2017 to support Lucid Eye‘s figure range of the same name. Unfortunately, it has become one of those many games that has drifted off over the years – Lucid Eye are now selling an Elf King roleplaying game (which I haven’t looked at since it uses AI art, and I’m more of a wargamer than a roleplayer) but I don’t know what’s become of the miniatures game.
Anyway, Paul and I have all the minis, original rules and cards for the Red Book of the Elf King skirmish game, so it was no bother to pull them out to play a game. In my head it had only been about a year since we played, but upon checking my photo roll, it turned out to be two and a half years: tempus fugit!
Fortunately, it’s such a straightforward game that neither of us had forgotten how to play and there was only a tiny amount of rulebook-flipping.
The Star Fall scenario from the original rule book is always enjoyable so we plumped for that one. A chunk of star iron – which of course has great mystical properties – had fallen from the skies, so our two Elf circles (groups of 18 warrior companions plus a Thane, a magic-using leader) were squaring off to try and retrieve it.
Red Book of the Elf King uses a very cunning variant of the draw bag activation system where each side gets 1D6 counters, then a neutral 1D6 is rolled and added to both sides’ counters, meaning that you can expect 2-12 counters in the bag to activate 7 units over each turn of the game. If you have more than 7 counters, units can be activated more than once as long as every unit has had at least one token. Also, there are a number of glamours (spells) that can increase (and sometimes decrease) the number of counters in the bag, so what you get is an unpredictable and entertaining game.
Circle reference sheet and glamour cards
You can choose various leaders and warbands for the game (one of the great features is that the Elf companions can serve as any one of the factions with simply a change of Thane); Paul choose Salian Trollblood (a Sting lookalike who terrifies all those around him) and I picked Alloysian of Vasterlant, who has the ability to redraw activation counters out of the bag thanks to some mystical sight. We’ve found that the ‘full fat’ Alloysian as written in the rules is a little over-powered, with unlimited counter redraws, so we agreed to reduce it to D3 per turn.
Alloysian of Vasterlant looking suitably mystical
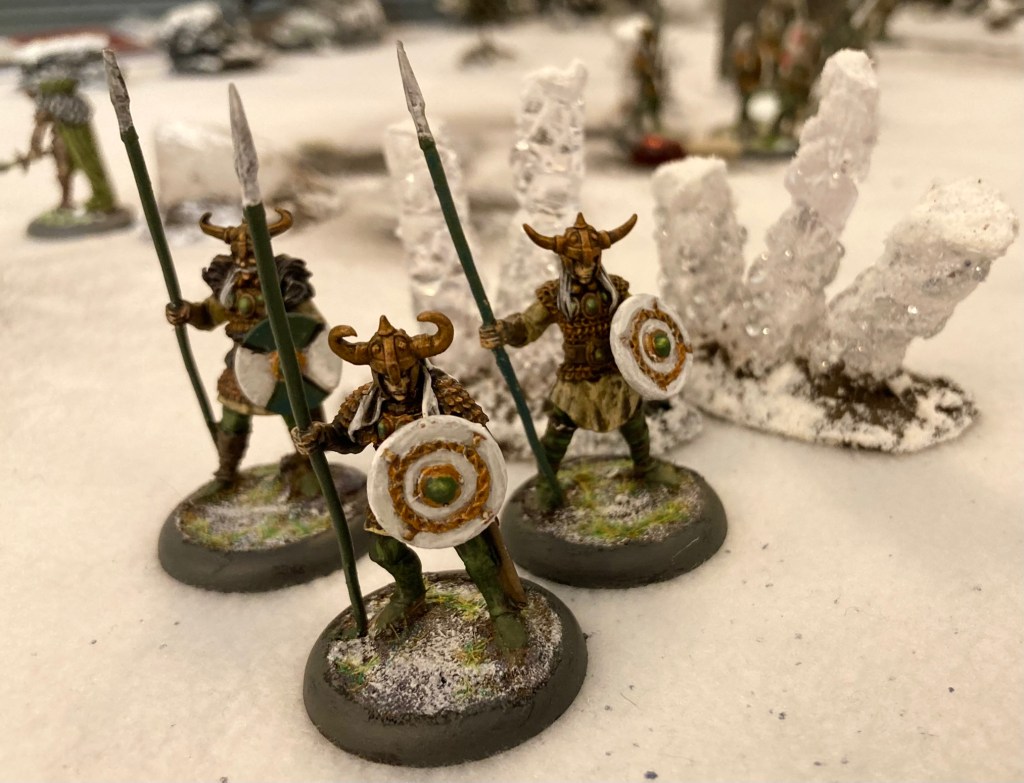
The game kicked off in earnest with the star iron deployed in the centre of the 4 x 4′ playing area, conveniently in the midst of a stone circle. Deployment was fairly even to start with, with both sides sending forth groups of companions (they always operate in units of three) to probe the area.
Spells are very important at this stage – each Thane starts with seven randomly-determined glamours. Clever use of these can give a serious tactical advantage, though a test has to be passed to cast them, which neither of us were doing very well at! I did manage to cast a glamour that allowed me to reroll any dice later on in the game which was a useful investment for the future.
Salian Trollblood’s companions made the best progress and got to the stone circle first, though I had some success in damaging them with rhud magick, a psychic ranged attack that can be made by all the Elves.
Each circle of companions has slightly different stats and skills – my special ability was Favour of the Hollow Fae, which allows them to add an extra dice to any ranged attack, so I was trying to get the most out of this. Being hit by rhud magick also forces a courage test which, if failed, results in a red penalty counter on a unit that inhibits its activations.
Having remembered that only the Thane has the power to carry the star iron, Paul sent Salian Trollblood up to the centre of the circle and started to drag it off towards his board edge.
Salian Trollblood attempts to do a runner with the star iron
However, he’d forgotten that carrying the star iron incurs an immediate penalty counter. Following a poor activation counter roll, this held him up just long enough for me to pull off a dastardly deed. In my deck of seven spells, I had found the ‘Dead Sun’ glamour.
The spells in Red Book can be pretty powerful – it’s a very sorcerous background, with a serious whiff of Moorcock and plane-warping, so it’s not a game to play if you don’t like anything more than the odd fireball in your fantasy games. The correct use of a glamour at the right time can be a game-winner, so I hoped this was going to be the case here.
The game before I cast Dark Sun – Salian’s companions (black edged bases) have a distinct positional advantage ahead of Alloysian’s warriors (green/brown bases). Salian is just out of shot at the top of the picture hauling the star iron back to his twisted towerDead Sun: if you can read this text without your glasses and roll 3 or less on a D10, your opponent is going nowhere fast!
‘Dead Sun’ is a tricky one to cast (needing to roll a 3 or less on a D10, though I had a Glamour modifier of +2 which meant that a 5 or less would do it). However, if successful, it would prevent Salian Trollblood and his companions from making any moves or ranged attacks for the rest of the turn, which was exactly what I needed to catch up on the opposition.
I fluffed one casting roll but managed it the second time with the benefit of my reroll that I had tucked away at the start of the game and presto! Salian’s circle spent the rest of the turn frozen while I rushed forward my Elves to surround him.
The companions of Alloysian (green/brown bases) rush through the Dark Sun to corner Salian
This swung the balance of the game; although Salian laid low a couple of my Elves, I had managed to wound him and keep his followers out of the fight. He dropped the star iron and had to concentrate on defending himself.
It was now the final turn of the game and Salian looked likely to win by virtue of more wounds and kills inflicted, but with a final rush Alloysian was able to overwhelm him and win the game.
Salian is down! Victory to Alloysian
Hoping not to wait two-and-a-half years before the next one! I have a yen to get my Trolls out and try out some of the different scenarios.
An out-take of one of many photos for Midgard Heroic Battles by Pete Jenkins. Miniatures by Gripping Beast photographed in front of a Jon Hodgson Backdrop.
After many months of waiting, we’re delighted to be able to announce that Midgard Heroic Battles should be released in November 2024. Following several years of writing and play testing, we can’t wait to get it out to you. Midgard Heroic Battles will be an all-in-one volume containing the rules (including flying creatures and sorcery), five scenarios, 12 sample Force lists and an appendix to allow you to create your own Heroes and Units.
Layout and art are currently being completed by the hugely talented Jon Hodgson (Beowulf Age of Heroes, The One Ring, Warhammer Ancient Battles, Dragon Warriors, Jon Hodgson Backdrops and many more) of Handiwork Games. We are absolutely delighted to have Jon’s input on this project which has raised the presentation of Midgard Heroic Battles to another level and can’t wait to show it off nearer the time of release. Stunning miniature photography by Pete Jenkins also accompanies Jon’s artwork.
Midgard Heroic Battles will be published by Reisswitz Press, who will be running pre-orders from their website in the run-up to release. A dedicated Facebook group to support the game, administered by members of the playtest team, will be launched on Friday September 20th 2024.
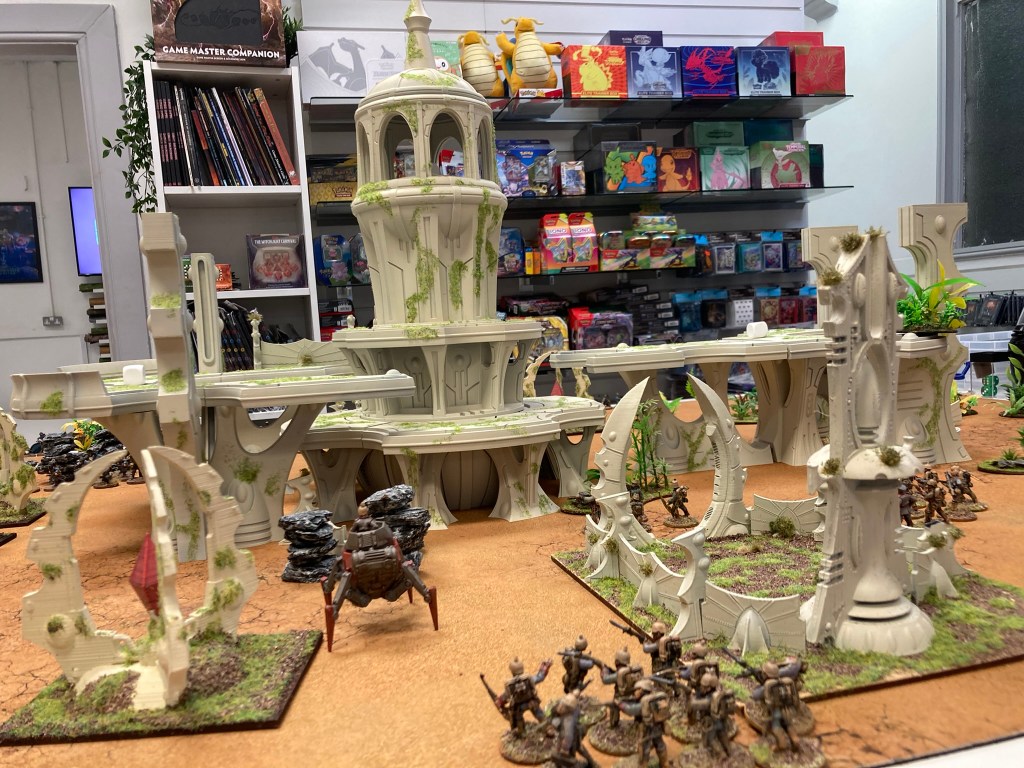
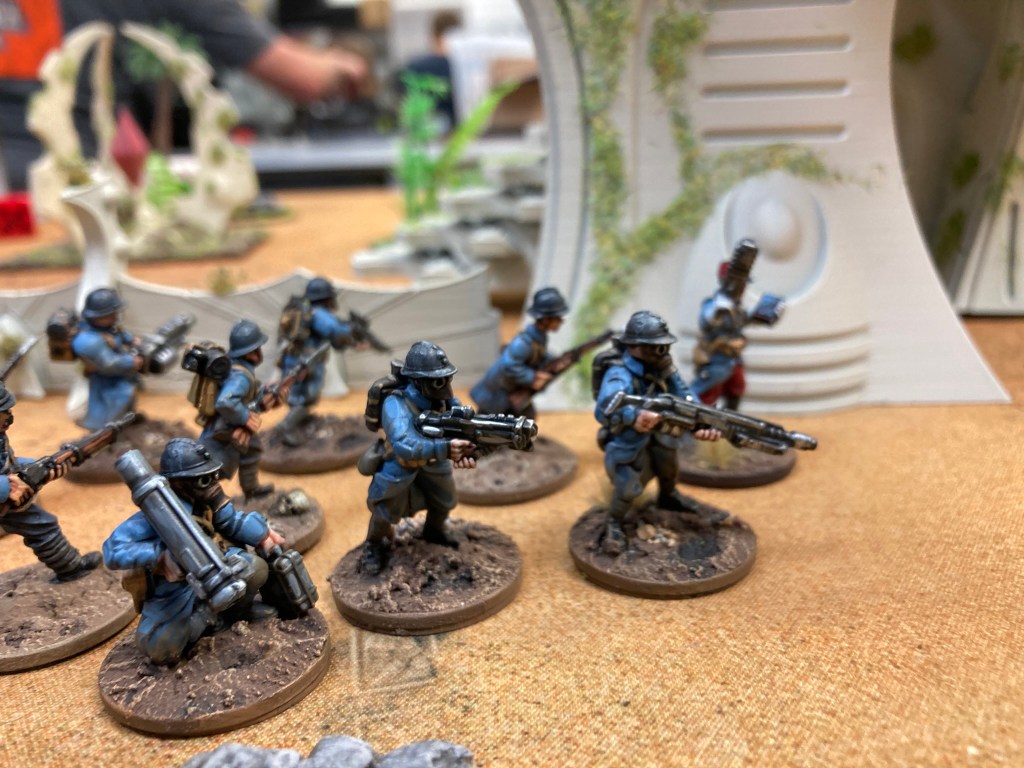
With our usual club having a week off, I decided to book in a game of Xenos Rampant with Paul W. Having only recently heard about 7th City Collectables, a local gaming store just a few miles away from me on the outskirts of Nottingham, I booked a table and pulled the poilus out of the loft.
7th City Collectables is a lovely venue, really well-lit and clean. For once, I didn’t have to adjust the light and colour balance on my pics! It was pretty busy when we arrived just after 7 as the previous Pokemon games were finishing but quietened down as the evening went on. I got a free drink with my table booking, which was a nice touch, and we got the toys out.
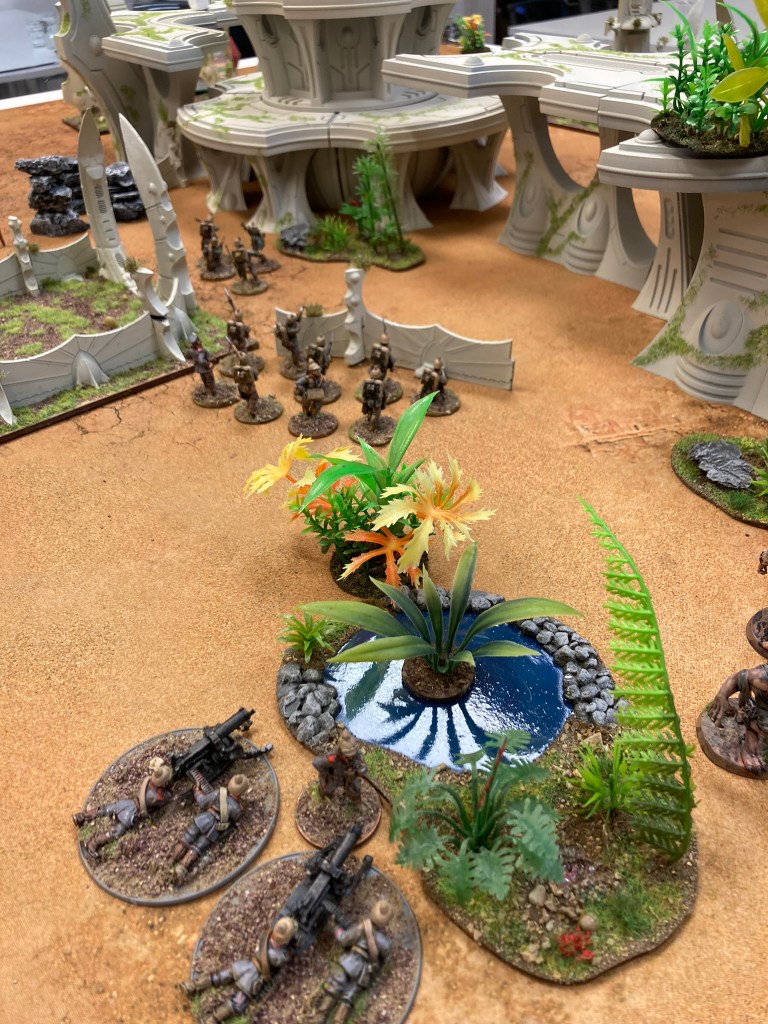
Paul has recently acquired a 3D printed Eldar-style landing port and was keen to get it out, so this became the main setting for the game. It’s not small! Back in the early days of 40K/ Rogue Trader, this kind of scenery was only available as bespoke handmade pieces and rarely seen outside of the pages of White Dwarf, so it was quite an experience to get to play on something of this size. (I think it made it all worthwhile for Paul lugging his two massive Really Useful Boxes into the venue!)
It also proved to be excellent for blocking line of sight and providing cover during the game, something that is very much recommended in XR due to the long ranges and power of weapons.
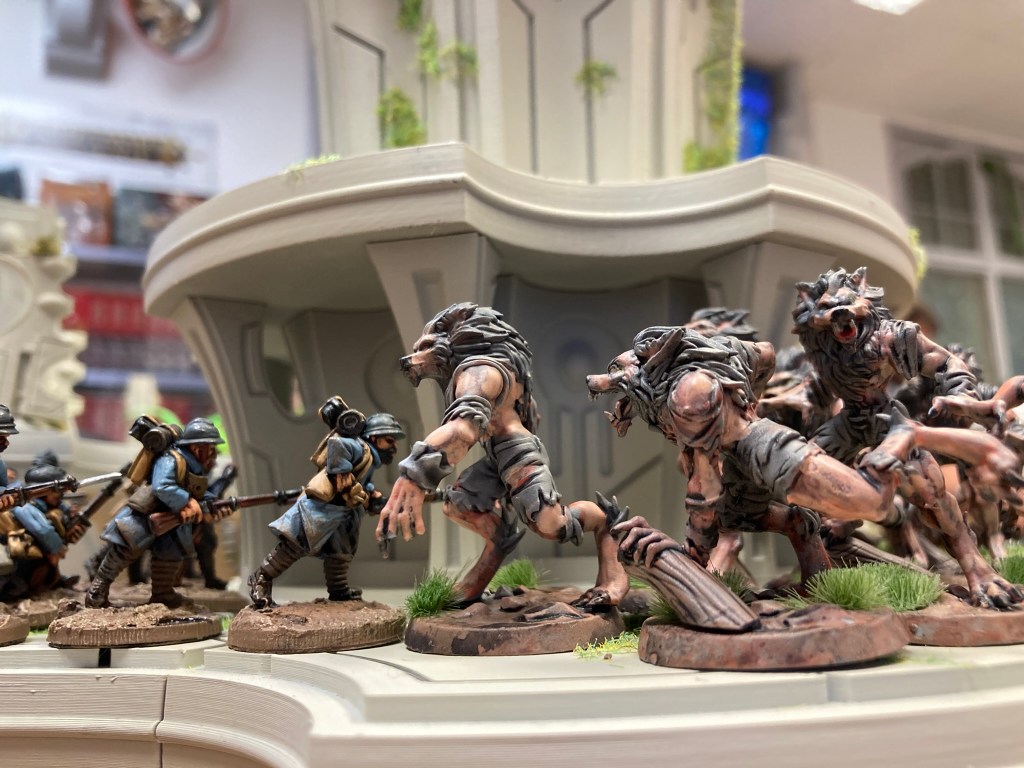
Forces used were our Weird World War One French and Germans. Both of these have their basis in historical minis that we collected with a number of more sci-fi units added. Paul’s Germans have rocketeers, a spider-like walker and (my nemesis) a horde of werewolves, my French have a mechanoid and their secret weapon, a huge hook-clawed xenomorph goaded into battle by some halberdiers and a baguette handler, naturally. (You can see how I made this force here).
As I had a diplomat mini in my box, I suggested that we play the VIP Extraction scenario from the XR rulebook. This VIP had got himself stranded on the docking platform and was waiting to be picked up by either side for the win.
This turned into rather a one-sided affair as my support weapons struggled against Paul’s superior types. I’d not noted the ‘engulfing’ special rule before that removes all cover bonuses for a mere +1 point, so my tactic of deploying my supporting weapons in cover was useless. Coupled with ‘armour piercing’ that reduces Armour by 1, and my futuristic Maginot Line crumbled in a matter of minutes.
I’d rushed forward some bold poilu light infantry to meet the VIP…they met the werewolves on the stairs…it didn’t end well! The werewolves did get to meet the hook beast and his baguettes a few minutes later, but by that point the VIP had fled.
Added to that, Paul’s rocketeers (moving 12″) had already zipped up to the platform and made their exit with the VIP. Game over!
Rocketeers: “You vill come vith us.”
This all felt a bit rushed so we re-set and played a different scenario with three different objectives to take and hold on the spaceport terrain. Following Paul’s sage advice, I changed my support weapons around to include ‘engulfing’ and ‘armour piercing’ so we had better parity in forces, and off we went.
I took less photos of this one but it was a much more evenly-matched game, and frankly I probably remembered how to play after a few months off XR!
My support weapons held the left flank while I carefully advanced the infantry forwards to the right, making best use of the cover. Some fortunate shooting pinned down one of Paul’s heavy infantry units on my right, making the advance easier.
The werewolves had deployed opposite the support weapons and mech on my left flank, which meant that they spent a large part of the game with their heads down waiting to rush the stairs.
Meanwhile, my infantry had made it to the central tower and were climbing up to the upper level of the spaceport. The first unit of poilus got shot off the building and fled, but I followed up by sending in the baguette handler and his ferocious beast, which quickly cleared the tower.
Although my support weapons were now taking casualties and the mech had suffered a terminal systems failure (rolling a double when at half strength is never good as a mechanoid in XR!), the infantry were in control of the main building and spread out to take two of the objectives. The Germans’ attempt to pin them with suppressing fire was ineffective, although the bloodied werewolves had finally pulled themselves together and taken the third objective.
With the turn limit reached, we diced for the value of our objectives, giving a deserved 6-5 win to the French.
Overall, a super evening’s gaming. XR continues to deliver a fast-paced game that you can play with any minis you like and doesn’t require too much rulebook-searching. The first game was a bit abrupt but once I had brought my force more in line with Paul’s for the second scenario, we had a very even and enjoyable scrap.
7th City Collectables is also a lovely venue and I will be certain to return!
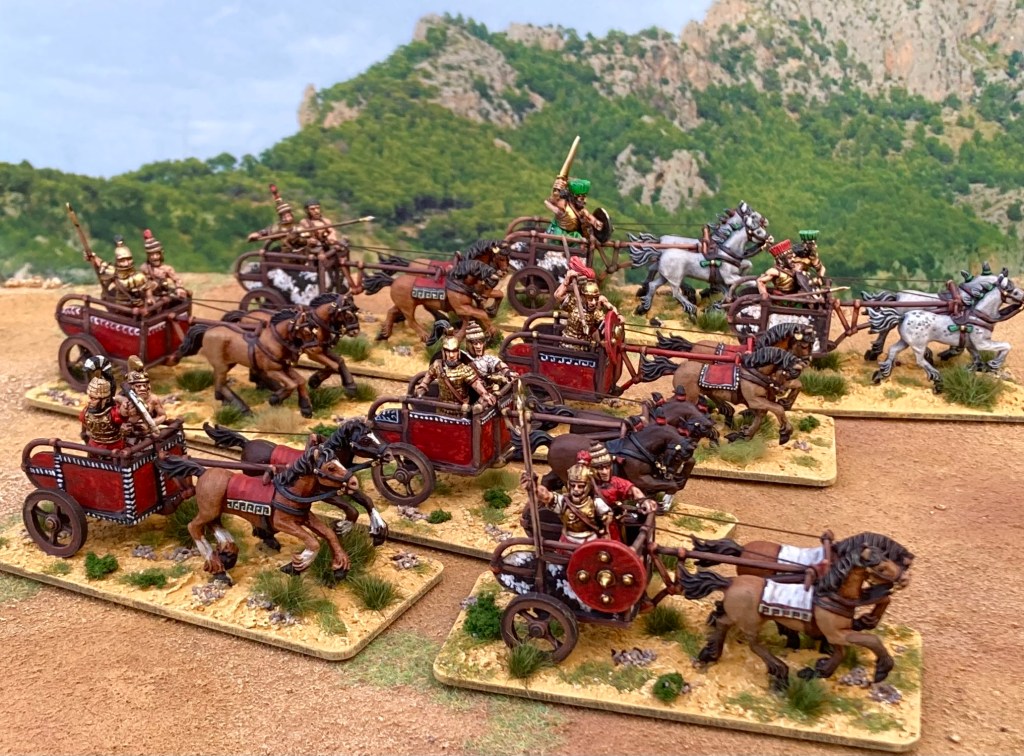
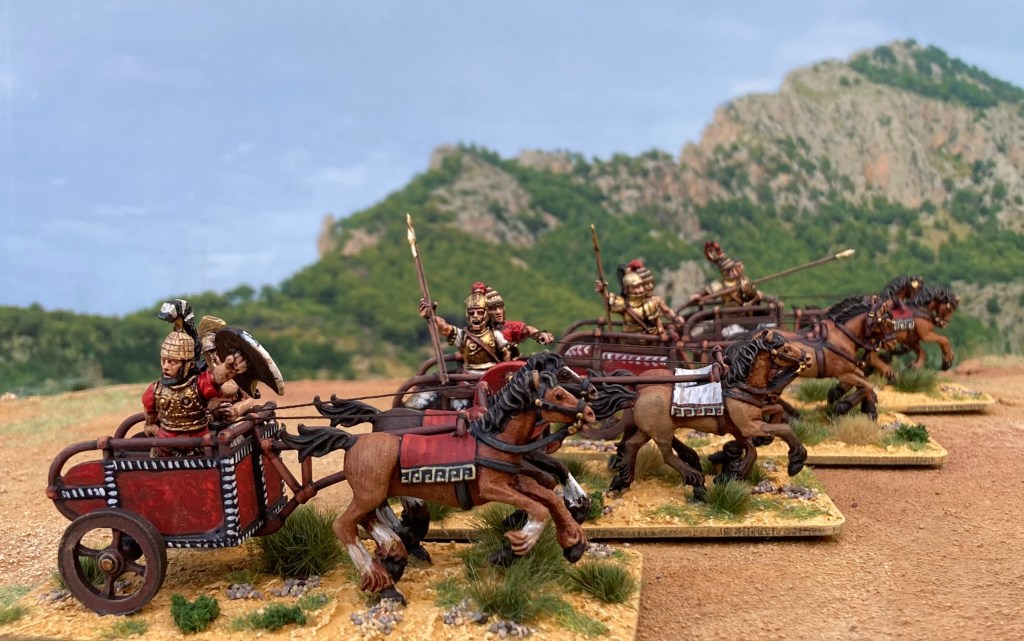
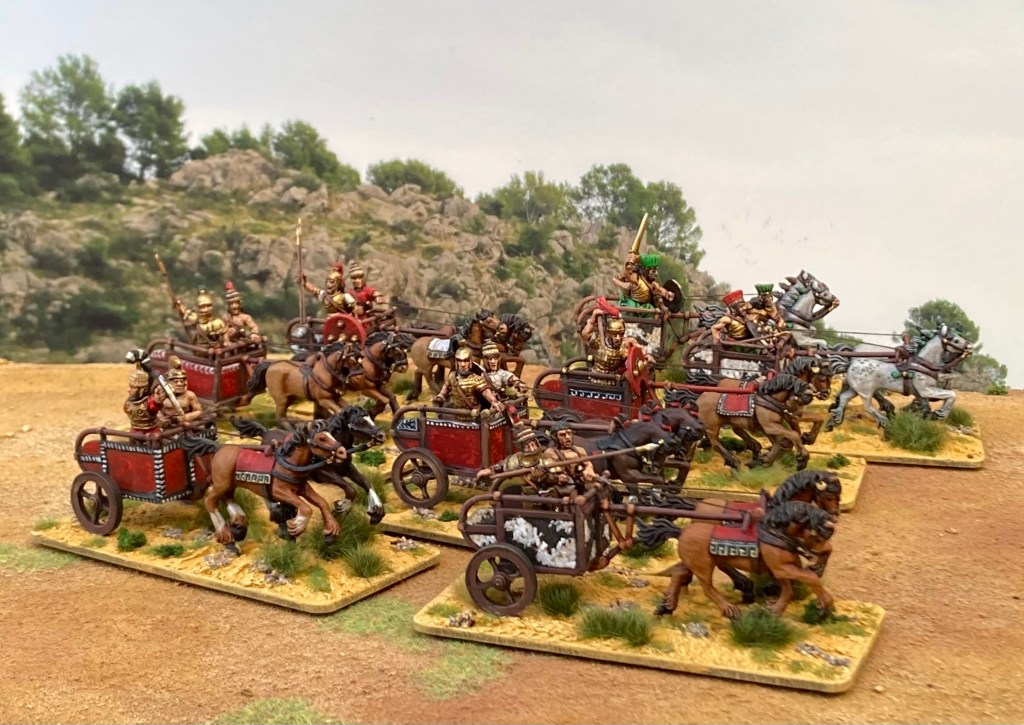
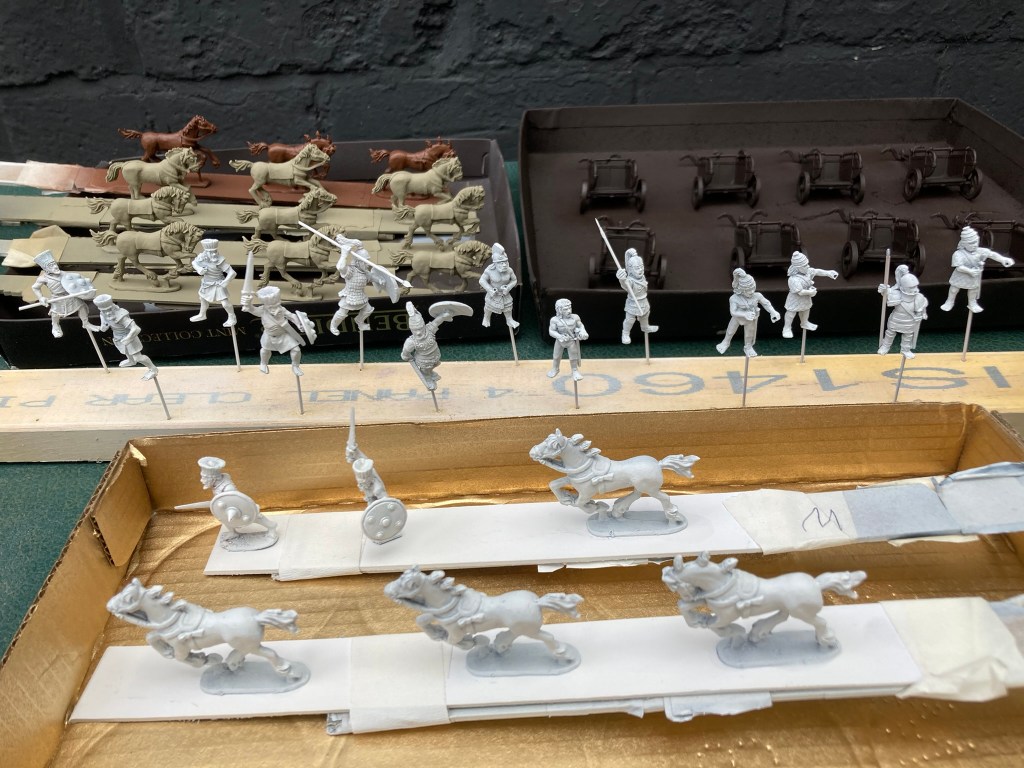
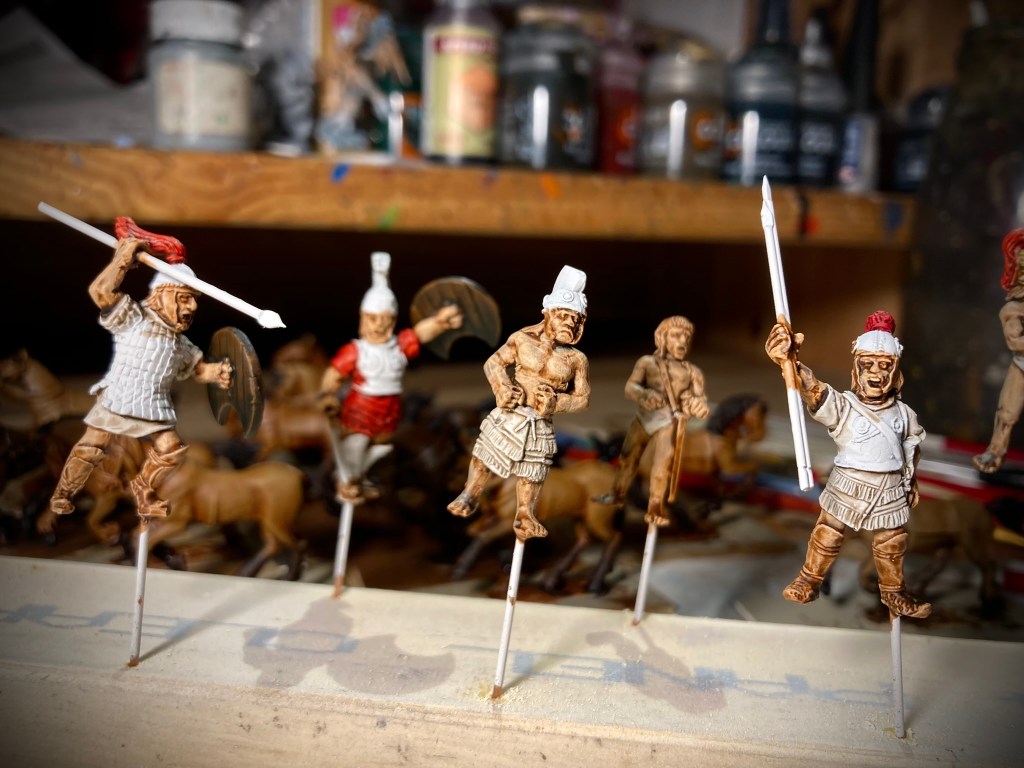
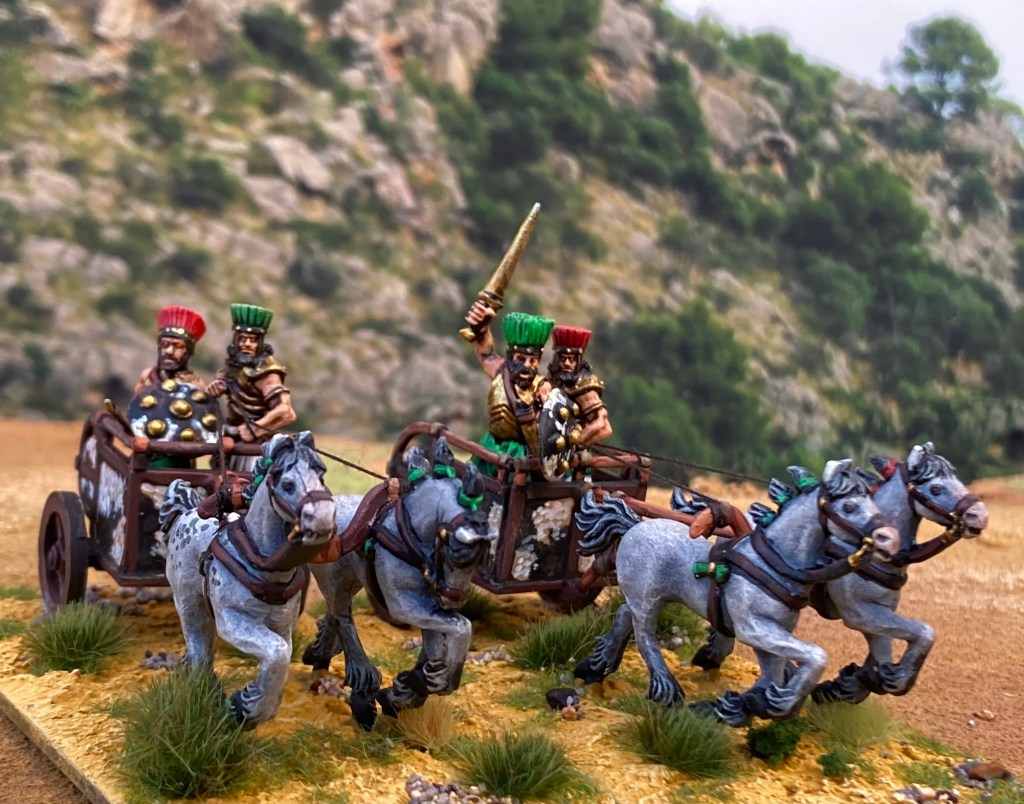
Having started on a bit of a whim, the 28mm Trojan Wars project is finally about to make its first public appearance at the Lard Workshop as part of Britcon 2024 in Nottingham this weekend. What started as an impulse buy of a few Lucid Eye miniatures then turned into the acquisition of a full Amazon force, which of course needed some opposition. Over the last year, I have bought and been donated various secondhand miniatures that I have used to put together some Achaeans to take on the Amazons outside the walls of Troy.
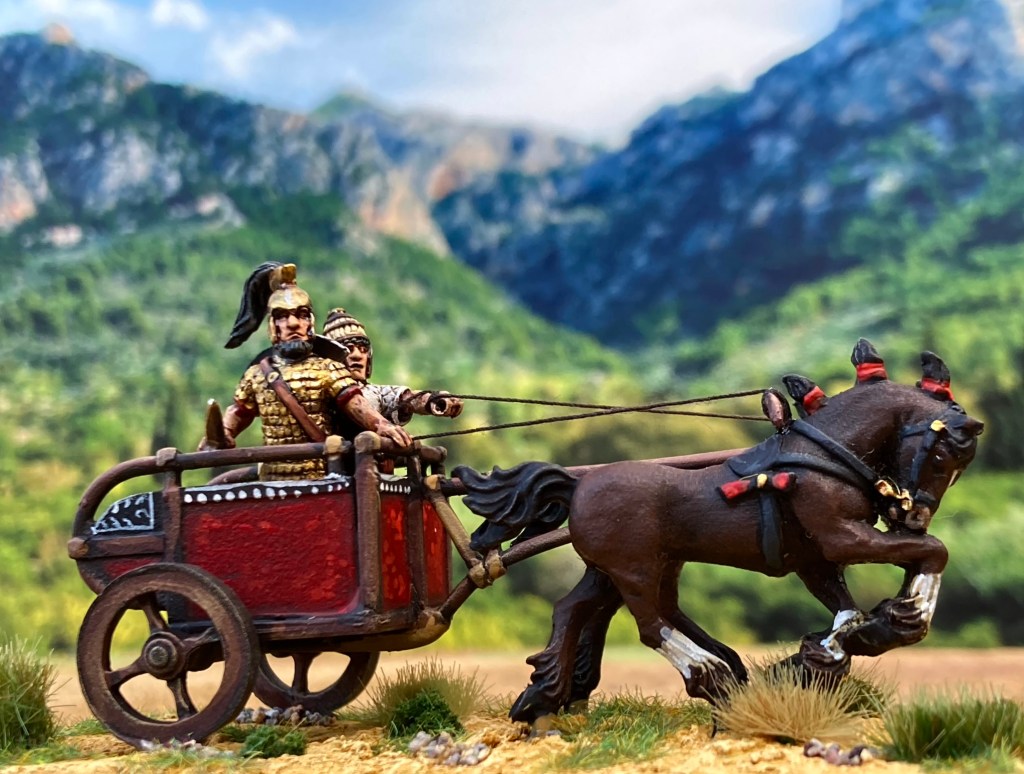
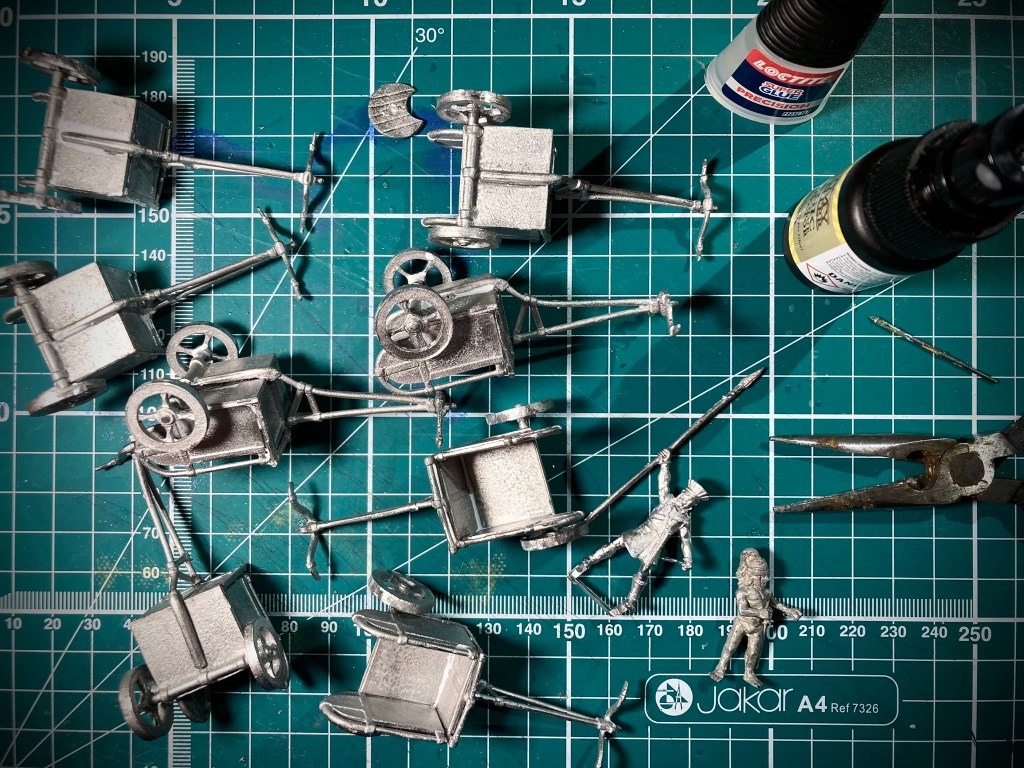
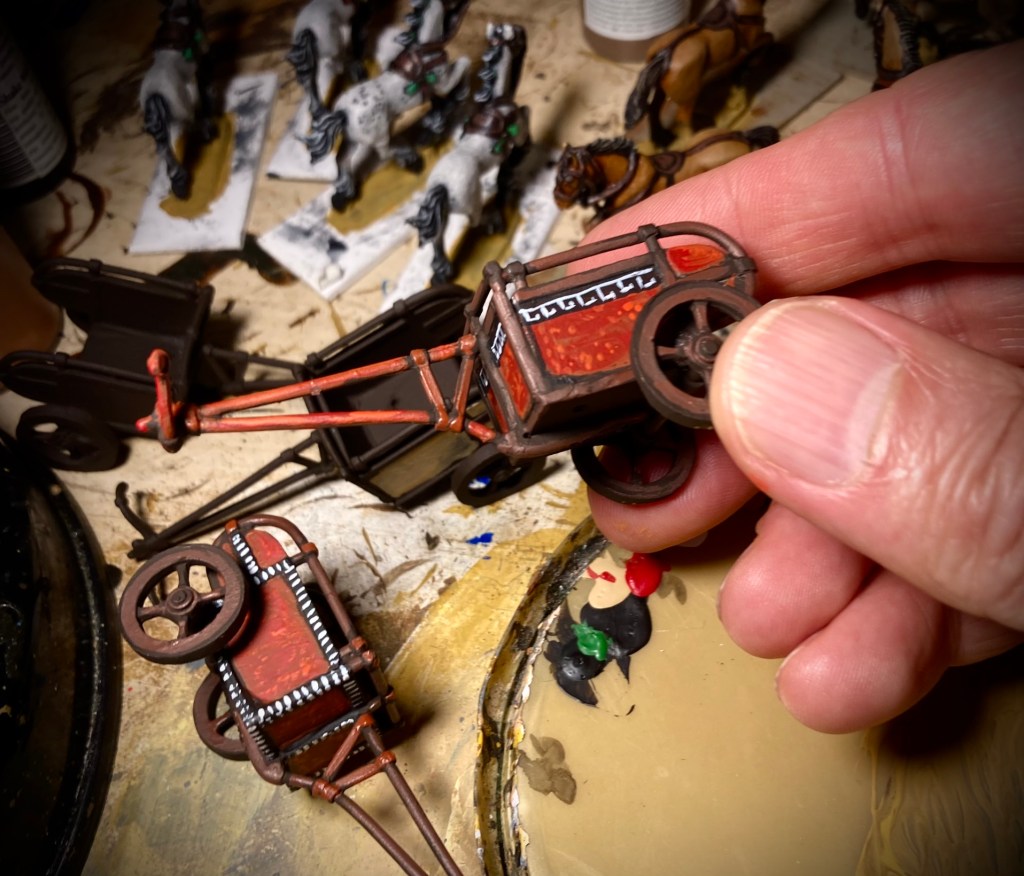
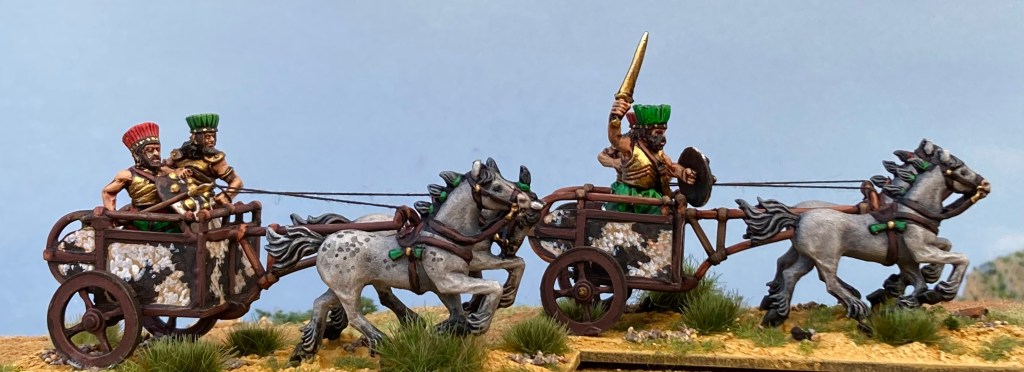
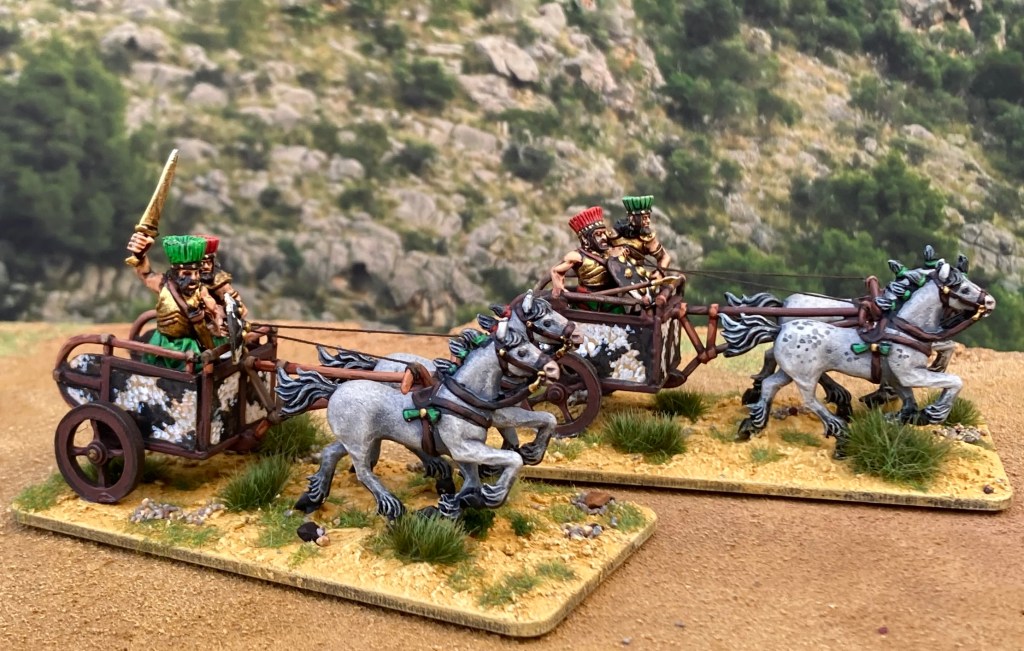
After completing a number of units of spearmen and Achilles’ Myrmidons, I needed some chariot-riding nobles to back them up. The disadvantage of having acquired various secondhand lots was compatibility of the models, and while I will usually happily mix and match between ranges, the Lucid Eye chariots are of far more heroic dimensions than the Foundry ones.
Foundry crew in a Lucid Eye chariot
Given that I had eight LE chariots and four Foundry ones, I decided to get all my Achaeans into Lucid Eye chariots. This meant putting Foundry minis in as crew which has worked a treat. I liked some of the Foundry heroes on foot, so some of those ended up drilled and pinned in as chariot-riding warriors as well.
Putting together metal chariots is always a faff, but much easier if you have the right kit. (Had I started this project today, I’d probably have gone straight for the newly-released Wargames Atlantic plastic chariots, but that’s one for a future article).
Fortunately, with eight models on the go, I could run an assembly line, cleaning and filing each piece as needed. Superglue accelerator was an absolute must!
Each crewman had a hole drilled into their foot and then a long piece of metal rod (cut offs from North Star spears) inserted, which served the dual purpose of a painting mount and a pin into the finished chariot. A couple of unfortunate crew members did suffer some ankle damage during this process, but fortunately many sins are hidden by standing inside a chariot cab!
I also took the time to drill out the drivers’ hands to hold reins; this is entirely optional, but I think that it improves the look of the finished model enough to be worth the effort.
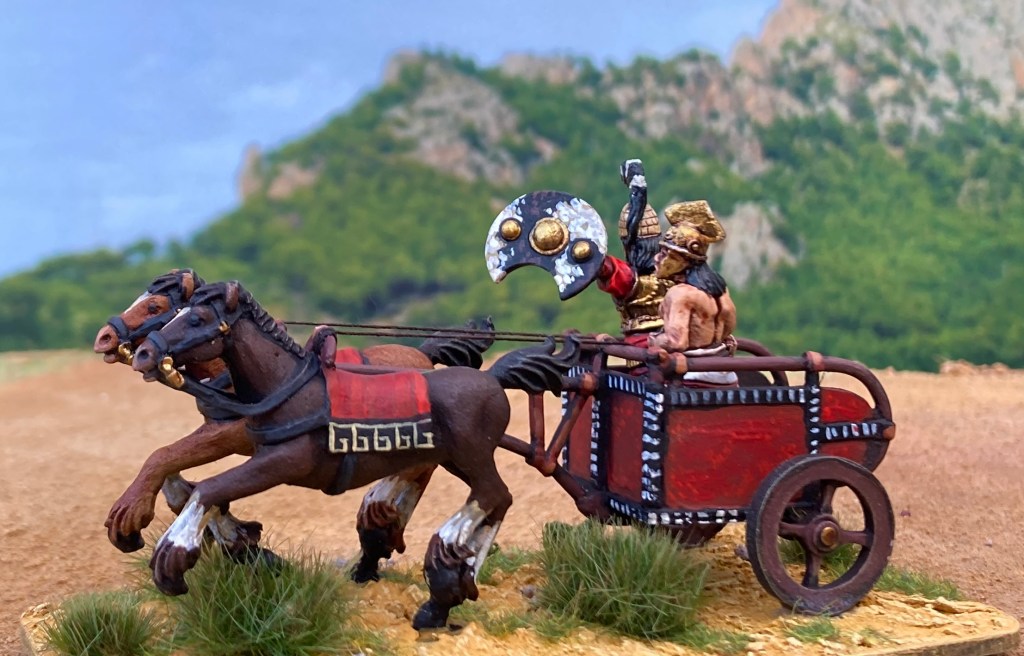
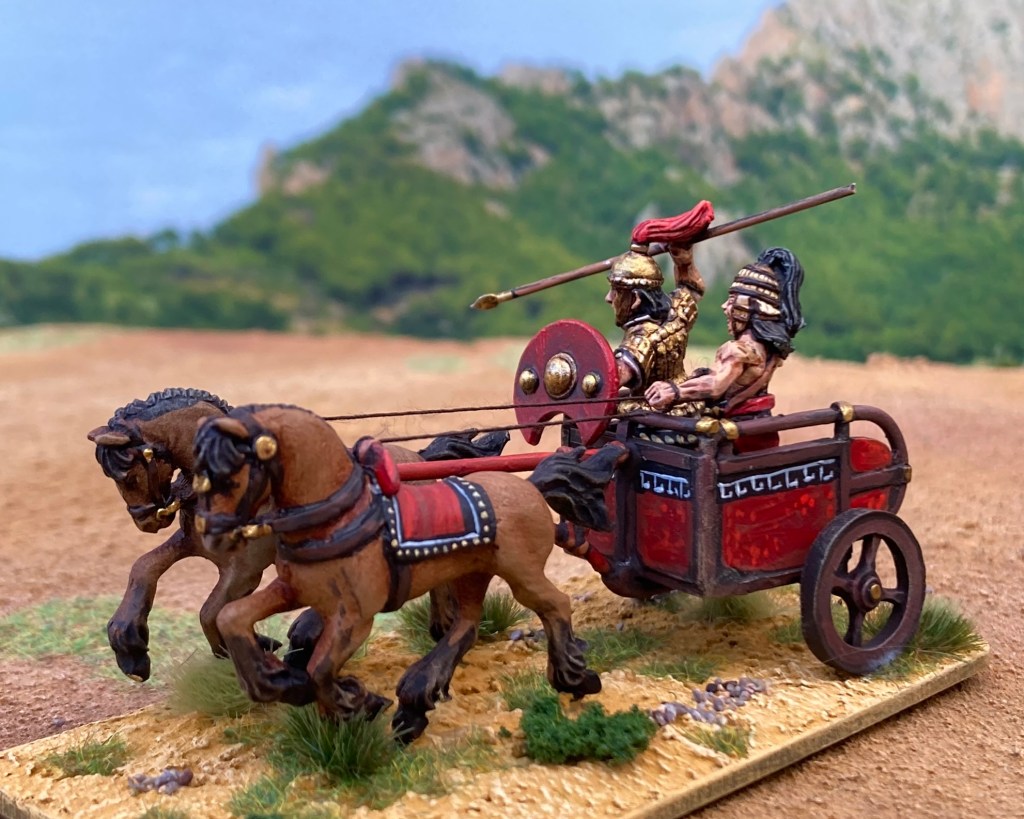
Chariots were sprayed with Halfords Camo Paint dark brown, then highlighted with various acrylics. Red was the theme for my Achaean army, so I tried to add a red element into all of the models, which I embellished with patterns painted in black and white.
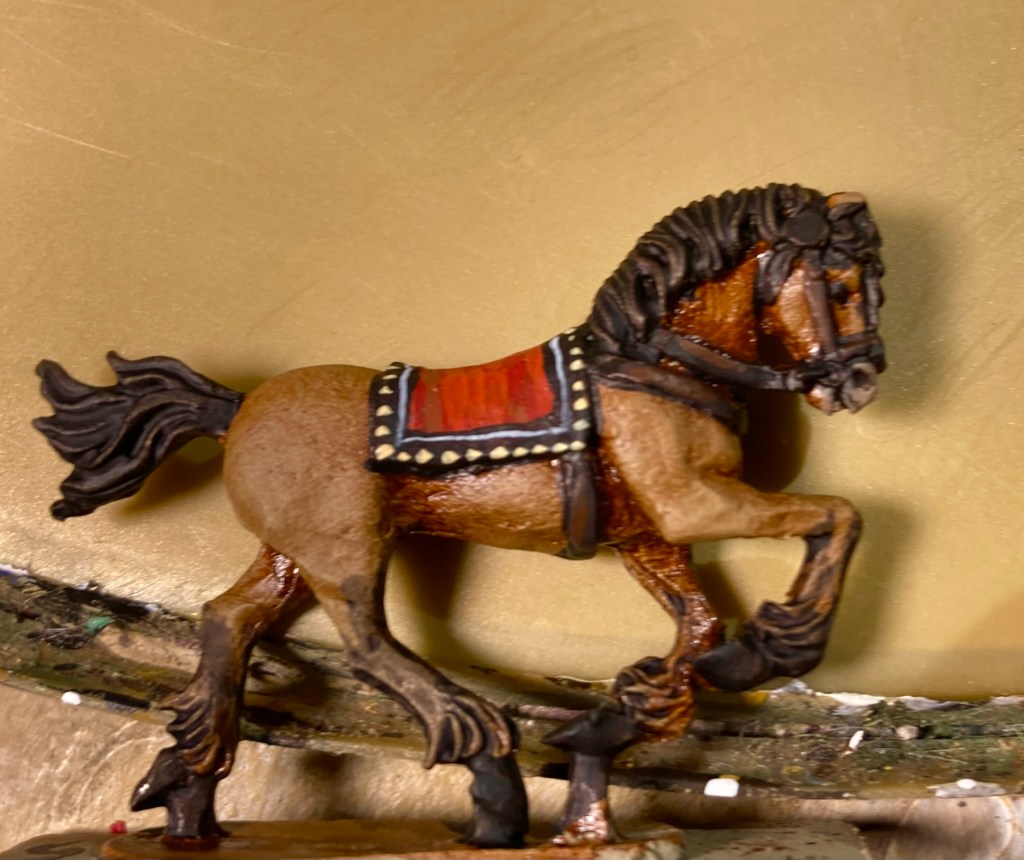
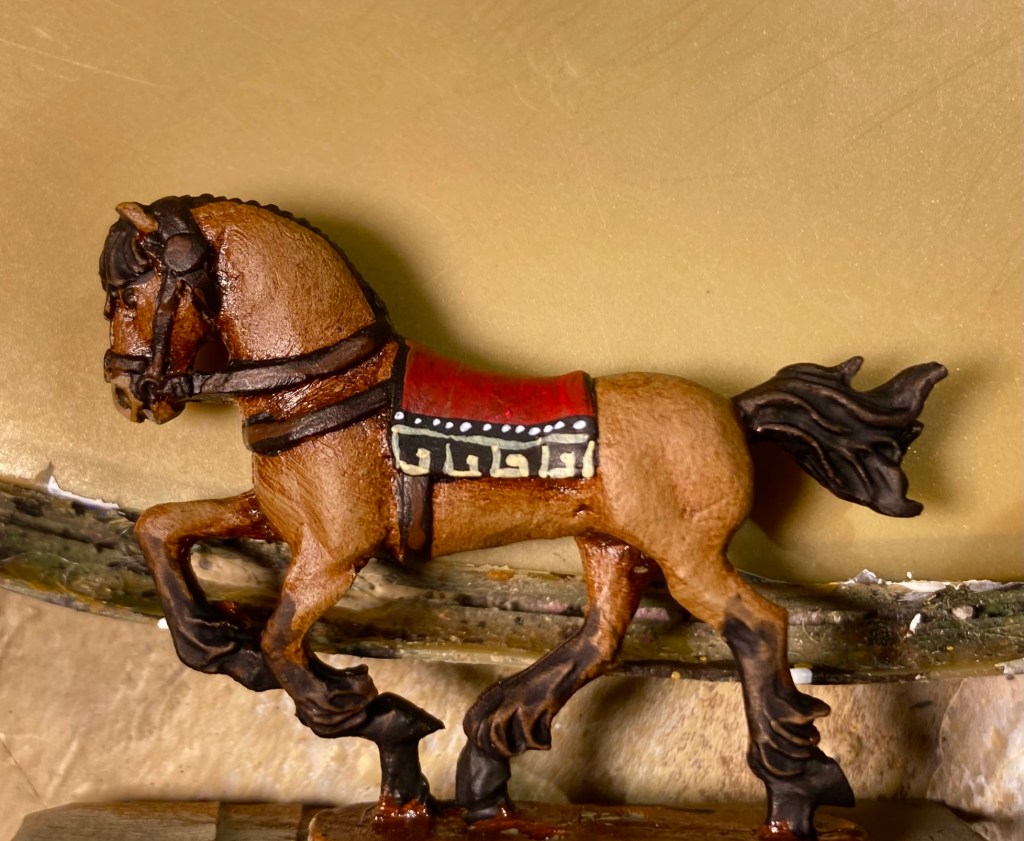
Horses also featured in the colour scheme, with co-ordinated blankets. The horses used were a mixture of Lucid Eye and Foundry from the bits box, undercoated with sprays and then painted using an oil wipe-off technique (you can see a better breakdown of this with my Amazon chariots here).
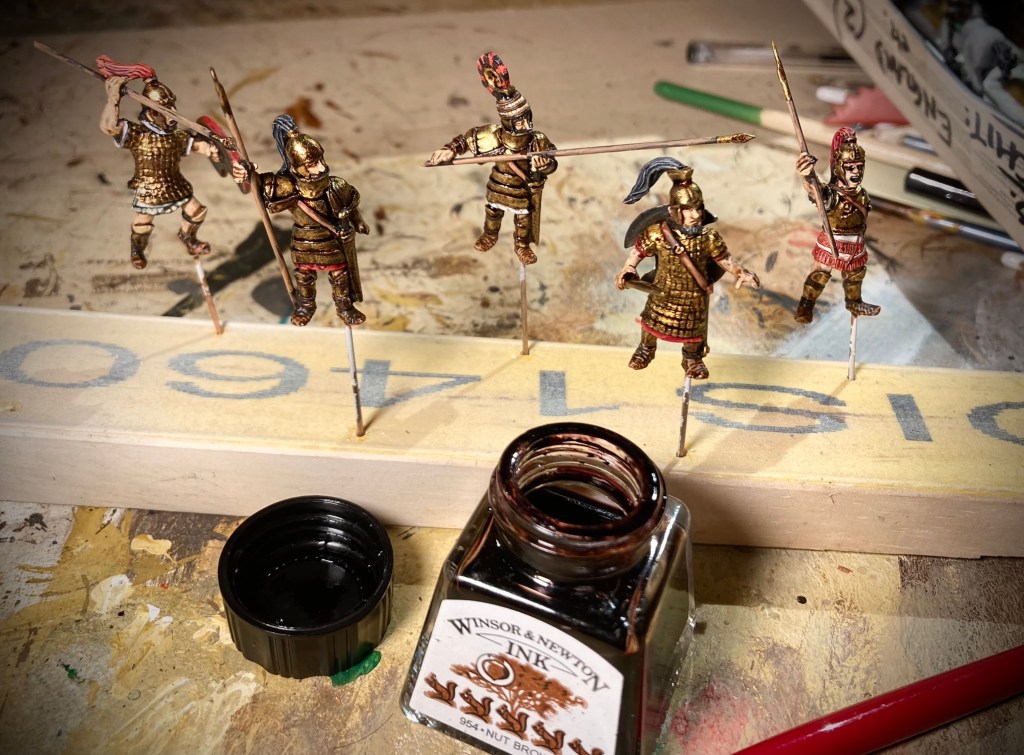
Crew were undercoated white and then painted with my usual mix of GW Contrasts and regular acrylics. I usually varnish before applying metallics, which I’ve found is especially important with shiny bronze-armoured warriors. The armour had a base coat of dark brown (GW Contrast Cygor Brown is great for this) and a coat of matt varnish. This was followed by a base coat of Vallejo Brass, a wash of Winsor & Newton Nut Brown ink and a final highlight of Vallejo Gold (with a very top highlight of Army Painter Silver in a few cases).
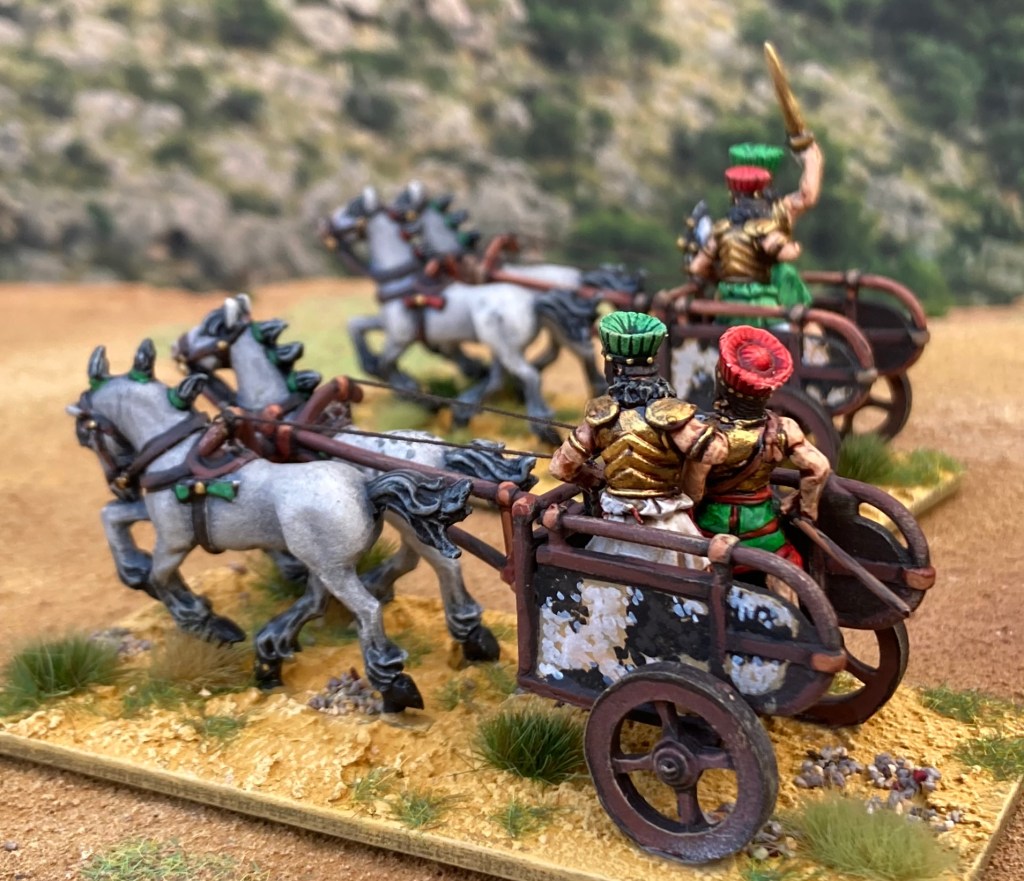
The six Achaean chariots are also accompanied by a couple of Sea Peoples ones – the same Lucid Eye models but with a different paint job. Possibly as the result of having drawn Portugal in the house sweepstake for Euro 2024, I’ve gone with a red and green combo for the Sea Peoples. I have dozens more of these miniatures in the lead pile so will be going for more.
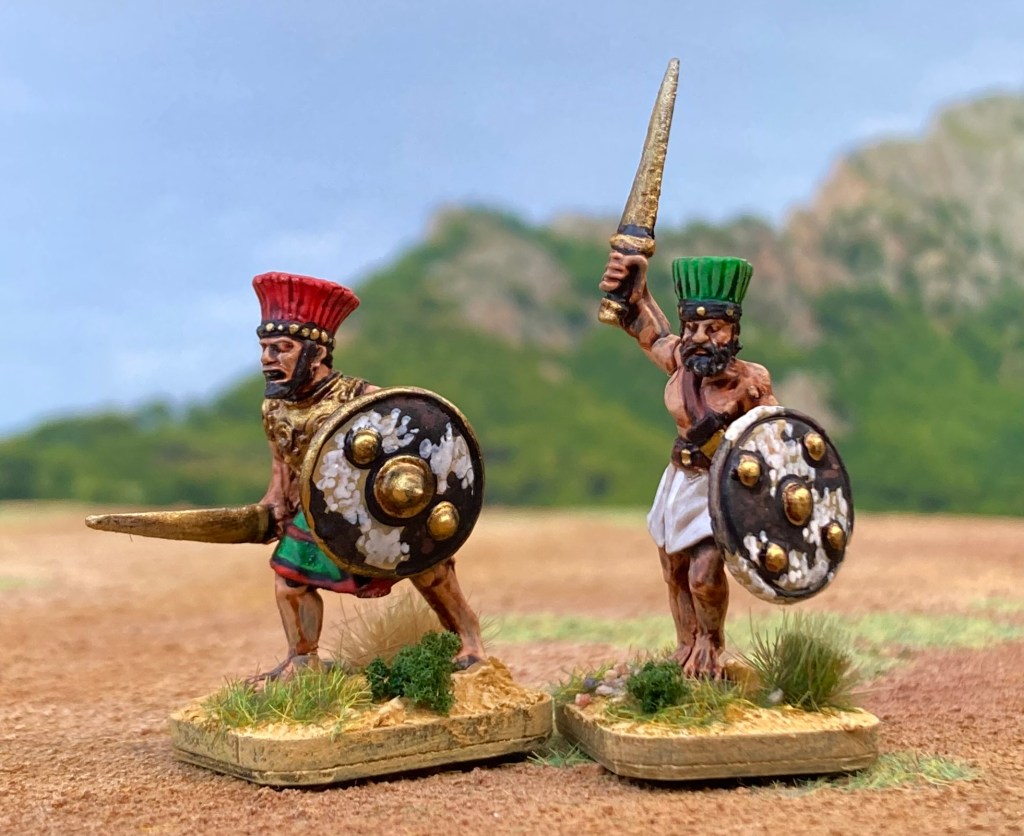
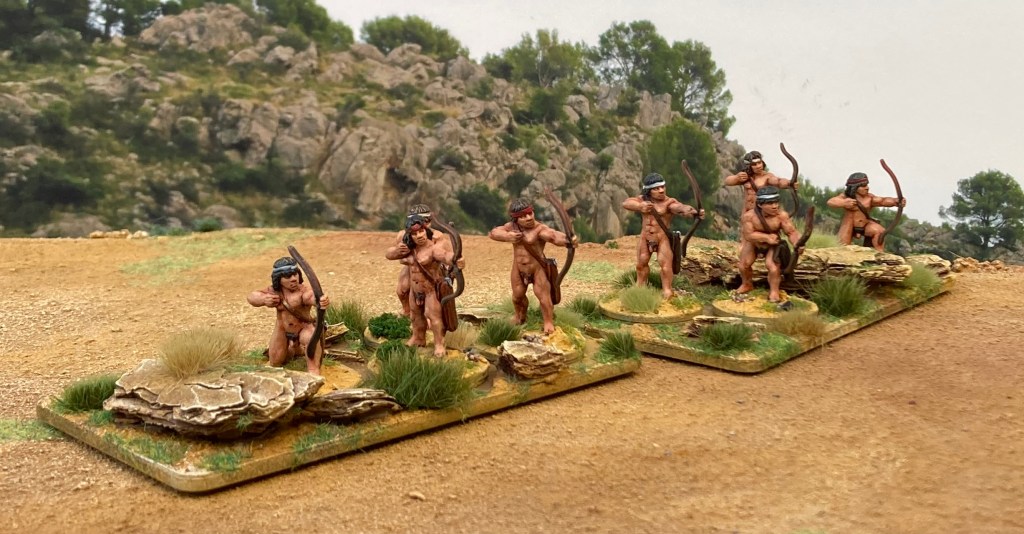
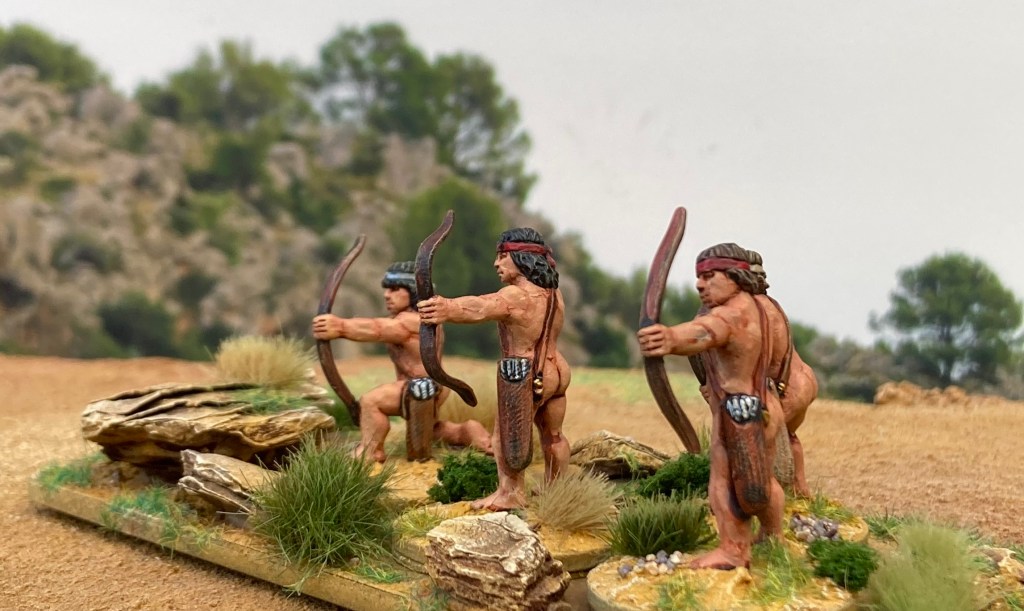
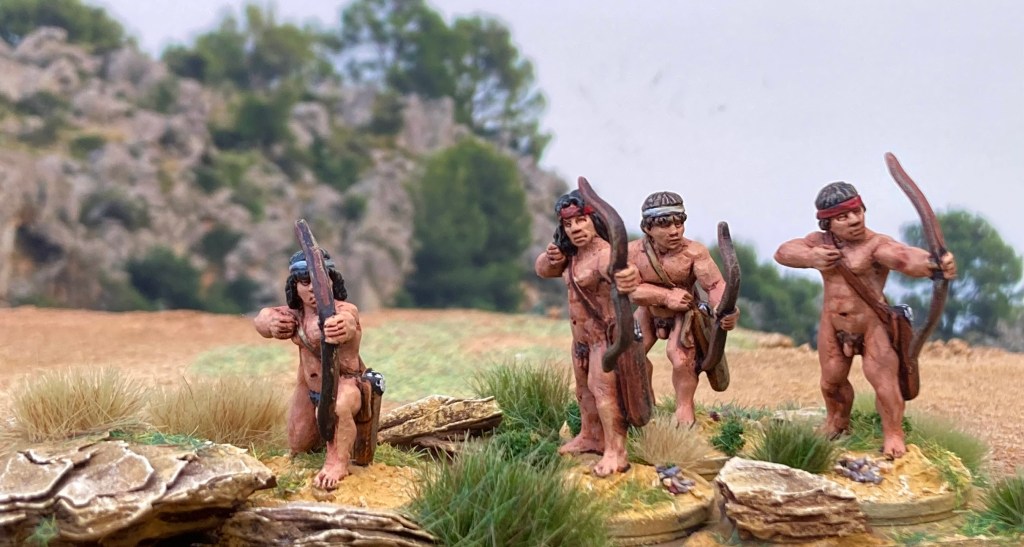
To back up the chariots, I needed a couple more archer units, so some Eureka Miniatures found their way onto the painting table.
These chaps don’t have much in the way of clothes but were a quick paint job!
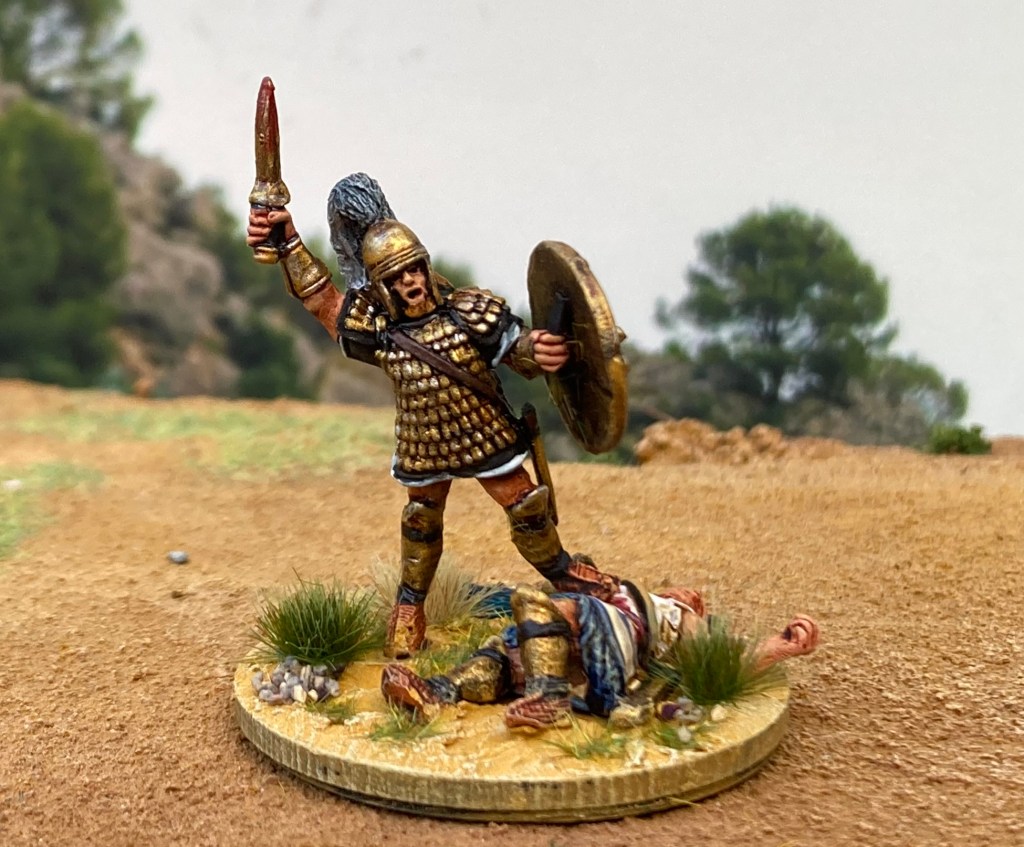
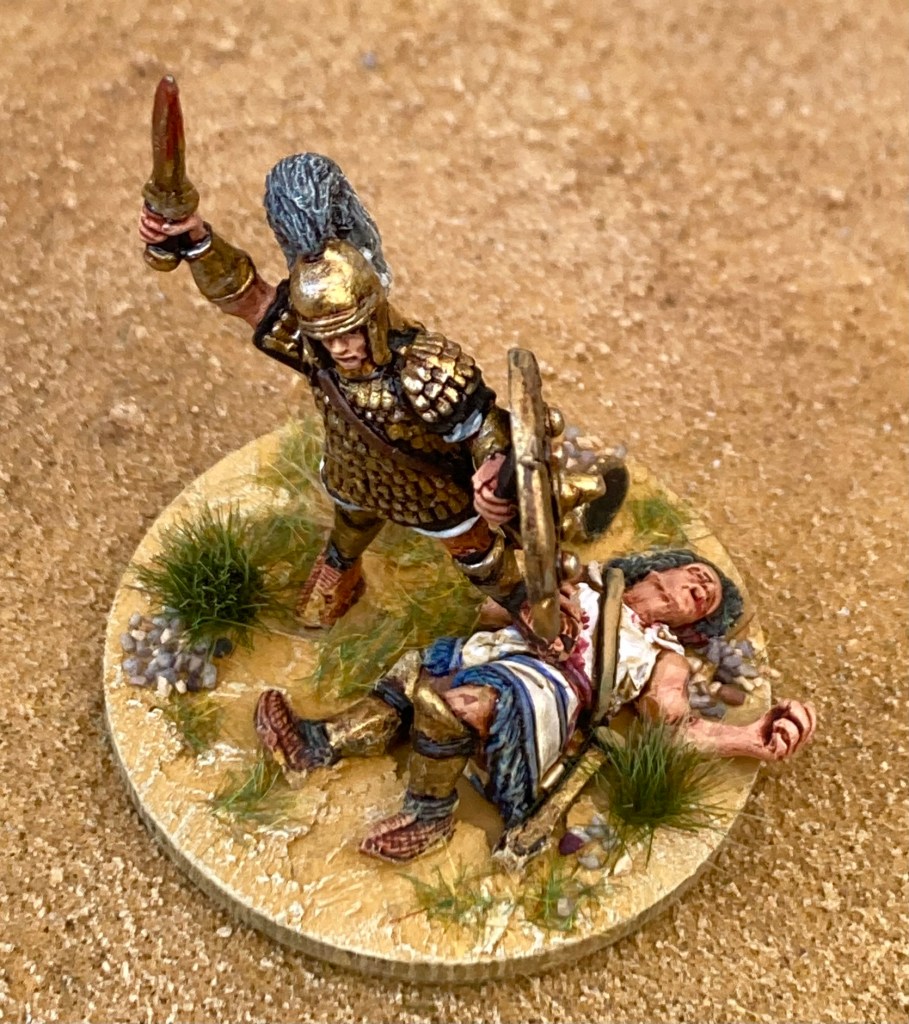
Lastly, I decided that Achilles needed a more mighty model than the Foundry one I already have painted (he’s nice but can’t really go toe-to-toe with the heroic Lucid Eye Amazons). I settled on the ‘Paris triumphant’ vignette from Redoubt Enterprises (now sold by Grubby Tanks).
I know that his equipment doesn’t exactly match Homer’s description but it’s the stance that’ll make him stand out on the table.
With these pieces finished, I now have a small but battle-ready Greek force that will be marching out at Britcon 2024 and also Ebor Lard in September. Looking forward to getting them on the table and into action!